Crocheting leaves is as easy as crocheting the flower itself - follow the crochet pattern and description. Having grasped the essence of the work, in the future you will be able to knit simply from a photograph of the model you like.
We are pleased with the wide variety of leaf shapes - just like in nature. You can come up with some options for your own work. You can see ideas HERE.
Typically, yarn is taken of the same thickness as for the main element. Although the texture of the thread may be different - smoother and shiny or, conversely, fluffy. When decorating clothes, it is better to use the same types of yarn. Although, it all depends on the specific sample and your creative approach to work.
Clover Leaf
We start with a chain of 4 VPs. Next, knit 1 VP rise, 1 single crochet, 1 double crochet, in the last stitch of the chain knit 10 double crochets. The result is a petal. Knit two more petals in the same way. Then, without breaking the thread, knit a chain of 8 VPs. Next, the scheme is as follows: 1 air. p. lifting, 7 columns b/n, last. We attach the chains to the connection. stem all three parts of the leaf.
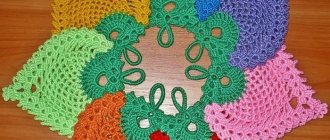
Beautiful crochet leaves for decoration or flowers
When creating appliqués from knitted floral motifs for clothing and accessories, you cannot do without leaves. They will favorably emphasize and complement the composition, giving it a complete look. Crocheted leaves, a diagram and description of which will be presented in the master classes, these are chapters so beautiful that they can turn the head of any wayward fashionista.
To work you will need:
- cotton yarn for knitting;
- hook;
- scissors.
Option 1: heart-shaped leaf
The difficulty of knitting is low. The time spent on work is 5-7 minutes. The leaf is knitted from the middle, gradually increasing in volume. The pattern consists of 3 rows, not counting the dial chain. The leaf is compact and heart-shaped, which allows it to be widely used in various floral arrangements when decorating clothes or hair accessories.
Diagram and description:
Step-by-step instruction:
- Start knitting with a chain consisting of 6 air loops.
- Close the chain into a ring using a connecting loop.
- Continue knitting according to the pattern in the round. Knit the beginning and end of the row with a connecting loop.
- Knit a leaf stalk consisting of air loops (first row) and connecting loops (second row).
Option 2: openwork leaf
The difficulty of knitting is low. It will take 7-10 minutes to work, depending on the size of the leaf. The leaf is knitted in turning rows, starting from the middle, gradually moving from top to bottom, symmetrically knitting the sides until the desired length is reached. If desired, you can add a cutting.
Diagram and description:
Step-by-step instruction:
- Cast on a chain of air loops.
- Unfold the knitting and then continue working according to the pattern, alternating single crochets with chain stitches. With each new row, the knitting gradually moves down due to the addition of loops at the bottom and not knitting a certain number of loops at the top before turning the product.
- Having knitted all the rows according to the pattern, you can additionally knit the stalk by casting on and then tying air loops with single crochets or half-columns.
- Cut the working thread and hide its end with a hook on the wrong side of the leaf.
Oval leaf
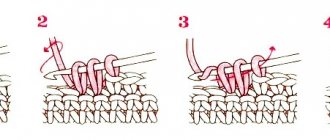
Knit the original chain of 13 VPs. Further knitting pattern: 1 VP rise, 7 RLS. The remaining 6 VPs remain unknitted. From the last sc we knit a chain of 6 ch. In 1 point of the lower river. connect 3 VP lifts plus 2 dc, 2 dc, 3 dc with one vertex, 1 dc2n in the 7th dc, 3 dc with one vertex, 2 dc, 3 dc with one base.
In one stitch we knit 3 VP rises plus 2 StlbSN, 2 StlbSN, 3 StlbSN with one vertex, 1 concave StlbS2N, 3 StlbSN with one vertex, 2 StlbSN, 3 StlbSN with one base.
Next: 3 air. lifting point, 2 stlbs s/n, 3 StlbSN with one vertex, 1 convex StS2N, 3 StlbSN with a common base.
Next: 3 air. lifting point, 3 StlbSN with a common top, 1 concave post with 2 nak., 3 StlbSN with a common top, 1 StlbSN.
We knit with a common top: 3 VP rise, 1 StlbSN, 1 convex stitch with 2 nak., 2 StlbSN.
Knitting a voluminous leaf: video master class
Simple crochet flower, master class for beginners
How to learn to create several things at once? Let me tell you a little secret! You need to start small - for example, by knitting a simple flower.
Learn how to crochet a simple flower and you can make all sorts of things! You only need to spend a few minutes on one small flower, but there are so many ways to use it - you can decorate a card or a gift with it, use it as decoration for clothes or hairstyles.
A beautiful crocheted flower can become the basis for an unusual bookmark, handmade jewelry, applique, or panel.
You can make many of these flowers and combine them into one napkin or use them to decorate sofa cushions.
Surely you have more “flower” ideas that would be interesting to bring to life. Tell us how you have tried or are planning to use such flowers?
This master class is primarily intended for beginner needlewomen, but I will be glad if my lesson is useful to experienced craftswomen. We will need very little time, so I suggest we get started!
Chestnut leaf
We start with the middle pattern, then knit the leaf elements one by one. The description describes the pattern of the smallest element. Knit the rest in the same way, adjusting the length by the number of stitches in the chain.
The first stage of knitting is to set a VP chain for the tail and middle. Next, the middle is knitted in circular rows.
Description
Middle
We collect a chain of 28 VPs. We close a chain of 4 VPs into a ring. Further knitting of the pattern:
- 1st row: 1 VP, 7 RLS, 1 VP. We finish the series SS;
- 2p.: 1 VP lifting, 13 RLS, 1 VP, SS in the lifting loop;
- 3p.: 1 VP, 20СБН, 1 VP;
- 4p.: 1 VP, 24 RLS, 1 VP;
- 5p.: 1 VP, 32 RLS, 1 VP.
Tail
We knit the remaining VPs with two rows. Stlb b/n, each attaching to the middle of the SS.
The smallest – bottom right – element of the leaflet
We make a chain of 13 VPs, knit a sc, attach a connection. dc in 3 stitches in the middle from 1p. ponytail We knit a SS in the next one. p. middle instead of 1 VP rise, then - in a chain of VP - 2 stb without / n, 2 half-column. s/n, 2 StSN, 2 columns. with 2n., 2 columns. from 3n., 2nd column from 4n., in the outermost VP and RLS we knit 15 StS4N.
Knit the second half of the element in a mirror manner. We attach the last column b/n to the middle. We skip 1 sc, 3 sc, *pico, 2 sc* - between *-* we repeat 10 times, 8 sc.
Tie the remaining elements of the chestnut leaf using the same principle.
Simple crochet leaves. Diagram and description
This section will present options for crocheting a simple leaf with detailed patterns and a description of each stage of knitting.
Option 1: a small leaf from an amigurumi loop
The easiest, simplest and fastest way to knit a leaf is to knit it from an amigurumi loop. The difficulty of knitting is low. The time spent on making one leaf is 1-2 minutes. This option is perfect for decorating a knitted rosebud, decorating a mini lilac bush, and can be used as an element when knitting using the Irish lace technique.
To work you will need:
- green knitting yarn;
- hook, according to the thickness of the selected yarn;
- scissors.
A small leaf is knitted from an amigurumi stitch. The diagram consists of only one row. The leaf shape is teardrop-shaped.
Diagram and description:
Step-by-step instruction:
- Start knitting with an amigurumi loop.
- Continue knitting according to the pattern, inserting the hook into the center of the loop.
- When all the elements of the row are connected, tighten the loop tightly and make a connecting post in the first loop of the row.
- Knit the tail of the leaf with air loops, followed by tying them with single crochets. At the same time, when knitting a ponytail, hide the end of the thread from the amigurumi loop.
- Cut the working thread and secure the tip to the wrong side of the leaf.
Option 2: symmetrical, diamond-shaped leaf
The difficulty of knitting such a product is low. An experienced master will need 2-3 minutes to work, a beginner a little more. A leaf knitted in this version can be used as an independent element, as well as for decorating elastic bands and hair clips with knitted flowers.
Diagram and description:
Step-by-step instruction:
- First you need to cast on a chain of air loops.
- Continue knitting according to the pattern from right to left, knitting the elements into a loop behind one wall.
- Repeat knitting on the other side of the cast-on row symmetrically to the first half according to the pattern. At the very beginning of the row, you need to knit while simultaneously knitting the thread of the beginning of the row into the fabric.
- At the end of the row, make a connecting post and knit a tail according to the pattern discussed in option No. 1.
Maple Leaf
Knit a chain of 10 VPs and close them into a ring. Further knitting of the pattern:
- 1st row: in each stitch, knit a fragment [2 StC2H plus 3 VP], replacing the first stitch with 2n at the beginning. for 4 VP lift;
- 2p.: in each of the fragments of the previous one. R. tie [3 StsC plus 3 Ch plus 3 StS1H], replacing the first StS3H with 3 Ch rises at the beginning. Total – 10 fragments.
- starting from 3rd p.m. the work is divided. In 9 fragments, knit [4 dc plus 3 ch plus 4 sts. with nak.], at the beginning replacing 1 StSN 3 VP lifting. We complete the r. 1 double crochet. We unfold the work;
- 4p.: 3VP rise, in each of 9 fragments knit [5 DC plus 3 air. p. plus 5 StsN];
- 5 rubles: 1 air. p. lifting, 11 sc, in each of the remaining 7 fragments, tie [6 sc plus 3 air. p. plus 6 StСН], replacing the first StСН with 3 VP lifting at the beginning;
- 6p.: 3 VP rise, knit 7 fragments [7 DC plus 3 air. p. plus 7 StsN]. Complete r. 2 dc, knitted with a common top;
- 7p.: 1 VP lifting, sc in all points of one fragment before. r., 3 air. p.p., tie 5 fragments [8 Sts + 3 air. p. plus 8 Sts.] Complete p. 2 dc, knitted with a common top;
- 8p.: 5 fragments [9 Stsn plus 3 air. p. plus 9 StСН.], replacing the first StСН with 3 VP lifting at the beginning;
- 9p.: 3 fragms. and 10 StSN;
- 10 rubles: 3 fragments. and 11 StSN, replacing the first StSN at the beginning with 3 VP lifts;
- 11r.: 2 fragments. and 12 STSN;
- 12r.: 1 fragment, start 3 VP under., 13 Stsn plus 3 air. p. plus 13 Stsn.
Crochet leaves, video tutorials on knitting
Leaves pattern for openwork items
The video should load here, please wait or refresh the page.
Napkin leaves crochet jute
This napkin can be used not only in the kitchen, in the dining room, as a table setting, but also as an eco-friendly washcloth! I crocheted from two-strand jute with crochet size 4mm.
The video should load here, please wait or refresh the page.
How to crochet simple leaves
In this tutorial, the leaves are knitted from Baby Cotton yarn from Seam (color 4321 soft pink, 4313 mint), Clover Soft Touch hook 2.5 mm.
The video should load here, please wait or refresh the page.
Source
Continuous knitting maple leaf
In the image of the pattern diagram, a black dot marks the beginning of knitting.
We make a chain of 15 VP. Below is the scheme of work:
- 1p.: 1 VP under., 13 RLS, in the outer st. knit [1 column. without/n +4 VP + 1 column. no/n], 13th column. with double crochet on the other side of the original chain;
- 2p.: 1 VP under., 13 RLS, tie into an arch from VP [2 columns. without / n +4 VP + 2 columns. no/n], 11th column. without/n.
- knitting the next 8p. leaflet - see diagram. Let's continue:
- 9 rubles: 1 air. p. under., then - RLS according to the scheme, we complete 4 VP;
- 10 rubles: we begin knitting the side left part: 1 VP, 8 single stitches, 1 air. p. above the stlb without / n the lower r., 1 RLS;
- 11r.: 1 VP under., 10 StBN, 4 VP;
- 12r.: 1 VP under., 14 tbsp without/n, 1 air. p. above the stlb without / n the lower row, 1 sc in the sc of the 9th row.
Further knitting of the pattern - see diagram. We attach the even rows with columns without / n to the column without / n of the 9th row.
Without breaking the thread, we knit the second left side of the sheet in the same way, and continue knitting sc until the end of 9 p. on the right, 4 VP.
Next R. we start 1 VP under. and knit the two right parts of the sheet in a mirror image to the left.
Feature of knitting flowers
The specific structure of these floral motifs does not provide for the presence of such a large number of petals, as, for example, a rose. Knitted pansies consist of only five elements, but their interesting arrangement and colors turn these small flowers into the favorite decor of many craftswomen.
Even with little experience, you can master the principle of making them and get full-fledged crochet pansies. Knitting patterns for two color options are posted below. Both options suggest placing the petals in two layers. The first contains small elements, and the second contains larger ones.
Crochet oak leaf
We make a chain of 20 VP. Next, the knitting pattern for the pattern is as follows:
- 1st: in 2nd. from hook 4 Stbn, 4 half stitches. from 1n., 5 tbsp. from 1n., 2 StS2N, 8 StS2N to the outermost point. We turn the work around and knit in the opposite direction - 5 tbsp. with 2n., 5 tbsp. from 1n., 4 half-st. from 1n., 4 tbsp. without/n. semi-st. without n. to the outermost point;
- 2p.: in the 1st column without n. knit 1 half st. from 1n., skip the next one. p., * 3 StS1N, 3 VP, 1 half st. without n.* – next. P. ;
- 1 half tbsp. without n., 1 RLS, 1 P1N, 1 StS1N, *3 StS2N, 4 air. p., 1 half st. without n.* – next. P.;
- 1 half tbsp. without n., 1 RLS, 1 P1N, 3 StS1N, *3 StS2N, 4 air. p., 1 half st. without n.* – next. P.;
- 1 half tbsp. without n., 1 RLS, 1 P1N, 1 StS1N, *2 StS2N, 4 air. p., 1 half st. without n.* – next. P.;
- 1 half tbsp. without n., *1 half-st. with 1n., 1 StS1N, 1 StS2N* - next. P.
The second side is done in the same way:
- 1 tbsp. with 2n., 1 tbsp. with 1n., 1 p/st. from 1n.* – to the next. p., 1 p/st. b/n;
- 1p/st b/n, 4 air. p., 2 StS2N * – next. p., 1 tbsp with 1n., 1 p/s with 1n., 1 st.b/n, 1 p/s b/n;
- 1p/st b/n, 4 air. p., 3 StS2N * – next. p., 3 tbsp with 1n., 1 p/s with 1n., 1 tbsp. b/n, 1 p/s b/n;
- 1p/st b/n, 4 air. n., 3 StS2N* – next. p., 1 tbsp with 1n., 1 p/s with 1n., 1 st.b/n, 1 p/s b/n;
- 1 p/s b/n, 3 air. n., 3 StS1N* – in next. p., skip 1 p., 1 p/s from 1n., 1 p/s w/n in the last. p/s b/n 2nd r.
Stem: 5 VP, 1 st.b/n in 2p. from the hook, 3 p/s b/n, complete 1 p/s b/n to the outermost p/s b/n of the 2nd row.
We secure the end.
Leaves for carrots/chamomile/strawberries
Summer delights us with bright colors. Sunny daisies appear. Fragrant strawberries and strawberries are filled with crimson. Juicy carrots grow quickly in the beds. A series of master classes in this section are devoted to the creation of leaves of these particular plants.
Leaves for carrots
To work you will need the following materials and tools:
- yarn for knitting (preferably cotton);
- a hook suitable for the thickness of the selected yarn;
- scissors;
- needle.
Knitting difficulty is medium. It will take 15-20 minutes to work. Leaves of this type are used to decorate a knitted vegetable, which can subsequently be used not only as a developmental material and decoration, but also as a keychain.
To crochet leaves, the diagram and description of which are offered in this master class, you need to be patient. The work of knitting this kind of carrot leaf is monotonous and requires perseverance. The sheet consists of individual repeating elements, which are gradually knitted according to the pattern, secured to the base. Next, the workpiece is folded and stitched.
Diagram and description:
Step-by-step instruction:
- Cast on a chain of 20 chain stitches.
- Knit a lifting loop, unfold the knitting and knit 20 single crochets.
- Cast on a chain of 21 chain stitches for the leaf stem. Next, knit according to the pattern, knitting the side stems on the central stem.
- Knit 2 single crochets.
- Repeat steps 3 and 4 9 more times. The result is something like this:
- Roll the knitting tightly into a tube and secure with the tip of the working thread and needle.
- Sew the finished leaves to the carrot.
Chamomile leaves
The difficulty of knitting is low. It will take 3-5 minutes to work. Such a leaf, paired with a chamomile flower, can be used as a decorative element for clothing, a summer hat, a hair clip or elastic band, as well as to create a full-fledged flower arrangement.
The chamomile leaf is knitted according to a pattern consisting of 3 rows, including a chain of chain stitches. A special feature of the work is the lack of symmetry of knitting relative to the cast-on chain.
Diagram and description:
Crochet leaves - diagram and description of knitting chamomile leaves
Step-by-step instruction:
- Cast on a chain of 20 chain stitches.
- Knit according to the attached pattern in turning rows. As a result, 2 rows will be connected on one side of the chain, and only 1 row on the other.
- Cut the thread and hide it from the wrong side.
Leaves for strawberries
Knitting difficulty is medium. Time to work – 15-20 minutes. The strawberry leaf is knitted from 4 separate parts, which are then connected to each other. First you need to knit 3 parts of the leaf according to the pattern, then the petiole. Attach the leaves to the petiole.
Diagram and description:
Step-by-step instruction:
- For the “leaf” part, cast on 8 chain stitches. Knit according to the pattern 3 rows. In total, you need to knit 3 blanks for 1 strawberry leaf. At the end of knitting, leave the end of the working thread 10 cm long for ease of joining the parts.
- Tie the petiole according to the pattern.
- Connect the parts together using a hook or needle, using the tails of the main threads left after knitting 3 “leaf” parts.
Crocheted strawberry leaves, the diagram and description of which are offered in this master class, look realistic and beautiful.
These beautiful crochet leaves, the diagrams and descriptions of which were discussed in the master classes, can be crocheted by even a beginner. All you need is patience and, of course, desire. Then everything will certainly work out!
Author: Nadezhda Korostik
Knitted oak leaf
In the description, the leaf is knitted from three colors of yarn - it is autumn. If you wish, you can turn it into a spring one by knitting it entirely from green yarn.
We knit a cord 2.5 cm long using 3-point knitting needles. Further knitting is carried out on the same loops:
- 1st row: cast on with knitting needles 5 stitches. cord set, 7l., 1i. We only have 8 p.;
- 2 rub. (front side): cast on with knitting needles 5p., 6p., remove 1p. purl, 6l. We have 13p.
In all the following persons. R. The central loop should be removed as a purl stitch. We continue with knitting needles:
- 3rd: persons;
- 4p.: 6p., remove with knitting needles 1p., 6p.;
- 5r.: like 3r.;
- 6r.: like 4r.;
- 7th: closed 2p., 11l. Total work 11p.
- 8r.: closed 2p., 4l., remove 1p., 4l. Total 9p.
Next 2p. we knit with knitting needles, changing the number of loops. Let's continue:
- 11p.: cast on with knitting needles 2p., 9l. Total 11p.;
- 12p.: cast on with knitting needles 2p., 6l., remove 1p., 6l. We have 13p.
Next 2p. we knit with knitting needles without changing the number of stitches. In the second of these rows we move to the next color of yarn. We continue with knitting needles:
- 15r.: close 3p., 10l. Only 10 p.;
- 16r.: closed 3p., 3l., remove 1p., 3l. 7p left.
- Next 2p. we knit with knitting needles without changing the number of loops. Then:
- 19 rubles: dial 2p., 9l. Total 9 p.;
- 20r.: dial 2p., 5l., remove 1p., 5l. Total 11p.
Next 2p. we knit with knitting needles without changing the number of loops. In the second of these rows we move to the next color of yarn. We continue with knitting needles:
- 23r.: closed 3p., 8l. Total 8 p.;
- 24 hours: closed 3p., 2l., remove 1p., 2l. Total 5p.
- Next 2p. we knit with knitting needles without changing the number of loops. Then:
- 27r.: [2p. in 1 p.]x3, remove 1 p., 2 p. in 1l. Total 3p.
Close the remaining loops.
Crochet maple leaf - even smaller size
Another maple leaf - even smaller.
I knitted it tightly, with acrylic yarn of a completely orange color, with crochet number 2.5.
This sheet turned out to be almost square in size - 9cm by 8cm.
Description of knitting
To start knitting the first sector of the sheet - the right one - we cast on 9VP.
We knit in the 4th VP.
We skip 3 VP from the beginning and in the fourth loop we knit a single crochet, crocheting the bow from the back of the chain of air loops.
Shackle on the reverse side of the VP
VP chain from above
We knit the remaining 5 sc.
When knitting by the bow on the reverse side of the air loops, a pronounced pattern of the VP chain is obtained both on top of the knitting and on the bottom.
VP chain from below
We continue to knit, according to the pattern, all 3 sectors of the maple leaf. The stem will be tied last.
You will get a figure like in the photo .
Please note that 1dc is made at the end of the stem to make the tip a little thicker. If you wish, you can bend it a little, as you did in the previous sheet.
After connecting all the sectors of the sheet, you get a hole in the middle. It's no problem. At the beginning of knitting, we had a tail of thread left, so we will remove it, thereby tightening this hole.
Pico on 3VP
We move on to the second row. We do 3 ch on the rise and immediately picot at the top of the third air loop.
!!! Next we will knit all the picots not on a harness, but on a separate element!!!
I showed what it is in an article about pico . If you need to remember, click on the link .
We knit the remaining 5DCs in accordance with the pattern. On the last column we make a picot.
Under the arch of 3VP at the end of the sector we knit sequentially (1СБН-2ВП-1СН-pico-2ВП-1СБН).
And we continue to knit on the other side according to the knitting pattern of the leaf sector.
When moving to the central sector, we knit single crochets into a set, passing one loop at the base in the side sector of the sheet and in the central one.
If you have a free knitting style, then you can skip 2 loops at the central sector. This will better “bend” the sides of the maple leaf.
Diagram of the smallest maple leaf
The pattern of this maple leaf consists of only 2 rows and there is not even a binding. And it turned out to be a leaf from a southern maple tree.
The beginning of knitting is in the center and is indicated by an arrow and the letters HB .
Crochet maple leaf pattern
In order to obtain a sheet smaller than this, you can proportionally reduce the number of air loops in the sectors of the sheet. Accordingly, the scheme will decrease. Moreover, for such a reduced leaf, it is also better to change the threads and hook to a smaller size.
But enlarging the sheet using this technique will not work. A maple leaf crocheted according to this pattern, but with a large number of VPs in the sectors of the leaf, will turn out loose and will not hold its shape. Yes, actually, this is not necessary. There are already enough knitting patterns for large-sized maple leaves on the Internet, but there are not enough small maple leaves.
palmate leaf
First sheet
We collect 11VP. Further:
- 1st: 1 tbsp. b/n in 2p., 1p/s with nak., 1 stsn, [1st.s/2n.]x3, 1 stsn, 1p/s with nak., 1stb b/n, ss, turn;
- 2p.: 1 stb/n in each stb of the row, [1 stb in the loop of the original chain] x11.
Without breaking the thread, we knit the 2nd sheet and all subsequent ones. The algorithm is the same, we look at the number of loops in the original chain from the image of the diagram.
Center
- 1 tbsp in the last p. T. o. in it, a total of two stitches are knitted, [1 st.b/nak. to the last point next. sheet]x4, 16 VP, 1 st.b/n. in the 2nd stitch from the hook, [1 dc. next p.] x14 times, SS in the 1st column of the middle.
Decorative leaf
Melange yarn is used for knitting. We start with 17 VP. Further:
- 1st row: 1 column without/n. in 3 sts from the hook, 1 stb without/n. in each stitch of the row, [1 tbsp b/n, 3 VP, 1 stb b/n] – to the outermost st., turn the work. On the second side of the original chain we knit 1 stitch without a thread, turn the knitting.
Track. p.: 4 VP, 1 RLS for the back wall in each st. to the arch, [1 RLS, 3 VP, 1 RLS] in the arch, 1 RLS for the back wall in each st. to the last 2 sts, turn of knitting.
Repeat the last row 7 times. Then we knit a SS in the center of the fabric to the arch 1p. We finish knitting.
And now we offer you several options for leaf patterns for interior compositions. These beautiful leaves are knitted according to the proposed patterns, the length is determined by the number of VPs in the original chain.
Knitting technique
Classic elements of Irish lace:
- simple leaf,
- round leaf,
- leaf with a central vein,
- sheet with an openwork window,
- dense trefoil,
- rose with three rows of voluminous petals,
- bunch of grapes.
When working with Irish lace elements, it is customary to use a consistent knitting technique. First, individual motifs (patterns) are knitted, then they are laid out on a sketch or pattern, and combined together with a lattice or brids.
There are several options for connecting lace motifs. The most popular is the connection of motifs with a mesh. It is done quite simply - the finished elements are laid out on the diagram, and the space between them is knitted with a mesh.
Sometimes, when connecting motifs of different sizes, “voids” of various shapes can form, which cannot be filled with regular types of mesh (loin or honeycomb mesh); in this case, they resort to using an irregular mesh that smoothly flows around the elements.
The reverse option of collecting lace is also possible. First, an openwork fabric or a mesh base is knitted, and then motifs are attached to it. You can also take regular tulle as a basis and sew elements on it.
In addition, lace motifs can be collected sequentially, tying them to each other as you work. Most often, small products from homogeneous elements are assembled this way, because it is quite difficult to assemble a whole canvas in this way.
But you can sew an openwork fabric if you take tightly fitting motifs and sew them together using a needle and sufficiently long untucked ends of the motifs.