Glowing paint can be a source of inspiration and material for creating unique decorative effects. It glows in the dark, turning an ordinary room into a fabulous place. But not only the interior is decorated with this paint. Luminescent pigment will help give an unusual look to any surface or object. And at the same time, the luminous composition is easy to prepare with your own hands at home.
What is luminescent paint and how does it work?
Luminescence is the ability of a substance to glow in the dark due to previously accumulated light energy. Luminescent paint contains substances such as luminous pigments (luminophores). They “accumulate light” during the day or while artificial lighting is on. And when darkness sets in, the bright glow of the painted surface becomes noticeable.
Important! Luminescent (luminescent, self-luminous) compositions should not be confused with fluorescent paints. The latter can glow only under the influence of ultraviolet rays (you need to buy special lamps for them).
Luminescent paints glow in the dark due to the accumulated light energy.
The process of accumulation and release of light energy by the phosphor is reversible, so the luminous paint will “work” for years. Phosphor is a physically and chemically stable substance that will last at least 30 years even outside the building. In this case, only 15–20 minutes of “recharging” with bright light is enough for the painted surface to glow for about 8 hours. The brightness of the glow depends on the concentration of the phosphor in the paint.
According to the principle of action, luminescent materials are similar to phosphorescent ones. But the latter contain phosphorus that is hazardous to health. Therefore, they are used very rarely and only for outdoor work. But phosphor-based materials are completely safe.
If the lights are turned off
An interior design in which walls and interior items are decorated with a glow-in-the-dark pattern can be called extravagant. If you paint the entire wall with this paint, darkness will cease to exist. A kingdom of twilight can be created in the living room or hallway, in the bathroom, in the toilet, in the kitchen, balcony, in service rooms and passage rooms. If a person was taking a shower at the time of a power outage, phosphorus paint will save the situation: it will be easy to find a towel and the lock latch too.
This is original lighting, but it will not replace a chandelier: it cannot be turned off in any way - this is a minus
In the bedroom you need to create decor with care. But in technical rooms it is appropriate to use, painting surfaces with a large area
In the attic or basement, fluorescent dye will be useful. At night the home will be cozy and comfortable.
Scope of application of luminous paints
In addition to the phosphor itself, the luminous paint includes a transparent varnish (it acts as the basis of the material). The area of application of a particular composition depends on the properties of the varnish. It can be selected for almost any surface - metal and plastic, drywall and wallpaper, concrete and plaster, textiles and wood, glass and ceramics.
On a note! The luminous composition can be applied to fresh flowers and used for body art. But it must be a water-based acrylic dispersion that is safe for health.
Glowing paints are often used when performing body art work.
Luminescent paint is used:
- when applying road markings, painting fences and road signs;
- for decorating interior surfaces (applying drawings to walls, ceilings, floors);
- for painting furniture and other interior elements;
- in make-up, stage art, in the creation of theatrical costumes and scenery;
- in floristry;
- in the production of advertising products (from signs to souvenirs);
- in landscape design (from painting gazebos and fences to creating complex patterns on facades);
- in tuning cars, bicycles, motorcycles (for airbrushing, painting wheels, hubcaps, bumpers, spoilers);
- for the production of workwear for road and emergency services workers.
Car tuning is one of the areas of application of luminous paint
Let's start painting
After completing the surface preparation, we proceed directly to painting.
The wall is ready for painting if:
- there are no bumps or dents on it;
- the material that makes up the base does not fall off;
- the surface is dry;
- treated with soil solution.
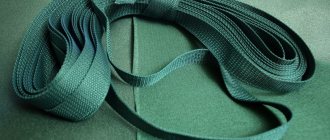
To carry out facade painting work, you can use a household spray gun, a paint sprayer, a wide brush or rollers of various sizes. The choice of tool will depend, first of all, on the consistency of the solution.
Wall painting tool
Advantages of the roller:
- it is convenient for them to wear the coating on the surface;
- the solution is used sparingly;
- the painting process is reduced significantly compared to using a brush;
- The paint is applied in an even, thin layer.
Brushes and rollers for painting walls
Before starting work, you must carefully study the manufacturer's recommendations printed on the surface of the package. The mixing proportions of the components of the solution will be indicated there, as well as the standard drying times and application conditions.
Before starting work, it is necessary to protect window openings and other elements that cannot be painted from paint. Otherwise, after completing the work, you will have to spend a lot of time cleaning and washing them, no matter how carefully you tried to work. To protect windows and other openings from paint and other building mixtures, cover them with masking tape or pieces of polyethylene. After this, you can proceed directly to painting.
Types of luminescent paint
All compositions on the market can be divided into two large groups:
- Colorless (or translucent). These are varnishes that are practically invisible in daylight. They can be applied over any “visible” pattern.
- Colored. In addition to the phosphor, these enamels contain a coloring pigment (color). During the day they look like regular paints, but at night they glow.
There is a large assortment of luminescent paints on the market.
Also, luminescent paints and varnishes differ in the composition of the base and performance properties. Among them are:
- Polyurethane-mineral enamels. They have high adhesion and are suitable for painting various plastics.
- Water-dispersed (acrylic) emulsions. Safe and dry quickly.
- Heat-resistant paints. They create coatings that can withstand heating up to +500 °C. Good for painting metal structures, glass, ceramics.
- Waterproof compounds. Create a thin waterproof film on the painted surface. Used for painting swimming pools, drainage systems, and bathroom elements.
How to make glowing paint from phosphor powder?
You can make paint with a glow effect with your own hands. To do this, you need to buy a phosphor, select a transparent varnish and a solvent for it. You will also need ceramic or glass dishes for mixing the ingredients.
The phosphor of the desired color can be found on the Internet or a building materials store. It is quite expensive, but 100 g of this powder is enough to completely color about 8 square meters. m of surface. The price depends on the color of the glow: pigments in light green, blue and white shades are cheaper, but brighter ones - red, orange, blue, green - are more expensive.
Phosphor - luminous powder for making luminescent paint
Important! The varnish should be chosen according to the surface that will be painted. This is the only way the finished paint will adhere well.
How to make glowing paint at home:
- Pour varnish into the dishes.
- Add powdered phosphor (the ideal ratio is when the composition consists of 70% varnish and 30% luminous pigment).
- Add a little solvent to the mixture (up to 1% of the total mass).
- Stir thoroughly.
- If you need to get a colored composition, color is also added to the dishes.
Materials and tools necessary for preparing luminescent paint
Paint made in this way is used and stored in the same way as regular varnish of a similar type.
Benefits of purchasing
The following types of luminescent paints can be purchased in stores:
- for metal;
- for glass;
- for glossy surfaces;
- for wood;
- for fabric;
- with a water-based base;
- for concrete.
There are colored dyes and clear varnishes. Any idea can be put into practice without problems. You just need to buy one of these luminescent paints.
The pigment itself is also always on sale. It sometimes costs more than paint, but this is not surprising. You can select the concentration taking into account individual needs; mix the powder with the base in the amount you want. As a rule, a little is needed. To paint the ceiling of a small bathroom, for example, you will need about 25 g of pigment and 2 kg of paint. Sometimes you just need to draw a picture. Having bought the pigment, used it, used up some of it, you can put it aside, and later decorate something else with it.
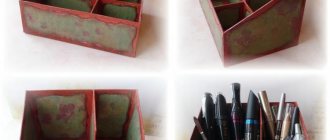
With the help of a phosphor and a base, you can create not only a unique wall design, but also an unusual manicure. It will also come in handy when you want to give an original gift to a loved one. For example, put an ornate, fancy pattern on a notebook, a postcard - why not? Things will cease to be ordinary: as soon as it gets dark outside, they will begin to glow.
Originality helps to surprise, delight, and puzzle. You don’t need to be able to draw well - it’s easy to come up with an abstraction and create a picture using a stencil.
Making your own phosphor
If you really want to, you can make your own phosphor. True, this will require more effort and special reagents. What do we have to do:
- Take pine concentrate and dissolve it in clean water in a ratio of 1:50. The finished solution should have a yellow tint.
- Pour 2-3 g of boric acid into a heat-resistant bowl with a wide bottom.
- Place about 10 drops of pine solution on the powder.
Coniferous concentrate is the main component that affects the glow of homemade phosphorOn a note! The color and intensity of the glow of the resulting phosphor will depend on the concentration of the pine extract. Therefore, it can be varied to achieve the desired effect.
- Mix the resulting mixture thoroughly and level it over the bottom of the dish in a layer no thicker than 4 mm.
- Place the dishes on the electric stove and dry over low heat.
- After the water evaporates, the mixture will begin to melt and bubbles will appear on its surface. They should be pierced.
- When the mixture is completely melted, it must be removed from the stove and left at room temperature until it cools completely.
- Grind the frozen crust into powder. This will be the phosphor, which can already be mixed with transparent varnish and used for its intended purpose.
Before making a phosphor, you should calculate the required volume of luminous paint. It is quite possible that it will be easier and cheaper to buy ready-made material in a store. In addition, “branded” paint will always be of higher quality than artisanal paint, and the color of the glow can be selected immediately, without lengthy experiments. And having one or several jars of luminescent paint in your arsenal, it’s easy to create an unusual thing, stylish tuning or a unique interior.
Main stages of coloring
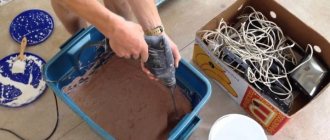
Step 1. First of all, thoroughly mix the paint and varnish solution. Since the reflective pigment is much heavier than the varnish, it may well precipitate at the bottom of the container. The container must be of a suitable size so that the working tool can be easily dipped into it.
You can quickly stir the paint using a drill with a mixer attachment.
Step 2. We immerse the roller in the container and begin to paint the surface, applying the solution to the wall with longitudinal movements. The façade surface should be painted starting from the top elements and gradually moving downwards. The most visible and extensive areas should be painted first. If you need to paint hard-to-reach elements, it is advisable to use a brush. Depending on the size of the element to be painted, it is necessary to use rollers of different sizes.
Pouring paint into the tray
Roll the roller over the paint
Step 3. The first application should be carried out in a thin and uniform layer. In this case, the paint is carefully spread over the base with a roller or brush. Each subsequent strip is applied overlapping the previous one by several centimeters.
Apply paint
Step 4. After completing the surface treatment of the facade, the paint must be allowed to dry.
Step 5. Then re-stain, thoroughly mixing the solution to avoid the appearance of sediment. It is considered optimal if, when applying the second layer, the coloring solution has a more liquid consistency. This will allow you to cover bald spots and excessively thick strokes left after applying the base coat. A liter of paint should be enough for 7 square meters of the surface to be painted.
Apply the second layer
Step 6. The final stage of painting is applying varnish to the reflective surface. Thanks to this, the facade will retain its attractive appearance for a long period of time.
When carrying out painting work, it is necessary to take into account the fact that any paint solution will acquire a darker shade over time. In this regard, painting the entire area of the facade must be done immediately, without taking long breaks during the process, since the next layers may turn out to be brighter than those applied previously.
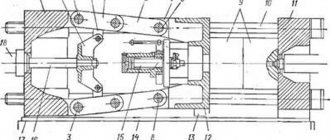
Prices for paint sprayers
Spray gun