Home » New Year
Svetlana Shevtsova 04/08/2020
84280 Views
No ready-made toys or garlands can compare with those you make yourself.
Of course, it’s easier to buy everything you need to decorate the Christmas tree, but creating New Year’s toys with your own hands, from paper and other materials, like nothing else, can create a festive mood and bring joy in the process of making them.
And the master classes proposed in the article will help you in this simple task.
Materials used
Christmas paper decorations
There are many variations of homemade New Year's toys for decorating the Christmas tree and interior, but the simplest ones are made from paper. Making them will not require large financial expenses, since you can use any available materials that any housewife has in use.
So, let's prepare the following:
- plain office paper (needed to create a pattern)
- colored pencils, felt-tip pens
- cardboard (white and colored)
- scissors and stationery knife
- PVA glue and glue gun
- skein of thread with needle
- yarn of various shades
- small decor from ribbons, beads, beads, sequins, sparkles, confetti, foil, shreds and other things
This is a basic set for creativity, but as you work you may need something else. So, let's get creative.
Crafts bear from plasticine
You will need:
- Plasticine
- Knife for plasticine
- Modeling board
Our bear will sit. Make a brick out of plasticine and roll it out a little. We will make a body out of it. For the head, roll into a ball and attach to the body. Roll 2 balls, flatten them and secure them in place of the ears.
For the muzzle you will need a piece of white plasticine, we form it in the form of a triangle with rounded edges and attach it to the head.
We make eyes and a nose from black plasticine. We attach the nose to the muzzle, a little higher - the eyes.
We make the lower legs as follows: roll two balls and press them down a little. We draw claws with a knife and fasten them in place.
Front paws: roll 2 sausages so that one side is much thinner than the other. We attach the paws to the body with the thin side, and draw claws on the thick side with a knife.
The craft is ready.
Spectacular flower
Unusual flower for the Christmas tree
To make a spectacular flower for a beautiful Christmas tree, you need to prepare the following supplies and tools:
- colored paper
- scissors
- ruler
- black and white pencil
- cardboard
- scotch
- glue
- decorative details: braid, rhinestones, stones, beads
Step-by-step master class:
- Cut 14 squares of paper measuring 2.5x2.5 cm and the same number - 3x3 cm. Fold each square into a bag. To prevent it from opening, secure the touching ends of the paper with glue.
- Now cut out a circle from cardboard and mark the center on it with a pencil.
- Alternately glue larger sized bundles onto the round blank, and smaller ones on top.
- Decorate the emerging flower to your liking
Execution technique
This is how you simply get a beautiful flower that will definitely attract the attention of guests with its originality. Beginners are advised to follow the photo instructions for making crafts.
General principles for making paper toys
Immediately before starting work, it is necessary to prepare the required materials. You can model a homemade sketch of a craft. However, novice needlewomen are recommended to use a ready-made template.
Note! There are many master classes on the Internet that are best to follow in order to move in a creative direction without making mistakes.
Heart pattern
Paper cones
paper cone
In the process of making cones for the Christmas tree, you will need cardboard, polystyrene foam or newspapers, decorative elements and a standard set of tools. You can make cones from felt.
Proceed as follows:
1 Cut thick or thin paper into many strips. Take their width approximately, but in our example it is 2.5 cm
2 Cut the strips into squares, making a cut across the workpieces
3 Bend the right and left upper ends so that it looks like an arrow
Paper arrow
4 We make a foam plastic round blank or crumple up newspapers and paste them into pieces by placing them on top of each other. Move from bottom to top
Foam blank
5 After which all that remains is to decorate these wonderful cones, fasten a loop of beautiful ribbon at the bottom and you can hang them on the Christmas tree
Ribbons on the bump
Pinwheel
Step-by-step methodology for decorating a turntable:
- You need to prepare 4 yellow and 4 red squares from paper.
- Fold the red shape in half, then unfold it and fold the side edges to the center line.
- The straightened square should be divided by kinks into 4 longitudinal strips.
- Such folds should be made across. As a result, the figure will be divided into 16 squares. In one of them (located in the second bottom right row) diagonal bends should be made. Make symmetrical bends on the left side.
- Bend the side corners at the bottom.
- The right edge of the part must be bent back, while its lower segment must be at an angle.
- Do similar actions with the left half.
- Bend the top of the module back (to the width of 1 square).
- Complete 7 more similar modules.
- To connect, take 2 fragments, and place the protruding segment of one of them in the pocket located on the reverse edge.
- Connect all the parts in a similar way and close them into a ring.
Graceful snowflakes
Graceful paper snowflakes
How to do without snow for the New Year, albeit artificial in the form of snowflakes. Classic flat snowflakes made of white tissue paper will not only help transform your Christmas tree. They will look spectacular on windows, walls and furnishings. You can make them in different sizes and with different patterns.
Instructions for use:
1 Take a white sheet of A4 paper. Fold it in half diagonally
2 Cut off the remaining part from the bottom so that a triangle remains
3 Bend the triangular piece across again and do the same again
Triangular blank
4 Excess paper from the bottom must be cut off
5 Apply a design to the triangle using a pre-prepared stencil. Cut out a pattern along it and straighten the snowflake
Snowflake
It is more convenient to glue snowflakes made from a regular napkin to the windows. You can use double-sided tape for this. Approximate patterns of patterns can be seen in the figure below.
What patterns can homemade snowflakes have?
Bulk paper toys
Options for three-dimensional toys that are very easy to implement:
- frog;
- birds;
- funny cat;
- sword;
- horse;
- planet;
- giraffe;
- girl;
- walking elephant;
- eagle.
Cool giraffe
Necessary materials:
- yellow cardboard;
- scissors;
- black felt-tip pen;
- a sheet of brown construction paper;
- glue.
Stages of creating a craft:
- Roll a cone out of yellow cardboard.
- Cut off the bottom for stability.
- Draw a face on one of the remaining pieces of paper.
- Randomly cut brown paper into small pieces.
- Stick brown spots on the resulting animal.
Volumetric giraffes
Volume elephant
Necessary materials:
- 5 double-sided sheets of pink and white A5 paper;
- a simple pencil;
- scissors;
- glue.
Step-by-step production:
- Roll four pink leaves into equal cylinders.
- Glue the cylinders at the top.
- Twist the remaining sheet in the same way as four.
- Place a single cylinder on top of the glued ones.
- Cut a trunk from a two-centimeter pink strip.
- Twist the strip with scissors and glue it to the body.
- Make the tail in the same way.
- Glue 2 circles of pink paper cut out to the sides of the head.
- Carefully draw a muzzle.
Father Frost
Santa Claus made of paper
In order to make a miniature Santa Claus, you don’t need to spend a lot of time. You can involve children in its production, because it is such an exciting activity. To make such funny pendants, prepare colorful sheets of paper and then proceed as follows:
1 Cut out the details of your future grandfather. They can be seen in the photo below.
Details of the future grandfather
2 Glue a loop of thread to the large circle.
Circle with thread
3 To disguise the thread, glue a blue cap on top of it.
Blue cap
4 Use small white circles and a narrow strip to form a beard and a hat brim.
Beard and hat brim
5 Glue the eyes, nose and Christmas tree branches onto the hat.
Eyes, nose and Christmas tree branches on a hat
That's all, the cute toy for the Christmas tree is ready. Using this technology, you can make a snowman or maiden.
How to make a paper snowman
DIY paper Christmas toys: diagrams, templates and step-by-step instructions | (100+ Photo Ideas & Videos)
Fantastic Christmas tree decorations
You can create beautiful toys for the New Year from paper. A festive ball using the decoupage technique, paper Christmas trees, voluminous snowflakes, New Year's garlands, pine cones, candies and snowmen will look great on the Christmas tree.
New Year's angels
Decoupage of a ball with a picture
The process of decorating the ball is as follows:
- Sand the entire surface with fine sandpaper and wipe off the dust.
- Prime the ball with glue in two stages using a sponge.
- Choose a napkin with a thematic motif and cut out the design.
- Remove the bottom paper layer and soak the photo in water for a short time.
- Using a needle, remove the top layer.
- Dilute the glue in a 1:1 ratio and glue the picture.
- Smooth out the image from the center to the edges.
- Sand the edges and paint the rest of the ball.
- Coat the finished New Year's ball with varnish.
You may be interested in: Methods for making homemade squishies
Note. There is a reverse decoupage technique. In this case, the motif is glued on the inside.
Decoupage of Christmas balls
Christmas tree made of snowflakes
Necessary materials:
- paper snowflakes of different sizes;
- scissors;
- glue;
- wooden stick for the base;
- beads;
- small pot.
Creation stages:
- Prepare snowflakes.
- Place each snowflake on the base, alternating with one bead.
- Secure the finished Christmas tree in the pot.
- Fill the pot with rain.
Note! Each snowflake and bead placed on the base must be secured with glue.
Garland "snowmen"
Stages of creating a garland in the form of snowmen:
- Cut out three circles of different sizes from paper.
- Bend the circles in half and coat 1 half with glue.
- Glue the second folded circle to one folded half.
- Connect half of the third and fourth with glue.
- Pass the tape in the middle, glue the fifth circle, closing the ring.
- Assemble medium and small mugs in the same way.
- Glue the smaller circles above the largest one.
- Hang several voluminous snowmen on the ribbon.
Material for creating snowmen
Note. To make the garland more beautiful, it is recommended to attach bright additional elements between the snowmen.
Beautiful candy
What you will need:
- serpentine;
- cardboard;
- wrapping paper;
- scissors;
- ruler;
- scotch;
- satin ribbon.
Creation stages:
- Cut a piece of wrapping paper measuring 30x30 cm.
- Form a “candy” in the form of a cylinder from cardboard.
- Place the base in the middle of the edge of a sheet of wrapping paper.
- Start rolling the “candy” by wrapping the shape into a roll.
- Secure the edge with tape.
- Wrap the tails on both sides and tie with a serpentine.
- Decorate the “candy” with any available materials.
New Year's balls
New Year's toys
To get New Year's balls for your Christmas tree, you will need a minimum of consumables. It is important to be patient in this matter, since you may not get the perfect toy right away. But don’t be upset, just continue and the result will definitely please you.
Balls have always been considered universal Christmas tree decorations. They can be made from cardboard or colored paper. As a result, they turn out to be no less effective than store-bought ones. Here are some options for making balls.
From stripes
How to make a ball from paper strips
Sequence of steps:
- From colored or any other decorative paper, cut a lot of strips (the more there are, the more voluminous the ball will come out) and two circles of small diameter
- Then take a large bead with holes, thread a thread through it and insert both ends into a needle
- Thread a circle onto a needle and all the strips from one edge
- Next, put a paper tube, a bead and a second circle on the thread
- After this, pin strips on the needle from the opposite edge, bending them into an arc
- Then you need to give the toy a finished look. To do this, arrange all the details in a circle and decorate the toy according to your mood.
From circles
12 Circles
Instructions:
1 Cut out 4 circles from paper of three different shades. You can use a glass as a template. There should be 12 parts.
2 Stack the rounds, alternating colors, and then fold them in half. Now straighten and draw the designated line along the ruler.
Stack of round beads
3 Along the marked line, fasten the workpieces with wire (wrapping it around) or a stapler. You can stitch it on a machine.
Bonded workpieces
4 Glue the petals together in 2 pieces: one on top, the other on the bottom. The result is a voluminous ball.
Volumetric 3D ball
Wicker ball toys
Wicker Christmas ball
You can download ready-made stencils of such balls from the Internet and print them on a printer, then cut them out and weave the toy yourself.
How to proceed:
1 Using the templates you will need to cut shaped strips and a circle. Form a flower-shaped shape from these elements, and glue a circle in the center.
Curly stripes and circle
2 Now you need to weave the strips, as you usually do with a braid. To prevent them from falling apart during work, secure them with clothespins.
Woven stripes
3 At the end, make a ball out of the braids and fasten the edges again with a circle.
Ball of braids
4 Make a loop of thread to which the toy on the Christmas tree branch will cling.
Types of templates are shown in the photo below.
Option #1
Option No. 2
Option #3
Cardboard balls
Cardboard balls
Any thick paper will do here: cardboard, postcards. Such toys keep their shape perfectly. They are unusual and look good on the Christmas tree, especially when they are of different sizes. It is better to hang them chaotically, then the picture will be more impressive.
Photo instructions for making cardboard balls
How can you quickly make this decor:
- Cut 20 circles from cardboard, 3.5 cm in diameter
- Now separately make a triangle template with equal sides that will clearly fit into the circle
- Attach the template to the back of the round piece and trace with a pencil. Make even bends along these lines using a ruler.
- Then drip a little glue onto the folds and glue the pieces together. Just after connecting the top of the toy, do not forget to immediately make a loop. Only then glue the bottom
- It will take 5 rounds each for the bottom and top. And to connect them you need a round valve in the middle - it needs to be glued together from the remaining ten parts. Glue the lower and upper halves to this valve
The finished toy can be coated with glue and sprinkled with glitter.
How to make mechanical toys with your own hands
Wednesday, November 14, 2022
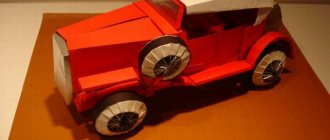
Today’s material will be devoted to making toys with your own hands, based on the recommendation of one of the books of the Detgiz publishing house, created in the 30s of the last century simultaneously in two cities - Moscow and Leningrad. Under the leadership of Maxim Gorky, Korney Chukovsky, Samuil Marshak, Arkady Gaidar and others, the world saw educational children's books, like the one on the basis of which today's publication is being created about how you can make interesting mechanical toys with your own hands. Despite the simplicity of the designs, all the toys described in the book are very entertaining: bear cubs can swing on a swing, a car can drive like a real one, and a starling can peck grains, just like a living bird. For work we will need the following materials:
- cardboard;
- stationery (banking) rubber bands;
- traffic jams;
- thin sticks (splinters);
- sand;
- scissors;
- glue.
Designations on the drawings: solid line (__________) - we cut along them; dotted (_ _ _ _ _ ) - bend the pattern away from you; dash-dotted (_._._._) - bend the pattern towards you; a line of only dots (. . . . . ) - something needs to be glued to this place. Each part of the toy is indicated by a capital letter, and the place where this part is glued is indicated by the same letter, but small. For example, we glue part A
to place
a
. Dimensions in the drawings are in mm.
How to make a swing toy with bear cubs
The cubs' house is set up on a large tree stump: two cubs swing on a swing from a small log, and the third watches them from the window. The swing is driven by sand. A glass of ordinary river sand from a children's sandbox is sifted, washed to clean water and dried thoroughly - this is where the preparatory work for making a homemade toy ends. Next, we cut out part A
(stump), glue it along the seam, glue the bottom
B
and knots
C, D, E.
While the part is drying, we make an engine consisting of a rocker
E
, a stick
G
and a
funnel
Z. We cut out the rocking chair and fold it, as in the drawing, through the holes we pass part F,
one end of which is split.
We insert the rocker inside the stump (point up) so that the ends of the stick come out through the hole in the stump part (the split end of the part G
should be above the knot
B
).
After this, they make a funnel Z
, insert it into the stump and
lightly
glue it at the very top by the ends.
Next, a swing with bear cubs sitting on it is inserted into the split end of the stick. If the rocking chair is installed smoothly and neatly, it needs to be glued to the stick. Now the most interesting part
: checking whether everything was done correctly and testing the swing.
A small amount of sand is poured into the funnel, which should pour evenly through the lower hole onto the rocking chair
E
and thereby set it in motion, and the swing with the bear cubs will swing along with it. If the swing does not swing, the reason may be that the sand is too wet and gets stuck in the hole; inaccurate positioning of the rocking chair; in a stick that fits too tightly into the hole in the stump.
| Sectional view of the finished toy |
If everything works as planned, then thoroughly and firmly glue the funnel to the right place, let the part dry, then fill it to the top with sand, glue the roof of the house and all other parts. When gluing the roof, pay attention to the fact that it should protrude 20 mm at the front and 10 mm at the rear. An entertaining handmade toy is ready. As soon as all the sand is poured out, the swing will stop, but just turn the toy upside down and the sand will again be in the funnel and the cubs will start swinging again. Attention! Patterns of various parts of this toy are attached on two sheets - each part has a different colored outline, be careful!
| First pattern sheet |
| Second pattern sheet |
| Colored pattern of individual parts |
| Second sheet of colored patterns for individual parts |
If you wish, you can download these patterns from the Cloud on mail.ru - download link
Mechanical homemade toy Carousel
This toy is no less entertaining than a swing with bear cubs: with the help of a thin elastic band, the carousel is activated and begins to rotate, like a real one. In order to make this funny toy, we first make the main parts: glue the pillar A
, glue the cover
B
B
into it .
Then we glue the bottom G
and the floor part
D -
at this point the production of the main element of the toy can be considered complete;
Now it's time to work on the carousel mechanism.
long
wire we make a loop of such a size that it passes through sleeve B. K
with the other end of this wire
and
stick it into plug
L. Then we tie an elastic band 30 cm long to the loop, pass this elastic band together with the loop through sleeve B
so that this loop sticks out a little, support
K
rests on the tube, and our elastic band could pass through the main post of the carousel and hang 10 centimeters below bottom of the toy.
We attach a nut to the end of the rubber band: we make a small wedge from a stick, which with its thin end fits tightly into the hole of the nut, and we split the thick end and insert the rubber band into it. After this, we drive the wedge more tightly into the nut so that the upper split parts close together more tightly and pinch the elastic. M
, a stand
H
are put on the tip of the wire sticking out of the cork, and a figurine of a rooster
O
.
Then they cut out the figures of the skaters: P, R, S, T, U, F
, thread their ends into the holes in the roof, slightly bending the green leaves, and then carefully straightening them when the figures are fixed.
The homemade carousel toy is ready. To make it rotate, tighten the nut with a sharp movement, place the carousel on a flat surface and the rubber band begins to slowly unwind in the opposite direction, setting the wire loop G
and the roof of the carousel in motion.
| The first sheet of carousel toy patterns |
| The second sheet of carousel toy patterns |
| Colored pattern of individual parts |
| Colored toy carousel pattern sheet |
You can download all four sheets of patterns on the Mail.ru Cloud using this link. If you find making mechanical toys with your own hands interesting, write in the comments - we’ll post patterns for the rest of the toys: a driving car, a grain-pecking starling, a shooting cannon.
Tags: Toys
Openwork Christmas trees
Openwork Christmas trees
It’s very easy to make spectacular openwork Christmas trees from paper, and then paint them green with paints. People call them vytynanki. They can be a worthy decoration for a real Christmas tree or used as gifts. To work you will need office paper, a template, a stationery cutter, glue and a cutting board (for cutting).
How to make a Christmas tree like this:
1 First, print a stencil from the Internet. To obtain a three-dimensional figure, you need 2 identical copies.
Stencil from the Internet
2 Lay out the paper on the board and use a knife to cut out patterns. Leave a strip at the bottom along which the base-stand will be glued together
3 Cut out the Christmas tree, fold it and glue it on top. Bend the strip from below into a ring and secure it using glue
Herringbone
The product turns out to be stable, so you can put it anywhere without fear.
How to make a Christmas tree with paper for kids
DIY paper Christmas toys: diagrams, templates and step-by-step instructions | (100+ Photo Ideas & Videos)
Corrugated balls - spectacular look
If you want something unusual, then you need to work hard, but the result will exceed your initial expectations after mastering the technique. During the 2019/2020 holiday season, such custom decorations will enhance any interior.
Please note: making corrugated balls requires following all instructions without deviation. You will need one roll of appropriate paper of any color, glue and scissors.
- Patchwork - technique and master class for sewing stylish and beautiful sewing with your own hands (80 photos)
- Tilda doll - a master class in sewing toys with your own hands. 125 photos of the best toy models
- How to make a car out of paper: step-by-step description of how to quickly and easily build a high-quality car (75 photos + video)
The work is performed in this order:
- cut part of the roll so that the width of the cut fragment is three centimeters. Don't unwrap anything;
- unwind it, twisting it every three to four cm along the way. Maintain integrity and avoid breaks;
- in places where they are twisted, the crafts must be straightened to achieve a convex configuration;
- repeat enough times to complete the design; three-dimensional objects should be connected with glue.
Angels
Stencil with an angel
Angels are ideal for New Year and Christmas themes. They are usually made from white paper in the form of flat or three-dimensional shapes.
How to turn an idea into reality:
- Print the desired template by downloading it from the Internet. Cut out figures from paper and decorate them at your discretion with sparkles, rain, rhinestones and other elements
- To make a three-dimensional angel, you will need to cut out the corresponding details: head, body, halo, arms and wings. Glue the cone - this will be the body and make the sleeves in the same way. Attach all the details of the figure to the base-dress with glue.
Volumetric angel
It’s not difficult to make a drawing yourself and cut out a flat angel from it. To do this, bend the sheet in half and make a sketch. After cutting, straighten it. Such cute creatures will look spectacular suspended on a chandelier, Christmas tree, or under the ceiling. Or you can decorate windows with them.
Yula
Step-by-step production of a spinning top:
- Prepare 2 squares of equal size from colored paper. On both sides of the figure you should put 2 dots dividing the side into 3 equal parts.
- Bend the parts along the first marks, then bend them along the second marks.
- Bend the lower left corner and the corner opposite it to form 2 triangles, and a square between them.
- Place one piece on top of another.
- After this, you should alternately bend the triangles into the middle.
- Raise the first folded triangle slightly to create a pocket.
- Place the last unoccupied triangular figure in the pocket.
- Use an awl to make a hole in the center, capturing all the layers.
- Insert a toothpick into the hole and start the spinning top.
Cute houses
Paper toy houses
Another option for New Year's decor is toy houses. Thick paper is suitable for making them - it can be colored or regular cardboard, old postcards, unnecessary boxes. The template for them is downloaded on the Internet and transferred to paper.
Further actions:
- Cut out the blank and bend it along the lines to make a box
- Then cut out the windows, door, chimney and roof
- Glue all these components to the base and decorate the craft as you wish.
Sequence of gluing a house
With the help of such fabulous compositions you can decorate the interior by placing them on the windowsill, fireplace (if you have one) or on furniture.
Bookmarks for books made of paper with step-by-step photos.
Origami heart bookmarks
I also liked the idea of mittens on a string. You can draw these mittens yourself, or you can cut them out of paper for scrapbooking.
The next idea is anti-stress bookmarks, although they are indirectly crafts, however, this is also a type of creativity associated with paper, and besides, in our turbulent times they can be very useful. They can be printed or redrawn from the monitor screen.
3D star
Visual instructions for work
A fairly popular New Year's toy is a star, which is usually attached to the top of the Christmas tree. You can make it yourself from colored paper. To make it look more realistic, let's make it three-dimensional like 3D.
How to create a cute star for your Christmas tree:
- Cut out 2 squares of arbitrary size and color from paper
- Now roll the blanks 2 times in half and twice more diagonally
- Unfold and you will see the fold lines
- Now turn each corner to the fold
- Fix the corners with glue so that it looks like bags. In this way they act in relation to each fragment of the asterisk
- The second part of the toy is made in the same way.
- Connect both pieces together and glue
The result is a pot-bellied, pointed star. Attach a ribbon or cord to it if you plan to hang the craft somewhere. And when fixing it on the top of the spruce, you need to make a hole from below for the trunk.
Simple paper crafts
Several options that can be made from colored paper easily and quickly:
- paper weapons;
- colorful bouquet;
- telephone;
- chamomile;
- the Dragon;
- colored balls;
- toy boy;
- parrot;
- ladybug;
- corrugated flower.
Paper flowers
Chamomile
Necessary materials:
- yellow paper;
- White list;
- glue;
- scissors;
- compass;
- pencil.
Manufacturing stages:
- Cut white paper into strips of equal width.
- Using a compass, draw two circles on a yellow sheet and cut them out.
- Glue the petals from the white stripes.
- Glue the petals onto the yellow circle.
- Cover the middle of the chamomile with another yellow circle.
Colored balls
To make a light multi-colored ball for the Christmas tree, you need:
- Fold a sheet of colored paper in half.
- Remove the second half and fold the first half into a fan.
- Glue the fan at the base.
- Make four fans of different colors.
- Connect the blanks into one ball using paper glue.
- Thread a thread through the bottom of the finished toy.
Helpful advice. Instead of glue, the safest way to secure the fan is to use a faster-to-use stapler.
Ladybug
To create a craft you will need:
- red paper;
- black sheet;
- regular A4 paper sheet;
- green paper;
- glue;
- scissors.
You may be interested in Using sodium tetraborate at home in slime
Ladybug
Step-by-step algorithm:
- Cut out small circles, a head and a mustache from black paper.
- Cut three identical circles from a red sheet.
- Bend the red circles in the middle and glue them together.
- Cut blades of grass from a green leaf.
- Glue the head, grass and the voluminous workpiece itself onto a white sheet.
- Glue black circles onto the red wings.
New Year's wreath
New Year's wreath
In crafts for the New Year holidays, you can’t do without a wreath, which is considered a symbol of financial well-being, longevity and happiness. This is a kind of amulet for the home against various adversities. Usually it is hung on the front door.
To make a wreath you will need a lot of green construction paper.
It is recommended to involve a child in the process, who will definitely enjoy such an activity.
Step-by-step instruction:
- Take a large flat plate and trace it on colored cardboard. Then the wreath will turn out more solid and will serve as a decoration for another year
- Now take the saucer and place it in the center of the large circle, trace and cut out a hole. The end result should look like a donut.
- Ask your child to place their palm on the sheet and outline it with a pencil. More of these pieces will need to be cut out.
- The finished palms must be glued onto the round blank in a chaotic manner, overlapping each other
- Glue all kinds of small decorations on top: beads, sequins, beads, bows, ribbons, bells, etc.
Wreaths can be of any design, it all depends on the inspiration.
Paper balls
You need to use the blank in electronic format - it will be printed with an inkjet printer (b&w versions are allowed with a laser).
The advantage of this method is the minimum number of materials. You will need patience - gain experience and improve the quality of the finished product: the lines will become smooth without any roughness.
As a result, you should end up with two-color spheres, where the segments are arranged in a checkerboard pattern. Do everything in this order:
- you want to print diagrams (stencils) with stripes and circles;
- cut out all the elements;
- The resulting parts should be arranged with a flower, and then fastened together with a circle;
- sequentially weave one edge to the other, and for reliability while working, fasten everything with clothespins or paper clips;
- Glue the opposite ends of the ribbons together.
The part of the circle that was connected by the circle is punched out (the hole should be small). A ribbon is inserted into the slot, on which everything will hang. It won't be perfect on the first try - over time you will understand and hone the technology.
Unusual lamps
Scheme for making a paper lantern
Probably everyone remembers from kindergarten how we were taught to make lanterns out of paper in creativity lessons. These delightful lamps are made simply and quickly from scrap materials: colored paper or cardboard from any packaging.
Master Class:
- From two multi-colored sheets of paper, cut out two rectangles measuring 100 x 180 mm and 120 x 180 mm
- Glue the smaller part into a tube and set it aside for now. Fold the second piece in half and make cuts at the bottom, slightly short of the edge.
- Similarly, you need to twist this rectangle like a bottle
If you did everything carefully, the smaller tube should fit into the larger one. Just don’t push it all the way through – leave a little. Lubricate this edge with glue and only then insert the tube all the way. Do the same with the opposite edge. Glue a loop of colored paper strip on top.
Simple but very beautiful lanterns for the New Year tree
These are such beautiful lanterns for the Christmas tree.
Flashlights
To decorate a New Year's lantern you need to follow these steps:
- Fold a colored paper sheet in half.
- Using scissors, make cuts from the bend side, not cutting 1.5-2 cm to the edge.
- Unfold the workpiece, then roll it widthwise into a tube, gluing the edges.
- Cut a handle out of paper and fix it with glue.
- Alternatively, a cut paper sheet can be wrapped around a painted cardboard roll.
Chinese lantern
Template for cutting parts
Another alternative decorative option is a Chinese lantern, which looks no less impressive . To make it, you need to use a diagram or draw the segments yourself (as in the photo). The length of one part will be on average 10 cm.
How to make a Chinese lantern
Further actions:
- Trace the template on colored paper
- Cut out the blanks - there should be six of them
- Form the bottom and top of the lantern
- Sew the lower segments with thread, then the upper ones
- Make a loop and that’s it, the flashlight is ready. Now you can decorate the Christmas tree with them
Unfolding paper toys
Below are schematic diagrams of the original toys.
Scan of an octopus Scan of a cat Scan of a decorative cup Scan of a gingerbread house
Quilling decorations
Quilling toy
Making jewelry using the quilling technique is not as difficult as it seems at first glance. To do this, you will need unnecessary newspapers or magazines, baking dishes, decor and a standard set of tools.
Step-by-step instruction:
- Place strips about 5cm wide
- Fold each one in half lengthwise, straighten it out and fold it again into an accordion.
- Lubricate them with glue and begin to slowly twist one
- Take a mold and place a strip that has not yet been twisted into it from the edge. Fill the rest of the space with twists, smearing them together with glue.
- Wait until the craft sets and pull it out
- Attach a ribbon to the top and decorate the toy to your taste
Unusual garlands
To do this, you just need to take scissors, a stapler, glue and paper of various colors. Cut the sources into pieces of various sizes - they will become the basis for decoration.
These elements will make lanterns, hearts, snowmen or pendants. You can use hearts as a test of strength. Production takes place in the following sequence:
- bending each strip of three in two (they are all different lengths);
- arrange each segment so that the longest is on the outside, and the shorter is on the inside;
- gluing the ends on one side and then on the other;
- After drying, secure the two parts with a paper clip.
Even a child who goes to 1st grade, 2nd grade (and even younger) can make these crafts. To make a heart 11 centimeters high, modules of 20, 25 and 30 cm in length are in demand. Christmas trees are an excellent alternative - they will require a little more attention, but having experience with hearts, you will no longer have any difficulties.
Another level of craftsmanship is provided by round lanterns resembling a top. For it you will need sections 30 cm long and 1.5 cm wide. It is advisable to use two colors - they will alternate.
You will need two circles with a diameter of 3 cm, which will be placed on top and bottom. Also take a needle and thread that will match one of the colors.
Everything will be decorated with balls or beads. They will be easy, and to achieve results follow the instructions:
- Decorations for the New Year: decor ideas and options for decorating a house and apartment for New Year's celebrations (135 photos)
- Window decoration - simple ideas and step-by-step descriptions of do-it-yourself window decoration (110 photos and videos)
- Diaper cake - a step-by-step description of creating a diaper cake. 115 photos and videos of creating a gift
- lay out all the areas on the table in the required order;
- bend each piece in two;
- fasten to the end of the thread;
- place the resulting peels on both ends;
- Twist a loop from the thread, on which it will hang;
- Separate the middles of the stitched strips, spacing them out.
Every person has already been familiar with bunches and chains since childhood thanks to their practice in kindergarten and elementary school. You can use them to decorate your apartment or office.
The production is simple, and the results will not take long to arrive. In addition to chains, you can come up with your own garland made up of pictures or shapes.
The sectors will be absolutely identical in size. Only the tone (optional) of the link will differ. All you need to do is securely fasten and glue the fragments together.
Origami toys
Scheme for making origami toys from paper modules
The technique of folding paper and fabric products without cutting or using glue is called origami. Having learned it, you can create many different toys for the New Year holiday: bunnies, snowmen, Santa Clauses, airplanes, birds, etc. Origami gift wrapping will also look stylish.
For New Year's decor in the house and on the Christmas tree in 2022, you should choose restrained shades with individual bright inclusions (red, burgundy, yellow). Then the coming year will definitely be successful. The methods of making toys presented in the article are just a small example. Get creative, it all depends on your imagination, or look for ideas on the Internet, there are many of them. It's so interesting.
Using the origami technique, you can make such a wonderful ball for a Christmas tree, as in the video below.
Kusudama super origami ball
DIY paper Christmas toys: diagrams, templates and step-by-step instructions | (100+ Photo Ideas & Videos)
History of origami
Nowadays, origami captivates mainly children. However, this was not always the case. Most animal figurines were created as iconic figures in Chinese and Japanese mythology. Photos of origami toys are still motivating to create something new.
Crafts bear from plastic caps
You will need:
- 2 large round yogurt lids
- 6 cola or mineral water bottle caps
- Felt pen
- Glue gun or Moment glue
Glue two large lids together. We put two small lids on the table and glue the bear's body to them. We attach covers on the sides - hands, on the head - ears.+
Using a felt-tip pen, draw a bear’s face on the lid or on paper and glue it. Draw claws on the paws.
The craft is ready.
Crafts for Valentine's Day - a heart and a ballerina made of cardboard. Master class with photos
Every day the number of people who want to celebrate Valentine's Day and make a gift or card with their own hands is growing. We suggest making an unusual Valentine card - it is made of cardboard according to the principle of a twitch toy. An elegant ballerina doll can also become an original gift for Valentine's Day. A detailed master class with templates and photos will help you master a new technique for making crafts.
A jerk is a variant of a mechanical toy, the parts of which are loosely connected and driven by threads attached to the back of the toy. Twitch toys have been known since the ancient world. In the 19th century they were popular in all European countries. In Germany they were called "Hampelmann", in France - "Pantins", and in English-speaking countries - "Jumping Jack". Such toys were also made in Russia, they were called “dancers”.
Even children can handle making a heart-shaped valentine with movable wings. More delicate work remains with the ballerina figurine, whose arms and legs can be made movable.
Felt bear craft
You will need:
- Felt set
- Paper
- Thread and needle
- Pencil
- Scissors
- 6 small black buttons
- 1 button slightly larger
- Filler
First, draw a bear pattern on paper.
Cut out all parts of the body in the following quantities: head - 2 pcs., torso - 2 pcs., paws - 4 pcs., ears 2 pcs. Transfer the pattern to felt and cut out the pieces. Sew the 2 parts of the head and body using a buttonhole stitch, leaving room for stuffing. Stuff and sew up the holes. Sew the head to the body.
Sew the ears to the head. Sew the front and hind legs to the body using buttons. There is no need to tighten the thread too much, let them be movable.
Sew 2 buttons in place of the eyes; for the nose you will need a larger button.
Our craft is ready.