Often entrepreneurs do not have enough money in their budget to order a sign, and they decide to make it themselves. This is possible, but you need to take into account many nuances, know how and what needs to be done. Otherwise, you won’t be able to save money: you’ll only spend money on materials, and then you’ll still have to turn to specialists. The following information will be useful to those who want to figure out how to make illuminated letters with their own hands, or are planning to buy a ready-made sign. You will learn about the intricacies of the process and the result that should be obtained, and also receive valuable tips on making your own.
What’s better: making the letters yourself or ordering them
To make a sign in the form of three-dimensional letters with your own hands, you need to understand that this is not the easiest process. It is necessary to take into account many nuances, to have at least some experience in this area and in the issue of connecting the backlight.
In addition, to make it profitable to buy materials, you need to make a lot of letters. The film is sold by linear meters, plastic - by sheets. To prevent materials from being left behind, you need to make at least 6 letters, and add a logo to them. Otherwise, the cost of the sign will be unreasonably high.
At the Althea advertising agency, the production of three-dimensional letters is put on stream, which minimizes leftovers, and this has a positive effect on the price of the product. In addition, we use milling and laser cutting technologies, which ensure high quality processing. The details of the letters are even and smooth, with ideal sizes.
If necessary, we can develop a layout of your sign taking into account the permissible dimensions and select the necessary lighting. For consultation, please contact us using the form on the website or by contact number - we will answer all questions and help you fill out your application.
Lightbox frame design
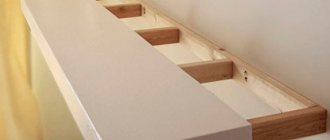
The frame must ensure the rigidity of the structure, therefore, when making a box for LEDs with your own hands, it is better to use an aluminum or steel profile. But for a small-sized structure, a furniture board or even an ordinary board is quite suitable as a super-budget option.
Important! If the box is installed outdoors, then the main task is to ensure the resistance of the structure to various atmospheric influences.
Manufacturing of the front surface
A lightbox can be made of different materials, but only transparent materials are used to make the front panel - acrylic or silicate glass, polystyrene, transparent PVC sheet, banner fabric (for large sizes). PVC has the lowest refractive index, but its cost is the highest.
The most practical option would be acrylic glass . It is somewhat more expensive than silicate, but also much more resistant to loads and impacts. However, when creating a small box (up to 0.5 square meters in area), you can use ordinary glass with a thickness of no more than 3-4 mm.
After the material is selected, an image is applied to its surface using large-format plotters. There is another way to make an image - appliqué from vinyl films. They are prepared on a cutting plotter and glued in parts onto the front surface.
Making the back surface
To manufacture this element, the material that was used for the side surfaces is taken, except for PVC. It cannot be used to make the back wall, since light elements are placed on it: LED strips, lamps, reflectors, etc.
Light box housing
The bodies of all lightboxes, without exception, are made of PVC (polyvinyl chloride sheet). In terms of reliability/price ratio, this material is unrivaled. A sign made by yourself can be no worse than a design made in a specialized production facility, but the main component is the quality of the material. The main requirement for it is mechanical strength, resistance to atmospheric and external influences, light resistance, and protection of the internal contents of the box.
Create a material with texture
Step 1
Select the Front Inflation Material of the text, on the properties panel, click on the folder button opposite the Diffuse and select Load Texture .
Open the picture misto1.jpg from the set with seamless metal textures.
Step 2
Click on the button opposite Diffuse and select Edit UV Properties .
Step 3
In the window that opens, adjust the Tile (Mosaic) and Offset (Offset) until we get the desired result.
Step 4
We configure the remaining parameters (color values are given in RGB format):
- Specular (Highlight Color): 135, 59, 33
- Illumination : 191, 96, 27 – Intensity -4.77
- Shine : 70%
- Reflection : 3%
Create a vignette effect
Step 1
At the bottom of the layers panel, click on the Create new fill or adjustment layer and select Solid Color .
Select black color, switch the layer blending mode to Soft Light (Soft light) and reduce Opacity (Opacity) to 50%.
Step 2
Take the Elliptical Marquee Tool (M) and create a selection around the text.
Then select the Solid Color and fill the selection with black.
Press Ctrl+D to delete the selection.
Step 3
Check that the mask is still selected. Go to the Window – Properties and increase the Feather to smooth out the edges of the vignette.
Types of outdoor advertising
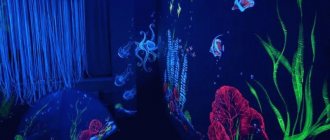
There is a wide variety of outdoor advertising media, including billboards, electronic displays, pillars, various advertising installations on roofs, and, of course, lightboxes. Thanks to constant backlighting, advertising information placed on the lightbox is clearly visible in the dark. It is the production of such light boxes (lightboxes) that this material will be devoted to, since today it is one of the most popular and most common elements of outdoor advertising.
Creating more materials
Step 1
Select the text material Front Bevel Material , click on the folder button next to the Diffuse and select Load Texture . Open the d.jpg image from the set with seamless metal textures.
Step 2
Next, select Extrusion Material and Back Bevel Material , click on the folder button next to the Diffuse and select the “d” texture.
Step 3
Then select Front Bevel Material , Extrusion Material and Back Bevel Material and configure them:
- Specular (Highlight Color): 104, 86, 64
- Illumination : 191, 96, 27 – Intensity -4.77
- Shine : 85%
- Reflection : 20%
- Refraction : 1.536%
Step 4
Now select only Extrusion Material (Extrusion Material) and Back Bevel Material (Back Bevel Material), set their Shine (Shine) to 30%.
Can LED lamps be used?
You can, it's a great light source, but LEDs are more expensive, and if you're making your own light box, you want to make it as cheap as possible. In addition, LEDs burn out over time, and if one burns out, everything needs to be changed, because the brightness of the new LED is noticeably higher than the old ones (they lose brightness over time). This is more expensive and more difficult than replacing a lamp, which, by the way, has a longer lifespan than LEDs. Therefore, making your own LED light box is advisable only if you need a very narrow or lightweight lightbox, a special lighting effect, or a certain shade of light.
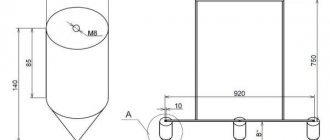
Cutting blanks
Most often, a lightbox has a rectangular shape and is assembled from 4 profile sections. It is necessary to make these segments. It is best to cut a plastic profile with a special miter saw, which allows you to cut exactly at a right angle. If you don’t have such a saw, you can cut it with a grinder or even a hacksaw, but this will require extreme care.
Frame assembly
The glue is applied to the contact surface of the corner. You need to apply it a little so that it does not flow out through the joints. Then the frame is assembled: the profile is simply pushed into the corner until it clicks. One end profile is not glued, but secured with screws. This is necessary for ease of maintenance of the light box in the future. There is no need to tighten the screws until the lightbox is assembled: the end side is simply snapped in place so that the structure has the correct shape while the glue dries. After assembly, you must wait until the adhesive joints gain sufficient strength.
Pasting or painting the back wall
The material from which the back wall of the lightbox will be made, and on which the lamps or LEDs will be attached, must be painted with white paint or covered with a white film in order to obtain a reflective surface and achieve a uniform glow of the image on the front wall.
Rear panel installation
Mounting lamps or LEDs on the rear panel
The number, location and connection diagram of lamps or LEDs depends on the size of the light box, its thickness, type and power of light sources. In any case, both lamps and LEDs in a light box made of PVC profile are attached to the rear wall as evenly as possible over the entire area.
Important: if you use LEDs, it is better to arrange them not in rows, but in a checkerboard pattern. If the LEDs are arranged in rows, the illumination will not be completely uniform, and when looking at an acute angle to the plane of the screen, a person will see a slight shadow. It's not critical, but it's not very pretty.
Since the power supply in the light box is also located inside the box, after installation it is better to cover its upper side with white film so that there are no dark spots on the image.
6. Making a top panel with an image
The image must be printed on self-adhesive film. To do this you will need film and a large format plotter. It is expensive and, of course, is unlikely to be available to a novice entrepreneur by chance. However, you can order printing on self-adhesive film from us (more details here).
Front panel installation
The acrylic glass screen just needs to be inserted into the groove of the plastic profile and then close the box with the fourth side, not secured with screws. After installation, double check that the lightbox is working and secure the fourth side. The light box is ready.
Setting up the stage lighting
Step 1
Select the Infinite Light 1 , in the properties panel set Intensity to 50% and Shadow – Softness to 100%.
Step 2
Using the Move Tool (V) you can move the light source around the scene to find the best location. Or, in the properties panel on the Coordinates tab, you can adjust the position using numeric values.
Adding light bulbs
Step 1
Open the picture with the letter E and use the Elliptical Marquee Tool (M) to select the topmost light bulb.
Then go to Edit – Copy to copy the selected area.
Step 2
We return to the main working file with the text and go to Edit – Paste (Editing – Paste) to paste the copied area onto a new layer. Call this layer “Light Bulb 01” and convert it to a smart object.
Step 3
Double-click on the smart object thumbnail to open its contents. Then go to Image – Image Size and set the Width and Height to 56.
Step 4
Hue /Saturation adjustment layer and transform it into a clipping mask (Ctrl+Alt+G).
Step 5
Double-click on the “Light Bulb 01” layer to apply the Inner Glow with the following parameters:
- Blend Mode : Linear Dodge ( Add )
- Opacity : 25%
- Color: #fff2e3
- Source : Center _
- Size : 27
Step 6
Save (Ctrl+S) the file and close it, then return to the original document.
The last stage of creating a neon box
After checking the LED lighting system, you can begin further work. First, you need to cut out the front. For this purpose, it is advisable to use organic glass. Corners should be rounded. You need to remove the protective film from the front cover, wash it with a sprayer and a rubber squeegee. Then the image or text is inserted. The film must be carefully smoothed, and excess polyurethane foam must be removed. To complete the lightbox with your own hands, you need to drill several holes in the product with a diameter of up to 1 cm. They will serve as ventilation outlets and to remove moisture from the product.