Often, thematic matinees are held in kindergartens and primary schools on May 9 and February 23. And at the New Year's performance, boys and girls may play the role of military men or sailors. If a child gets the role of a perky sailor in a New Year's performance, then you will have to try.
There will be no problems with clothes, look for them in the baby’s wardrobe, but you need to work on the paraphernalia. You can run around stores and costume rental shops in search of a naval collar and cap, or ask veteran sailors you know about the elements of a naval uniform. Try making a sailor's costume with your own hands. The work is not as difficult as it seems.
Young sailor costume
Usually girls at matinees get the role of a princess or a snowflake , for which there is a white fluffy dress. But it may happen that your daughter will get to perform a sailor dance and will need a special naval costume.
Part of the costume can be selected from the children's wardrobe, for example, find a white blouse and a white or blue skirt. Sew cuffs onto the blouse using blue fabric. Using a white satin ribbon, make three stripes along the cuffs.
Wear a vest under the blouse or sew in a striped wedge, imitating the presence of a vest on the child’s body. White tights and dark shoes will complete the look.
Headdress
A sailor always has a lady of his heart, a girl waiting for him on the shore. For a sea dance at a matinee, girls will need a themed costume. The women's visor cap is made simply and differs from the men's cap. You will need a piece of blue fabric and white satin ribbons. A women's headdress will keep its shape even when made of soft material.
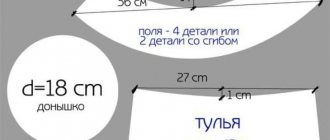
For the pattern, measure the circumference of the girl’s head and the height of the headdress. Mark on paper ¼ of the circumference and 20 cm of the height. Connect them with a line to form a wedge. Using scissors, cut out the pattern and transfer it to the fabric. Make four identical wedges of blue fabric and connect them together with a basting stitch, then sew them on a machine.
Cut out the dublerin and make a band the length of which is equal to the circumference of the baby’s head. Using an iron, glue the band blank to the fabric, fold it in half and sew on a white satin ribbon.
Using pins, pin the band to the cap, sweep and sew on a typewriter. Sew the ties on the sides so that the headdress, while sitting comfortably, does not fall off the head. Carefully press the crown inside the visor, forming a depression around the circumference. The sailor suit for the young sailor is ready.
Sailor skirt
To dress up a girl for a matinee, replace trousers, shorts and breeches with a skirt. DIY sailor costume
- sun, half sun;
- straight cut;
- with folds.
A straight skirt goes with a tunic, a pleated skirt goes with a T-shirt, sun and half-sun goes with a blouse . Manufacturing procedure:
- Straight skirt. To sew a straight-cut skirt yourself, take two measurements: waist circumference and product length. Calculate the width of the product by multiplying the waist circumference by 1.33. For example, the girth is 55 cm, multiply by 1.33, you get 71.5 cm. Round and measure 72 cm on the fabric. Make two rectangles. The first is the length and width of the skirt, the second is the length of the waist circumference and the width of 15 cm. Connect the rectangles into separate circles. Fold the blank for the belt in half so that the free edge is on top. Take a 2 cm wide elastic band, cut the length around your waist, and connect it into a circle. Insert the elastic into the waistband and sew the edges of the fabric using a sewing machine. Fold each piece in half four times, securing the bends with pins. Start attaching the waistband to the skirt, moving from pin to pin and stretching the waistband to the same mark on the skirt. Fold the bottom of the product and sew on a typewriter.
- Skirt with pleats. To create such a model, decide on the length of the product, taking into account seam allowances, and the width, taking into account the waist circumference and the size of the sweetie. They can be made towards each other or bent to one side. Secure the folds with pins or a basting stitch. At the end of working with folds, you will get a rectangular product with a length corresponding to the waist circumference and 2 cm for the seams. Sew the top and bottom of the skirt using a machine. Sew on the belt. Iron the folds thoroughly. Thread an elastic band into the waistband. If you are an inexperienced tailor, then control yourself when trying on a skirt for a child at different stages of making the product.
- Skirt sun. To cut out a circle skirt without calculating a formula, you can use a plate or pan lid, which will coincide in circumference with the circumference of the child’s waist. Fold the fabric right side inward. Place it on a flat table surface with the edge facing you. Along the fold of the fabric, measure the length of the skirt 25 cm and 2 cm allowance (to hem the skirt). Make a chalk mark at this location. Take a plate whose circumference corresponds to your measurements + 3 cm for the seam. Place the plate on the reference mark and outline it with chalk. This will create the top line of the skirt. From the top line, use a tailor's tape to set aside the selected length of the skirt (25 cm plus an allowance of 1.5 cm). Along the top line, draw an allowance of 1 cm to connect to the belt. Start cutting the skirt from the bottom edge. Then remove the top. Cut along the fold on one side only. The stitching will be at the back and will have a zipper sewn into it. Make the belt from a rectangle, with a length equal to the waist circumference plus 3 cm for the seam and a width of 6 cm plus 2 cm. You can insert an adhesive pad inside the belt for rigidity or simply insert an elastic band. Baste the seam on the skirt and sew in the zipper at the same time. Baste the belt to the top line of the skirt and try it on. Correct the flaws and sew all the seams using a machine, and process the cuts using an overlocker. Steam the seams well with an iron.
What does a sea cap look like?
This headdress, as we have already said, is the generally accepted form of a cap in the navy that does not have a visor. In the army, such a cap began to be used in 1811, and initially it was also worn by infantrymen and artillerymen. As a result of the reform of 1850, the right to exclusive wearing passed to the navy, and since 1874, the style, mandatory presence of ribbons and their length (at least 40 cm) were legislatively approved. Since 1878, inscriptions began to be made on them indicating the place of service or ship, and black and gold St. George ribbons were used on dress uniforms.
Costume for a little sailor
The basis of the costume of the conqueror of the seas will be a white shirt and trousers.
There are quite a lot of shirt options. For a do-it-yourself sailor suit for a boy, take a white shirt from your wardrobe or use a ready-made shirt to make a pattern on light linen fabric. If you are going to sew the shirt yourself, then remove the line of buttons by making a v-neck.
Sew blue cuffs to the finished white shirt with a width equal to half the little artist’s wrist. The main attribute of the outerwear, of course, is the guy - a blue or blue collar with three white stripes.
Sailor's trousers
Making a New Year's sailor costume is not at all difficult. Take casual clothes as a basis: blue trousers, although you can use black and white trousers. And if there is nothing suitable in the children's closet, then check the adult wardrobe. Find clothes that you can sew for your child. The big problem will be the lack of free time. Young mothers, and even working ones, have almost no free minute, and sewing an outfit will require a lot more.
If we also take into account the time for purchasing the missing decorative elements and fabric, then there is absolutely no time left. Plan the time in advance to sew a New Year's suit so as not to sit the night before the matinee. Find a pattern, select fabric, buttons, appliqués, ribbons. You can sew the simplest trousers for your child yourself.
Find a pattern or trace the finished trousers, folded along the middle seam. Leave a 2 cm allowance. Just steam trousers made of blue fabric thoroughly; if they are made of white fabric, then sew blue cuffs along the bottom just like on a shirt. Carefully iron the creases on the trousers and pick up a black leather belt with a massive buckle.
Marine beret for cabin boy
A person unfamiliar with sewing can handle a simple version of a beret for a little sailor. You don't need a complicated pattern , it's so simple.
You need to cut out two circles of white fabric and a rectangle. The circle is the basis of the beret; select its size according to the circumference of the child’s head. The length of the rectangle is equal to the circumference of the head, plus 1 cm for the seams. The width of the rectangle is equal to double the height of the beret - 16 cm.
A simplified version of a children's outfit for a boy
It’s easy to sew a woven headdress with your own hands. To do this you will need a blue wide elastic band and white fabric. We connect the ends of the blue elastic band and tie them. Cut out a circle from white fabric and sew it to the inside of the elastic.
It is not necessary to sew a children's shirt; you can take a vest and wear it under a white shirt that is not fastened with all the buttons. If you can’t find a vest, take a regular white sleeveless T-shirt and paint blue stripes on it with acrylic paint.
The collar can be cut in the same way as in the instructions for the first costume, but the stripes can be painted on with any white paint rather than sewn on.
Pants for boys are regular black. Even the classic version is suitable.
Pompon
To make it, cut out two identical circles with a diameter of 8 cm from thick paper and make a hole in the middle. We wind the yarn on the folded rings in a thick layer to make the pompom voluminous.
Very carefully cut the yarn along the outer diameter, and between the layers of paper we pull the thread tightly and tie a knot. Remove the paper and cut off the ends of the thread evenly. Sew the pompom exactly into the center of the beret.
Jack
It should be noted that real guises are made from fabric that is most similar to ordinary satin in a very dark shade of blue. Three thin white stripes around the perimeter are applied with paint, like a print. So, let’s start making our own patterns for a sailor’s suit for a boy, or rather its important detail.
Materials:
- The fabric is dark blue.
- White paint or thin white satin ribbon.
We need to make sure that the collar is the right size for our sailor. To do this, take measurements of the child’s neck circumference L, the distance from neck to shoulder P and the desired length of the back D.
After that, take a sheet of paper, preferably in a box, and start drawing a pattern. Place point H in the upper left corner and from it draw a horizontal line to the right and a vertical line down. On the vertical line we put aside distance D and put point T. We measure down another 1.5 cm and put T1. We connect both points with a smooth line. From T1 to the right we draw a horizontal line and lay the segment T1K on it. We calculate its length using the formula T1K= L/3+0.5 (cm). From point K1 further to the right we measure measure P and place point K1. We draw two lines from it - up, to the intersection with straight line H, where we put point H1; and down, setting aside a piece 30-33 cm long, depending on the boy’s height. Here we put point M2 and from it to the left we draw a horizontal line, on which we lay off a segment of 5 cm and put point M1. Now we connect points M1 and T1 with a smooth line.
The do-it-yourself guy pattern for a boy’s sailor suit is ready. We lay it out on a cloth folded in half lengthwise. We align the fold with line HT1, outline it with chalk and cut it out, not forgetting to take into account seam allowances of 1.5 cm. We cut the inner semicircular part slightly with scissors so that the fabric does not tighten later.
We bend the edges around the perimeter and overcast them by hand, after which we stitch them on a machine. Iron the seams thoroughly.
and make a pattern
To sew a sailor suit for a boy with your own hands, you need to correctly make templates of the parts and correctly determine their size. For a headdress, you should measure the circumference of your head in the place where the lower part of the cap will be. It should sit comfortably on your head, not fall in or squeeze. For a beret, it is more convenient to sew in an elastic band and determine the desired size when trying on the finished product.
The pattern of the guy is also built according to the individual dimensions of the child. Since you are sewing a costume for a holiday, and not an actual uniform, it is enough to roughly follow the proportions and make a beautiful thing. The collar should not look like a cape. You should not make it too narrow and small. Of course, take into account the amount of fabric you have. The optimal length at the back is to the bottom of the shoulder blades, and at the front when tied, the item should end in the middle of the chest.