Making a wooden handle
The handle is made of ordinary wooden beam:
- On one side I cut it at an angle, and on the other side I trimmed it with a knife to give the handle a round shape that is comfortable to hold in the hand.
- Then I glued the handle to the mask using hot glue.
- From the inside of the mask I put a piece of thin plywood and use a self-tapping screw to additionally secure the handle.
The yellow arrow points to the hole in the handle, which is intended for hanging the mask on a nail in the wall.
It's scary, it's creepy!
Miguel Walch was able to combine masks in folk traditions with modern design. They look very impressive, impressive and terrible. People wearing such masks turn into the walking dead, vampires, witchers and other evil spirits.
With bloody mouths, as if they had just tasted human flesh. With sinister, glowing eyes, large horns, ugly faces. It was as if they had just crawled out of dug up graves. If you meet someone like that in a dark alley at two o'clock in the morning, a myocardial infarction is guaranteed.
Creating a layout for cutting
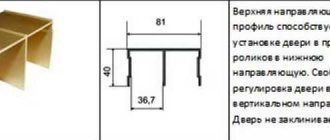
For the layout I used a piece from an old cardboard box measuring 400x400 mm. External dimensions and other details of the mask are visible in the photograph. The shaded areas will be removed.
A protective mask made of cardboard can ignite from sparks during welding. Do not use it or analogues made of flammable materials when working.