Home » Building a house » Premises » Bedroom
Annie Cooper 03/29/2020
4570 Views
The bed is perhaps the most important piece of furniture in the apartment, intended for sleep and relaxation. However, it is not always possible to find the desired option in the assortment of finished products. Then you can make a sleeping place yourself, receiving several advantages at once: original author’s design and functionality at a low price. We will tell you further how to make a bed with your own hands and what materials to choose for this.
Design
Hanging bed - an unusual design solution in the bedroom interior
Any bed, regardless of shape and configuration, consists of the following components:
- Frame
- Base
- Side and support panels
- Optional design elements (legs, hanging backrests, headboard, storage drawers, lifting mechanism)
A home-made sleeping place usually consists of a frame on which a base is installed - a mattress support. The supporting structure is made from:
- wooden slats (slats)
- metal mesh
- spring mechanism
Furniture for sleeping and relaxation can:
- have legs (most often no more than 20 cm high)
- be floor-standing (the frame is located directly on the floor)
- be suspended (fixed to the ceiling)
Original headboard for bed
The headboard is a decorative element that:
- carved from wood
- sawn from chipboard
- forged from metal
- upholstered with foam rubber and fabric
- can be carved and solid, straight and curved
In addition to the main functionality - a place to rest, the bed also serves as:
- closet
- stand
- sofa
- podium
In these cases, the mattress is hidden in the shell of the body during the day, and at night it is unfolded using a “book” mechanism or a gas lift.
DIY bed headboard
The headboard serves as the “face” of the bed. In the classic version, this part of the structure looks like a towering rectangular element. Designers offer ideas for decorating a headboard that are easy to make with your own hands.
The headboard is a fence. A fence with triangular tops is imitated from wooden planks or clapboards.
Soft ears. Mickey Mouse ears are sewn from fabric and flat foam rubber, which are put on the headboard like a cover. When the ears get bored, they can be easily removed.
Drapery with hooks. Flowing light fabric, falling from hooks built into the wall, adds charm and elegance to the bedroom.
Panels with a relief of the chosen shade remove the coldness of the interior and make the bedroom cozy.
The bed as a creative object, the process of its making is fascinating. Some ideas will require the skill of a furniture maker or the help of such, but creating your own individual, interesting bed would really be an inspiration.
Choice of frame material
For self-assembly of furniture, wooden models are most often chosen
For the body of sleeping furniture, reliable materials with high strength values are used:
- Tree . Natural, eco-friendly material, best suited for work. However, it is afraid of moisture and is susceptible to fire
- Metal (corners or pipes). Such furniture will be durable, will last a long time and will not creak. It is worth considering the large weight of the structure and the risk of corrosion. In addition, the strict cold design of metal is not suitable for every interior.
- Fiberboard or chipboard. Furniture is the most fragile and therefore unreliable.
- Rattan _ Durable, versatile material, but expensive. It is cheaper to buy a ready-made rattan product
- Pallets . Making a structure from them is reminiscent of assembling a construction set from identical parts. But pallets do not always fit into the traditional conservative style of an apartment
Preparation of the project and drawing
When choosing a ready-made solution or starting production from scratch, start planning:
- They think over the general design concept : how many people the bed will be designed for, whether there are drawers or niches. When choosing a size, take into account the parameters of the room - there should be enough free space around the furniture.
- A preliminary sketch or drawing is made with the main details: the base box and the frame for the mattress.
- Choose a mattress model . Only after the dimensions have been clarified do we begin designing. Otherwise, after making the bed base, you may not find a mattress of the right size.
- A detailed drawing of the base box, load-bearing frame, headboard and backrest is drawn up, indicating the method of fastening the parts together.
A detailed drawing is necessary to purchase materials and fasteners, as well as to prepare the missing tools.
Bed dimensions
Drawing of a double bed
Depending on the parameters of the sleeping place, the beds are:
- Single . The optimal width for resting 1 person is 85–120 cm, length is no more than 2.2 m
- One and a half . Width – up to 1.6 m, minimum length – 1.9 m. Suitable for free sleep of 1 person or rest for a mother and a small child
- Double . From rectangular shapes - 1.6 m by 1.9 m to almost square - 2.3 m by 2.2 m. This design comfortably accommodates 2 people
Another option is bunk furniture, where 2 sleeping places are located one above the other on a metal frame. Most often they are used to equip children's rooms, where this is the only way to save space.
Wooden double bed project
List of required materials
The list of materials below assumes they are all of good quality. In fact, you should purchase more lumber than is listed in order to be able to reject pieces with defects (knots, bends, cracks, etc.). Those who buy lumber of a larger width than required and cut blanks of the required size from them turn out to be right.
As a general rule, the wider the board/block, the higher the quality of the wood (narrow boards are cut from the trunks of thin, low-grade trees and often end up warped).
| Lumber size | Quantity | Place of application |
| 5x20x240 cm | 2 * | bed side rails |
| 5x20x360 cm | 1 * | bottom of the headboards |
| 5x25x240 cm | 3 * | bottom of the headboards |
| 5×7.5×240 cm | 3 * | for making legs |
| 4x4x240 cm | 2 | slatted bottom supports |
| 5x10x240 cm | 13 | slatted bottom (you can also use 5x7.5 cm boards) |
| 60mm wood screws | 24 | for attaching bed side rails |
| * Instead of boards marked with an asterisk, it is better to buy six 5x25x240 cm boards and cut blanks of the desired size from them. | ||
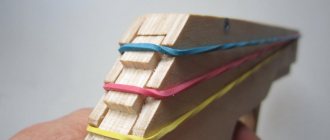
General form
Cross section
Notice how the bottom slats rest on the bars supporting them.
Cutouts at the ends of the slats ensure that the slats do not add too much height.
Headboard
It is better to make holes for dowels by clamping the horizontal fragment of the headboard and the leg together with clamps. The hole should be drilled through both parts at once, as shown in the figure.
Foothills
Bed side rails
Each side rail of the bed has a row of bars on the support bar. The purpose of these bars is to prevent displacement of the bottom slats.
4x4 cm bars, which will support the weight of the slatted bottom, are best secured with both glue and screws.
Final assembly
The side rails are attached when the bed is installed in its permanent location. They must be removed to move the bed frame.
The slats that make up the slatted bottom are not secured. Small wooden blocks prevent them from slipping along the support bars.
Next, we give the floor to the author of this material.
Preparatory work
Schematic drawing for assembly
Before deciding to assemble furniture yourself, experts advise determining the following parameters:
- Location of the structure in the room
- Number of people who will use it
- Availability of material for the manufacture of the frame and necessary accessories
- The ability to buy a ready-made mattress or the need to order a non-standard size option
- Availability of drawings and diagrams for manufacturing
Necessary materials
A level, tape measure and fasteners are needed to assemble any bed.
After selecting the frame material and calculating the dimensions of the future bed, purchase the necessary materials. For a wooden structure (fibreboard, chipboard, plywood, rattan) - this is glue, acrylic varnish, wood stain, painting brushes, sandpaper, putty.
To work with metal you will need the following tools:
- circular saw (grinder)
- metal drill set
- welding machine
- file
- brush for metal surfaces
Tools for making a bed
Any of these structures cannot be assembled without:
- measuring tape
- electric drill
- metal corners
- screwdriver
- self-tapping screws
- adjustable square
It is convenient to work with wood, having the following tool set:
- electric jigsaw (hacksaw)
- chisel
- plane
- Grinder
Necessary accessories and fasteners
To make a bed with your own hands, you need to prepare fasteners and accessories. If the bed is planned to be foldable, you should purchase special folding mechanisms. They can be of the following types:
- mechanical;
- with springs;
- gas.
For stationary products you need to take:
- metal corners;
- screeds;
- screws;
- self-tapping screws;
- legs if necessary;
- lamellas or metal mesh.
To make drawers, you should purchase roller mechanisms. It is better to give preference to metal products, as they are more durable compared to plastic ones.
Furniture Assembly Instructions
Pallet bed
When making a bed from different materials, the tools used and the procedure are different. Let's look at each case in more detail.
Made of wood
Double wooden furniture, assembled on your own, will decorate any interior
A balanced choice for a beginner in carpentry is to make a rectangular structure from solid wood.
Calculation of materials
Wooden blocks and boards - the main materials for making a bed - must be dry and of high quality
To make a double wooden bed with legs measuring 1.6x2 m you will need:
- 15 pieces of pine beams 220 cm long and 5 by 5 cm in section
- 22–24 planed 2-meter boards, 10 cm wide, at least 2 cm thick
- Glue
- Self-tapping screws (0.4 cm and 0.6 cm)
- Metal corners of suitable size
Step by Step Actions
Ready to assemble bed frame parts
Next, the work is performed step by step according to the following instructions:
1 Using wood glue, glue together 4 wooden blocks with a length of 220 cm (2 parts), 160 cm (2 parts), 210 cm (1 part). The result is 5 blanks of different sizes, but the same thickness of 20 cm
2 Fold the paired blanks into a rectangle and fasten the joints with glue. Corners overlap for strength
The joints of the parts are reinforced with metal corners
3 A single crossbar is attached to an inverted frame along exactly the middle. The lamellas are subsequently attached to it. Strengthen the jumper with persistent 15-centimeter bars or metal corners
4 Additionally, the parts are fastened with self-tapping screws. At this stage, it is important to ensure that the proportions of the structure are maintained and the right angles inside
The legs are attached with self-tapping screws to the corners of the frame
5 The legs are screwed into the corners of the frame - they are the remains of the same pine beam with a length of 20–30 cm or higher (optional). Attach the supports to the inverted frame with glue, self-tapping screws, and reinforce them on both sides with corners
6 The block in the middle of the wooden blank is also placed on 2 legs on top and bottom to give the structure additional stability and prevent the center from sagging
The slats are laid perpendicular to the side and central panels
7 The body is turned over. Support boards or remnants of timber are installed at the same level as the central crossbar. Lamels are placed transversely on top of them at a distance of 4–5 cm from each other.
8 It is important that the boards laid crosswise do not rest against the sides of the frame - this will cause the structure to creak during use. Provide a gap of at least 0.5 cm on each side
9 The slats are screwed to the side and central panels with two 4 cm screws so that the base is rigid and can withstand the weight of the mattress and people
10 Check the correct installation, the stability of the frame, sand all wooden elements with a machine or sandpaper
Finished piece of furniture covered with stain
11 The finished product is coated with a primer or stain, and then varnish
12 From the remaining boards they knock down a headboard, which is attached not to the frame, but to the wall above the bed
How to make a double bed with your own hands using a tool
How to make a bed with your own hands: step-by-step instructions for assembling designer furniture | 60+ Photos & Videos
Made of metal
Scheme for welding metal profiles with a reinforced grid at the base
It is difficult for a beginner to make metal furniture without the skills of welding and cutting metal, however, with minimal experience, it is possible. Experts do not recommend assembling parts with bolts - the structure will quickly become loose.
When working on a bunk metal bed, profile pipes are used:
- 2 by 2 cm (from 40 m and more)
- 4 by 4 cm (minimum 8 m)
- 5 by 2.5 cm (8–10 m)
Bunk beds are best for children's rooms
When working, they start by making the backs from 4x4 cm pipes, the shelves are made from a 5x2.5 cm profile, and the lintels are made from 2x2 cm pipes. The order of welding the parts is determined by a pre-drawn diagram, the collapsible parts are connected with self-tapping screws.
DIY metal bed
How to make a bed with your own hands: step-by-step instructions for assembling designer furniture | 60+ Photos & Videos
From laminated chipboard or plywood
Thanks to the drawers, the bed turns into a storage system
When assembling a bed from laminated chipboard, you need to take into account the peculiarity of the material: the sheets are difficult to cut and sand at home. Therefore, the easiest way is to order the necessary parts in a carpentry workshop and work with them in the future.
For a single bed with functional drawers, you only need 1 sheet of laminated chipboard. It is cut into 17 parts of given sizes, from which the frame, supports of the bed itself and drawers are then assembled.
When working with slabs, the same tools are used as with wood . Additionally, you will need European confirmed screws and plugs for them, plastic rollers and handles.
The assembly procedure is as follows:
- Drawers are assembled from finished parts, connecting to each other with confirmations. Experts advise using a drill with a special confirmatory drill. Plastic or polymer rollers are glued to the bottom for movement, and a handle is screwed to the side panel
- In the same way, the lower bed frame is assembled from 3 parts - one side remains open - there will be drawers. 4 plastic legs are nailed to the corners
- The upper part - the decorative box - is made rectangular and installed so that it does not interfere with sliding the drawers
- Plywood slats are attached transversely to the frame at a distance of 10 cm from each other. For fastening, use self-tapping screws 3 cm long
- Place a mattress on the base and roll the boxes inside
A single bed does not require an additional crossbar, but when making double furniture this element is provided.
The round shape of the bed suggests a frame of non-standard shape
If the choice is made in favor of a round-shaped bed and mattress, then a sheet of plywood is used for the work - it is stronger than laminated chipboard and easier to cut. In this case, the frame is attached crosswise, and wooden beams are attached to the sides of the cross. The front part of such furniture is decorated with hardboard.
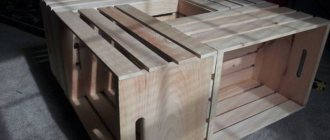
From pallets
Assembling a bed from pallets is the simplest and most inexpensive option for arranging a bed
The easiest way to make a piece of furniture with your own hands quickly and without high costs is to use wooden pallets. For each bed you will need 2 structures (with legs) or 4 elements (without legs).
The pallets are sanded, coated with primer, painted with acrylic paint in 2-3 layers, and varnished. The workpieces are connected to each other with self-tapping screws, the first layer to the second - with metal plates. A headboard is made from the remains, a mattress is placed on the frame and the bed is used for its intended purpose.
Bed 180x200 cm in rustic style
ReginaPiterFORUMHOUSE participant
I want to share the idea of a bed; my husband was inspired to make it with his own hands, from materials that are available at the nearest hardware store. There was nothing else in the store, except for an ordinary board (dry). My husband outlined his idea, and I tried to recreate it in the designer. We agreed on this option.
The frame was assembled from 40 mm boards - two pieces were used for the sides and legs, and three pieces were used for the headboard, a prefabricated central beam (from bars), two sawn steps 900x300 mm were used as legs. The mattress panel is made of thirteen wooden slats (board 100×20 mm). The headboard and frame elements were connected by complete cutting. The balusters in the corners were purchased, there weren’t many identical ones, so we made do with different ones.
Various metal fasteners were also used - corners, bolts, plates, self-tapping screws (for lamellas).
After a trial assembly, the structure was disassembled, coated with alkyd glaze varnish, sanded with fine sandpaper and coated again with colorless varnish. And to make it easier to move, pieces of carpet were glued under the legs.
Surprisingly, the forum member’s husband did all the work without power tools; all he needed was a garden hacksaw, a chisel, hand sanding and a file.
An impressive result with such initial results.
To the statement that it is easier to order furniture, ReginaPiter responds as follows.
Of course, it’s easier when it’s not affected by the crisis and there are financial opportunities. But there is another reason - the pleasure of the work and the result and pride in my beloved spouse, who until that moment had not held a hammer in his hands.
By the way, the bed became a catalyst, and now the house has a homemade insulated entrance door, a table, and the couple are not going to stop there.
Making a wardrobe bed
Drawing for making a wardrobe-bed
When assembling a structure that serves as a closet during the day and a sleeping place at night, the following nuances are taken into account:
- It is recommended to use an old finished frame without longitudinal crossbars and slats.
- The corners of the frame base are attached to a vertical surface (concrete or brick wall)
- 2 lifting mechanisms and 2 gas springs are attached to the sides of the structure
- The bed frame, made using wood or chipboard technology, is firmly bolted to the lifts
- It is important to correctly adjust the mechanism so that the berth rises and falls without distortions and jumps, and gently fits into the grooves of the frame
- Additional shelves and narrow cabinets are installed on the sides of the cabinet body. It is recommended to use this design not as a main bed, but as a guest bed.
A homemade bed is an unusual interior and design solution that emphasizes the individuality and creative inclinations of the homeowners. Having drawings and minimal carpentry skills, making bedroom furniture is simple and much more profitable than buying it.
A sleeping place created with your own hands according to the given recommendations will be reliable and durable, providing comfortable sleep and rest.
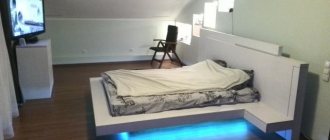
Wardrobe-bed with a lifting mechanism in the interior
Drawing up a drawing
Before you start creating a bed with a lifting mechanism with your own hands, you need to make a drawing. The project must contain the exact dimensions of all parts, dimensions of the future product, and a list of selected materials and mechanisms. It is important to think through all these nuances in advance. If you do not have such experience, you can find ready-made drawings with already calculated dimensions on thematic resources.
Options for large bed sizes, their main pros and cons
Any of them consists of several points. The first indicates general design parameters, as well as information about the selected materials. The second contains all the information regarding the assembly of specific elements. The third determines the order of actions. The work should be divided into points to simplify it as much as possible. The output will be not just a drawing, but also a ready-made plan with a detailed description of all actions.