From paper
The simplest option is to create an aircraft out of paper. An ordinary piece of paper from a school notebook is enough for him. If there is a desire to develop a more complex model, then use colored paper, cardboard, or matchboxes.
Your son will definitely like this paper airplane craft; it will make him feel like a young designer or pilot.
Preparing material for work
To create crafts, sticks must first be prepared for work. You should soak them in a container of water in advance - this will take 12 hours or longer, depending on the thickness of the material. In order not to wait so much time and speed up the processing process, you can fill the workpieces not with cold water, but with boiling water - just boil them for half an hour.
After treatment, wooden sticks are not only cleaned, but also become more flexible and easy to use.
Do-it-yourself foam crafts - features of work, master classes, photo examples
Simple DIY crafts - instructions for creating products from paper, cardboard, pine cones, fabric, bottles
From cardboard
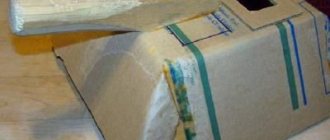
After purchasing household appliances, the packaging remains. Don't throw it away right away. It will be an excellent material for making a cardboard airplane. The size of the product depends on the size of the box. The child can help cut out the necessary parts and participate in the process of connecting them.
A parallelepiped is made from cardboard. Such a narrow box will become the basis of the aircraft. You will need to cut out the portholes and doors with a utility knife.
A narrow strip is also made from cardboard. It needs to be divided into four parts. The two middle elements connect
Cuts are made in the back of the plane where the tail is inserted. The cardboard wings are attached to the base with tape; you should also make a propeller.
Do-it-yourself fairy-tale house made of self-hardening mass
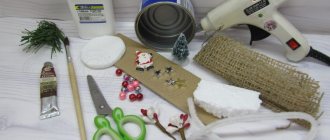
Make the main material yourself. To make a self-hardening mass, take:
- napkins or toilet paper - 20 g;
- flour - 50 g;
- PVA glue - 75 g;
- starch - 50 g;
- olive, baby oil or Fairy oil - 20 g;
- dry gypsum putty - 125 g.
To make this glue, take napkins or paper and tear them up, placing them in a tray. Then pour hot water. All this will soften, then squeeze the paper to remove excess water. Now you need to pour the glue here, stir it with your hands to get a homogeneous mass.
Now you need to measure out 125 g of dry putty and pour it into adhesive paper.
Since plaster dries out the skin of your hands, wear gloves when you make a fairy house this way.
Now add flour to the mixture and mix again. Next comes baby or olive oil. The last ingredient is starch, add it.
Place this mixture in a bag and store it there. You can also place it in a container with a lid.
Here's how to make a self-hardening paste. Now look at what you need to make a fairytale house:
- glass jar with screw cap;
- foil;
- self-hardening mass;
- hot glue gun;
- wire;
- watercolor paints;
- white acrylic paint;
- tassels;
- modeling tools;
- spray varnish.
Unwinding pieces of the desired size from the foil, roll them up, make several flagella and several blanks similar to flat cakes.
Glue thicker flagella to the bottom of the jar, and use thin ones to make the outline of a window and door. And two blanks in the form of flat cakes will turn into two steps to the house. Place foil on the lid in the form of a triangular piece.
Look where the pipe will be located. Place a slightly twisted wire here and wrap it with foil.
Now you can add foil volume to some places in the house, if required.
It's time to take out the self-hardening mass and put it on foil. Use this spatula for this.
Wet your fingers in water and smooth the surface of the self-hardening mass. While it is still wet, use modeling tools to add texture to the piece. Then the walls will look like stone.
To make the surface even more prominent, walk over it with a toothbrush. Its bristles will add graininess.
To make the bottom of the house have a grassy heap, add pieces of clay here and create the texture with a metal tool.
To further make a fairy-tale house, you need to cover the foil in the window area with this mixture. Now you need to leave the workpiece to dry overnight, and in the morning you can continue creating. Dip the brush into the water, wet the window, and apply the mixture here. Using a metal tool, make dotted lines to cut out the window.
And with a silicone stack you will make stripes on it. Then apply thinner lines so that this part of the house looks like wood.
Make a stump out of a piece of foil, cover it with mass and with a metal spatula, also apply patterns on it so that it is clear what it is.
Add touches to the window by cutting out the excess. Make a window sill like a wooden one by marking lines on it with a metal spatula.
Now let the house dry, at which time you can decorate the roof. To do this, you need to stick clay on the sides of the lid and make stripes with a stationery knife or a thick needle.
Now attach this roof in place and add a little self-hardening mass here, leveling it with wet hands. Apply a little clay to the pipe as well. Make a semblance of masonry with a metal tool.
At this stage, you can fashion several bricks and attach them to the door and walls. If you want, cut out several circles; to do this, place the reverse tip of the brush against the selected side and twist it.
Attach a clay fungus here too.
You can rest until the house is completely dry. Then mix purple and blue paint with a little black. Paint the stonework with these tones.
Paint the rubble with green paint. For the door, use brown with a little green. Blur these tones with a wet brush to create smooth color transitions.
And to cover the walls, use pink, yellow, beige, orange.
Color the fly agaric cap red.
Let the paint dry. After this, you need to take white acrylic, slightly moisten the tip of the brush with it and walk over the protruding parts. All that remains is to apply white spots on the fly agaric caps and window sills.
This is such a wonderful fairy-tale house. You can do not one, but two or even more. Then it will be even more interesting for the child to play.
Another interesting structure can be made from waste materials. But some others will have to be purchased, but you will not spend more than $3 for this.
Made of plastic
Bottles are an affordable material that is always available in the house. You will need three more covers, one for the nose of the car and two for the chassis. Crafting an airplane from a bottle will delight a boy. This original product can be presented to grandfather or father for any occasion.
A plastic vessel is covered with newspaper using PVA glue. Cut out wings, tail and propeller from cardboard. All of them are covered with paper. They need to be dried well.
A plastic tube from a ball is suitable for the chassis. The lids are attached to it with a glue gun. Then the wings and tail are connected to the base. Afterwards the craft needs to be decorated and varnished.
Fence made of branches for children's crafts
A fence made from twigs looks completely natural. Material collected from different types of trees or bushes is suitable. The rods can have different thicknesses and contain shoots or buds. To make Baba Yaga's hut, they often make a palisade made up of stakes of different heights that fit tightly together. Some of them are crooked in shape, but in this version this is what you need. A similar construction can be made for Leshy or any other inhabitant of the forest.
Such a fence made from twigs for crafts, as in the example above, looks very neat and is suitable for fencing a beautiful rural house in the shape of a log house, assembled from thicker tree branches. To make it, you need careful preliminary work: select all the branches of the same thickness, use a knife to plan each one separately from the bark and cut into pieces of the same size. You can make a fence of branches for garden crafts, which has longer posts. They are connected to each other by weaving wire with two horizontal jumpers. Use pliers and twist each turn tightly. It is more convenient to work both on top and on the bottom of the fence, so that the number of turns is the same and the fence looks even and not skewed in case of an error.
They strengthen the entire fence or individual posts at the base, depending on the material from which it is made. If it is polystyrene foam, then, having punched a hole in the right place, drop hot glue there and insert the post, holding it in a vertical position until it hardens. The branches are simply stuck into plasticine or clay, just like into a plaster solution.
Airplane made from clothespins
Little ones will love the simple model they can make with adults. A wooden clothespin, an ice cream stick, and glue are prepared for it. For the wings and tail section you will need cardboard.
The propeller must be inserted into a cotton swab and attached. Then the wings are attached to the structure. An ice cream stick is used for this. It can be replaced with a part cut out of cardboard.
Review of models from different manufacturers
Among the models presented on the domestic lighting equipment market, you can find wooden pendant chandeliers in the form of geometric shapes and an unusual abstract look, design developments and lamps put into mass production.
Here are some models of wooden lamps that can be purchased currently:
"VELANTE 588-706-03."
The Italian brand chandelier is produced in China, its technical characteristics:
| Number of lamps | Base type | Total permissible power, W | Height, mm | Diameter, mm | Materials used |
| 3 | E27 | 180 | 1120 | 380 | wood/metal |
The average cost of the model as of the second quarter of 2022 is 5000.0 rubles.
"Crystal Lux Sueno SP6".
The chandelier is manufactured in Spain, its technical characteristics:
| Number of lamps | Base type | Total permissible power, W | Height, mm | Diameter, mm | Materials used |
| 6 | E14 | 360 | 650 | 520 | wood/metal |
The average cost of the model as of the second quarter of 2022 is 21,000.0 rubles.
"Eurosvet Clark 70056/6".
The model is produced in Russia, its technical characteristics:
| Number of lamps | Base type | Total permissible power, W | Height, mm | Diameter, mm | Materials used |
| 6 | E27 | 240 | 260 | 610 | wood/metal |
The average cost of a lamp as of the second quarter of 2019 is 7,000.0 rubles.
"Alfa Pyramid 24533".
The model is produced in Poland, its technical characteristics:
| Number of lamps | Base type | Total permissible power, W | Height, mm | Diameter, mm | Materials used |
| 3 | GU10 | 150 | 1150 | 280 | wood/metal |
The average cost of a lamp as of the second quarter of 2019 is 7,000.0 rubles.
"Arte Lamp Villaggio A3400LM-8WH".
The chandelier is made in Italy, its technical characteristics:
| Number of lamps | Base type | Total permissible power, W | Height, mm | Diameter, mm | Materials used |
| 8 | E14 | 200 | 460 | 760 | wood/metal |
The average cost of the model as of the second quarter of 2022 is 14,000.0 rubles.
From popsicle sticks
For the model you will need cardboard. You should prepare three wide and three small ice cream sticks. You also need glue for the craft. Five elements are connected together, then two wide sticks are attached to the base.
The propeller is cut out of cardboard. A black bead is glued to it. All that remains is to decorate the aircraft, and it can be used in games. Children will help decorate the model by drawing portholes, doors, and making inscriptions.
Toys
Why buy expensive games or dolls in stores. Homemade characters become beloved friends and gain character.
You can build a miniature puppet theater. We draw an eye and a mouth at the tip, a fringe of cotton wool on top, a scarf made of rags, and the hero of your favorite fairy tale comes to life
The big advantage of such “actors” is their low cost, and therefore it doesn’t matter if your son or daughter takes them for a walk or to a children’s group. Lost - let's draw a new one!
It's easy to create an army of planes. Additionally, you will need clothespins. We glue the wings. Like a hang glider, we can color the tail to your taste.
Made of wood
A plywood craft can be created independently by a 12-year-old teenager. If the child is still small, then adult help is required to assemble the model. The wooden airplane craft is made using a jigsaw. You will also need sandpaper.
You need to print the template on paper, and then attach it to the material and circle it. Jigsaws cut out all the elements, then assemble the apparatus. All that remains is to decorate it by drawing patterns.
Chandeliers depending on age
Taking into account the age of the child is no less important when choosing a chandelier. Those products that a preschooler will like will not interest a teenager at all. Here are the basic recommendations for choosing chandeliers:
- For infants, they usually purchase lamps in muted tones - blue, beige, greenish and others that will not distract the baby from sleep. There are chandeliers with the ability to switch different effects - the night sky, changing the color of the light flux (for children closer to one year). This will serve as an additional incentive for development.
- For a boy aged 1-7 years, brightness and catchiness of details are important. The chandelier can resemble a toy; it should arouse interest in the baby.
- For a schoolchild or teenager, chandeliers are chosen based on the opinion of the child himself. It is possible to switch to adult options and such style solutions as classic, loft, hi-tech. In elementary school, a child is usually interested in certain thematic areas.
The correct light in a baby's room ensures the health of his eyes and excellent health. Therefore, you should carefully read the information, choose the right design and study lighting standards in order to buy the ideal chandelier for a boy’s bedroom.
Chandelier for the nursery
A children's room is a small world that is not intended for adult problems. There is a special atmosphere of comfort, wonderful carefreeness and fun here. And light plays an important role in creating this atmosphere. To choose the right chandelier for a nursery, you need to consider a few simple rules.
First of all, you should pay attention to its safety and practicality. It is necessary to refrain from buying a chandelier with elements made of crystal or thin glass, because if a child decides to test its strength, the fragments may cause injury to him
In this regard, the lampshade must be made of safe materials such as plastic or textiles. Designers also recommend hanging ceiling chandeliers in the nursery.
As for colors, the choice is up to you and your child. Some people prefer lamps with frosted lampshades that create soft diffused light. And some people like chandeliers with bright images of cartoon characters, spaceships or princesses.
Made from plasticine
For this craft you will need green or blue material. Knead the plasticine well and roll it into an element resembling a carrot. This will be the base of the liner. Make a small ball from the blue material and give it an oval shape. It is mounted at the front of the aircraft.
The remaining green or blue plasticine is used for the wings of the aircraft and the tail. Craft airplanes for children are made in different sizes and colors. Kids are happy to take part in this process.
Paper airplane using origami technique in 5 minutes
For the smallest fidgets, there are, of course, simpler instructions, such souvenirs turn out just as good and they fly very well too, depending on how you launch, you may not even be able to catch up; they will fly wow 100 meters, you’ll be exhausted looking for them later).
The most important thing is that you need to make the two sides the same in a mirror image so that they turn out even and then everything will definitely work out.
On one of the forums I spotted a craft called Piranha, and does it look like it’s true? The author also chose red as the color. See how cleverly you can roll up such a miracle. No special skills are required. The most primitive option with a simple model.
It turned out to be a cool thing, my boys really liked it).
By the way, you can get a little creative and give dad a little surprise.
In general, make a craft with your child so that there is something to do with your beloved family, because such work brings you very close together.
From candy
You can make a sweet gift for a man or boy. For this you will need a cardboard box. You also need to buy your sweet tooth’s favorite candies from the store. Such a surprise will only cause positive emotions.
You must first read the instructions on how to make a craft airplane out of sweets. A step-by-step master class will allow you to quickly get the job done. The model can be made on a stand or supplemented with other elements.
Focus stick
Every real magician must have his own magic wand. How to make a magic wand:
A trick with a scarf appearing - you can make a special stick so that there is an elastic band at its end in a special cap.
The trick is as follows: the magician secures a scarf with an elastic band in advance and hides it in his sleeve. The elastic band should be matched to the color of the stick or suit, and with a wave it must be released so that the scarf pops out of the sleeve.
Flying wand - to make you need approximately 50 cm of invisible thread and cardboard. The lighter the material from which the wand is rolled, the easier it will be to repeat the well-known trick. The thread is attached in the middle of the stick, in which you need to make a through hole in advance.
Adviсe:
- The length of the stick should not exceed 60 cm.
- The hands must be constantly in motion so that the viewer does not see the thread.
Such a wand can become a good prop for every wizard. The most important thing is to teach your child popular tricks.
War plane
All the boys love military equipment and enjoy watching aircraft. You can make a military aircraft craft yourself. To do this, choose any material that is available in the house and get to work. It is better to download ready-made templates to accurately reproduce the model.
You need to carefully work out all the details and carefully decorate the car. For military equipment, choose green or gray. Using a marker, they draw patterns on the product and make inscriptions.
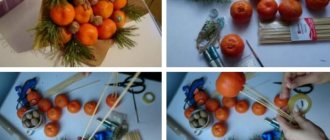
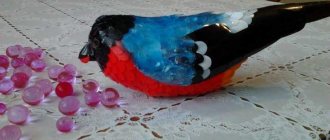
Original corn plant
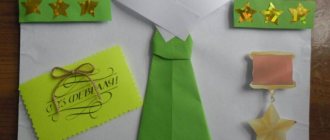
Your child will definitely like this model, especially if you have a boy. This craft resembles the shape of a real corn plant. You need to purchase red colored paper, green double-sided cardboard, an empty matchbox, sharp scissors, a pencil, and glue.
Let's start creating:
- Cover a box of matches with a sheet of paper and cut out a cardboard strip 3 centimeters wide. Exactly half of this length will be the body of your corn truck. We bend the strip in half and glue it to the box.
- From cardboard we cut out both wings in the form of two strips, slightly rounded at the edges. We glue them to the box parallel to each other at the top and bottom. Cut out a rectangle from green cardboard and seal the side of the box, masking it completely.
- Now we cut out parts of the tail, they should also be rounded. Then we cut out the strip and fold it as shown in the photo.
- We glue all the parts to the tail section, and we can start decorating. Glue two red stars cut out of colored paper onto the wings on both sides. You can draw or glue a small imitation propeller on the front. The video below shows how to make such a paper airplane with your own hands.
- Your child will be delighted with such an airplane! This could be a great idea for a gift or for a craft competition.
Airplane for young pilots
Kids will love to become airplane pilots. For a large model, you will need a cardboard box from household appliances. It’s better to use a video of making a craft airplane so as not to confuse anything.
A parallelepiped is made from cardboard; holes must be made in it for the tail. Cardboard elements will be inserted into it. You also need to attach the wings and propeller.
The structure must be large enough to accommodate a child. Children will enjoy playing with the plane, imagining themselves as pilots.
Cool plane that flies for a long time: folding diagram
The pictures below will help you make an airplane that flies several hundred meters. Follow the instructions carefully and fold the piece of paper using a ruler; the folds will be straight. You can draw some lines with a regular pencil.
Let's start folding the plane:
- Fold the paper in half across the sheet.
- Then fold the sheet in half lengthwise.
- We bend the right corner as follows.
We bend the left corner in the same way.
Next, both corners need to be folded again and ironed.
Opening up the corners.
We wrap them inside and iron them.
We bring the lower parts of the corners up.
Fold the corners inward along the fold line.
- Turn the workpiece over and do the same on the other side.
- Fold the corners on the reverse side to form an isosceles triangle.
Fold the triangle in half.
We turn the workpiece over and use a pencil to mark a line at a distance of 2.5 centimeters from the base.
We bend one wing and iron it thoroughly.
We repeat the same procedure with the second wing.
Draw another line on the wings.
Fold the corners up.
To make the fighter fly as far as possible, you can make small flaps.
You can learn about another way to fold a long-flying airplane by watching the video.
Photo crafts airplane
https://www.youtube.com/watch?v=Xayeuqc50So
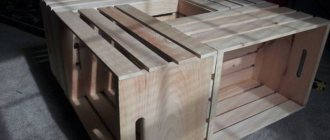
Casket
You can make an original box for little things and secrets. To do this you will need 29 wooden pieces, paint, cardboard, glue, satin ribbon and scissors.
Stages of creating a box:
- Paint the details. Using templates, cut out the sides of the chest and the lid from cardboard. The sides should be rectangular, and the lids should be semicircular.
- Place 7 pieces on the table. Attach cardboard rectangles to them perpendicularly.
- Form the long sides from 6 parts.
- Connect two semicircles with the remaining sticks.
- Trim the edges of the chest with satin ribbons. Glue two tapes to the lid and to the base. They will replace loops and fasteners.
A small but original souvenir is ready.
Handbags
An exclusive wooden handbag made of ice cream sticks will definitely not leave its owner unnoticed. With your imagination, you can build an accessory of any shape and size, and borrow the handles from an old bag. The main thing is not to get caught in the rain with such a handbag.
- Wooden clothespin.
- 2 shaped ice cream sticks.
- Several small straight ice cream sticks.
- Hot glue.
- Hot glue gun.
- Small magnet.
- Spray paint in 2 colors (you can also use acrylic), in our case the main color is.
- Brush.
- A sharp stationery or pocket knife.
- Toothpick or bamboo skewer.
Toy furniture
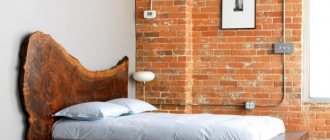
Bed
Do-it-yourself toy furniture will delight kids not only with the result, but also with the manufacturing process. With just two dozen popsicle sticks you can easily make a baby doll bed. This craft will not take much time and will easily fit into a doll’s interior.
Easel
Popsicle sticks can be used to make a mini easel for photographs. To make it you need 9 sticks of the same size, one even stick and a toothpick. Each easel leg consists of three glued sticks, they are fastened together with a toothpick; the role of a stand is played by a stick attached across.
Desk
Making it will require a lot of effort, and in addition to sticks and glue, you will need cardboard for flexibility and stability. If you add a bouquet and congratulations to the finished craft, you will get an excellent souvenir for a first grader.
Bench
To make a mini-bench, you should take cardboard blanks as a basis, fasten them together and cover them with wooden sticks. Then the bench can be painted and varnished.
Bird feeders
One of the easiest options for making a bird feeder is using popsicle sticks. For the bottom you need to take 10-12 sticks and fasten them together, gluing two sticks to the edges of the structure. For the walls, you need to lay out the sticks in the shape of a square in several rows. All that remains is to secure the rope and hang it on the tree.
Stands for pens and pencils
1 option
For the base you need a jar, preferably a tall coffee jar, so that the sticks are slightly higher than the container.
Read here: How to make money on Instagram?
We put two rubber bands on the jar. Then we insert 1 stick under the elastic bands, glue them vertically, closing the jar. Leave until dry.
A well-dried piece can be painted with acrylic paints, an applique can be glued on, and decorated in any way. Let the child choose his own style of performance.
Option 2
Master class on making crafts from sticks:
We fold five sticks vertically and glue them to the transverse sticks on the inside at the top and bottom.
You can paint it with acrylic paints in a single color or make it in repeating stripes.
Decorate the outside with decorations. For example, 4 sticks glued on top of each other in the shape of a flower can be painted in a contrasting color. If you try, you can create a bee, etc.
The coasters are ready!
- Bathroom tiles. What is it like?
- Angorka. What it is?
- Flowers as gifts.