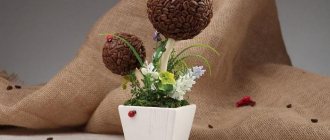
Chestnut topiary is such an original and interesting craft that it can be used to decorate any room. Making it is a fun and creative process that all family members can take part in. It is better to plan this event in the fall, when the ground is strewn with fallen fruits. Before you make a topiary, you need to carefully consider its design. You don’t have to limit yourself to chestnuts alone. You can make topiary using a wide variety of natural and artificial materials. You are offered a master class on making crafts from scrap materials with your own hands.
Chestnut topiary is such an original and interesting craft that it can be used to decorate any room
Tools and materials
Before making topiary from chestnuts, it makes sense to draw up a sketch of the future product. This will allow you to choose the most optimal option. In addition, thoughtful planning involves preparing the necessary art supplies.
To make topiary from chestnuts with your own hands you will need:
- glue gun;
- chestnuts of various sizes and configurations;
- acorns;
- roasted coffee beans;
- scissors;
- material for creating the base of topiary;
- thick wire;
- strong branch;
- pot or vase for stand;
- plaster or putty;
- strong thread of any color;
- bronze or golden paint;
- cord or braid for finishing the barrel.
Preparing chestnuts for work
Before you start making such a decorative tree, you need to know that after harvesting, chestnuts should lie in a cool place for 2 - 3 weeks. This is necessary so that the collected material deteriorates as slowly as possible; after all, chestnuts do not last forever. Their shape should be flattened on both sides, so the chestnuts will not puff up and will lie more evenly on the surface of the base. In order to create a beautiful tree the first time, you need to study in detail our master class on do-it-yourself chestnut topiary, offered below.
Making a topiary base
The ball with attached fruits is the main part of the product. It should not only be beautiful, but also light so that the souvenir does not turn over due to a shift in the center of gravity. Don't limit your imagination solely to the ball. The base can be made in the shape of an ellipse, prism or heart. This topiary will look unusual and original.
We also recommend reading:
Event decoration: how a holiday is created. What color should the outside of the house be painted? 3D floors: modern technologies, recommendations from designers, photos of finished interiors Beautiful decoration for a beautiful celebration: we decorate the wedding hall with our own hands
The home crafts master class involves using the following material to create the base:
- Old newspapers. Despite its fairly large volume, the paper has little weight. Newspapers are moistened with a glue solution and rolled into a ball. Its shape is fixed with threads. You can use the base within a day.
- Styrofoam. First, a cube is glued together from several fragments. After this, the workpiece is given the desired shape. Final finishing is done with a rasp and sandpaper.
- Children's ball. You need to choose a dense product made of hard plastic, since the rubber ball will simply deflate and become deformed after making a hole in it. You can strengthen the rubber ball by wrapping it with threads soaked in epoxy glue.
In all cases, the created base should be painted so that its color is not visible through the fruit. Bronze paint is perfect for this, against which chestnuts, acorns and other decorative elements will look great.
Tree of Happiness “Birdsong” - photo presentation
See all the photos of topiaries from Alena Tikhonova in the general selection!
Did you like the master class on topiary made from natural materials: chestnuts, acorns, halves of nuts and plums? Subscribe to our newsletter and leave comments!
Creating a topiary trunk
Before making a topiary, you need to prepare several blanks for making the trunk. During the work, you can decide which of them is better suited for creating a harmonious and spectacular souvenir.
The barrel can be made from the following materials:
- Bamboo sticks tied together. Such a trunk will look original. Strength will be at the proper level. To prevent the sticks from getting dirty, it is advisable to coat them with varnish.
- Tree branch. It is better to use oak, larch or cedar. The wood of these species is characterized by high strength, moisture resistance and durability. Cracks will not form on the branch due to changes in air humidity.
- Thick aluminum or copper wire. It can be given the most intricate shape. After this, the barrel is wrapped with a rope or braid soaked in glue.
You can decorate the trunk with artificial leaves, toys and beads.
Cones
This material is very often used to make beautiful topiary. As a rule, there are no problems with cones. They can be found in the forest or in a city park. Nowadays, coniferous trees are used almost everywhere in landscaping. If there are no such natural areas in your locality, you can purchase pine cones on the Internet.
To use this material for crafts, you first need to prepare it. The collected cones should be washed. They can close from water. Next, they need to be dried on the battery. Some people place the buds in the oven for 10 minutes at temperatures up to 350°C.
After drying, you should shake out the seeds and small debris that may be between the scales. For topiary, it is advisable to select cones of the same size. Pine, spruce, and cedar are suitable. The main thing is that they are without visible damage.
Making a topiary stand
Topiary made from real chestnuts implies the presence of a stable stand that will be in harmony with the trunk and base. You can use any kitchen utensil, baby bucket, wooden box or flower pot as a stand. To give it stability, you need to pour heavy objects into it. For this, granite crushed stone or old unnecessary nuts are used. A gypsum solution or mixed putty is poured over the weighting material. When the filler begins to set, the barrel is lowered into it. After it has completely hardened, you can continue working. Plaster needs finishing. For this, any available material is used.
Making the base of the topiary
The work begins with placing the ball on the barrel. This activity must be carried out very carefully so as not to damage the lining of the base and the finish of the barrel. In order for the ball to hold firmly and reliably, it must be fixed with glue. This way the finished product will gain integrity.
Topiary made from real chestnuts implies the presence of a stable stand that will be in harmony with the trunk and base
Once the base is firmly glued to the trunk, you can begin decorating it. It is better to start this procedure from the top of the ball, gluing the chestnuts in rows. It is better to use flattened fruits of approximately the same size. Using a glue gun, you need to fix the chestnuts on a base with colorless silicone. It hardens in a matter of seconds, so this stage is completed quickly and without any special complications.
After the ball is covered with chestnuts, the openings between them are filled. For this, tea, coffee beans or small acorns are used. The finished product is varnished.
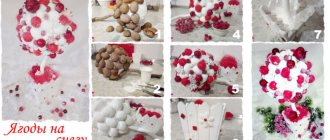
Step-by-step master class with photos - topiary from acorns, nuts and chestnuts
Stage I. Making the ball, painting and preparing the decor
The ball for topiary from chestnuts “Birdsong” is made from padding polyester and knitting threads. We paint the trunk, decorative ladder and 5 halves of the walnut with bronze, and lightly dust the pot with a semi-dry sponge.
The trunk does not need to be sanded: the texture of the wood under the bronze looks impressive.
In addition, we select 18-20 whole caps of acorns and glue beads into them.
Stage II. Crown decor
Cover the entire surface of the ball with dried chestnuts and insert bronze nuts. Between the chestnuts we glue acorns and hats with beads, as well as empty pluses.
To protect topiary made from natural material from damage by insects, lightly treat the finished tree with any hairspray.
Stage III. Pouring and filling the pot
Mix gypsum or alabaster directly in the pot: the solution must be thick to hold the trunk of the chestnut topiary. This volume of plaster dries in 2-3 hours, but we recommend leaving it overnight so that the moisture evaporates completely. All the secrets of filling and attaching topiary.
We glue pre-prepared sisal balls onto the dried plaster, and decorate the pot with white lace and satin ribbon. At the base of the tree of happiness we place a sisal nest with two doves, pearls and an acorn cap with a bead. We attach a ladder to the trunk, fix it at the top and bottom with glue.
Stage IV. Finishing decor
We wrap the crown of the chestnut topiary with a metal chain, gluing it at several points. We make miniature bows from satin ribbon and also glue them in a chaotic manner on the surface of the tree. We glue sugar berries onto the bows, and distribute 7-10 decorative doves along the crown.
On one side of the topiary we place a sweet couple of doves in a nest made of sisal with white stamens.