Necessary materials
To create a children's toy, you must use only safe materials. For children under 5 years old, it is better to choose whole natural fabrics, without lint or added synthetics. It is also recommended to do without accessories in the form of buttons, glitter, etc. If a toy is being made for an older child, then the imagination is limitless, as is the choice of material.
Fabrics for soft toys
Knitwear is ideal for sewing toys for little ones. This is an elastic and practical material, from which it is very easy to make a toy, and it is safe. It is easy to wash and does not lose its shape, does not require additional processing, and thanks to the variety of colors, the toy will turn out to be very impressive.
Another fabric that is often used for tailoring is silk . This is a capricious material; working with it will require patience and accuracy. But products made from silk are very beautiful and durable. It is also used for decoration, but can also be used as a whole fabric. Requires delicate washing and gentle drying.
And the most popular material for sewing soft toys for little ones is cotton fabric.
It is very diverse, inexpensive and used everywhere. It is very easy to work with, has increased durability and strength, moreover, it is safe, and stains and dirt are removed quickly.
For older children, you can use other fabrics, such as faux fur or wool; this is an ideal option for sewing bears; it will give the toy a realistic look, and if handled with care, it will last a long time. Other fabrics are also suitable, for example, velvet, velor, felt.
Other materials
To make a soft toy with your own hands, you will need not only fabric, you must have other materials, such as:
- Pattern and template from which the toy parts will be created;
- Soft filler, you can use cotton wool, but it is recommended to take pieces of foam rubber, it will help maintain its shape longer;
- Threads and needle, scissors;
- Thick paper;
- If decor is planned (when making toys for children over 5 years old), then you can use buttons, sparkles, and ribbons.
Teddy bear made of roses
Nowadays, when you don’t know how to surprise a child on his birthday because of the abundance of toys in stores, an unusual gift would be a bear made of roses with your own hands.
Such gifts are given not only to children, but also to beloved ladies on Valentine's Day. If you provide the figurine with a wish in the form of a heart inserted into the hands of the bear, then your beloved’s delight will know no bounds.
Women will be happy with such a gift on their birthday.
You can make the basis for the floral bear the one you like. It could be a sitting bear, or it could be a full-length figure. For the base, you need to take a thick sponge into which you will stick skewers of equal length with roses at the end.
Important nuances
To sew a soft toy, you need to accurately make a fabric pattern using a template. This is an exact copy of the details of the future product, depicted on paper, which is then transferred to the material. Each toy has its own set of templates, but you can also draw it yourself. Then you should cut them out and attach them to the fabric using tailor's needles.
Before making a toy, you should wet the selected fabric and dry it. This will help check whether it will shrink during the first wash and whether the toy will lose its shape. If this happens, it is recommended to wash the material before sewing, dry it and only then start working.
Teddy bear made of fabric
Bear cubs, as a rule, we are used to seeing shaggy, so a do-it-yourself bear made of fabric should contain lint. Plush, fleece, velvet, faux fur, these are the fabrics that are most suitable for creating the image of a bear.
True, the purpose of the craft must also be taken into account. If this is a case for a mobile phone, then it is better that the bear is made of suede, artificial leather, or imitation leather.
The bear pillow should be made of a soft, but not fluffy material, so that it is pleasant to rest on your face.
Bear toy pattern
Making a soft teddy bear toy is quite simple and easy to do yourself. For
it is enough to use any popular pattern.
Some tips on how to choose it:
- All patterns can be divided into simple (with a minimum number of details) and complex (where additional design is required in the form of accessories and decor, such as dresses, ribbons, seam processing).
- Beginners should start with easier ones, these include: a Barney bear (or a simple bear made of fabric), a sock bear, a Tilda-style bear.
- Other popular but difficult patterns for sewing are: Teddy bear, ballerina bear, polar bear, mother bear with babies.
Schemes for making crafts
Without a diagram for creating a bear, it is difficult to navigate the process of making a craft. In addition to the general appearance of the finished product, the diagrams provide templates for all the parts from which the bear is created.
Note!
Do-it-yourself dove: TOP-150 photos of non-standard crafts made from scrap materials. Step-by-Step Instructions for Making a Dove for Kids
- Felt mouse: 160 best photos of DIY felt mouse crafts + simple and quick instructions for beginners
Do-it-yourself bullfinch: TOP-140 photos of exclusive options for crafts from scrap materials + simple instructions for children
All templates are provided with size indicators. By leaving seam allowances, you can conveniently and economically cut out all the details using the pattern.
The sewing technology is the same as for all products.
The process of connecting all the parts into a single composition (after the parts are filled with filler) is also indicated in the diagram. This can be a rigid fastening, in the form of stitching together parts. You can connect the part on hinges, then all parts of the body will move.
Master classes on making soft toys
Teddy bear made of fabric
One of the simplest patterns is a Barney bear, transferred directly onto the fabric, without using templates.
How to make a soft toy with your own hands without a template:
- Take a small piece of fabric and fold it in half exactly in the middle with the right side facing inward;
- Using a pencil, draw several rounded lines;
- You should start with the head - describe a small semicircle, then the ear, a rounded cheek, a slightly elongated paw, a slightly rounded belly and one elongated leg;
- Cut strictly along the contour;
- Expand the material - the bear pattern without using a template is ready;
- Repeat all the manipulations exactly, thus preparing its back part;
- Sew the two halves together from the wrong side;
- Leave a small gap, turn the product inside out and fill it with filler.
There are other interesting patterns for a soft bear toy.
Felt bear
To make a felt toy you will need:
- multi-colored felt;
- floss threads;
- pattern paper;
- tracing paper;
- scissors and needles.
Performance:
- Select and transfer onto tracing paper a template for the parts of a felt bear; the scale must be respected and be 1:1. Also, everyone can show their imagination and draw parts of the bear’s body themselves.
- After the drawing has been transferred to tracing paper, it is transferred to thick paper, strictly observing the scale and every detail. Thus, the template is ready.
- Then all the component parts are cut out from a thick sheet and fixed to the fabric using tailor’s pins. Carefully trace with a simple pencil or chalk, remove the template and cut out - the pattern is ready. Advice! Perform all manipulations on the wrong side.
- Next, 2 identical parts are placed on top of each other and sewn together, leaving a small gap for the filler. They are turned right side out, the toy is evenly filled with foam rubber, cotton wool, synthetic padding (optional) and sewn up to the end with neat stitches.
- After all parts of the bear’s body are made, they are sewn together, and depending on the imagination, eyes, nose, and mouth are made.
One option for creating a face is to use buttons or sew on store-bought glitter. Many craftswomen embroider them from multi-colored floss threads using satin stitches. You can also cut out a nose, eyes and mouth from felt of a different color and sew them on with threads; for this, a chain stitch is most often used.
The final touch in making a felt bear is decorating the product. You can sew on several multi-colored ribbons, bows, sparkles and a very bright and beautiful toy is ready.
Teddy bear made from a sock
Making a soft bear from a sock is very simple.
You don’t need a pattern for this, just have the materials:
- new sock;
- filler;
- needle, thread;
- scissors;
- marker.
Work algorithm:
- turn the sock inside out, place the heel up;
- the head is the nose part, draw them with a marker;
- cut along the contour and sew;
- leave a small hole, fill the product with filler;
- shape the nose of the sock into a ball;
- distribute evenly and sew up to the end, tightening the edges with threads;
- a rounded head is obtained;
- then the heel and part of the toe to the elastic band are the torso and paws;
- the heel is the future hind legs, it must be cut strictly in half and formed into two limbs, sewn together, stuffed with filler;
- The front legs are made from elastic, simply cut out, stitched together and sewn to the body.
- then the ears are created, they can be made from the rest of the sock or take a new one.
- They can be made from elastic - just draw two semicircles and cut them out, stuff them with filler and simply sew them to the head.
- For decoration, you can use ribbons, buttons, sparkles, thus creating eyes, a mouth, and a nose.
- From another sock you can make a color for a bear; for this you need to cut out small round fragments and sew them on the paws, muzzle and even the stomach - thus getting an unusual color.
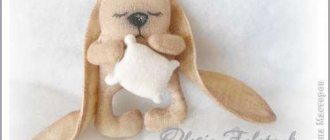
Teddy bear pillow
To create such a bear you will need cotton fabric, soft filling, a sewing machine, and scissors. To get a more realistic product, it is recommended to take weave of different colors.
The first step is to create a pattern; it should be large enough and round in shape. The head and ears are depicted, then they are cut out, the seam is sewn by machine, the product is turned inside out and stuffed with soft filling, and sewn up to the end. The material acts as decor; it will be comfortable to sleep on and so
This will create the effect of a bear's face.
Two round appliques are cut out of a dark color - these are the eyes. They are sewn to the pillow with hidden seams or sewn on by machine.
It is better to make the muzzle bright, any color of your choice, in the form of a large oval-shaped piece of fabric. A small round mouth is sewn to it.
For realism, you can sew on small front legs. They are made from the same color of fabric as the pillow itself and are attached to its lower part, having previously been stuffed with filler.
Bear in Tilda style
This bear cub is distinguished by its elongated body proportions and legs; it has recently gained a lot of fans. To make a bear in the Tilda style, you need to take fabric from bright cotton sprint, a template from which a pattern, scissors, threads, a needle will be created; ribbons and bows often act as decoration.
Transfer the template to the double folded fabric, leaving a small seam allowance. Sew together and turn right side out, then sew with a blind stitch.
The peculiarity of this soft toy is that the legs are attached to the body with buttons, this allows them to move, creating different positions of the bear’s body. The ears are sewn to the head, and the nose, eyes and mouth are created from threads, without using any decor. A mandatory decoration for a Tilda-style bear is ribbons or bows; you can also do original embroidery by hand.
Teddy bear
Making a soft Teddy bear toy with your own hands is a difficult task, so before starting work you should carefully study the algorithm.
How and where to start:
- Choice of material – this teddy bear is made of faux fur, the material should be short-pile. Also, to create this model, you need to stock up on thick cotton fabric for making the inside of the paws, the inside of the ears and the muzzle.
- The details of the pattern should be made in a mirror image in relation to each other, this will help to create the artificial pile to lie in one direction, which will create a realistic toy.
- The bear's limbs must have holes to create fastenings for their mobility.
Work algorithm:
- Transfer the patterns of parts onto pile fabric; they should be a mirror image;
- Cut them out, leave punctures for the paws to create fastenings;
- The ears and paws are made from two different materials, the outer side is made of pile, the inner side is made of cotton;
- Sew them together;
- Turn inside out and then stuff with filling;
- The next step is fastening;
- They are inserted into the space left in advance, these are cardboard disks with a hole with a mounted bolt (the body of the bear cub);
- A nut is also sewn into the limb and then stuffed with foam rubber;
- The fastenings in the limbs and torso are carefully sutured, making them invisible;
- Next, you should screw the limb to the body, this fastening gives the soft toy mobility;
- By analogy, perform this manipulation on all paws;
- After the body of the bear cub is ready, you should embroider the eyes, mouth, and nose with threads;
- Tie a bow or ribbon around your neck;
- Teddy bear is ready.
Teddy bear ballerina
To sew a ballerina bear, you need to take dense material, preferably short pile. For the heels, palms and inside of the ears, you need to choose a soft fabric, for example, silk, cotton.
Patterns need to be made according to templates; there will be a lot of details here, because... legs, palms, knees and shoulders are movable, they are sewn separately. In order for the pile to lie in one direction, all fragments of the bear are made in a mirror image and then sewn together. They are turned right side out, stuffed with foam rubber and sewn up with a hidden seam.
The ankles, legs, shoulders and palms of the toy are movable, this is achieved with the help of a button fastening. There are 2 design options: hidden (when stitches and buttons are sewn into the details from the wrong side) and external (they are sewn on the front side and look quite nice, only the color of the fabric and the color of the buttons must match).
The loop is made on the body, and the button is sewn on the paws. Next, the loop is made on the arm or leg, and the fastening is sewn on the palm or ankle. To decorate the face of a bear, ballerinas most often use beads or multi-colored sparkles. A ribbon is tied around the neck, and the same is attached to one ear.
A mandatory accessory for this toy is a ball tutu; it is created by hand and made of transparent bright fabric, for example, chiffon, veil, cambric.
The cut should be short, it should be tied onto a thread and distributed evenly to create beautiful voluminous waves. Pull the skirt at the bear's waist, sew it up with a hidden seam, you can also insert a narrow elastic band, this will make it possible to change the clothes of the ballerina bear.
Polar bear
In order to understand how to make a soft toy with your own hands, you will definitely need a bear pattern with the number of necessary parts.
This soft toy differs from all previous ones not only in color, but also in the fact that the bear stands on four legs. Therefore, tailoring a polar bear is different from the rest. The fabric should be chosen dense with a long, hard pile, the pattern should be made strictly according to the template, executing in a mirror image. Sew the fragments together and fill them with filler through a small hole.
In order for the toy to be stable, the paws must be filled very tightly.
In one version, the polar bear is performed in a stationary state, the limbs are sewn to the body, and in another, a hidden button fastening can be made.
Bear with babies
To make a soft toy of this type, there are many options for patterns; it could be a bear in a lying position, and several of her cubs around her. And also sitting with the offspring on your lap, or even standing. The difficulty of this composition is that you have to work with small details. The fabric can be varied, ranging from faux fur or regular cotton.
For sewing the family, movable fastenings are not used; all limbs are sewn tightly to the body. To create faces, buttons are selected from the mother; for babies, most often the mouth, nose and eyes are decorated with floss threads or glued with small sequins.
How to sew a bear with your own hands without a sewing machine
It is easier to make a bear from fabric than from fur. And the creation process takes less time. This toy is more suitable for babies or children who are allergic to fur.
What materials will you need?
To sew a fabric bear cub you need the following materials:
- Fleece, felt, cotton or velor.
- For stuffing: holofiber, padding polyester, padding polyester or cotton wool.
- Buttons or beads for eyes.
- Buttons for paws.
- Finished spout.
- Threads for sewing parts.
- Threads for mouth embroidery.
Fabrics for sewing a bear can be combined both in structure and color. Such a toy will look brighter and more attractive to the child.
Constructing a pattern
Print the finished bear pattern from the Internet onto paper and cut it out.
It consists of the following parts:
- head;
- torso;
- upper foot;
- lower leg;
- ear
Transferring to fabric and cutting elements
Fold the fabric in half, right side inward. Place the templates on it, securing them with pins. Trace each element with a disappearing marker or pencil. Transfer the head, torso, upper and lower paws onto the fabric in a mirror image. There should be 4 parts of the ears. When cutting, allowances for seams should be taken into account.
Important! If the edges of the material are fraying, it is better to cut out the elements with zigzag scissors or process the cuts with overcast stitches
Stitching the main parts and stuffing
Use a back stitch to fasten the body of the bear, connecting the two parts and leaving room for stuffing. Sew darts on both parts of the head and make a muzzle without touching the filling holes. Using a stick or pencil, turn inside out and fill the body and head; sew up the holes with a blind stitch.
How to sew and stuff paws
Connect the two parts of the upper legs and attach with a “back needle” seam. At the same time, do not cover the place for filling. The stitches should be small and similar to machine stitching.
Carefully turn out the paw and fill. Sew the hole closed with a blind stitch, leaving a long thread. The second upper leg, as well as the legs of the bear cub, are created and stuffed in the same way.
Attaching the ears
Sew two parts of one ear, leaving the bottom cut. Turn out and fill lightly. Perform the same steps with the second ear.
Fastening all the parts together
Connect the body and head of the toy so that the central seams match. Secure with safety pins and sew with a hidden stitch. Fold the bottom edges of the ears and attach them to the head with a hidden seam, masking the darts.
Pin the legs of the bear cub with pins along a horizontal line, then the arms. Thread the long end of the thread remaining on the foot after stuffing into the needle. Attach a button from the outside and sew the limb to the body with stitches passing through. Repeat these same steps with the other paw on the opposite side. In this way, attach all the bear's paws.
Photo 3. A small finished teddy bear, all the parts of which are securely fastened together.
Sewing on the eyes, shaping the nose and mouth
Mark the locations of the eyes with dots. Attach buttons or beads tightly. The finished nose can be glued with reliable glue or embroidered with thread along with the mouth.
What stitches should I use when sewing a soft toy?
Threads for sewing toys must be strong and must match the color of the product. The only exception is when a decorative loop stitch is made; it is used as a finishing stitch and not only sews the parts together, but also processes the edges of the fabric.
To create a soft toy with my own hands, I usually use the following types of seams:
- External - the internal fragments are sewn together with it, it should go in small stitches and look neat, there should be no gaps between them.
- Loop stitch - a thread is passed through a loop over the edge of the fabric and tightened, thus processing loose fabrics and sewing together the pattern pieces.
- Blind - the thread with a needle should be inserted into the fabric from the inside, having previously folded the edges of the material together. The stitches are made small, neat, you need to make sure that the needle and thread go exactly along the line, without going to the front side.
- Joining seam - this method is used to sew a button and some other accessories to a soft toy, as well as fragments, such as limbs, head, tail, etc. They are sewn with small stitches on the front side, threading the needle through the fabric.
Sewing tips
Since the bears are stuffed with sawdust and heavy granules, it is important to use strong threads. The easiest way to buy Russian LL70. Reinforced thread for denim, or thick threads from Maderia and Gutermann, are suitable.
Before stitching, it is recommended to attach the seams with a contrasting color thread and pins. To avoid bevels and displacements, the tip should enter the fabric at a right angle. To make it comfortable to work with thick material, the basting should be quite dense, so the stitches are made small.
Using a sewing machine is allowed, but may be inconvenient for small models and elements. Sometimes craftswomen combine methods, sewing straight parts with a machine, and curved and small parts by hand. The stitch length should not exceed 1.5 mm. The main seam should go strictly along the drawn contour line. To sew parts manually, use a back stitch with a needle; the finished stitch resembles a machine one. Afterwards the basting is removed.
The parts are sewn together, leaving a small hole for stuffing. If the design includes darts, it is better to start with them. To prevent the fabric from being damaged during the process of filling the elements and compacting the edges, additional processing is required. The seam allowance is folded to the wrong side and basted tightly with contrasting threads.
The direction in which the parts of the toy's head are sewn affects the accuracy of the fit. To prevent the cub's face from becoming deformed, the seams should be drawn from the tip of the nose to the back of the head. Since the muzzle is the most noticeable part, the wedge is done only by hand. The elements on the back of the lugs are usually more sloping and slightly larger. To help them straighten out better when turning them right side out, you can bring the seam to the base.
What is the best material to make the eyes and nose of a bear from?
Most often, buttons are used or sequins are glued, but sometimes floss threads can be used to decorate the face. To do this, you should master the embroidery method. The most common of them is satin stitch, the stitches are made even, tightly adjacent to each other. Cross stitch is also used, this is the easiest way.
For some toys, the appliqué method is used.
Here you need to cut out a small piece from a fabric of a different color and use a buttonhole stitch to sew on the pattern.
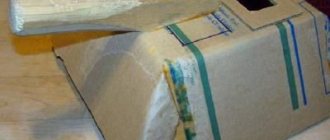
Paper bear
Cardboard is an excellent and safe material for crafts. A paper bear in the shape of an accordion is a wonderful toy for children. Making a bear is easy and simple, and the whole family will enjoy this craft. All you need is to buy cardboard. If you have suitable cardboard boxes, then you practically don’t need to buy anything.
The bear's body itself is an accordion made from long strips of cardboard. Having cut out two double legs, you need to connect them with glue to the body to get a bear standing on 4 legs.
The head with ears can be cut out of cardboard as a single element, or the ears can be cut out separately and attached to the head. Draw or color a face with felt-tip pens.
The final stage is connecting the head with the front paws. It feels like the bear has lowered its head.
This toy can decorate a child’s shelf or desk.
What to fill a sewn toy with
Foam rubber is most often used as a filler; this material is dense, it does not fall off and holds any shape perfectly. It's also easy to remove if the toy needs to be washed. You can use ordinary cotton wool, but it quickly clumps and the product may lose its original appearance.
Synthetic padding is also used - it is easy to purchase and a pleasure to work with. With it, the toy will keep its shape for a long time, it is easy to dry and does not get lost. An alternative option is holofiber - this material is durable and easy to use.
Natural fillers are used as a filler, this is wool. It is environmentally friendly, will allow the product to keep its shape and even generate heat; it will be very pleasant for the child to sleep with such a toy.
Collecting a good-natured bear cub
To assemble, you will need to sew both the arms and legs of the animal. Just remember to leave holes for the filler insert. Then they have to be turned inside out and stuffed well after the two foot pieces are sewn in.
Collecting a bear cub is very exciting:
- First the head is sewn to the body. The seam should not be visible;
- Now it’s the turn of the front and hind limbs. To attach them, it is best to use a long needle and proceed according to the scheme:
- The paw should not be pierced completely, but only from the side of the body. Then the other limb is also strung;
- The resulting pair is attracted to the body.
- To be safe, this operation is performed several times, leaving three millimeters between the seams. Now the legs can rotate.
You can decorate the cute bear with any beautiful accessories in accordance with your idea of the image you are creating.
How to insert a wire frame
The wire frame is used quite often in soft toys; it allows it to hold its shape and gives it flexibility. To create it you will need a little wire; for safety, its ends should be bent using round teeth. The wire should be copper or floral, along the entire length of the toy.
Then, when the desired blank is made, it is lightly coated with glue and wrapped with the selected filler. This will prevent it from getting out while using the toy. Next, the filler is evenly distributed around it and a frame is obtained, which is then placed in a fabric pattern. The fragment is sewn together.
Thus, the wire frame is inserted both into the body and into the limbs or even into the ears and tail of the toy.
The sequence of making the body of the craft
The proposed step-by-step instructions on how to make a bear clearly show that each part needs to be sewn separately:
- The finished pattern is printed;
- All the details are cut out from it;
- The number of pieces of each part is indicated on it;
- The arrows indicate places that should not be sutured;
- First, a couple of parts of the bear’s body are cut out;
- The halves must be sewn together;
- Baste the neckline with a thick thread;
- The body should be tightly stuffed, in which case it retains its shape well.
How to decorate a soft toy
There is a huge selection of accessories for decorating toys. The most commonly used are beads, buttons, sequins, ribbons and bows. They are sewn to the product using a hidden seam or special glue. You can also take small pieces of fabric, for example, velvet, cambric, silk, chiffon, they are overlapped and then sewn on using a buttonhole stitch.
Sometimes original embroidery appears as decoration, as this helps make the soft toy unusual. This option has increasingly become used when the product is created by hand.
Another option for creating a unique look can be specially tailored clothing, such as a dress, skirt or jumpsuit. It is made from beautiful lightweight fabric.
Author: Elena Petrova
Decide on the type of craft
Those needlewomen who have made a bear always want to keep a photo of the bear they made with their own hands as a souvenir.
Note!
- Crochet mouse - TOP-120 photos of the best knitted items. Step-by-step master class on knitting toys for beginners with simple work patterns
- Crochet mouse - DIY knitting patterns. Crochet mouse manufacturing technology + photos of original craft ideas
Crane craft - simple schemes for creating crafts at home with step-by-step photos + original ideas for children
Beginning lovers of applied art simply need to browse the Internet for sites that present catalogs of photographs of bears.
You won’t see any kind of bears there, they have different purposes:
- hairpins;
- covers for mobile phones;
- Kids toys;
- pillows for children;
- cups for pencils;
- covers;
- applications;
- panel;
- floral compositions in the form of this animal.
Teddy bear pattern
The first teddy bear is easier to sew in a large or medium size. Small details in sewing are more difficult for a beginner. If the needlewoman has no experience with small parts, then it is better to start with large parts, since it is easier and more convenient to work with large parts. A large or medium bear can be sculpted manually.
The teddy bear pattern consists of:
- Head 2 parts;
- middle of the head 1 part;
- front leg 2 parts;
- front outer leg 2 parts;
- front outer leg 2 parts;
- back 2 parts;
- belly 2 parts;
- hind legs 4 parts;
- eyelet 4 parts;
- foot 2 parts.
If desired, you can make a pattern for the front legs. The pattern will be one third smaller than the pattern for the hind legs.
The bear's head is made from an oval and a circle. An oval is drawn at the bottom and a circle at the top. The bear's face is carefully outlined and drawn out. According to this scheme, two parts are made.
The middle of the head looks like a pear
. This part secures the two head pieces. One side of the nose is narrowed, the other part is widened. A rectangle and an oval are drawn on paper. Next, it is carefully drawn along the form and brought out into the middle of the head.
Forepaws
, external and internal must be the same size. The details are based on an oval shape. Six parts of the same size are made.
The hind legs need to be made in the shape of an "L". This part is made from an oval and a small circle. The oval and circle are arranged in the shape of the letter “L” and carefully outline the shape of the leg. There are four of these legs.
The ears are made in the shape of a triangle. A triangle is made to the required size. It shouldn't be too big. Afterwards it is smoothly outlined. There are four of these triangles made.
The bear's foot is made in the shape of circles. First, a large circle is drawn, and five small semicircles are drawn to it.
It is worth remembering that when cutting out parts from fabric, you should retreat one centimeter on each side of the part. This is needed for seams. And the details of the feet and ears are cut out of thick fabric.
Craft polar bear
You will need:
- Toilet paper roll
- Sheet of white paper
- Felt pen
- Glue and scissors
Take the dimensions from the sleeve and transfer them to the paper, making an allowance of 1 cm. Cover the sleeve with white paper. Draw 4 legs. Cut and glue them onto the sleeve. Use a felt-tip pen to draw the eyes and face of the bear. Cut out 2 circles and glue the ears. The polar bear is ready.
Tilda doll patterns
Good afternoon, dear craftswomen!
In our previous articles, we introduced you to the distinctive features of Tilda dolls. We also learned to sew a Tilda Pumpkinhead doll.
Tilda style dolls are popular all over the world. Now it is fashionable to give Tilda dolls as a souvenir, gift or interior decoration.
In this article you will find various patterns for Tilda dolls, as well as a master class on sewing a Tilda doll for beginners. Here you will find life-size Tilda doll patterns, and you can download the patterns for free and sew a Tilda doll with your own hands.
Tilda doll patterns
Angels and fairies are a very popular theme for gentle Tilda.
Tilda is a flower angel, Tilda is a sewing angel, an angel of home comfort, a sleepy angel... Tilda will turn into an angel, you just have to sew her beautiful wings. And Tilda is an angel and you will sew her wings using the pattern below. Tilda doll life-size patterns for free.
Tilda Angel pattern
The pattern can be printed on a printer or transferred from the monitor screen to paper.
Also, in the summer, I would like to sew Tilda - the Beach Girl, in a cute swimsuit and a headband. It couldn’t be easier to do this, since there is practically no costume, we sew it together with the pattern and sew on a small skirt.
Pattern Tilda the Beach Girl
From the pattern presented below you can sew Tilda the witch, Tilda the schoolgirl, Sleepy angel, Santa Claus. The nose needs to be carefully filled with padding polyester so that it stands out on the face.
Pattern doll Tilda schoolgirl
Another angel pattern, only the wings are smaller here. The basis for Tilda - a coffee angel, a country angel, etc. according to your imagination. Tilda patterns in full size
Pattern Tilda Angel
Classic Tilda - sophisticated, slender. The following pattern is suitable for Tilda in a coat, a sweater, or a beautiful princess dress.
The following Tilda pattern is suitable for Scops Owl, Santa Claus.
Pattern of Tilda in pajamas
Plump Tilda girls in cute swimsuits are also popular. Their skin was slightly tanned. See how to dye fabric for Tilda's skin here.
Peculiarities
The Teddy doll has the following features:
- The paws and head are attached to special hinges. This allows them to be rotated to any desired angle.
- The Teddi bear is usually stuffed with sawdust. At the same time, the head is stuffed tightly. Moreover, the form it will take depends on how this operation is carried out.
- For weighting, a special material is used - granulate. It is added to the tips of the paws and the lower part of the body.
Teddy Bears
One of the most famous manufacturers is Steiff.
The pattern provides that the body, head, upper and lower legs are made separately and attached using special fasteners. Such dolls can be used for performances in puppet theaters.
One type of Teddy bear