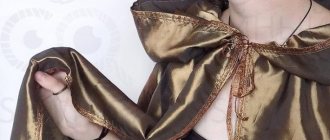
A little history of the poncho, popular among fashionistas
The development of this clothing model began with the Araucano tribe, South America. They cut a hole in a wool blanket for their heads and put it on themselves. Then the fashion spread to the inhabitants of Patagonia. However, the products did not differ in the type of cut or size. Most often, they cut out a rectangle of 1.5x1.5 meters, which did not include sleeves or cuffs.
Girl in a poncho
Later the trend moved to Mexico, creating things was considered a craft. The clothes were of different colors and types of decoration. The color of the product reflected the characteristics of the area where it was made.
Additional Information! Women were assigned to work with dense materials, and men were assigned to work with thin fabrics.
Several hundred years later, the idea began to be used by the military. Waterproof material and ease of sewing made this item practical and affordable.
In the 60s, it became a mandatory attribute of hippies, since they drew the idea and style from the peoples of India and Central America. Loose fit, versatility - confirmed the hippie ideas about freedom, peace and love. It was also valued for the opportunity to express a person’s imagination and individuality, since they were sewn independently.
In the 70s, clothing began to gain popularity among needlewomen and housewives. They began to be knitted using various stitches and adding embellishments. So people moved away from the traditional rectangular, square shape and began to use them as household products. Afterwards, ponchos appeared at Couturier’s fashion show, paired with various things.
You might be interested in Simple life-size Tilda hare patterns
In 2022, ponchos are becoming fashionable again. Dior, Moncler, Burberry are some of the many brands that have ponchos in their collection.
Poncho on a model at a fashion show
Master class for a cape with sleeves
How to make a cape with sleeves:
1. First we make a pattern. To do this, take your T-shirt and lay it flat on the paper. Mark the armhole points for the sleeves. To make them symmetrical, first we work with half of the drawing. We copy half of the top of the back, and then draw a mirror image, all contours should be smooth. To make it easier to sew in the sleeves, we make the teardrop shape a little wider at the top and bottom. We prepare fabric in the form of a rectangle one and a half meters long and 1.2 meters wide. We outline where we will have the armholes, fix the material with needles and trace the parts of the pattern with a pencil.
2. Next, use scissors to cut out the armholes, but do not forget about the indentations for the seams. After this we put on the product. If you are comfortable in it, measure the circumference of the armhole.
3. Next, fold our workpiece in half, remove the corners by about 10 cm.
4. We go over the edges with an iron, bending the indents.
5. Bend the cut corners right side inward so that the edges match. We sew the cut line manually with an indent. Next, turn them inside out and iron them.
6. Use pins to secure all the edges that we turned and ironed.
7. Next we need to make a pattern for the sleeves: for this you can also use your own shirt or jacket as a basis. Again, place the product flat on the paper, fix it with needles, and transfer the design. Next we do the same for the back.
8. Measure the rollback length of the sleeve. If they coincide with the armholes, then cut out the sleeves, adding 1 cm for the seam. If the fabric stretches well, then the width can be reduced.
9. Fold the sleeves in half, stitch the edges first by hand, and add cuffs. Then we sew the seams using a machine.
10. Now all that remains is to connect the sleeves to the main workpiece. We insert the two parts into the armholes and secure them with pins to make sewing easier. While using the machine, periodically check that the edges match well.
11. Decorate the product to your taste: adding a belt would be a good solution.
How to choose fabric and model
Due to the fact that they are worn in any season, different types of fabric can be used:
- atlas;
- fleece;
- knitwear;
- fur;
- cotton;
- tulle;
- wool;
- drape
The type of fabric is chosen depending on the season when the fashionista wants to wear it.
Silhouettes:
- Mexican;
- square;
- oval, etc.
The item is suitable for any body type, but the main thing is to choose the right model:
- The classic one reaches mid-thigh and is considered universal. However, in 2022 it may be either long or ultra-short.
- If you are tall and have a slender figure, a wide, short product will suit you.
- For a curvy girl, a flowy, elongated product is suitable.
For example, a poncho without seams (oval pattern) is suitable for a plump girl.
Product on a plump girl
Raincoat for a child
Let's start our master class with the lightest, but very necessary element of children's clothing - a raincoat. A waterproof raincoat will protect your baby from the rain; you can wear it for walks in the yard, go to kindergarten, and at the same time not occupy your hands with unnecessary objects , such as an umbrella, which is not at all easy for a baby to hold. But with a waterproof raincoat everything is much simpler - put it on and go. Moreover, it is easy to sew, easy to wash, and although it will last only a couple of seasons, it will save the family budget, as any mother knows, now in children's stores the prices are very high.
Instructions for sewing a raincoat with a hood
For work we will need:
- sewing machine;
- waterproof material (bolon, taslan, polyurethane oxford);
- scissors;
- threads, needle;
- chalk, pencil (ballpoint pen);
- ruler or centimeter.
- Fold the oilcloth material in half.
- Place a children's raincoat or jacket (back) against the folded seam to determine the required length.
- Measure along the folded seam a size 20 cm larger than the selected length of the product.
- Cut the oilcloth in a semicircle from the point of the selected length along the back and measure exactly the same length along the other edge of the original material.
- Make a neckline, determine its size, and take the neckline of the jacket as the base.
- The hood is cut out of oilcloth with a rectangle folded into a square , the side of which is determined by the size of the head plus 10 cm, the necessary allowance for seams and an autumn headdress.
- Before sewing the hood to the cape, it is stitched along one side and gathered together to fit the neckline. In this case, you need to make sure that the side with the seam is sewn into the neck, so the raincoat will be most effective at preventing water from getting inside.
Recommendations for sewing a raincoat:
- this product is convenient because it is made without seams and does not require any processing;
- the rain cape has no sleeves and is tied at the neckline, so it should not be too long;
- It is better to choose a waterproof material , either transparent or colored, so that the child can walk comfortably and happily in it;
- You can decorate the new thing with a beautiful bow, tying the hood along the neck and chosen to match the oilcloth material, or being a bright contrast against the background of a white or transparent raincoat;
- the only seam on the hood can be sewn by simply turning the edge twice, or it can be decorated with braid or ribbon to match the ties;
- if necessary, you can provide buttons on the front shelves, and a light drawstring along the wide bottom.
Cape
A rainproof jacket or a fashionable autumn outfit made from fabric materials can be made according to the instructions above. But let's complicate the task and sew a cape consisting of two layers , that is, with a lining.
For the first layer of such a wardrobe item, you can use either water-repellent fabric, then it will be an insulated version of a raincoat, or any lightweight material, for example, fleece, knitwear or raincoat fabric.
Instructions for sewing a raincoat for a girl
For sewing we will prepare:
- two pieces of fabric (for the top and lining);
- chalk or a bar of used soap;
- centimeter, ruler;
- scissors, pins, thread and needle;
- buttons, braid, ribbon.
- The simplest measurements of the future product are carried out in the same way as the previous version of the raincoat, using existing wardrobe elements, or you can take measurements directly from the girl (on the back, shoulder and forearm).
- The material is folded in half, where the fold is - there will be a back. And where the folded edges meet, there will be shelves.
- To sew a long raincoat (below the hips), there is no need to take the entire square of material diagonally; you can make the product narrower by measuring the distance from the middle finger of the right hand to the middle finger of the left, which is sufficient for cutting out the width. The main thing is that the distance from the corner of the neckline is the same as the folded side of the fabric (back).
- Two identical elements are cut out, the top and the lining, which are placed on top of each other with the wrong side.
- The seams of the bottom and shelves are processed.
- The neck is cut out.
- If a cape with a hood is provided, the pattern is cut to the size of the head from both fabrics, allowing for 10 cm for seams and the cap.
- If the cape is without a hood, then the neckline is simply neatly trimmed with braid or ribbon.
Recommendations for sewing a smart raincoat:
- since the raincoat consists of two layers, if the seams are properly designed, the product can be double-sided;
- If desired, you can provide pockets. They can be sewn on both the outside and the inside, then this must be done before joining the parts and processing the seams;
- the hood, when using simple fabric (not rain), can be sewn by folding two squares, rounding the upper corner and finishing the resulting seam with braid or tape. The round top of the hood will look more elegant;
- The shelves are decorated with buttons or ties. For this purpose, decorative pintucks are now available, sold in all fabric stores. They can again be used with a double-sided version of the cape;
- if for some reason the neckline is large, then in this case it is better to reduce it not by gathering, but by sewing it with neat folds or stitched undercuts;
- the same goes for the fit of the hood. , sewn inside the double-sided blank, is adjusted to the size of the neckline using soft folds or darts made before joining the parts;
- the hood can also consist of one top layer of fabric, that is, without lining. It must be processed so that it looks like an appropriate addition to the wardrobe.
Using the same option, you can sew a raincoat with or without a hood for an adult girl. The material is taken at the rate of 1.2x1.5 meters for the cape itself and the cut for the hood is calculated based on the size of the head. The hood in this case can be either functional, to cover the head, or for the sake of fashion, dangling over the shoulders or descending with a cone downwards, which is often used in carnival outfits.
How to sew a poncho with your own hands: step-by-step guide
It’s not difficult to sew it yourself, the main thing is to follow the instructions and have at least a little experience in sewing clothes.
Step-by-step instruction:
- Decide on the model and length of the future product.
- Take measurements of the length of the product.
- Prepare a pattern from paper or cardboard.
- When cutting fabric, you need to take into account the correct placement of the pattern on the fabric. It is recommended to place the parts on the fabric in one direction along the grain thread.
- Considering the type and purpose of the product, decorate it with lace or appliqué.
Thing on a slender lady
Military style poncho coat pattern
One of the simple types that anyone, even a novice seamstress, can sew.
Important! The product will become more attractive when combining contrasting, fiery red fabric with gold buttons.
Sketch construction:
- From the upper corner on the right (point B), draw a horizontal and vertical line to the left and down.
- Along the horizontal line and vertical line, set aside 1/3 of the half-circumference of the neck + 1.5 cm and place point C.
- Create a front neckline.
- For the back neck, set aside 2.5 cm down from point B. Place point D.
- Create a back neckline.
- From t. C, etc. set aside the measurements: shoulder length + sleeve length and product length.
- Add a few centimeters for the fastener.
- Build a collar.
You might be interested in this. Pattern of a children's and adult's hat: sewing order
Military style poncho coat
Cut out:
- 2 halves front;
- 1 back piece;
- stand-up collar;
- belt.
The details are cut out taking into account the fastener.
Tailoring:
- Sew shoulder seam on front and back.
- Iron the seam allowance.
- The lining is folded face to face with the product and basted.
- Sew seams.
- Fold the edge allowances and hem them.
- Reinforce the collar with an adhesive pad.
- Turn the product inside out.
- Iron.
- Sew all seams.
- Sweep in, sew in the neckline.
- Make loops, sew buttons.
- If desired, decorate with lace and decorative buttons.
Poncho pattern with sleeves
A complicated model that will require more time from the seamstress than the previous one. Can also be added with pockets.
Some find it easier to tie the sleeves - it looks interesting and attractive.
Product with sleeves
Cashmere poncho pattern
For this model you need to cut out: front, back, collar, 2 long and narrow stripes.
If you have wide fabric, you can cut out parts with folds along the shoulder line.
Instructions:
- The collar is sewn along the short edge.
- Press seam allowance.
- Sew the collar into the neckline, with the seam in the center of the back.
- Sew with a sewing machine.
- Turn the collar up 1 cm.
- Tack.
- Sew on a sewing machine.
- Turn up the allowance on the sleeves, along the bottom.
- Sew the seam.
- Combine the parts face to face.
- Sweep.
- Sew.
- Sew the binding.
- Thread into the drawstring.
Pattern
Simple model for cool weather
When building a simple model for winter or cool periods, it is recommended to use warm material. For example, fur, wool.
Instructions:
- Take measurements.
- Draw a rectangle on the fabric, in which the length is equal to the length of the product, and the width is the length of the arms + shoulder length + 1/3 of the neck circumference.
- Draw the neckline with a smooth line.
- Edit the pattern.
- Cut out the product.
- Sew seams using a sewing machine.
- Process the bottom.
Pattern of a poncho with a hood
A poncho with a hood is suitable for rainy, windy weather. This model was used by the military. In this case, to sew the product, you can take the previous model and add a hood to it. When creating a pattern, the seamstress needs to take measurements from the client's head.
Note! In most cases, it is easier to cut the hood together with the main element.
Product with a hood
Patterns for cape coats
The simplest style option is a straight cut without a pronounced waistline. Below is an example of a cape coat pattern.
For this style, you will need to measure the circumference of the hips, neck, distance between the shoulder points, and sleeve length. The shelves of the product will correspond to the hip circumference, you will only need to add a few more centimeters to make the product spacious.
To create a one-piece sleeve, we need to measure the width of the shoulder from the collar, as well as the length of the planned sleeve. To make a collar, just a small piece of fabric that matches the neckline is enough.
The side seams need to be sewn on a machine, then we attach the ready-made collar, tuck the edges of the sleeves and the bottom. You can then add buttons or sew a belt if there is excess material left.
Sewing a poncho without a pattern
How to sew a poncho with your own hands quickly and without a pattern? A poncho is a versatile, practical outfit, so you can sew a regular product without using a pattern or taking measurements. This can be done in 2 ways:
- If you have 2 similar scarves at home in size and type of fabric, you can sew a poncho in half an hour. To do this, just sew the parts together, leaving the neck intact.
You might be interested in: Creating a pattern and sewing a shopper's bag with your own hands
Additional Information! The model looks great with a bright scarf and fur trim. Such an original Russian image will attract the attention of others.
When duplicated with a dense lining of fur or wool, it can be worn in the fall.
Product made from a scarf with fur
- Cut a neckline from the center of a large scarf and finish the cut edge using bias tape.
When connecting 2 scarves, do not rush to cut the corners near the neckline. You can turn them inside out and get an unusual model with an asymmetrical collar. You can also use a scarf or stole.
Sewing pattern for a poncho from a scarf
What you need to know to sew an original dress
The cape dress has been the most stylish model for several seasons now.
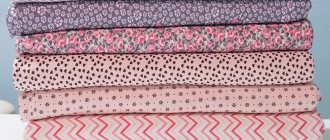
Choosing fabric
To make it, choose the right material:
- For an evening out, expensive fabrics are suitable - satin, brocade, velvet.
- Light, chiffon, silk fabrics - for warm summers and soft springs.
- For a daily look - soft, not too dense fabrics.
- The model with a hood is made of knitwear, jersey, soft wool, cashmere.
- The organza outfit should be complemented by a non-see-through underdress.
Taking measurements
Let's take the necessary measurements:
- Half-girth of the neck: make the tape through the protruding cervical vertebra, close the tape in the jugular cavity. Do not tighten the tape.
- DP (Shoulder Length): From the neck along the entire length of the shoulder.
- SL (Sleeve Length): from the point of the shoulder to the protruding bone on the hand.
- The length of the product is measured from the back: from the protruding cervical vertebra to the point you choose. This can be mid-thigh and above the knee.
- If a belt is assumed, then the length to the waist is also measured.
- For a dress with a hood, measure the height of the hood and the circumference of your head.
How much material will be needed
With a loose cut, you will need a piece of fabric equal to 2 times the length of the dress. When cutting, do not forget to leave seam allowances. If you plan to sew a hood and pockets, then you need to take another 40-45 centimeters in reserve.
Fabric consumption by size:
- Size 44-48 with a hood with a length of 106 cm will require 3 meters with a width of 150 cm.
- If the cape is cut out separately and then sewn into the shoulder seam, the consumption will be 1 meter more (with a width of 150 cm).
How to make pompoms and other product decorations
Ways to decorate a poncho:
- Pompoms. It can be made using a fork, cardboard, hands or a chair. All methods will take the same amount of time.
- Fur. By attaching fur along the bottom of the product and on the collar.
- Buttons. Choose beautiful buttons and sew along the line of the intended fastener.
- Add pockets to the product.
- Lace. You can sew along the bottom of the product on the sleeves or near the collar.
Pom-poms on a poncho
The thing is suitable for a girl of any age and figure. You can make a poncho yourself with your own hands, sew it for both an experienced craftswoman and a novice seamstress. New sketches can be viewed in the Burda magazine. Men's poncho - the pattern is similar to the women's one.
Video material
A beautiful cape on an evening dress, office dress or even a sundress can transform your look. As an option, you can, of course, buy one in a store, but why, if the cape is very easy to make by hand. You will need a minimum of funds and skills. Choose one of our ways to sew a cape on a dress made of chiffon or any other material, and go ahead - you are guaranteed to have a stunning decorative detail for any outfit!
We knit a stylish cape on the shoulders with a description of the work and patterns
This comfortable and very light knitted cape will suit any dress or sundress.
The total volume of the product is designed for size S.
The mesh pattern is performed according to the instructions provided:
1) 1 front row: knit to the last loop + 1 purl behind the back wall;
2) Purl row 2: 1 knit stitch + 1 purl behind the back wall + 2 knit stitches together. Then repeat 1 purl behind the back wall + 2 knits together until the last 1 purl behind the back wall.
The cape pattern looks like this.
Knitting instructions:
1) We start from the back. Use knitting needles to cast on 140 stitches without tightening.
2) We knit with a 35.5 cm mesh pattern.
3) In the last row we knit 49 loops according to the pattern and transfer them to the holder.
4) Close off the next 42 loops, and tie the remaining 49 and transfer them to the holder.
5) Move on to the front part of the product. We knit in the same way as the back, only at a height of 30.5 cm. In the 88th row we make a cutout for the neckline. We do it as follows: we knit the first 55 loops, then attach the second ball and close the central 30 loops very loosely from it. We tie the row to the end.
6) Now we knit each part from different balls, closing for the neckline on both sides 1 loop in each row 6 times.
7) Transfer the remaining 49 loops on each side to the holder.
We sew the shoulder seams by closing the loops using three knitting needles.
9) Sew the side seams, leaving armholes for the sleeves.
10) On the front side of the product, we crochet 2 rows with a half-column along the bottom edge and along the sleeves.
11) We tie the edges of the neckline in one row with a half-column.
The knitted cape with a mesh pattern is ready. Now it can take pride of place in its creator's wardrobe.
Cape made of regular stole
Few people realize that a simple poncho can be made from ordinary wide scarves without using sewing skills. A fashionable stole cape will replace a jacket or jacket. It is also called a transformable scarf .
This wardrobe item can be thrown over your shoulders and tied on your chest in a beautiful knot. Some manufacturers produce stole models with small slits, which allows you to convert a scarf into a poncho and vice versa.
A stole, similar to a square-shaped blanket, can also simply be transformed into a cape: it must be folded into a triangle, thrown over the shoulders and tied with a belt at the lower parts. Or you can tuck the ends of the fabric into the sides of the strap and get a spacious vest.
You can even make an impressive poncho from two stoles if you tie them with neat knots at the front and back. Scarves can also be draped over the sides. This look will be no less attractive than with just a stole.
Wide fabrics can also be used for sewing ponchos. Tunics, capes, and do-it-yourself dresses made from stoles will become a favorite element of a needlewoman’s wardrobe. You can sew a poncho for a child. Fabrics for them must be selected in bright colors. Capes made of thick materials in neutral colors are also used by men. The poncho looks great with any element of clothing, so you can buy it or make it yourself for any season and occasion.