We all love beautiful and functional gadgets, but the purchase of each of them entails the purchase of several more quite expensive accessories (despite the fact that they themselves are usually not cheap). One of these accessories is a case or case, the creation of which is the focus of our today’s master class. With a little creative ingenuity, you will get a truly exclusive item without spending a single ruble.
Let's start with a relatively simple and very interesting book case.
To work, you only need a book with a nice cover and a few additional materials:
- 2 zippers of suitable length
- 2 pieces of “smart sponge” - a thin synthetic material that can restore its shape
- Keeper tape
- Awl and scissors
- Thick thread and two needles, thin and thicker
- Hot glue adhesive
Measure the length, width and thickness of your device, add approximately 5mm to the first two, and select a book of the appropriate size. When choosing the width of the spine, do not forget that in addition to the tablet, there will also be sponges inside.
Sew the keeper tape to the zipper edging, but only on one side, as shown in the photo:
Cut a block of pages from a book, you only need its cover:
Make holes around the entire perimeter of the cover, stepping back from the edge by about 5 mm. The distance between the holes should be about 2-3 mm, so we recommend using a very thin awl.
Sew the zippers to the cover by threading the thread through the holes, starting from the spine of the book. They should converge in the center of the long side of the future case - this will make it more convenient for you to open it.
Sew the second halves of the zippers behind the keeper tape to the second “flap”, also starting from the spine. This will require some effort as the edges are joined together, but it is important to ensure that when you are finished the zippers can be zipped and unzipped properly and the tablet and sponges can fit freely inside the cover.
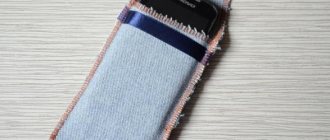
Cut out rectangles of the “smart sponge” of suitable size and glue them inside the cover, as shown in the photo - one layer on each side. Hot glue glue dries very quickly, so we recommend gluing it section by section rather than applying it to the entire surface at once.
As a result, you will get a case like this:
Master class: how to make a case yourself
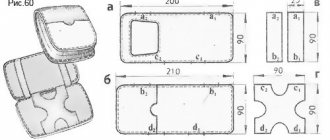
If you're willing to tinker a little longer, a similar case can be made from a piece of cardboard lined with fabric:
The tablet will be securely fastened inside, and the clasp will be two matching ribbons (in the male version, this can be a ribbon with Velcro at the end). Materials and tools:
- Fabric with a pattern you like and ribbon or thin braid
- Cardboard box
- Sewing machine, scissors, ruler and pins
- Thread and needle or glue for hot gluing
- Elastic hair band
- Aerosol glue
Procedure:
Cut out three cardboard blanks: 2 of them should match the tablet in length and width, another 1 should match the thickness. Fold them as shown in the photo - this will make your further work easier. Place the tablet on the future cover, outline and cut out the rounded corners.
In the same sequence, place the blanks on the wrong side of the pre-ironed oblong piece of fabric. Outline each of the three parts of the future case using a pencil. Trim off the excess fabric, slightly away from the edges of the TOTAL perimeter (seam allowance). You will get a rectangle, inside of which the spine of the cover and two parts are outlined. Cut another identical rectangle from the remaining fabric.
Sew the two flaps to each other along the perimeter, wrong side out, rounding the corners in accordance with the markings. Leave a long gap in the center of its lower part, through which you can later insert cardboard blanks. Turn the finished cover right side out and iron it.
Through the hole left, insert cardboard blanks sprayed with aerosol glue into the case - right and left. Make sure that the fabric treated with glue is stretched onto the cardboard as far as it will go and does not wrinkle, carefully smooth both “flaps”.
The third, narrow piece of cardboard can be thrown away; it was needed to coordinate actions and you will no longer need it in your work.
Your cover is almost ready. Fold the unstitched edges of the fabric under and carefully secure with hot glue. Glue on ribbon ties (we sewed them from the same fabric as the cover).
To keep your tablet securely in the case, you need to glue loops of tape to the inside of the cover. This is done as follows:
Open the cover like a book. Secure one end of the tape to the top left corner of the right sash. With the tablet centered, determine where the other end of the loop should be attached so that it grips the corner of the device diagonally. Holding the tape with your finger, remove the tablet and stick it at the desired point. Do the same in the lower right corner.
The hinges should be tight enough to tightly grip the corners of the gadget, but loose enough so that it can be easily inserted or pulled out of them.
To hide the ends of the loops, cut a rectangle of fabric the same color as the cover and carefully glue it on top.
This fastening is quite reliable, but just in case, we also tied the finished case with a hair elastic.
Preparing parts for the future tablet case
She took out a block of sheets from an old notebook. I ripped the seams of the cover apart and took it apart. On its cardboard (inner) side I outlined the tablet and cut out two parts according to its shape. One of them will serve as a folding support, so I cut it in half lengthwise.
From the upper (faux leather) part of the cover, using existing cardboard patterns, I cut out parts with an allowance of 1 cm (photo 1). I made a hole in the blank for the tablet camera (photo 2)
I glued a foam backing onto the leatherette parts, and cardboard elements of the appropriate size on top. I folded the leatherette allowances onto the inside of the blanks (photo3)
To decorate the inside of the case, I cut out three parts from white cardboard, which are 0.2 mm smaller around the perimeter than the top ones. Fitted
Related link: DIY office chair cover (photos + diagrams)
Master class: making your own iPad case
Another project involves the most seemingly unexpected base - an envelope for parcels with bubble wrap inside, and in addition to it:
- A piece of fabric you like
- Hot glue, glue stick, stapler, or small sewing pins
- 2 buttons
- Thread and needle
- Thin ribbon or lace
- Scissors
Step-by-step instruction:
Remove the bubble wrap from the envelope, you only need a thick base. Place the tablet across it to measure the appropriate depth of the case.
Cut the envelope at the desired height so that its back wall is several centimeters longer than the front - it will serve as the hinged lid of the case.
Cover the inside of the envelope with fabric, then do the same with the outside of the envelope, including the lid.
Sew one button onto the lid and the other onto the body of the envelope. Now your case can be closed by wrapping a string or ribbon around them.
Manufacturing process
Many users, not having felt at home and not knowing where to get it, immediately give up creating a cover.
Please note that felt can be replaced with any other fabric, even leather/leatherette is suitable here!
Don't give up, almost any fabric will do for this purpose. Use what you have on hand.
Gluing cardboard to fabric
First, glue the material you took with the pieces of cardboard, then make sure that there is some space left between the cardboard pieces. Before the glue hardens, check this; the distance is necessary, first of all, so that the cover can be closed. In other words, at this stage you should end up with something like a book.
Homemade protective accessory for your tablet
Working on the inside
Next you will need to take the edges that are peeking out and fold them inward. Glue them to the cardboard, then check that everything is glued securely enough.
Carefully glue the corners
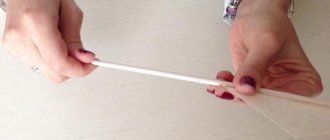
The next step is gluing the leather strips to the bottom. Their dimensions should be as follows: 15 cm in length; 1 cm in width. Two such strips must be carefully divided into two parts with scissors, and then glued with glue to the corners of the protective accessory being created.
At this stage, it is imperative to check whether your tablet fits in the case or not. If everything is fine, glue two fixation elastic bands in the way that is most convenient for you. We cut out another piece of fabric (leather), then glue it into the inside, so that the uncovered cardboard is completely hidden from view. In the end, of course, you need to stitch everything, because the glue can easily come off at the most inopportune moment.
All that's left is to hide the cardboard
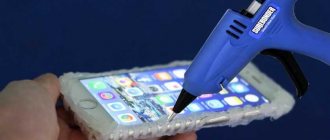
Case clasp
The most interesting moment in creating a case is its clasp. We take Velcro, as well as a piece of leather/fabric. Now you need to glue it all in such a way that there is Velcro on one side and fabric on the other. Be sure to sew it all (for the fastening element, you need to sew it especially securely and efficiently).
Velcro
Leather tablet case
And finally, here's a sample suede pouch that's perfect for those who prefer a more formal style, or those who don't want the hassle of gluing and finishing the edges. It will take you about 15 minutes to make.
Stock up on a piece of thin suede, a pencil, paper, a ruler, a sewing machine and threads to match the fabric. Draw a pattern on paper according to the following pattern:
The black lines are the cut lines, the red dotted lines are the seams (only one is marked in the figure, but, as you understand, both sides need to be stitched), the red arrow is the direction of the fold.
A long ribbon-tie also needs to be cut out of suede, then one end of it must be threaded through two small slits on the lid of the case and sewn in the form of a loop so that the seam is not visible from the outside. You can close the case by wrapping a ribbon around it and tying it at the base.
Brief information on creating cases
So, you are interested in the question of how to create a tablet case yourself, without having to buy it. It is also likely that you are asking yourself the following question: “Is it possible to make a cover at home, or is it fundamentally impossible?” It should be noted here that this thing can not only be made, but, if desired, even surpass in beauty and originality factory products of this kind! And if you add your own imagination to everything else and show creativity in the process of work, then all your friends will envy you, because they definitely won’t have such a case!
Notepad case
What you need to create a case
In fact, making a case is by no means a difficult task, anyone can do it, you just need time, a little effort, and, of course, desire. If you are a creative person, then you will most likely be able to make not only a convenient accessory, but also a simply beautiful thing that will delight the eye every day. So, what will you need to create?
- Colored felt (it should be cut based on the specific dimensions of your touch gadget);
- Glue;
- Elastic band (used to secure the tablet inside the case);
- Button;
- Two pieces of cardboard (also cut out based on the size of the tablet).