Making a longboard with your own hands
Longboards are a fashionable phenomenon. However, not every extreme sports fan can afford such fashion. If you want to save money on buying a board or just want your equipment to be special and unique, you can make it yourself.
In this article we will tell you how to make a longboard yourself.
It is worth noting that assembling a longboard yourself is a simple process, but not as simple as it might seem. Before you start, make sure you know how to handle wood and various machines for processing it.
Tags
on the board more than removing the board from the board layer.perpendicular to the board. boards with a hard board or on a board. with your own hands with your own hands with your own hands with your own hands with your own hands longboard with your own hands longboard with your own hands all with your own speed. child with your own hands child with your own hands electric drive with your own hands Do it yourself made a longboard. the master made a stencil. the master made protective
presshelpmasterthenpaperdrawingscommentscut imagefuturelayerbendreplyworklinkneedfiberglassscrewssitevoices
What will you need?
In order to create a good projectile that will not let you down the first time you ride, it is not enough to just have a jigsaw and a great desire.
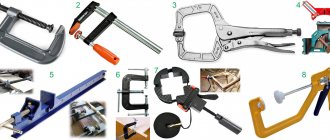
Equipment
Ideally, you should have the following equipment on hand:
- press (later we will tell you how it can be replaced);
- jigsaw;
- laser level;
- screwdriver.
Now we need to talk about what materials you will need to create a longboard with your own hands.
Materials
To assemble a full-fledged projectile, stock up on the following items:
- plywood 4 mm thick. To make one board, one sheet of plywood is enough. However, make sure that this sheet is perfectly even; do not take the first product you come across. You can immediately ask the store to divide the layer into segments of 30 to 40 centimeters. But, if the store cannot provide such a service, it is quite possible to do such work in the workshop yourself;
- longboard sandpaper (it is better to choose perforated one);
- tracks and wheels;
- wood glue;
- PVA glue;
- acrylic paints;
- self-tapping screws
Downhill.
If you have a thick and heavy board in front of you, most likely it is intended for downhill
(second line in the picture about decks -
Speedboarding
).
Here, riders, as a rule, choose not long boards (from 33 to 38 inches), unless they are two-meter strong, of course =). Stability and speed are important in this discipline. A heavy and rigid deck satisfies these requirements. It is also important that you feel comfortable standing on the board. There are many shapes and deflections
, and it is up to you to decide which one is more convenient for you.
By the way, decks are often made aimed directly at downhill and freeride
, because these styles are united by speed and they are closely intertwined. Here are examples of such longboards.
Let's get started
Let's say you already have separate pieces of plywood 30–40 centimeters wide. Next, you will need to give them the desired shape and form a concave.
Choosing a form
You need to stock up on a template on which the future shape of the board will be drawn in full size. You can create it yourself (just be careful about symmetry) or print it in parts from the Internet. It is important that the length of the sketch is slightly less than the sheets of plywood, so that there is an indentation from the edges.
After this, transfer the form to one of the pieces of plywood. Mark the center line. It should be smooth and clear. Mark with dots the places where the holes for the tracks will soon be.
Let's make a concave
In order to create a good bend in our board, we can use a special press called a slipway. However, if you do not often work with wood, you may not have such a unit in your workshop.
The machine can be replaced with a very simple product. Take a thick board that will be larger than the plywood sheets in length and width, and in the middle attach to it with self-tapping screws a narrow block about five centimeters wide and about three centimeters high.
We stack our pieces of plywood on top of each other so that the sheet with the intended shape is on top. We drill holes around the perimeter of the sheets.
After this, the sheets can be fastened to each other with wood glue.
After you have coated the sheets well with the adhesive, place them on an improvised press so that the rail on the thick board is exactly in the middle of the future product.
The edges of the plywood blank must be attached to a thick board using self-tapping screws. Make sure that all screws are tightened equally. Otherwise, the concave will turn out uneven.
Remember two things:
- You don't need to tighten the screws too much, as the longboard will be uncomfortable to stand on if it bends too much.
- But don't loosen the fastenings too much. After removal from the press, the plywood will bend slightly towards its previous shape.
After a day, you can remove the plywood from the press and be proud that you have created a blank board with a concave with your own hands. Use a laser level to check whether the bend is even. If it has serious flaws, try to correct them by placing the board under the press again for a day.
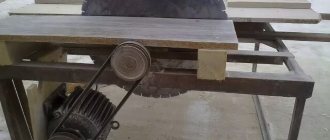
We saw and drill
Once the board has received the curve we need, we can begin to shape it. Using a jigsaw, cut along the outline of the board.
Where the drilling points are marked, drill holes for the tracks.
We fasten the skin
When the shape of the board is ready, we can glue the sandpaper on one side of it. If you bought a product designed specifically for wheelboards, you won't need glue. One of the sides of such skin will be self-adhesive.
DIY electric longboard. Mountainboard.
So, another, almost annual post about electric boards. This year we will talk about mountainboarding. I would like to point out right away that this mountain was made for riding on asphalt or what we call this word. No one will knead dirt on it.
This board is based on Trampa 685 BLACK. Great board. If you take it for the city, choose softer bushings (Dampa).
The pulley has 66 teeth per wheel, also from Trampa.
Price: about 44-46k rubles (depending on the exchange rate) for the whole board and pulleys with 66 teeth.
The brackets were found on one of the foreign forums. I was captivated by their compact appearance. They fit perfectly on the tracks.
The fruit of labor, tears, sweat and blood for three weeks.
In short, we smear, grind, smear, grind,... repeat until an acceptable result is achieved. In between, apply release agents. I used polyester resins, glass mat 300 and 450 for the mold, and T-11 fiberglass for the body itself.
As a result, we get a body with 6 segments, which bends perfectly along with the board.
Price: 6-7k rubles for materials (I took a lot and with a reserve). Plus a lot of rubles for the instrument.
General rules for making a longboard with your own hands
First of all, you need to cut the sheets of plywood into equal rectangles with sides of 30x40 cm. After this, you need to give each rectangle the desired shape and the intended line of curvature of the sides. In order for the board to have a given shape, it is necessary to make a pattern, which must be drawn in full size and with a symmetrical pattern.
You can use the Internet and print out the drawing in parts and then glue it together, but even in this case it is important to maintain the symmetry of the drawing. The important thing is that the pattern should be slightly smaller than the plywood rectangle. The distance from the edges to the pattern can be about 1 cm.
After the pattern is ready, you need to attach it to one of the pieces of plywood and mark the center line, which should coincide with the middle of the board. The axis must be drawn clearly and evenly. It is necessary to mark the places where the tracks will be attached.
It is important to make the correct bend. For this procedure you will need a press. If you don’t have special equipment to use, you can make do with improvised means. For example, you can take a board that is larger in size than the future deck and attach a wooden beam with dimensions of 3x5 cm to it in the middle. Next, you need to stack all the plywood rectangles so that the marked sheet is on top. Holes should be drilled around the perimeter of the folded sheets.
It is necessary to lubricate each sheet with wood glue, carefully stack them on top of each other and place them on the press. The sheets on it must be arranged in such a way that the beam runs strictly in the middle of the intended axis. The edges of the plywood should be attached using self-tapping screws to the press board.
When fixing, you need to tighten the fasteners with equal force to get a good result. The middle should not be tight, but not weak either. The plywood sheets should remain in this state for about a day so that they stick together well and the press makes the desired bend. After removing the load, the resulting deck will straighten a little to its original position, but the desired bend will still remain.
The base is ready, now you need to use a level to check how evenly the bends on the future deck are. If there are deviations, then it is best to place the deck under the press for another day.
The next stage is the correct sawing of the board and drilling of holes for the tracks. To shape the board, you need to use an electric jigsaw. Carefully cut out the required structure along the line drawn on the top plywood. Where the places for attaching the tracks are marked, you need to make holes with a drill.
After the deck is ready, you need to attach sandpaper to one side, which should follow the shape of the board. When purchasing special paper for boards, additional lubrication with glue is not required, because it already has an adhesive layer. If ready-made sandpaper is not used, then it is best to choose the perforated version. This will make it easy to glue the required element to the deck due to the presence of small holes.
In order for the base to be completely ready, it should be painted. If you wish, you can make a drawing and give your future longboard an individual look.
First of all, the board is sanded so that there are no flaws. Then the primer is applied using diluted PVA glue. After the primer layer has completely dried, you need to paint the board and, if desired, apply a design. Acrylic-based paints are preferred.
Overview of the main varieties
There are many styles of longboarding. For each of them, different types of decks, suspensions, and wheels are used. Each user chooses the optimal travel option based on individual preferences. Some people like speed and difficult tricks, others like aggressive driving, and others like leisurely walks.
For carving and cruising
Such designs are considered the most convenient and reliable. The deck is in the shape of an elongated oval and has a length of 70-130 cm. The wheels are often soft, with a diameter of 76 mm. A longboard for carving is equipped with practical bearings, so it can easily overcome minor unevenness and accelerate quickly. Advantages of the models:
- excellent maneuverability;
- the ability to cover long distances;
- shortened versions are used to perform tricks;
- wide wheels provide comfort during the trip;
- the maximum speed can reach 100 km/h.
The main disadvantage of longboards designed for cruising and carving is their large size. Since the dimensions of the smallest boards exceed the parameters of a classic skate, many tricks are not available for them.
For slalom
Longboards with a deck length of 60-70 cm are ideal for maneuverable riding and performing tricks. The diameter of wheels of low or medium hardness does not exceed 72 cm. Among the advantages of the models are:
- good maneuverability;
- high speed dial;
- the ability to perform feints;
- acceleration of the board without pushing off with your feet.
This type of longboard has some disadvantages. The structures are not intended for long descents and are less stable compared to other types.
Downhill
The main distinctive features of such a longboard are: a rigid long deck (up to 1 m), strong tracks, which are fixed to the board with through bolts to increase reliability. The model is designed for fast descents, the optimal wheel sizes are from 70 to 75 mm. Among the advantages are:
- acceleration up to 140 km/h;
- durability, reliability;
- stability on different routes;
- The package includes high-quality durable bearings.
People who decide to opt for longboards for downhill should become familiar with their disadvantages. The structures do not have good maneuverability, so they are difficult to take turns. Such models are not suitable for tricks.
Sliding
Longboard is designed for a discipline that is a bit like downhill. It is distinguished by the presence of a large number of slides and reversals. The minimum length of the deck is 90 cm, the board is quite thick, the width reaches 1.3 cm. The wheels are hard, small, and equipped with high-quality bearings. The models have the correct shape, which ensures maneuverability during high-speed descents. Benefits include:
- acceleration to 100 km/h;
- safety and stability of the structure;
- strength, rigidity;
- excellent maneuverability.
These types of longboards are not without their drawbacks. They are considered “highly specialized” and, due to their large size, cause inconvenience during transportation and storage.
Surf style
These are the longest longboards, reaching 1.5-3 m, designed for surfing. The designs allow you to sit, walk or lie down while riding. The deck is 2 cm thick, characterized by high rigidity, and the wheel size is no more than 120 mm. The advantages of the models include:
- increased strength, reliability;
- comfortable riding in pairs;
- the ability to move around the board while moving;
- suitable for covering long distances.
Among other types of longboards, surfing models stand out for their impressive weight and size - this is the main drawback of the designs. The products are clumsy and can only move on high-quality road surfaces.
Dance models
Such longboards are used to perform all kinds of dance tricks. The width of the deck reaches 8-10 cm, length - 80-150 cm. The board is very thin (less than 1 cm), elastic, and sags a little in the center while riding. The wheels have minimal rigidity, the diameter does not exceed 75 mm. The main advantages of the design:
- the ability to perform many tricks;
- good stability indicators;
- high maneuverability;
- attractive appearance.
If you need to choose a longboard for a dance hall, you should know in advance about its disadvantages. The models are not durable and may cause inconvenience during transportation. Despite these shortcomings, they are popular among young people.
Electrical
Ultra-modern longboards are equipped with a motor and battery. Today, such models are produced by many well-known companies. The designs are equipped with additional functionality in the form of USB ports and control panels. The advantages include:
- ease of use;
- functionality;
- folding design;
- original appearance.
Electric longboards are great for the city. The main disadvantage is the high cost compared to classic models.
Longboards designed for freeride must withstand high loads. It is for this reason that the deck will be the strongest and heaviest, the suspension will be wide, and the wheels will be rigid.
Equipment and materials
To make a good longboard deck, you need to prepare the following tools:
- press or something that can replace it;
- electric jigsaw;
- laser level;
- screwdriver
The material from which the longboard is planned to be made is also important:
- Plywood sheet 0.4 cm thick. To make a longboard deck, 1 sheet of plywood is enough. But it is important to inspect the sheet when purchasing and make sure that it is even.
- Perforated skin for the deck.
- Pendants of the right size.
- Wheels.
- Carpenter's glue.
- PVA glue.
- Acrylic based paints.
- Self-tapping screws.
Parts needed for an electric logboard.
I bought the electrical parts on AliExpress, and everything else at a local hardware store.
Here is the entire list of parts that we will need for work:
- Electric drive for longboard. I bought it here.
- Controller for drives. I bought it here.
- Battery indicator. I bought it here.
- 6 or 12 volt batteries
- Steel box size 20x40 mm.
- Steel sheet 1.5 mm.
Also, for the work you will need different tools, such as a drill and a fortuna, but this has already been done.
Step-by-step instructions for making a longboard
The most important thing when making a longboard is to find the required type of wood; if it is not possible to get maple, then oak will do.
Instructions for making a longboard:
- It is necessary to determine what shape the deck will be and find a good quality template that will take into account all the design features.
- The resulting pattern should be transferred to one of the plywood sheets, matching the centers of the pattern and the material. .
- The resulting workpiece is polished along the edges.
- To determine the places where the tracks will be attached, you need to perform the following steps: move 8 cm from the bow and 22 cm from the tail.
- After the workpiece is ready, it is necessary to apply a layer of polyurethane to prevent the wood from drying out.
- The last step is to attach the tracks and wheels of the required size.
In order for a longboard to be reliable while riding, it is necessary to attach sandpaper to the top of the deck, which should have a shape that follows the pattern of the board.