Relevance
If your child cannot part with the “Young Doctor” set and comes up with a large number of games with such a set, endlessly examining all the household members and his toys, then it’s time to make him a costume in which he will feel like a real professional in his favorite business. If you know how to sew, and it is not difficult for you to design a pattern, then it is enough for you to look at pictures depicting the fabulous Doctor Aibolit or photographs of real doctors’ costumes. But, if you want to make such a costume with minimal effort and skill, then check out the following list of easy-to-make accessories and clothing items for a doctor or nurse costume.
Apron
The easiest way to make a doctor's costume is to sew an apron. It can be very simple, but you can also make it more elegant.
- Cut out an apron of the required size from a piece of fabric. The top cut and side edges are folded and stitched. To the bottom we sew a ruffle from a strip of fabric about 7 cm, laying it in folds. The length of the ruffle fabric should be one and a half times longer than the length of the bottom of the apron. We make a loop from red satin trim to secure the apron around the neck, and also use it to tie the apron on the back. Be sure to make an applique of red satin ribbons in the form of a cross.
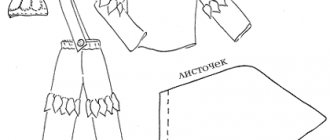
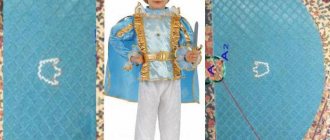
How to sew a Doctor Aibolit costume
The child will certainly appreciate the efforts of the parents and will want the same outfit for the holiday. Another advantage of this choice is that the baby will have a better attitude towards doctors and will no longer be afraid of just the sight of a white coat. In order to sew a product, it is advisable to choose chintz or simple cotton fabric; it is inexpensive, does not wrinkle much and is perfect for a suit. The outfit consists of a hat and robe. To make it, you will need a pattern. It's easy to find on the Internet. The process consists of the following steps:
- The dimensions of the person who will wear the suit are measured. The pattern is transferred to paper according to the measurements obtained.
- All parts are cut out of paper and transferred to white material.
- They should be outlined with a pencil with small indentations from the edge. They are made from two to three centimeters. This needs to be done from the inside out.
- All that remains is to sew all the parts in accordance with the diagram. It is better to use a sewing machine.
- When the hat and robe are ready, take a hot iron and carefully iron the items along the seams.
- Cut out a medium-sized cross from red fabric or paper and attach it to the front of the hat.
- Attach a similar red cross to the pocket or chest of your robe. You can choose shiny fabric or sequin-covered material for the cross.
Doctor Aibolit's children's New Year's costumes are often complemented with rain showers and festive decorations on the collar and cuffs. For an adult, you can also come up with original options. The main thing is to create a special holiday atmosphere.
Sew a train playpen for a child with your own hands: pattern, diagrams and description
Sew an envelope into a car seat for a newborn with your own hands: pattern, diagrams and description
Vest
Another easy way to make a doctor costume is to sew a vest. At the same time, it is very easy to sew, even if you only have a general understanding of this process.
- We take the child's measurements. We need numbers that will allow us to find out the length of this vest and its width. In this case, it is better to measure the width of the vest with a margin. Multiply the length by 2 and cut off the excess fabric. Fold the strip of fabric in half. We cut out the neckline and process it using bias tape. We fold the side sections of the vest and stitch them. It is necessary to sew the ties, retreating approximately 15-20cm from the shoulder. On the chest in the area of the heart, make an applique - a red cross.
- The same vest can be made with buttons. To do this, you need to cut out three parts from the fabric: the back and two front parts, which will be fastened together with buttons. Don't forget to add pockets and a red cross to the vest.
How to sew a doctor's cap. Question answer
...have you ever sewed a children's chef's and doctor's costume? I was asked to sew these two costumes in kindergarten.
I’m most interested in the cook’s hat; I don’t know how to correctly calculate the pattern for the puffy top...
Thank you in advance!
Anna Zhukova.
I had to sew hats for doctors and chefs, but not for children, but for adults, real doctors and chefs.
Let's start with the doctor's headdress, because... he is simpler.
A doctor's cap is a cylinder with one bottom. Therefore, you need to cut out the crown of the hat in the form of a rectangle.
The height of the rectangle is the height of the cap + seam allowances.
- There is a 1 cm seam allowance along the top edge for attaching the bottom.
- On the bottom edge, the seam allowance is 6-4 cm for making a hem seam with a closed cut. It is better to make this hem seam wide (3-5cm) so that the bottom edge of the cap has a fixed shape, and so that ties can be sewn on to adjust the volume of the cap on heads of different sizes.
The length of the crown rectangle is equal to the circumference of the head + seam allowance Psh = 2cm + seam allowance Pz (to adjust the width of the cap). Let's denote the length of the crown by the letter A.
A=Og + Psh+ Pz
The distance between the ties should be such that when fully tightened, the volume of the cap corresponds to the smallest head, and when the ties are completely loosened, to the largest head of the child.
Let's move on to the bottom.
The bottom has the shape of a circle with a circumference equal to the length of the side of the crown. It is necessary to calculate the radius of the circle.
From geometry we recall:
L=2πR
In our case L=A, which means
R=A/2π
Thus, we calculated the radius of the bottom of the cap; when cutting, do not forget to add 1cm seam allowances.
All. You can sew a doctor's cap.
We'll talk about the chef's hat next time.
My blog is found using the following phrases
My blog is found using the following phrases
coded by nessus
Share with friends
comments
Powered by Facebook Comments
blog.t-stile.info
Costume from baby's clothes
If you don’t have time to sew a suit, then to create the image of a doctor, the child’s clothes that you have at home may well be useful.
- For example, a white tank top or T-shirt. White color is traditional for the doctor's profession. Another distinctive sign is a red cross, which must be placed on clothing. This can be applique, embroidery, drawing with a waterproof marker or fabric paint, or a sticker.
- White shirt. The shirt should be a little large so that it is long and at the same time it is possible to wear it over other clothes, like a doctor’s coat. In this case, it is necessary to trim the sleeves so that they do not dangle. It is best to insert elastic into the cuffs. If the shirt fits loosely on the child, then sew two ties at the waist level that can be tied at the back. This will make the costume look more like the real thing. In addition, it’s great if you can add large pockets to your robe. Place a red cross on your chest.
Headdress
- Scarf. This option for making a headdress for a nurse's costume. Therefore, it is more suitable for a girl’s outfit. It's very easy to make. Cut out a triangle from the fabric. We fold its edges and stitch it or process it with red bias tape. Place a red cross in the center.
- The doctor's cap is made as follows. We will need a piece of white fabric measuring 50x20 cm, a circle with a diameter of 15 cm, as well as a narrow strip of fabric 5x80 cm. We will use the narrowest strip as ties for the hat. The edges of the strip need to be folded to the wrong side and folded in half. Sew along the front side so that the edges remain inside the resulting strip. Next, take a fabric measuring 50x20 cm. Fold the side narrow edges and stitch them. We need to sew one of the long sides in such a way that we can then insert the resulting strip for ties there. To do this, bend the edge of the fabric by 0.5 - 1 cm. Iron this fold with an iron. Then we bend it again, but this time by 4 cm. We also iron it with an iron. Let's make a line. Sew the other edge to the prepared fabric circle. We insert a strip for ties along the bottom edge of the cap and try it on the child. Instead of ties, you can use contact tape (Velcro).
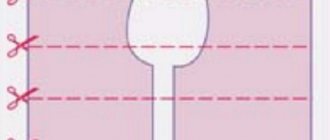
Master class 2 ways to sew a bib with your own hands (+ pattern)
The day before yesterday my youngest daughter went to kindergarten. To prevent children from getting their clothes dirty, parents were asked to bring bibs for their babies. I sewed this baby bib for my baby with her name embroidered.
From paper measuring 42x26 cm, cut out the following pattern. This pattern is for children aged 2 years and older. If you need a pattern for younger children, then you need to reduce it on all sides by 2 cm, the neckline will not be 11 cm, but 8-9.
We cut out a pattern from the fabric in two copies in a mirror image (top and bottom layer) + another one from oilcloth or a bag (you can do without it).
We place all 3 layers on top of each other: oilcloth, then 2 layers of fabric with the right sides facing each other.
We chop with needles so that the layers do not move apart.
We machine sew from the wrong side along almost the entire edge, leaving 6-7 cm unstitched.
Now, wherever there are roundings, we cut the fabric with scissors, slightly short of the seam.
Turn the bib right side out through this hole.
Bag
A shoulder bag is a necessary accessory for a nurse. It should be roomy enough and must have a red cross.
- The first option involves making a handbag, some type of bag with handles. We fold two pieces of fabric approximately 20x25cm right sides together. On the wrong side, we sew a stitch along three sides. The top edge of the bag must be folded and stitched. We turn two strips of fabric 50-60cm by 7-10cm into handles for the bag. We bend the long sides of these strips inward, bend them in half and stitch them on the front side. Sew the handles to the bag. Such a handbag may have one handle, but a longer one, which can be worn over the shoulder.
- Second option. We will need a strip of fabric 80x30cm and 10x100cm. We bend one of the narrow sides of a wide strip of fabric and sew a stitch on a machine. Next, we fold this prepared side at a distance of 25 cm onto the front part of the remaining fabric and lay the side seams. Then we bend the free sides of the remaining part of the fabric. The bag is almost ready. All that remains is to add a handle and, if necessary, a fastener in the form of a button, Velcro (contact tape) or button. And also make an applique in the form of a red cross.