DIY cosmetics organizer on the wall: ideas for crafts
Using a metal sheet, you can create a product for the wall. Many craftswomen skillfully used a sheet for baking in the oven, which had become unusable.
The metal sheet must be covered with fabric. You can use cotton or chintz fabric. It is important that it does not show through. The edges of the sheet must be decorated. To do this, you can take a wooden photo frame, lace, boards, and so on.
For sewing accessories
This organizer is very convenient because all the cosmetics are in front of your eyes. You need to glue a magnet to each product and place it on a metal sheet.
We create a homemade organizer with our own hands from fabric
The organizer is called so largely because it allows you to organize space in the most effective way. If your closet with socks or underwear is a mess and it’s difficult to figure out where everything is, then you don’t have an organizer. If cosmetics are piled up in a cosmetic bag, and there are countless jars in the bathroom, and it’s hard to figure out what they’re for, an organizer can help. Thus, it is indispensable:
- For storing underwear (socks, panties, tights, bra);
- For placing cosmetics and creams;
- For sorting spices and various kitchen items;
- In the hallway for storing keys, mail, leaving notes for family, for shoes;
- In the children's room, to keep the children's table and toys tidy and clean;
- For tools, be it the husband's hammers and files or the wife's sewing and knitting tools.
This is only a small part, and the organizer’s capabilities for optimizing space and making life easier for the housewife are limited by one thing – your imagination.
It is most convenient to place the organizer on the wall if it is a hallway or a children's room. It will also fit perfectly on a door or in a closet on a hanger. The linen organizer can be placed directly in the linen closet.
Now the question of whether an organizer is needed has disappeared by itself.
The simplest type of organizer that even a beginner can create is a wall organizer with pockets. To make it you will need:
- Fabric for base;
- Fabric for pockets;
- Sewing supplies;
- Cardboard;
- Sewing machine;
- Decorative elements.
You can easily sew an organizer on the wall by reading our master class. Before you start sewing, you need to determine what items require an organizer. Let's make a wall-mounted one for storing children's toys and stationery.
- Cut a rectangle of the desired size from thick, bright fabric. The more things you have to store, the larger the organizer will be.
- Finish the edges of the rectangle by folding them 0.5 cm and stitching them on a sewing machine.
- Sew a loop in the center of the top edge, using which the organizer will be attached to a wall or door.
- Now it's the turn of the pockets. For children's stationery, as a rule, both small and large ones are needed. In the large ones you can store felt-tip pens, pencils, paints, and in the small ones you can store scissors, rulers and other things. We draw patterns on thick cardboard. These can be ordinary rectangles, semicircular pockets, triangular ones, or small strip holders for small items. Experiment with sizes and placement, because during use, not a single pocket will be left idle.
- From the fabric you have chosen for the pockets, we cut out blanks, not forgetting to add 0.5 cm on each side for seams.
- We determine where each pocket will be located and using a sewing machine or a regular needle - whichever is more convenient, we sew them to the fabric.
- Now the most interesting part, in which the children for whom this organizer is intended will take part with great pleasure - decorating.
You can decorate the resulting product in a variety of ways:
- Give your child felt-tip pens, paints and markers and let him paint. Or let the child draw an object on each pocket that will lie there;
- Cut out pictures from fabric with a pattern and sew them onto pockets;
- Stick on the appliques;
- Sew buttons, ribbons, bows, flowers from fabric;
- Craftsmen who do embroidery can embroider a variety of pictures on canvas and sew them onto the organizer.
There are a huge number of decor options. Depending on the interior, resources, time and capabilities, you can create a wide variety of interior items.
Bag for sewing supplies
An organizer for sewing accessories is not very easy to make with your own hands, but experienced seamstresses can make it in literally a couple of hours.
Materials for work:
- Any fabric of your choice and lace;
- Zipper 60 cm;
- Lining material;
- Foam rubber;
- Threads to match the bag;
- Scissors, needles, pencil, ruler;
- Sewing machine.
To form the bottom, you can take small plates and trace them on the fabric. Cut out two parts. Then you need to cut the same part from the lining. Using a ruler, measure a 10/60 cm line on the main fabric. Add an allowance of 1 cm and trim. Do the same with the second fabric. Next, draw a 15/60 cm segment on the lining and foam rubber, and cut it out. All received parts must be stitched.
Original laundry storage
Sew the bottom and main part of the bag together. Secure with pins and sew the entire resulting structure, then lay parallel lines at a distance of 1 cm on the bottom part.
Secure part of the zipper to the lid of the product with pins. Sew at a distance of 1 cm from the edge. Make lace along the edge of the product and sew on a handle.
You might be interested in Sewing short skirts with and without patterns
Also, a sewing organizer can be made from ordinary fabric and padding polyester.
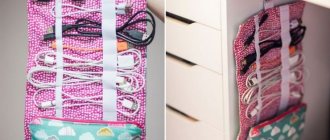
Master class: Very quick organizer for a bag
For those who don't know how to sew: you can glue them together with a hot glue gun.
Everything is holding together. So, we'll need felt or something similar. I have a non-woven polyester rug from FixPrice.
- Share
Let's make a pattern. If you don't want to, you can use my sizes. To make a pattern, lay out what will be stored in the organizer on a sheet of paper. Or just the largest item, such as a wallet. Mark the boundaries, make allowances. On the long sides up, add a couple of centimeters.
- Share
- Share
Then the pocket pattern. It should be slightly smaller than the side. And the top of the pocket is about 1 cm longer than the base, so that things are not stuffed into it, but neatly folded. Then we will sew this part and divide it into smaller pockets.
- Share
Cut out the details. Number of pockets as desired. I have two outside and one inside.
- Share
On the main part, slightly compact the top of the long side. To do this, mark and tuck our allowance. We sew several lines.
- Share
- Share
- Share
You can add some decoration.
- Share
Sew on the pockets. 1) Here it is important to immediately decide how many compartments they will be divided into. And first sew on the one with the smaller ones. For example, if the inner pocket is divided into 3 parts (12, 14 and 14), then sew it first. And we sew the outer pocket on the same wall of the organizer from above so that the side and central seams coincide. 2)And the second important point: do not forget to align the side of the pocket so that it runs parallel to the wall of the organizer. After all, we specifically made a margin of 1 cm for volume.
- Share
- Share
- Share
All that remains is to assemble the sides. Don't forget to tack the ends of the stitches!
- Share
- Share
- Share
- Share
- Share
Thank you for your attention!
I hope MK will be useful for someone!
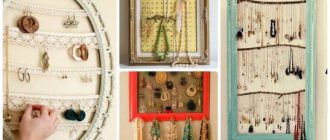
Convenient jewelry storage
The easiest one to make is from an ordinary board, decorated as desired. Make as many hooks and loops as possible to hook the decorations onto.
Decoration board
If a person already has extensive experience in needlework, then you can try to make a homemade organizer for accessories. It is made from photo frames of the same size with a soft center mounted on a ball guide.
It would be great to store things in plastic boxes lined with padding and fabric. For decoration, you can sew on various beads and brooches. Or paint the product yourself, it will be very original and beautiful.
Step-by-step making of an organizer
There are a large number of bag organizers that you can make yourself. They can have different shapes, be suspended or installed on a shelf, and made from various materials. We will tell you how to make a simple version of a system for storing bags in a closet.
- First you need to choose the size of the future product .
- Then you need to cut out rectangles of the required size from plastic or polyethylene. Pieces twice the size are cut out of the fabric.
IMPORTANT! When cutting, remember to leave a few centimeters on each side for seams.
- The cut parts need to be folded in half with the wrong side inward . You need to put prepared pieces of plastic or polyethylene in them. Then stitch on top.
- The edges of the fabric must be shaped like an accordion . This can be done using an iron. You need to leave allowances on the sides.
- The folds at the edges of each pocket must be stitched.
- Next, you should take a large piece of fabric and place plastic or polyethylene between its two layers.
- Place the pockets made on the resulting base and secure them with tailor’s pins.
- Using a machine, sew pockets to the back wall of the future organizer. The edges of the base need to be given a rounded shape. This can be done using a glass. All edges of the resulting product should be covered with tape or bias tape.
- Eyelets are installed in the required places.
By showing your imagination and spending a little free time, you can create an original and functional storage space.
DIY laundry organizer
Materials for work:
- Regular box;
- Wallpaper of any colors;
- Wallpaper glue;
- Brush;
- Large ruler;
- Pencil;
- Stationery knife;
- Stapler scrapings.
Draw a line along the bottom of the box, all around the perimeter. Using a knife, cut the box along the line. Cover it with wallpaper. Make a bottom out of cardboard and cover it with wallpaper.
For seamstresses and craftswomen
To make partitions, you need to decide what size the compartments for storing things will be, based on this, make partitions from cardboard that are equal to the length and width of the product. They can also be covered with wallpaper. Insert the partitions into the box and secure with a stapler. You can store clothes.
Wall Mounted Magazine Organizer
Materials for work:
- Textile;
- Wooden stick;
- Tourniquet;
- Scissors;
- Sewing machine and threads;
- Hook for the product;
- PVA glue is transparent.
Make three pieces of fabric 50x40 cm. Fold each piece in half on the long side to make 50x20 cm pieces. Sew the long edges so that the cover is in the shape of a pipe. Turn the product inside out and iron it. Do these steps with all the blanks.
Wall mounted magazine storage
Fold one of the sleeves in half lengthwise. Place the other one on the table. Place the sleeve on top so that the fold is 10 cm from the bottom of the first sleeve. Insert pins into the blanks, and then sew all six layers of material along the edge of the sleeve.
Attention! Seams on the product should not be visible.
Take the last unsewn sleeve and place it on top of the two sewn ones. The lower parts of the blanks should be on top of each other. Secure the top of the bottom layer with pins. Sew along the edges. This time, fold the last sleeve in half, making sure that the front edge is 4 cm larger than the back one. Insert a wooden stick of the required width on top. Sew the resulting allowance around it. Pin the material with pins and stitch it, removing the stick in advance. Insert it into the resulting compartment.
You might be interested in this: Simple patterns and methods for sewing nightgowns
Bathroom organizer made of cardboard
DIY stationery organizer
You can store the stationery in ordinary glass jars. It is advisable to choose jars of the same size for this work.
Work process
Materials for work:
- Banks;
- Light acrylic paint;
- Pencil, brush, markers, tape.
You can color the jars using any means (paints, varnishes, felt-tip pens).
Before work, you need to pour a little PVA into the paint so that it adheres well to the glass. You can also store some makeup products or brushes.
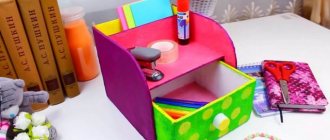
Organizer for the artist
Materials:
- Fabrics of different colors;
- Cardboard;
- Office paper;
- Seal;
- Felt fabric;
- Rubber;
- Magnetic button;
- PVA glue.
First you need to cut out the parts from cardboard and paper.
Glue the cardboard onto the seal and cover it with fabric.
For decoration, you can use different pictures to suit your taste. Transfer them to felt. Iron the picture for a few minutes until it is well absorbed into the fabric.
You may be interested in this: Sewing zippers to bags made of different fabrics with linings
Sew it on the machine with tight seams. The cover is ready. Make loops inside for storing brushes and other materials.
Fabric craft
You can independently make a craft to suit every taste from scrap materials by watching a master class on making organizers with your own hands on our website.
Choose any model and get to work, and our detailed, step-by-step instructions will help you create a convenient and necessary household item quickly, efficiently, and beautifully.
For the convenience of users, the site has a video with a detailed description, useful life hacks, and interesting ideas.
Shoe organizer
The most convenient option is to make boxes from wood. It is better to take high-quality wood so that the boxes last a long time. The sizes can be any, preferably such that boots fit freely. You can make small drawers nearby for socks or shoe cleaning products. If wooden boxes are not affordable, you can use cardboard and lining, but such a product will not last long enough. Shoes should only be stored in a dry and clean condition.
Car bag
Massive organizers
Volume organizers are designed for storing large items, cereals, and a large number of products. They can be compact, like a stationery set made from cups that easily fits on a desktop, or massive and require a separate space, like a piece of furniture.
Note!
DIY feeder - step-by-step instructions for creating a feeder + detailed diagrams with photo reviewsDo-it-yourself rugs - TOP 120 simple patterns with master classes on how to make them yourself + photo reviews of finished rugs
- Do-it-yourself dolls: a master class on making a beautiful doll. Simple instructions with photo examples of ready-made options
Interesting multi-tiered designs are made from hangers interlocking with each other, towel rings, and scarves.
Convenient car organizer
Materials for work:
- Plastic container;
- Fabric to choose from;
- Velcro tape;
- PVA glue;
First you need to cover the container with the selected fabric. After this, you will need to stick pre-cut Velcro onto the bottom of the container.
This is done so that the bag does not fidget during use. The Velcro sticks to the fabric in the trunk. You can store cleaning products, a first aid kit or car tools in it. You can also make a separate tall box to store the fire extinguisher so that it does not just lie in the trunk.
Craftswomen will appreciate: master class organizer for sewing accessories
The process of sewing can be a lot of fun, but not when all the necessary little things are in disarray. Indeed, in this case, most of the time you will be looking for what you need. You can buy a ready-made container, but firstly, it is not so interesting. Secondly, if you sew really a lot, then there will never be enough containers. Build a convenient organizer from what is at hand.
Most of the materials for making such an organizer have already been used, so the project will be cheap and environmentally friendly. The containers are made from plastic milk cans (can be replaced with cans of liquid laundry detergent). In the center there is a box with compartments for various tools.
Plastic containers are placed in two boxes of the same size, which are located on the sides. This makes it easier to remove them from the organizer. These handy boxes can hold small items like buttons or rhinestones. Convenient stickers with inscriptions will make it easier to find the desired item.
For the project you will need:
- square-shaped milk or detergent canisters;
- cardboard boxes of different sizes;
- glue;
- burlap or other thick fabric for upholstery;
- rope;
- knife and scissors
Try to select the boxes so that they fit snugly into the larger one. If that doesn't work, make them out of cardboard.
Step 1: Cut the plastic canister into two pieces. For this project you will only need the bottom one.
Step 2: Cut the bottom of the canister along the corners, not reaching the very bottom to the height of the future container. Based on the size of your canister. The top part should be enough to form lids. Fold the sides, additionally trimming the side edges at the corners.
Step 3: Make a small crescent-shaped cut on the top lid of the resulting box. Make a straight slit on the bottom. The box is now easy to secure in the closed position.
Step 4: Now let's start installing the boxes. If you were able to find the perfect size, simply reinforce the walls with tape. Then your organizer will last longer. If you need to adjust the size, then you can’t do without strengthening.
Step 5: Place the cardboard dividers in a large box. This will prevent the two boxes from falling out when you take one of them out. If you don't know where to find cardboard, go to your local store or pharmacy before closing.
Step 6: Now you need to make the central part of the organizer. This box will be pulled out by a rope, so you need to form a small side on the bottom that will prevent things from falling out. It is made from several layers of tape.
Step 7: The part of the large box where the rope handle is attached was also secured with tape. The rope must be pulled through the hole cut with a knife and secured with a knot on the inside. The ends of the rope are coated with wood glue or PVA to prevent the edges from fraying.
Step 8: Coat the box thoroughly with glue before wrapping it in burlap. The glue can be applied using a brush or an old credit card.
Step 9: Make the handle for the small medium box in the same way.
Step 10: Assemble the structure. Burlap and rope are somewhat reminiscent of canvas and sea ropes. In this case, red fabric was used to upholster the middle part. But if you want to enhance the nautical theme, add blue.
Each section can be obtained separately. Have fun sewing and keep all the necessary things in order.
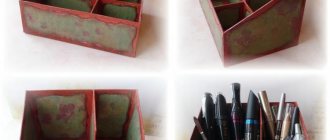
Handbag - basket for cosmetics
To make a cosmetics organizer with your own hands from fabric, you first need to decide on the shape of the bag. It is made in the same way as a sewing organizer, only with minor modifications.
Materials and tools:
- Two pieces of felt. One: length - 40 cm, width - 22 cm. Second: 2 cm longer than the first, width - about 15 cm.
- Velcro or tape;
- Cardboard;
- Glue;
- Lightning;
- Scissors, needles and threads.
Cut out the side parts of the product from cardboard. Cover them with felt and glue them together. The bottom and top are also made of cardboard and covered with fabric, sewn to the base of the product. Sew a zipper into the top of the bag. You can safely store makeup products and other small items.
Organizer bag
In conclusion, it should be noted that making an organizer for various things with your own hands is quite simple. Many master classes, patterns and drawings can be found on the Internet. There are more than a hundred types of organizers for cosmetics or linen. The main thing is to include all your imagination and creativity. You can make an original sewing organizer with your own hands from ordinary cardboard and glue.
Organizer for cosmetics
Almost every girl has a lot of cosmetics. But how not to get confused in this variety and quickly find the right thing in the morning? If you are familiar with this problem, then an organizer is the ideal solution.
By the way, magnetic boards have become very fashionable in 2022. They are used for literally everything, including cosmetics.
Such a board looks interesting in an unusual shape. For example, in the form of the first letter of your name.
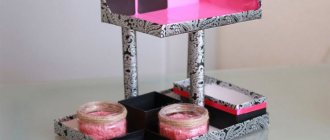
For brushes, you can create another organizer from a transparent container. Thanks to the additional decor in the form of beads, they will have a stable position.
Another budget option is to use chip packaging as a base. Minimal decor will help give it an attractive look. By the way, you can even store painting brushes in such an organizer.