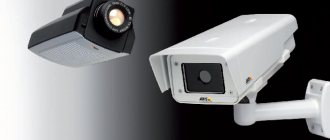
How to make homemade video surveillance using simple usb webcams? I asked myself this question after an unsuccessful attempt by homeless people to break into my garage next to my house in broad daylight.
Fortunately, a neighbor noticed the “robbers” and scared them off. My garage is located next to my nine-story building and the windows of my apartment overlook it. The line of sight to the garage is about a hundred meters. At night, the garage is clearly visible - it is illuminated by street lights. So why don't I organize 24-hour video surveillance from the window? This is just the perfect option to look after your garage without leaving your home. And the cost of such simple video surveillance on web cameras will be a pittance. All you need is straight hands and desire.
Home video surveillance on a PC - how I did it.
At first I planned to use a regular car video recorder for video surveillance. What could be simpler - installed it on the windowsill in the apartment and pointed it out the window towards the garage. But then, I wanted to watch the drunks at the entrance from another window, and it wouldn’t hurt to keep an eye on the landing in the entrance itself. To do this, you already need to have three car video recorders. And this is not so practical. Therefore, I decided to use my old laptop with three cameras connected to it. In this case, the configuration of the video surveillance system on a laptop can have various options:
- you can, for example, use EasyCap - a special USB device that converts signals from conventional analog video cameras into a digital USB signal;
— you can use unlimited number of wireless IP cameras connected to a Wi-Fi router. In addition, if you wish, you can even broadcast this video on the Internet (on a smartphone, etc.);
I settled on the simplest and cheapest option - to use for video surveillance the most ordinary computer usb Web cameras that I bought once.
Later, I even managed to attach a monocular to the webcam - it turned out to be an excellent long-range surveillance camera.
Microscope from a camera
One of the simplest and most affordable ways, but with everything you need. You will need a camera with a 400 mm, 17 mm lens. There is no need to disassemble or remove anything, the camera will remain working.
We make a microscope from a camera with our own hands:
- We connect a 400 mm and a 17 mm lens.
- We bring a flashlight to the lens and turn it on.
- We apply a drug, substance or other micro-subject of study to the glass.
We focus and photograph the object under study in an enlarged state. The photo from such a homemade microscope turns out to be quite clear; the device can enlarge hair or fur, or onion scales. More suitable for entertainment.
Regular cheap usb webcams for video surveillance.
One day in my local supermarket, in the household goods department, they “threw out” a whole mountain of probably not very popular webcams on the rack. The simplest and cheapest Chinese web cameras. On sale, with a price of about 0.5 dollars. Kisses the mountain Karl! For 0.5 dollars! In general, I collected about eight of them then. I don't even know why. Just like that, for the sake of freebies. Then they lay idle for a long time. I gave some away, some was left lying around. And so, after those homeless people took a fancy to my garage, I decided to bring these free web cameras for video surveillance into the light of day and use them. As it turned out, it was quite successful.
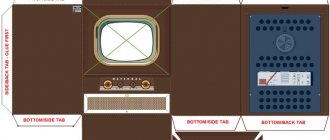
Gate
In principle, the shutter does not have to be an element of the camera; it can also be external - in the form of a lens cap or built into the lens. The camera must have the ability to control an external shutter. Ideally, as with some medium format cameras, it is desirable to have two shutters: one is a focal length shutter, directly in front of the sensor, which operates if the lens does not have its own central shutter, and the other is a central shutter built into the lens.
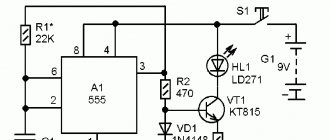
Shutter functions also include flash synchronization. What was done and how
In order not to be unfounded, let's consider making a modular digital camera on your knee at home. I warn you right away that if you have a problem disassembling a working camera and assembling it while maintaining functionality, then the success of the conversion event is very problematic. It is not the gods who burn the pots, and anyone can master disassembling cameras, but the number of damaged cameras during the learning process depends on the individual. I specifically do not dwell on the specific screws on which the case is held, considering this task a necessary “test for lice.” I will only note that when disassembling this model you cannot do without a soldering iron. Some wires are too short. And besides the screws, the case is also held in place by latches, to which a certain force must be applied
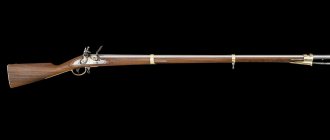
The Casio QV 3000 camera was taken as a basis. The assembly that combines the lens, matrix and viewfinder looks like this:
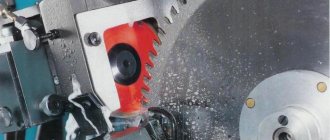
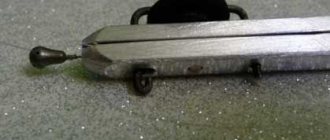
The lens unit was completely disassembled. The following were removed: the viewfinder, all the objective lenses, and the motors that control the change in focal length and focusing. These engines look like this:
Motor that moves the lens when focusing, left
It turned out that after disconnecting the cable leading to the motors and limit switches, the camera is fully operational and does not react to the absence of a lens. The central shutter was removed from the lens, rotated 180 degrees and positioned in front of the IR filter directly adjacent to the sensor.
The central shutter in this camera has two functions: limiting exposure time (shutter function) and changing the diameter of the aperture. We are not going to use the second function; it is only important for us that the camera has the ability to fix the aperture in the fully open position, and that its diameter is larger than the diagonal of the matrix. In other words, the device is suitable for conversion if it has manual control of shutter speed and aperture, and if the maximum aperture diameter, approximately defined as the maximum focal length of the lens divided by the f-number, is greater than the diagonal of the matrix.
The Casio QV 3000 camera has a Sony ICX 252 CCD sensor. Its size is 7.2 mm × 5.35 mm, i.e. its diagonal is approximately 9 mm. The lens in this camera has a maximum focal length of 21mm. The maximum aperture number is 2. Thus, the diameter of the aperture must be greater than the diagonal of the matrix. In reality, the lens aperture at the maximum focal length is slightly less, and it is necessary to accurately align the shutter opening with the matrix so that there is no vignetting of the corners. Thus, we turn the central shutter into a focal length shutter. Although, unlike classic focal length shutters, in which the curtains move from edge to edge of the frame, here the curtains move from the center to the edge of the frame, however, it turned out that at shutter speeds longer than 1/400 s, the curtains move so quickly that the center of the frame is overexposed not noticeable. In general, if the camera has a shutter speed of B, then you can use the central shutter built into the lens.
| Dimensions of matrices existing today and their markings | |
| 4/3″ | 18.00×13.50 mm |
| 1″ | 12.8×9.6 mm |
| 2/3″ | 8.8×6.6 mm |
| 1/1,8″ | 7.18×5.35 mm |
| 1/2,7″ | 5.27×3.96 mm |
| 1/3,2″ | 4.54×3.42 mm |
| Historically, the marking of matrices corresponds to the marking of vidicons by outer diameter with the size of the light-sensitive area equal to the matrix. Approximately, the diagonal of the matrix is 2/3 of the marking value | |
It turned out that even if you remove the protrusion around the lens from the camera body, the distance from the front wall of the camera to the matrix will exceed 28.8 mm. Therefore, in order to use the lens mount with M39 thread, which was taken from the Zorki-5 camera, it was necessary to move the glass with the matrix about 5 mm closer to the wall of the camera. To do this, the supports to which it is attached were sawed off, and the glass of the frame itself was carefully shortened. Ideally, the frame would have to be re-cut. But in this design, a lens housing glass was used, which was shifted forward, rigidly connected to the camera body, and to which a ring with an M39 thread from the Zorkiy-5 apparatus was attached with screws. In order to achieve precise alignment, pictures were taken with the Jupiter-3 lens set to infinity, and by placing washers under the support ring, I achieved a sharp image. To work with lenses for Zenit-type SLR cameras, an adapter ring was made from M39 to M42 threads. It was made from two extension rings with washers sandwiched between them to achieve the ring's exact thickness of 16.7mm. If done accurately, the scale on the lens is sufficient to focus satisfactorily on most subjects. The great benefit of digital cameras is the ability to see on the screen the same image that is projected onto the matrix. Unlike film cameras, there is no need for a complex mirror lifting mechanism and precise adjustment of the ground glass. However, there is one thing: only every 40th pixel of the registered ones is displayed on the screen. However, the ratio of the sizes of silver crystals on the film and grains of frosted glass is no better. As shown by the test shooting, the results of which are given below, in all cases it is possible to achieve acceptable focusing quality.
It is often said that lenses designed for film cameras have a resolution of 50 line pairs per mm. Those. Matrices with a frame size of 640×480 pixels will work effectively with them. But they forget that the lens characteristics are given for the maximum open aperture. And these lenses, such as Jupiter-3, have a relative aperture of 1:1.5. And already at an aperture of 1:5.6, typical for most point-and-shoot cameras with long-focus lenses, its resolution will improve significantly. But with this matrix, a 50 mm lens in terms of viewing angle corresponds to a 250 mm lens of a 35 mm camera, which most point-and-shoot cameras never dreamed of. Diffraction will begin to affect the image at apertures smaller than 1:11. So, in reality, this lens can provide, with appropriate aperture, a resolution at which the capabilities of the matrix will be fully realized. This will happen, in particular, because only the central part of the image circle is used. Reworking the camera finally made it possible to separate the influence on the sharpness of the lens and the matrix. Below are the results of shooting the world with one lens with registration on matrices, the sensitive elements of which differ in size by almost two times. Helios 44 lens with ICX252 matrix and matrix installed in a Canon D60 camera.
The letter D indicates the diameter of the circle of confusion in pixels. Inside this circle, it is not possible to distinguish adjacent strokes. They are either absent or heavily distorted by moire.
Given: lens focal length 58 mm. Mira contains 90 black radial strokes.
| ICX 252 | Canon | |
| Matrix size | 7.20×.35 mm | 23.4×15.6 mm |
| Frame size | 2088x1550 pixels | 3008x2000 pixels |
| Sensor size | 3.5 µm | 7.8 µm |
| Diaphragm | F/2 | |
| Linear resolution limit in µm | 1,3 | |
| Diameter of circle of confusion in pixels | 80 | 80 |
| Lines per pixel resolution (black + white lines = 2 lines) | 0,71 | 0,71 |
| Diameter of circle of confusion in mm | 0,28 | 0,62 |
| Resolution of line pairs per mm | 102 | 46 |
| Diaphragm | F/8 | |
| Linear resolution limit in µm | 5,3 | |
| Diameter of circle of confusion in pixels | 74 | 74 |
| Line resolution per pixel | 0,77 | 0,77 |
| Diameter of circle of confusion in mm | 0,26 | 0,58 |
| Resolution of line pairs per mm | 110 | 49 |
| Diaphragm | F/16 | |
| Linear resolution limit in µm | 10,6 | |
| Diameter of circle of confusion in pixels | 97 | 83 |
| Line resolution per pixel | 0,59 | 0,69 |
| Diameter of circle of confusion in mm | 0,34 | 0,65 |
| Resolution of line pairs per mm | 84 | 44 |
Since with an aperture of F/8 the resolution in lines per pixel is the same for pixels of different sizes, then in this case the lens resolution exceeds the capabilities of both matrices. At F/16 and F/2, the resolution for the ICX 252 is determined by the lens, and for the Canon-Helios system the influence of the lens is noticeable, but insignificant.
Let's take a closer look at the dependence of the resolution of the Helios 44 - ICX 252 system:
Maximum contrast and resolution in the area of F/8-F/11; at aperture F/2 aberrations are clearly noticeable, at F/16 there is a drop in contrast and resolution.
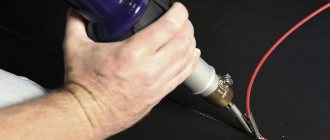
How to extend a USB webcam for video surveillance - twisted pair universal USB extension cable.
But now I am faced with a new problem - how to extend the webcam cord . Making a normally working homemade USB extension cable is not an easy task if you are encountering USB cable extension for the first time. Physically, USB uses a differential signal (symmetrical amplitude signal). Therefore, no shielded wires longer than half a meter (even super shielded ones) will really work in USB. The USB bus is a symmetrical communication line!
For a USB extender you only need a twisted pair cable! An ordinary computer wire is twisted pair. more about how I made an 18-meter USB extension cable here .
To wire three web cameras from a laptop around the apartment, I needed three pieces of twisted pair wire, about 10 meters long. But, experimenting, I managed to connect a USB webcam through a piece of twisted pair cable even 18 meters long. It's all about the special connection of the cable conductors. The performance of the USB extender depends on this.
Microscope from a mobile phone
The second simplified method for making an alternative microscope. You need any phone with a camera, preferably one without auto focus. Additionally, you will need a lens from a small laser pointer. It is usually small, rarely exceeding 6 mm. It is important not to scratch.
We fix the removed lens on the camera eye with the convex side outward. We press it with tweezers, straighten it, you can make a frame around the edges from a piece of foil. It will hold a small piece of glass. We point the camera with the lens at the object and look at the phone screen. You can simply observe or take an electronic photograph.
If you don’t currently have a laser pointer at hand, you can use the same method to use a sight from a children’s toy with a laser beam; you just need the glass itself.
Making a USB extension cable:
I took an 18-meter piece of twisted pair cable and terminated it with dismountable female and male USB plugs purchased at a radio store.
Important point! I connected the blue pair of network cable conductors to D+ and D-. Why blue? – All four twisted pairs of the cable cores have different lay pitches. This is clearly visible if you remove the overall sheath of 10 - 15 centimeters from the UTP network cable. So, the USB extension cable worked perfectly if the D+ and D- signals were sent through the blue or green pair of wires . If we put D+ and D- on the orange pair, then the USB extension cable did not work at all. The brown pair worked intermittently. Probably, the laying pitch of the blue and green pair of cores is ideal for the passage of a high-frequency USB signal (resonance, impedance, characteristic impedance, etc.).
I paralleled the other three pairs of cable cores and ran power through them - three colored wires plus, three striped wires minus.
also read about the reasons why a homemade USB extension cord does not work here .
The video surveillance software I use.
For home video surveillance, I use the awesome demo version of Active WebCam . Program website: //www.pysoft.com/ . You can also download it there. This free demo version of the video surveillance program has absolutely no time limits and is absolutely fully functional. Has Russian language. It differs from the registered version only by the inscription “DEMO MODE” in a small blue rectangle in the upper left corner of the program window. The “DEMO MODE” inscription has absolutely no effect on functionality and practically does not block the view. That is, this is an ideal video surveillance program for home (and not only) use.
Active WebCam is not demanding on PC hardware. For me it works freely with two web cameras on an ancient IBM ThinkPad R 51 e (there are only 2 USB ports) and on an old Acer eMachines E 528 with three web cameras. In general, the program can work with an unlimited number of cameras. Both video cameras and web cameras. You can record to a file, as well as broadcast a video stream to the Internet via the built-in HTTP server. The program has a “motion sensor” - you can configure video recording to start when movement appears in the frame. This is perhaps the best free video surveillance program I have tried.
Me and Diode. © yaidiod.ru.
Photosensitive material
Today's sensors, given the number of frames they can take, are probably produced in larger quantities than photographic film was 100 years ago. And the cost of one frame is probably not higher. Matrices are offered by several manufacturers, in fact, in a ready-to-use form. Along with all the logic necessary for their functioning. I think that today it is much easier to make a working electronic circuit with a matrix than a receiver using T3 transistors 40 years ago. Nowadays there is a lot of talk about the fact that the matrices are of the wrong size. And how can they be used if their area is much smaller than the working field of the lens? However, a similar situation has always existed: in the same cameras, with the same lenses, plates of size 18x24, 13x18, 9x12 were used. Many medium format cameras allow you to shoot frames in 4.5x6, 6x6, 6x7, 6x9 formats. Contax recommends using lenses from the 645 model, designed for a 6x4.5 frame, with its cameras with a frame format of 24x36 mm. And even a frame on the legendary 35 mm film is not only 24x36. Many cameras with a 24×18 film frame were produced (Chaika, Zorki-12, FED-Mikron, Agat-18), Nikon 1 had a 24×32 frame. The fact that the area of the sensitive element is smaller than the working area of the lens has its advantages. In fact, the entire area has never been used since the time of the daguerreotypes. If we want to capture everything that the lens has created, we end up with a round frame. If the frame is much smaller than the image field, we can easily move it and thereby compensate for perspective distortions.
There is another problem that arises when using a large area sensor with lenses that have a short back focus. These are significant angles of incidence of rays on the edge of the frame. In front of most matrices there is a filter that cuts off the ultraviolet and infrared regions of the spectrum. This filter is a plane-parallel glass plate several millimeters thick and is capable of significantly shifting and reflecting a significant portion of the edge rays. Perhaps these cameras should ditch the filter in front of the sensor and, like the first Kodak DCS cameras, use a filter in front of the lens. However, its area should be significantly larger and, accordingly, its cost may be significant.