- April 29, 2019
- Miscellaneous
- Tamila Gresko
If your old refrigerator breaks down, you can, of course, call a technician and try to fix it. If all the actions you have taken have not brought results, then there is only one option left - to send the used unit to a landfill. It’s better, of course, to take the refrigerator to a metal collection point and get money for it. Often inexperienced people who have no idea how much non-ferrous metal, namely copper and aluminum, are in the engine, sell old refrigerators as ferrous scrap. There are also beginners who do not know how to disassemble the refrigerator motor. According to experts, this is not so difficult to do. You just need patience and a certain tool. You will learn how to disassemble the refrigerator motor yourself from this article.
The principle of operation of the compressor device from the refrigerator
- 10.1. Step-by-step assembly instructions
- 17.1. Related articles:
A standard refrigerator compressor is a compressor unit without a storage tank, which is enclosed in a metal casing. Two copper tubes extend from it, through which air is sucked in and released out under pressure. The electrical connection diagram practically does not change, since it is ready-made. Air filters are mounted on the inlet and outlet pipes, followed by an oxygen hose with an adapter for the consumer.
Refrigerator compressor: operating principle
To understand the purpose of this device, you should consider the operating diagram of the equipment. A simplified version, where only the main structural elements are indicated, is given below.
Rice. 1. Operating principle of the refrigeration unit
Designations:
- A - The evaporative radiator is usually made of copper tubes and is located inside the chamber.
- B – Compressor apparatus.
- C – Condenser, is a radiator assembly located on the rear side of the installation.
- D – Capillary tube, used to equalize pressure.
Now let's look at the algorithm of the system:
- Using a compressor (B in Fig. 1), refrigerant vapor (usually freon) is pumped into the condenser radiator (C). Under pressure, they condense, that is, freon changes its state of aggregation, passing from vapor to liquid. The radiator grille dissipates the heat generated in this case into the surrounding air. If you noticed, the back of the operating unit is noticeably hot.
- After leaving the condenser, the liquid refrigerant enters the pressure equalizer (capillary tube D). As you move through this unit, the freon pressure decreases.
- The liquid refrigerant, now under low pressure, enters the evaporative radiator (A), under the influence of the heat of which it again changes its state of aggregation. That is, to become steam. During this process, the evaporative radiator is cooled, which in turn leads to a decrease in the temperature in the chamber.
Next, the cycle is repeated until the required temperature is established in the chamber, after which the sensor sends a signal to the relay to turn off the electrical installation. As soon as the temperature rises above a certain threshold, the device turns on and the installation operates according to the described cycle.
Based on the above, we can conclude that this device is a pump that circulates refrigerant in the cooling system.
Features of the air compression idea
Before deciding to implement an idea, it is advisable to decide exactly: is this idea really worth taking on? Let's consider several important aspects of the topic in order to help future designers make the right decision:
- Refrigeration compressors are not designed to work with air.
- The compressor performance of domestic refrigerators is low.
- To lubricate the mechanism of refrigeration compressors, special oil is required.
The corresponding conclusions follow from this. When working with air, the device will not be able to function for a long time without good cooling.
When a refrigeration compressor operates with freon, the housing is cooled due to other temperature parameters of the refrigerant.
Compression of the air mixture by a refrigeration compressor occurs under completely different temperature conditions, which will lead to an increase in operating temperature by an order of magnitude. Ultimately, without good cooling, the compressor will simply burn out.
A burnt-out refrigerator compressor as a result of a violation of technological operating conditions. The same fate awaits the device that is supposed to be used in the project if special protective equipment is not used.
The low performance of home refrigeration units is another factor limiting the use of such equipment for producing compressed air.
For example, to pump a 5-liter receiver to a pressure of 5-7 atm, it will take at least 15-20 minutes of operation of the refrigeration unit.
Meanwhile, this volume of air is not enough even to inflate a car tire in one sitting or spray paint one wall of a small garage room.
Poor performance of the refrigerator system is common for such equipment. But for an air compression system, especially with a high flow rate, a high-performance system is required
Finally, another important factor is compressor oil. To lubricate the mechanism of refrigeration compressors, a special freon oil is used, the properties of which change dramatically in contact with air.
If you do not change the oil to another type of lubricant that is structurally friendly to air, after a certain time the compressor mechanism will simply “close up” due to rapid wear of parts.
Turn-on moment
Reinsurance with automatic switching off and on means that the connection line must go through the relay. You need to read the instructions that came with the compressor
This is especially important since it works in unusual conditions. It often becomes necessary to install a condenser (depending on the type of compressor and the refrigerator from which it was removed)
From the outlet we go to the switch. Then we connect the phase wire to the desired relay terminal. The neutral wire can go in two directions. If there is a ground wire, leave it; if not, connect it to the ground terminal on the relay. The second option is better.
As a result, we get protection using nulling. Then the phase and neutral wires go to the compressor starting drive. According to the indicated diagram, the wires are connected to the required terminals. Everything is ready for painting. Let's summarize the materials used:
- compressor (can be used from the refrigerator);
- receiver (fire extinguisher, for example);
- pressure switch;
- pressure gauges;
- flexible hose (oil resistant);
- adapters, plumbing gaskets, FUM tapes, etc.;
- Chipboard or board for stand.
Popular articles Funny congratulations on March 8, 2022. Funny and funny poems for March 8
This is a superficial list, but it covers all the major paint compressor parts. In addition, the entire product can be put into a box or case, built with a lid, or otherwise decorated and given a solid and professional look. As mentioned above, in order to get a compressor, it is not necessary to break the refrigerator. Automotive electric pumps are often used and give good results. But their assembly system is slightly different, and there are more difficulties in connecting to the power supply and cooling system.
Operating pressure in a refrigerator compressor
The operating pressure produced by a standard compressor connected to the refrigerator ranges from 2 to 4 atmospheres.
This may seem like a small indicator to some, but no more is needed to circulate freon through a closed system; at this pressure it copes with its function perfectly. You also need to understand that when connected to refrigeration chambers, it is specially configured for exactly this power. The regulators keep the work at a certain level so that the refrigerant pipes do not rupture.
Refrigerator inverter compressor design
In fact, this is not a separate type, but a feature of the work. As discussed above, the installation motor turns off when the threshold temperature is reached. When it rises above the set limit, the engine is switched on at full power. This starting mode leads to a decrease in the service life of the electric mechanism.
The opportunity to get rid of this disadvantage arose with the introduction of inverter installations. In such systems, the engine is constantly on, but when the desired temperature is reached, its rotation speed is reduced. As a result, the refrigerant continues to circulate in the system, but much more slowly. This is quite enough to maintain the temperature at a given level. This mode of operation extends the service life and consumes less electricity. As for the other characteristics, they remain unchanged.
How to adjust the pressure in the compressor from the refrigerator
Self-adjustment of pressure is only possible if the person assembling the pump unit has the necessary skills. For proper regulation you will need:
- atmosphere regulator relay;
- pressure gauge;
- receiver.
The principle of operation of the automatic relay is the system of switching on and off the electric motor, as well as relieving excess pressure. When the number of atmospheres in the receiver reaches a critical set point, the relay turns off the engine and the air stops being pumped; the excess air is discharged through the unloading valve. If the power required for operation has dropped, the relay will automatically connect the engine, and it will continue to be pumped.
Important! The relay must be adjusted when the receiver is 40–60% full. In this way, you can establish a real operating indicator and correctly set the point of discharge of excess.
The schematic diagram for connecting an automatic regulator looks like this: it is inserted into the circuit between the secondary motor control circuit and the unloading valve. The connection is made using threaded heads. Two to the receiver - two to the pressure gauge. The remaining connectors are used to install a plug or an additional safety valve.
Different models of refrigerators use compressors of different operating principles. There are regular, linear and inversion. The principles of their operation are different, but they perform the same task: they build up pressure, forcing air or liquids to move in pipes or containers.
Refrigeration units fail for various reasons: freon leaks, thermometer and relay failures, wiring faults. If the compressor is intact and working properly, it can be removed and adapted for various purposes.
It is easily suitable for creating a spray gun to use as a spray gun when working with airbrushing. Another application is as a compressor for inflating tires. The third possible option is the creation of an air pistol for cleaning work surfaces. The fourth option is to assemble a compressor for a pneumatic stapler or nail gun.
How to make a simple compressor from a refrigerator
The simplest compressor for the garage can be made from an old refrigerator.
To make it you will need to purchase:
- Air filter from a car, designed for different pressures. Its price is quite low.
- A plumbing bypass valve, which can be restrictive and disruptive, combined with a six-bar check valve.
- Any plumbing hose that can withstand more than six atmospheres.
- Chinese pistol without pressure gauge.
- Any capacity storage cylinder. The larger it is, the less often it will need to be turned on.
- From copper tubes, connecting communications or hoses of any formation.
Tip: The cylinder is an accumulator for storing air. As work progresses, the pressure will decrease, which is not very important when inflating tires, where no more than three atmospheres is sufficient. But for pneumatic tools this will be insufficient and critical.
Instructions for manufacturing the device are as follows:
- The tank is being assembled. Its device includes at least three pipes:
- input;
- day off;
- to drain condensate. The element is installed after mounting the container strictly at the bottom so that the liquid can be drained without problems.
- The problem with the compressor may be that it will spit out oil, so you need to close the outlet pipe so that it is directed straight up.
- The hose to the tank should go in the same direction.
- The intake pipe is bent upward and equipped with a short rubber tube; an air filter from the car is attached to its end.
- A reverse water bypass valve is placed between the cylinder and the compressor, which prevents air from escaping back, and is the simplest indicator that the pressure has reached a given value. When it reaches six atmospheres it will begin to hiss, which means it is time to turn off the compressor motor.
Advice: A conventional refrigeration unit produces over 15 atmospheres, so there is no need to worry about the engine. You can further increase safety by screwing in a valve at the outlet of the cylinder; a plumbing valve will do. When filling the cylinder, the tap can be blocked.
- Everything comes together.
- The balloon is strengthened.
- After starting the compressor, air will be drawn in until the bypass valve operates, in which case its supply should be stopped by turning off the engine.
Tip: When such a compressor is operating, you should not move away from the device to ensure safety when turning it on.
The disadvantage of this device is:
- If the valve jams, if it does not work, the compressor will burn out or something will rupture. Therefore, you should install a pressure gauge.
- It is necessary for control - any automation can break. To do this, it is recommended to leave a check/bypass valve in the system.
The entire assembled structure will look like this:
- Through the pipe, which is equipped with a filter, the compressor takes in air.
- The outlet hose leading to the tank is equipped with a check/bypass valve.
- At the outlet of the tank there is a control valve, and after it a shut-off valve is installed.
- There is a pipe at the bottom of the tank through which condensate drains.
- A hose goes from the control valve to the gun.
- The pressure switch closes and opens the contacts that supply the compressor with electric current.
The photo shows a diagram of the assembly of a compressor from an older model of a refrigerator.
Refrigerator dismantling work
In order to craft a mini-compressor with your own hands, you need to prepare for work.
First you need to remove the compressor directly from the refrigerator. This is the initial stage. It is located at the bottom of the refrigerator at the back. To remove it, you should prepare a set of basic tools: pliers, a set of keys and screwdrivers (curly and regular). There are two tubes on the compressor itself that connect to the cooling system of the refrigerator. They need to be bitten off using wire cutters or pliers. It is strictly forbidden to saw them off with a hacksaw, since when sawing small pieces of metal can get into the motor, which can lead to catastrophic consequences.
DIY compressor for a spray gun.
Watch this video on YouTube
After this, you need to remove the start relay. It looks like an ordinary black box with wires protruding from it. First you need to unscrew the fasteners, and then cut the wires leading to the plug. Don't forget to mark the top and bottom of the relay so that there is no error during installation later. You also need to pick up all the fastening elements of the unit; they can also be usefully used when making a high-pressure compressor with your own hands.
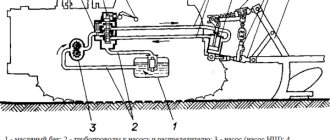
Refrigerator piston compressor design
This device is an electric motor with a vertical shaft; the structure is housed in a sealed metal casing.
Design of a piston compressor in diagrammatic form
Designations:
- The lower part of the metal casing.
- Mounting the stator of an electric motor.
- Motor stator.
- Internal motor housing.
- Cylinder fastening.
- Cylinder cover.
- Valve mounting plate.
- Cylinder body.
- Piston element.
- Shaft with crank pin.
- Backstage.
- Rocker mechanism slider.
- Coil coiled copper tube for refrigerant injection.
- Upper part of the sealed casing.
- Shaft.
- Suspension mount.
- Spring.
- Suspension bracket.
- Bearings mounted on a shaft.
- Electric motor anchor.
What can be made from an old refrigerator compressor?
The compressor in a refrigerator is used to move vaporous refrigerant through thin tubes, so this part is used in homemade installations in which gases are compressed. The compressor cannot be used as a water pump, but any inert gas can be successfully transported or compressed with it.
These properties are used by home craftsmen to make the following products:
- Compressor for inflating tires.
- Compressor spray gun.
Each home-made device, which is used at home, is manufactured with minimal investment of time and money. Such compressors will practically not differ from factory products.
Compressor for inflating tires from a refrigerator
The operating pressure of the compressor installed in the refrigerator is from 2 to 4 atmospheres. This is enough to inflate car tires. The operation of the device is short-lived, so during its operation you do not need to use a pneumatic accumulator. To make a device for inflating tires, in addition to the compressor, you need to prepare:
- Electrical cable with plug.
- Oxygen hose.
- Clamps.
- Automotive fuel filter – 2 pcs.
- Air pistol with pressure gauge.
- Spiral air hose.
In addition, to complete the work you will need a screwdriver, a knife, pliers and a hacksaw.
A do-it-yourself compressor for inflating tires from a refrigerator is made in the following sequence:
- Remove the compressor from the refrigerator.
- Connect the electrical wires to the electronic unit.
- Install fuel filters on the inlet and outlet pipes.
- Connect a spiral hose to the outlet filter.
- Connect the air gun.
Operations are performed with care to avoid injury. Modern refrigerators use freon as a coolant, which is an inert gas, but when heated, this substance is unsafe for health. It is mandatory that all work on dismantling the engine is carried out when the refrigerator is disconnected from the household electrical network.
To dismantle the compressor, it is enough to cut through the copper tubes with pliers, at a distance of about 10 cm from the part. Then use a screwdriver to unscrew the four screws with which the shock absorbers of this part are attached to the refrigerator body.
If during the dismantling process it was necessary to remove the electrical cable, then it is installed in place. The main difference between using a refrigerator part in a homemade compressor is that the motor must run constantly when the device is turned on. Therefore, the wire going to the refrigerator relay must be disconnected and the contacts connected to each other for continuous flow of electric current.
Refrigerator compressor for inflating wheels Watch this video on YouTube
After removing the compressor from the refrigerator, the tubes are flattened, so the first thing that needs to be done is to restore the geometry of the pipes. To do this, use a hacksaw to cut off 0.5 cm on the incoming and outgoing tubes.
In order for the air entering the compressor to be cleaned of dust, you will need to install a fuel filter from the car on the inlet pipe. To do this, just separate 10 cm from the air hose, then put the section on the incoming pipe, and then tighten it with a clamp of a suitable diameter. At the next stage, a clamp is put on the connecting hose and the filter is installed. Once the clamp holding the filter is tightened, assembly of the compressor inlet is complete. If at the initial stage of manufacturing a homemade compressor it is difficult to determine where the air inlet is, then it is enough to plug the compressor into the network. The incoming pipe will intensively pump air inside. To determine air movement, touch the copper tube with your hand.
A second filter is installed on the outlet pipe. This part performs the function of an oil separator. To prevent internal parts from wearing out, oil is poured into the compressor housing. By installing a filter at the outlet, you can eliminate the possibility of oil getting inside the wheel along with air.
To make it easy to move while inflating the wheels, a spiral hose is connected to the outlet filter, which should be securely secured with a clamp.
After installing the air gun, the tire inflation compressor will be ready for use. If the step-by-step process is completed as described above, then such a homemade product will make it easy to set the required tire pressure. At the same time, the device’s performance is not inferior to industrial designs.
Compressed air can also be used to clean dust from electronic equipment, and a device installed in a garage is used to remove contaminants from hard-to-reach areas of the internal combustion engine.
Compressor design through the eyes of Kulibin
The compressor motor is often equipped with three pipes:
- freon input;
- freon output;
- technological master.
The engine is bathed in oil, which also dissolves freon. It is difficult to change the brand (type) of refrigerant correctly. When vacuumizing, wait a quarter of an hour: the oil will release old freon. The compressor will have to run idle for 15 minutes. The oil change process is not easy, although the procedure can be followed. Before refueling, make sure: there is no water, air, or replaceable freon inside. For what? The old R12 is considered the worst enemy of the ozone layer, and is being replaced everywhere by a new, explosive one, but not in the concentrations inherent in rooms operating refrigerators, should there be a leak into the environment.
During operation, experimenters note that oil is thrown out of the outlet pipe. As part of the refrigerator, the nuance is devoid of lethal consequences. The liquid flows back into the oil bath. When you build a homemade compressor from a refrigerator, equip the outlet path with cleaning filters. Accessories are required to stop oil and water. Car enthusiasts use Lada Kalina fine fuel filters that cost 100 rubles apiece. Turn it on, it will be visible through the light-transmitting case: the paper filling swells. The main thing is that it doesn’t break.
It will be useful to install a safety valve; a Chinese pistol equipped with a pressure gauge is not a problem to buy. A couple of words characterizing the device. Let's call the main components of a homemade compressor station:
- compressor;
- receiver;
- control valves;
- connecting hoses.
The receiver is represented by a tank. Experienced citizens recommend making a suitable container out of a fire extinguisher; the authors prefer the idea of welding a part from a piece of thick pipe or sheet steel. Select the size according to your location and needs; the reinforcement fits in random places. You will need four holes:
- inlet from the compressor;
- day off for use;
- control for pressure gauge;
- service for draining condensate.
The latter is located near the bottom of the container. Before making a compressor yourself, find documentation for the unit removed from the refrigerator. Laziness tormented me - calculate the working pressure of 8 atm. Enough to pump up the wheels and blow out the engine - with interest. When blowing out candles, reserve a limit of 15 atm. When choosing fittings, calculate the maximum pressure, making a reserve.
The control pipe is equipped with a pressure gauge and pressure sensor, which automatically switches off when the set value is reached. Remove the compressor from the refrigerator with your own hands along with the start-up relay (there are two relays in separate housings). The set of mechanisms is powered by a 230 V mains voltage. It would be better to find a surge filter similar to that protecting an old washing machine. The unit will protect the device. Residents of the garage cooperative often cook, voltage stability leaves much to be desired. The nominal value differs from the standard one, often contradicting GOST requirements for the quality of electricity supply services.
A few words about the operation of the compressor. The receiver needs to stabilize the pressure and allow the running engine to rest. The compressor pumps air into the cylinder, controlled by the control valve. The bypass valve protects the system from an accident, the start-up relay controls the normal operation of the engine and protects against overheating. Air is pumped into the receiver and taken in by an outlet hose equipped with a filter. Entering the compressor, the outside air is purified, dust is eliminated, and, if possible, moisture. Some motorists pump the receiver with 8 atmospheres and store the device for weeks. This cannot be done, although it is possible!
A humorous note with serious consequences allows for a useful farewell to end the subsection.
Functionality check
The fact is that we are removing the device from an old refrigerator, so we need to make sure that our unit is still “alive”. So, we flatten the tubes with pliers - this is necessary so that air flow passes through them. Next, we need to put the start relay in the position in which it was in the refrigerator design. This is very important, because if the position is incorrect, there is a risk of damage to the device, as well as failure of the compressor winding.
There are wires on the relay body to which you need to screw a piece of wire with a plug. It is better to wrap the connection point with electrical tape to eliminate the risk of electric shock. We plug the device into a power outlet. If you did everything correctly, the compressor will work, and air will flow from its tubes. By the way, it is necessary to mark which tube the air flow comes out of and which one it goes into.
Where to find a compressor for an airbrush
The compressor for making the airbrush is located at the back and bottom of the refrigerator. Ask your friends - what if they have a rarity in their garage or closet? Or you will be even luckier - such specimens may be taken out onto the street as unnecessary, and you will get the unit for free. The most likely way to find an old refrigerator is to search for it on the Internet. Was your search successful? Remove the necessary components. To disconnect the compressor, arm yourself with special tools. Take :
- pliers (side cutters);
- a pair of screwdrivers – flat and Phillips;
- two 12x14 keys.
The disconnection process is not very difficult, the main thing is to carry it out carefully: debris inside the compressor will harm the device and permanently disable it.
How to disconnect the compressor. Step by step.
Compressor Assembly Resources
Materials:
- Refrigerator compressor;
- Connection cable with plug;
- Car air filter – 2 pcs;
- Oxygen hose for pipes;
- Spiral oxygen hose with quick-release adapters;
- Air gun for inflating wheels;
- Clamps, wires.
Tools: knife, screwdriver, pliers.
Supercharger, pressure gauge and other parts
If you plan to use a powerful supercharger dismantled from old equipment, you need to purchase a pressure gauge and an emergency valve that will not allow the pressure in the receiver to rise above the permissible level. As for the simplest compressor from an old wheel, a car device powered by a cigarette lighter and used to inflate tires is quite suitable here. However, such a supercharger can create excess pressure, which will lead to a tire rupture. This situation is very dangerous and is fraught with injuries, sometimes incompatible with life. Therefore, you should never forget about the emergency valve.
Let's consider an example of a simple compressor based on a car electric pump and a tubeless wheel as a receiver.
How to use a compressor from a domestic refrigerator
Home craftsmen find use for an outdated refrigerator, in particular, a compressor made from it. An easy-to-use spare part with low power is suitable for inventing an engine, a completely working homemade one. A refrigerator compressor is a structure placed in a housing that does not have a storage tank. The electrical circuit is connected, so there is no need to change it. This way you can make a silent and inexpensive motor up to 6-7 atm, which is sure to be suitable for use in a garage for inflating tires, painting spare parts, and airbrushing.
Assembling a compressor unit
The compressor from the refrigerator is equipped with a start relay, to which the thermostat is initially connected. It is not involved in this assembly, so it must be disconnected by first marking the contacts on the starting relay and closing them with a piece of insulated wire.
We select an oxygen hose according to the diameter of the pipe, and install an air filter at the compressor inlet. One of its plastic air intake pipes can be cut off, leaving a hole free. The connection can be made without clamps, since this element of our installation is not under pressure. The pipe for it should not be made long. We cut it off with a knife and install the filter by hand. To prevent the copper tubes of the compressor from being on the same line and interfering with each other, they can be bent in different directions.
Next we attach the second air filter to the outlet. If necessary, the copper pipe can be shortened to accommodate it using wire cutters.
As the author’s own practice has shown, even with relatively low pressure, such an assembly cannot do without clamps. We place them on the pipes and tighten the connection. The author plugged the second copper pipe coming out of the compressor with a self-tapping screw and electrical tape.
We attach a small piece of oxygen hose to the air filter, and connect a spiral hose for compressor work. This can also be done through a quick-release adapter.
Now you can connect an air gun to inflate the wheels to the spiral hose and check the functionality of our installation. To avoid excess pressure in the hoses and filter, you can crimp the trigger of the air gun with a nylon tie.
As you can see, the author of the homemade product managed to obtain a working pressure of about 3 atm, which is quite enough for quickly inflating wheels in the garage. By the way, such an installation can be used for a wide variety of work, for example, for painting with a spray gun.
Step-by-step assembly instructions
Before you begin, you should prepare all the necessary tools and materials. Such kits may differ from each other depending on what the future owner of the compressor expects.
In addition to the compressor itself, which is removed from the refrigerator, you need to prepare the following:
- Receiver. As an alternative, a housing from an old fire extinguisher is suitable. You can also weld such a body from a sheet of metal or pipe.
- Set of various hoses. You can use car hoses. One must be 100 millimeters, and two must be at least 600 millimeters.
- Consumables. A gasoline filter from a car, a pressure gauge, clamps, wire, etc.
- Bonding tool. Pliers, screwdrivers, drill with a set of drills.
- Additionally, you will need a wooden board, which will be the basis for the entire structure. The compressor must be screwed to it using ordinary self-tapping screws. You need to attach the device to the board in the position in which it was placed directly on the refrigerator.
Then you should take a plastic container of any size from three liters.
In the upper part of the container you need to drill several holes for the compressor tubes. Then insert the tubes into the holes made and fill everything with resin. In this case, the inlet tube should be located at a distance of 200 mm from the edge of the receiver. The outlet tube should be placed 10 mm inside the container. The receiver can be made of plastic, and nothing bad will happen here. But for greater reliability, it is recommended to make it from a metal box. With this outcome, there is no need to fill everything with resin for a good seal, and the hoses are closed. Moreover, only a pressure gauge can be installed on a metal body.
Silent homemade refrigerator compressor (silent compressor)
Watch this video on YouTube
To do this, you need to drill a hole in the receiver for a nut, which needs to be welded in such a hole. Then there is the option of screwing the pressure gauge into the nut. After this, work on creating a homemade compressor from a refrigerator ends. You can use any materials for painting, but first you can clean and prime them to avoid corrosion. After this, you just need to attach the receiver to the base using a wire.
Manufacturing process
The most fuss will be with the receiver.
If you use an old fire extinguisher as a receiver, be prepared for the fact that there will be quite a lot of metal work. In addition, it will be necessary to ensure tightness. If we do not have significant experience working with metal with our own hands, it is better to take a plastic receiver. If you use heavy parts, you should be mentally prepared for the fact that the compressor will be stationary. It is better to immediately prepare a reliable base and fasteners for it.
Compressor preparation
Determine where the compressor has a tube for the incoming air flow and where the outgoing air flow is. To do this, you can briefly plug in the compressor and determine which tube the air is blowing from. Be sure to mark the tubes at the base so as not to mix them up. This can be done with colored electrical tape or a piece of medical tape.
Carefully trim the tubes to about 10cm. This is necessary for easy connection of hoses.
The vertical position is important for the compressor. The relay body has an arrow pointing up
It will be convenient if we fix the compressor in the correct position.
Receiver
Let's consider a simplified version with a plastic canister. Let's cut two holes in the lid for the tubes. The inlet tube must be made long, almost to the bottom. The outgoing one can be made short, about 10cm.
Small sections of about 2-3 cm remain outside. The structure should be secured with epoxy resin to ensure tightness. In the case of an old fire extinguisher, the same actions will have to be done by soldering and welding the fittings. But you can install a pressure gauge on the metal case.
Connecting parts
Attach a gasoline filter to a short piece of fuel hose. Place the other end onto the compressor inlet tube. The filter is needed to prevent dust from falling into the compressor.
Use a second piece of fuel hose to connect the compressor outlet pipe and the receiver inlet tank. The air flow will go from the compressor to the receiver. We put clamps on the hoses, since the air flows under pressure. Another short piece of fuel hose is needed to secure the diesel filter. The filter is needed to clean the air flow. A hose and equipment can be attached to the outlet fitting.
Compressors using all sorts of unnecessary things as receivers
If, when choosing compressors and motors, craftsmen settled on components from refrigerators and cars, then they do not use anything as receivers - even bottles of champagne and Coca-Cola (at pressures up to 2 atm). Let's list a few worthwhile ideas.
If you have a receiver from KrAZ at hand, you can get a unit with minimal labor costs: all the pipes are already screwed into it.
If you are the owner of unnecessary diving equipment, you can use it at work.
Almost every summer resident with a stove on gas cylinders will have these unnecessary containers.
If the hydraulic accumulator in the water supply system has a leaky bulb, there is no need to throw it away. Use it as a receiver by removing the rubber membrane.
An expansion tank from a VAZ is an inexpensive purchase, even if it is new.
The next idea is for air conditioner installers who have leftover freon cylinders and split system parts.
Freon cylinder as a receiver
Another viable receiver came from a tubeless car wheel. An extremely budget-friendly, although not very productive model.
Wheel receiver
We invite you to watch a video about this experience from the author of the design.
cheapest DIY compressor
Watch this video on YouTube
Spray gun from a compressor from a refrigerator
Home craftsmen manage to assemble high-quality compressors for spray guns from an old refrigerator. Professional equipment for painting cars costs a lot of money, because the demand for such devices is high. If you use this method, you can get a working device at minimal financial cost.
The compressor is the main component of such a system, so it must be carefully removed from the refrigerator. For this work, it is enough to use wire cutters and a screwdriver.
A homemade spray gun operates from a household electrical network, which experiences significant voltage fluctuations, so in order to maintain the pressure while painting a car at a certain level, the compressor should be equipped with a receiver. A fire extinguisher or gas cylinder is used for this purpose. When choosing a container, you should pay attention to its condition. If the metal is heavily rusted, then pumping air under significant pressure into such a tank is unsafe.
Clean cylinders with a volume of at least 10 liters are suitable for the receiver. In order to control the pressure while using a homemade receiver, a pressure gauge is installed on the cylinder, and a reducer is installed to prevent the formation of excessive pressure. These parts are mounted on a water pipe, which is installed at the outlet of a fire extinguisher or gas cylinder. An oxygen hose of sufficient length is connected to the reducer so that you can move freely with the spray gun during operation.
To spray paint, it is better to purchase a factory airbrush. Homemade products will not allow high-quality dosing, which will lead to disruption of the uniformity of application of the paintwork.
The function of the pump that will pump air into the tank will be performed by the compressor from the refrigerator. In order not to be constantly distracted, it is enough to install a pressure switch to turn on the motor. Such an element of the electrical circuit will start the compressor when the pressure drops to a minimum value.
DIY compressor for a spray gun.
Watch this video on YouTube
After dismantling, the tubes coming out of the compressor will be flattened, so to connect them to the hose, you will need to cut off the deformed areas with a hacksaw. This work should be performed in such a way that metal shavings do not get inside the device.
Next, according to the instructions, you should definitely install air filters. Automotive fuel products are suitable for this purpose, the use of which in a compressor unit will clean the incoming air from dust, and the outgoing air from motor oil. The filters are connected to the tubes using adapters made from sections of oxygen hose. All connections must be properly secured with clamps.
To prevent air from flowing back into the compressor when the device is turned off, an additional valve is installed after the outlet filter. This design will allow you to maintain pressure at the required level.
When the receiver and compressor are ready for use, they are installed on the platform. To move the product along a horizontal surface, bases on a metal plate equipped with wheels are most suitable. In order to install a homemade spray gun with minimal time, before starting work, it is recommended to make a small drawing. This approach allows you to avoid design errors even at the design stage.
If the reason for the failure of the refrigerator was not the compressor, then after removing the part from it you can make an excellent compressor for inflating tires or for painting a car. The refrigerator body can be given a second life. For example, use it as a flower bed, shelf for spare parts and tools. If you want to get into poultry farming, then a reliable incubator is made from a refrigerator, which will not be inferior in its characteristics to the best industrial designs. Radiator tubes should not be scrapped. They can be used to make heating installations, including those powered by solar energy. In general, a refrigerator is a device all of whose parts can be used after the equipment has served its purpose.
The compressor can be used in a variety of areas - for inflating tires, airbrushing, painting spare parts, etc. Having the necessary tools and certain technical knowledge, it is quite possible to independently manufacture this unit based on a conventional refrigerator. A homemade compressor produces about 7 atmospheres, which is quite enough for an ordinary garage workshop, so many people are increasingly thinking about how to make such a compressor? A DIY refrigerator compressor will be quite quiet and, most importantly, cheap in terms of cost.
Commissioning works
To begin, close the outlet valve and fill the receiver with air. The pressure in it is selected based on the initial characteristics of the device, which used to be a container. This value is set as the maximum allowable.
The overpressure valve is usually set to a rating of 1.2 times the upper limit. In this case, it is advisable to check it by disconnecting the pressure gauge contacts or setting the maximum level higher.
With the system under pressure, all components are checked for air leaks. It is easy to find by its characteristic whistling sound. Also, such a defect can be detected using soapy water.
The lower limit on the pressure gauge is set to a value equal to the minimum pressure required for the operation of a particular tool or device. After that, they record the time during which the receiver becomes empty with constant use. This data will help you properly plan the entire work process.
It is also very important to check the operation of the electrical circuit. The compressor should turn on when the pressure in the receiver reaches a predetermined minimum, and when filled to the maximum it should turn off
If this does not happen, then it is worth checking the entire electrical circuit again.
If a homemade compressor is not mounted in a housing or on a frame, it will be very difficult to transport. This may damage the connections.
However, when fixing to a common frame, it is very important to solve the vibration problem. When purchasing a pressure gauge, you should immediately look for a seal or tag on it that would indicate the date of its last check. If it is not there, then you should not purchase such a device.
Even new products have similar markings. Sometimes it is much easier to purchase a ready-made unit than to create it yourself. However, some things are simply not available for sale. They are either very rare or have other characteristics that do not meet the design requirements. It is worth making a small tap on the receiver itself so that the air can be released. This will allow the unit to be transported without residual pressure in the system. Also, such a faucet will make it possible to drain liquid that will accumulate in the system, despite the presence of a large number of filters and other measures to separate moisture from the air. Some craftsmen, in order not to make unnecessary holes in the container, prefer to create one branched output, installing all the necessary components on it. This is a fairly practical solution, but according to safety regulations, the overpressure valve must be located on the receiver itself. If when working with the device it is necessary to obtain a suction effect, then you additionally need to make a special device from two thin pipes welded together at an angle of 45 degrees. By supplying air from the side of an acute angle, you can get the necessary impact from the welded end. Before starting work, it is worth studying the market for finished products of this type and assessing your expected costs. It may be much cheaper and easier to purchase a product in a store than to create it yourself.
Popular articles Congratulations on March 8th. Beautiful congratulations for March 8 in verse and prose
Which is better - a homemade option or a professional device?
Before trying to make our compressor out of an old refrigerator, it is necessary to compare these two options, i.e. a ready-made compressor sold in specialized stores, and our homemade version. In total, there are several main differences between them:
- The design of the factory compressor contains an electric motor that transmits torque to the working chamber through a belt drive. As for the homemade compressor, it consists of a housing and the engine itself, without belts.
- The factory version already has automatic pressure relief systems, inlet and outlet filters, pressure meters, etc. installed. In a compressor from a refrigerator, you will have to install the control equipment yourself, taking into account all the features.
- Despite the fact that most factory compressors are equipped with automatic systems, some budget models do not have this feature. In other words, these units will have to be turned off independently, noting the time on the clock. Homemade compressors are mainly equipped with a protective relay that turns off the engine if there is a risk of overheating.
- Some factory models may not have any lubrication at all. Of course, their service life is short, but they do not emit various emissions. This circumstance is very important, especially if the spray gun behaves rather capriciously, not tolerating various impurities. As for homemade compressors, there is plenty of this oil. By the way, you need to pay attention to what kind of oil you fill in - synthetic oil does not combine very well with regular oil, so you don’t need to pour in just anything.
- The main feature of a homemade compressor is that it works very quietly, especially if you put all the tubes on it correctly, maintaining a tight seal. As for factory compressors, they are noisier, so their use is only possible outside the home.
- The cost of manufacturing a homemade compressor is very low, because we take the main components from old equipment, and the control equipment will cost us one thousand rubles. As for the factory compressor, the situation is different.
- It is impossible to make any technical changes to the factory compressor. In other words, if the unit is not powerful enough, then it can only be used as a tire inflator, nothing more. Homemade options are good because you can add some parts to them, for example, a large receiver, thanks to which you can significantly increase the power of the device.
- A factory compressor is a complete technical device, so any improvisation with it is impossible. With a homemade unit, you can do almost anything - take some parts outside the body, or hide everything in one box and attach a handle on top for easy transportation.
- You can install a fan on a homemade compressor to cool the device from the outside.
Most refrigeration compressors have some limitations in terms of their operation. There are several modes in total:
- Normal - from 16 to 32 C.
- Subnormal - from 10 to 32 C.
- Tropical - from 18 to 43 C.
- Subtropical - from 18 to 38 C.
However, combined modes are more common, having a different range.
Thus, a homemade compressor can be much more efficient than factory ones in terms of working with air.
The video shows a version of a homemade compressor for inflating wheels
Compressor from a refrigerator for inflating wheels
Watch this video on YouTube
Pros and cons of compressors from cars and refrigerators
The good thing about a car compressor is that it can run on a battery. True, if you use it for some stationary crafts, then this is not an argument at all.
The car compressor works a little faster than its opponent. However, the difference is not so big as to draw clear conclusions.
We recommend: Do-it-yourself folding wheel chock
The advantage of a refrigeration compressor is that it is more durable than a car compressor. By and large, he is able to work for years. It also pumps up to 30 atmospheres.
The speed test showed that the compressor from the refrigerator creates a pressure in the wheel of 2 atmospheres in 2 minutes 45 seconds.
Whereas a car compressor copes with the same task in just 1 minute 29 seconds.
We recommend watching a detailed review of compressors in the video on our website.
Who is more powerful, no one expected this.
Watch this video on YouTube
Stage one
The good thing about a “manual” compressor is that it can be made exclusively to suit your needs. For example, if you make a compressor for an old-style airbrush (single-action), then, in principle, a receiver is not needed. This reduces the price of assembly costs.
But modern painting conditions require better technology, which is why a double-action airbrush is in use. It controls the air flow, so a receiver is necessary.
Directly compressor
The most popular option is to take it out of the refrigerator. Sites selling refrigeration equipment will help you choose the technical side of the required compressor. The most important criterion when purchasing such a compressor is the price. Air injection characteristics are the same in almost all models.
Receiver
It must be a container that can handle gas (or liquids) under pressure. The use of plastic barrels or canisters for these conditions is not recommended. The first option for making a good receiver is a fire extinguisher. A hydraulic accumulator, oxygen cylinder or propane cylinder can also be used. Once the main parts have been selected, all that remains is to assemble them together.
Features of servicing a do-it-yourself compressor
We have already figured out the differences between factory and home-made units. We established what spare parts and tools are needed to assemble the device with our own hands, and also examined the assembly process step by step and determined the scope of application of homemade compressors. It remains to touch on the features of their service.
The devices in question must be operated taking into account the following recommendations:
- It is necessary to protect equipment from overheating. Otherwise it may fail.
- It is necessary to regularly carry out maintenance of a homemade compressor. It consists of changing the oil and filters. If you used a unit from an old refrigerator, then it would be best to clarify what lubricant was used in it, and use only it or suitable analogues. If the device was purchased in a workshop, then all questions of interest can be asked to specialists. Replacing filters is also necessary to ensure that dust and other contaminants do not get inside the unit. It is recommended to carry out maintenance once every six months or once a year.
- A homemade compressor must be used strictly for its intended purpose.
- It is recommended to install the device in a vertical position. The correct angle will be indicated by the arrow on the start-up relay.
- For convenience, the unit can be equipped with wheels. When performing certain jobs, the use of additional devices (for example, a sprayer) will be required.
Some technical data and service features
It is quite difficult to say unambiguously what pressure a particular compressor will show. Much depends on the specific brand and service life of the device itself. By the way, old units show even better performance than modern ones.
Maintenance of our homemade device is a very important point in operation.
The main work will consist of replacing diesel and gasoline filters, as well as changing the oil in the device. The design of compressors usually contains three copper tubes. We used two of them earlier, and the third remained untouched. It is the shortest and sealed at the end. So, the oil is drained through it. To do this, it is necessary to cut off the sealed part, and then drain the treatment. Filling is done through it.