Clamp - what is it?
A clamp is an auxiliary tool for a mechanic, joiner, or carpenter. It is used for temporary, according to technology requirements, connection of two or more parts during gluing, before welding, for precise drilling of the package.
A clamp can be even more convenient to use than a vice. You can work with it anywhere, hold it at any angle. And the vice is rigidly screwed to the table, they cannot be moved and the orientation in space cannot be changed.
The type and design of the clamp is determined by its purpose. When it is necessary to permanently and firmly connect two parts, use a device with a clamping screw. For quick tacking, a mechanism with a handle and a ratchet is suitable. Special clamps are used in carpentry when gluing two bars at right angles. They differ from each other in size, material, and technology of their manufacture.
If necessary, it is possible to make a clamp using improvised materials with your own hands to suit your individual needs.
Design and principle of operation
A clamp is without a doubt a useful tool that is often used in various areas of life. Its main task is to provide high-quality fixation of elements on the working surface or any other supporting part. According to the drawing, such a tool must have at least two elements in its design.
The dimensions of the self-made unit depend on the needs of the user. A professional craftsman always has a small, long and large clamp in his arsenal. This small arsenal allows you to work with workpieces that can be of different diameters and lengths.
In addition to the supporting surface, the design of the clamp contains a movable jaw, which must be equipped with a fixation mechanism.
To make the jaw move, a lever or screw is provided. They make it possible to increase the force applied during compression and prevent reverse movement of the element when processing the workpiece. From the outside, the clamp looks very much like a vice.
The tool also found its use among carpenters. There it is used to fix two elements, between which an adhesive composition is applied. It does not always happen that the necessary tool is at hand at the right time. If you have a drawing and detailed instructions, you can make the tool yourself. It is better to make it from wood or metal. Sometimes an old jack or brake pads are used.
Metal
If we look at the design of the unit in detail, it always contains elements such as:
- lever arm;
- frame;
- clamp;
- movable sponge.
The advantage of such a unit is its durability, since the metal retains its properties for a long time. Using the tool, you can create a tight screed without worrying about the strength of the unit. Compared to a regular vice, such a hand-made clamp does not weigh much, so it is easy to carry with you.
If necessary, a stationary structure can be made.
Metal structural elements provide maximum grip on the workpiece. Thanks to this, there can be no talk of any rotation at the time of processing. The master is confident that even when working with an electric tool, the workpiece will not fall out or slip. By making a structure according to modern drawings, it is possible to obtain a universal tool that can be used with parts made of different materials, including metal, plastic, and wood.
The shape of the workpiece can be either flat or three-dimensional; this does not in any way affect the quality of fixation. The length can vary from several to tens of centimeters. Each type of tool has its own characteristics. For example, screw clamps are the most common. They have become in demand due to their simplicity of design and low manufacturing cost.
The finished tool is also inexpensive.
Such units have the appearance of a metal bracket. The support part is located on one side, and the threaded eye is on the other. The adjusting screw is located in the second part.
A sponge is installed in the part of the screw, called the working part. The handle is installed from the outside. It is most effective to use the tool when processing large and heavy parts that do not have a complex shape. If we talk about versatility, then in the work of the master, quick-clamping F-shaped units are such. The supporting part of such a clamp is fixed to a long rod. The working element with the sponge slides over it.
The workpiece is fixed using an auxiliary screw. On some models, you can find a stepper-type push mechanism instead. The pipe version of the tool also helps to ensure high-quality fixation of large workpieces.
The design of such a unit contains two main parts: a sponge and a support platform with a clamp. When you need to combine workpieces, and an angle of 90 degrees must be maintained, you should use an angle tool. It has two supporting and working surfaces, thanks to which you can evenly glue two parts perpendicular to each other.
It is difficult to find a ready-made tool in the store that allows you to fasten elements together at an acute or obtuse angle. But such a unit can be manufactured if desired. There is another type of clamp - tape. Its design has one flexible element, that is, a rod along which several jaws move.
When the user places the jaws in different locations and adjusts the amount of tension, they create a tool that can handle complex shaped parts.
A clamp with two hinged parts and a spacer spring is called a clamp. This tool is used infrequently because the quality of the joint is not reliable. However, there is one significant advantage - the workpiece can be quickly installed and removed, which significantly saves time.
If we talk about making tools at home, then most often they use drawings for the first three types described. With their help you can solve most everyday problems. At the same time, the tool is not too demanding on the material.
Wood gluing
Wood gluing
In the manufacture of blanks for decoupage, brushing and other types of arts and crafts, a large number of different methods of gluing wood are widely used.
Wooden panels from blocks are glued together, parts are glued into product units, fittings are glued to products, and so on.
Why are not thinly sawn wooden boards used in the blanks, but boards are glued together? To gain the required width of the material, and most importantly, so that the plane does not move under the influence of water-based paints and varnishes and during further use!
As for the finished blanks made of pine and plywood: of course, wooden products can also be assembled using nails, but who is interested in protruding caps on the lid of the box and the risk that the product will eventually become loose and be brought in for repairs?! An adhesive joint with PVA-based wood glue, which is non-toxic, fireproof and diluted with water, will reliably retain the shape of the wooden product throughout its entire service life.
How to properly glue wooden surfaces?
High-quality gluing is achieved by observing several very important rules.
1) Before gluing wooden panels, the material (in our case it is pine) must be well dried. For carpentry work, wood moisture content is recommended at 6-7%. With higher humidity, there is a high probability of cracks forming at the gluing points and loss of the original geometric shape of the wood.
2) The surfaces to be glued must be smooth. This is achieved by jointing* wood, milling, thicknessing**.
3) The glue is applied to the surfaces to be glued in an even layer. After applying the glue, it is necessary to tighten (clamp) the parts to be glued well. Carpenter's clamps or clamps will help with this. Wires*** or screw clamps**** are suitable for gluing panels. For gluing volumetric products, quick-release and belt clamps are used.
Varieties
The purpose of this publication is not to build something like an encyclopedia of mounting clamps - there are many types of them, and there are even more patents for new, “super-super” ones. Our task is to show which clamps are most needed in a home workshop, and how best to make a clamp without wasting a lot of material and time.
The most common types of clamps in handicraft production are shown in Fig:
- G-shaped (G-cramp; G-clamp) - the simplest, most reliable and cheapest of general-purpose clamps. Disadvantages: it takes a long time to tighten and can turn the parts being glued if the stop hinge is of poor quality or not maintained. The latter is quite important: an adhesive layer that has not set is a good lubricant, but it is undesirable to separate and recompress the surfaces being glued together, as the strength of the dried joint decreases sharply. In addition, a regular G-clamp does not hold round parts well, so a special pipe clamp is used to secure pipes or a round profile for welding or butt soldering (see next figure). Assembled from ordinary structural steel s=(2.5-4) mm, such a welded clamp provides reliable fixation of pipes up to d(120-150)x(1.5-4) mm.
- F-shaped (F-cramp). Quick-clamping, operates on the principle of jamming the sliding stop in the dead center position. Pressure until it is firmly secured is most often provided by a screw clamp, as in a G-shaped clamp. An even “softer” and faster clamping, but less reliable, is provided by a trigger-eccentric clamping mechanism, see below. The most versatile and widespread of the clamps. The main disadvantage is that due to vibrations and shocks during operation, it can self-unclip and release. Or, on the contrary, it jams tightly, and when wedged with a hammer blow (see below), either the clamp or the part “shoots out”. It is not suitable for adaptation to butt welding of pipes: the jaws are driven by indirect heating and the pipe joint moves apart.
- C-shaped (C-clamp, fixing tongs). A fairly narrowly specialized tool. The main purpose is to compress the parts to be glued. Simple C-clamps are made with a spring clamp. The trigger-lever clamp allows you to precisely set the clamping force.
- Angle clamps for welding linear parts (pipes, profiles) at a given angle. There is no completely established special Anglo-American term. The most commonly used are welding clamp and dead-lock clamp.
- Joiner's bench - a carpentry clamp for joining panels from boards, slats and beams, assembling units from shaped parts (for example, railings with balusters). On the trail. rice. a rail clamp is shown; There are also rack and pipe ones, see below. Please note that pipe clamps are sold under the name “pipe clamp”, and clamps for end-to-end welding/soldering of round timber should be searched for under the query “welded clamp”.
- E-shaped (E-clamp). A highly specialized tool for edging carpentry with glue. If you need to carefully glue an edge on existing valuable furniture/interior design, it is difficult to do without an E-clamp.
- O-shaped or tape, or crimp grip (loop stay, loop brace). Band clamps are most often used by virtuoso carpenters and furniture makers-restorers. If you can fetch up to $1000 or more for a well-restored antique Viennese chair, then for a slightly skewed or wobbly chair they will fetch, at best, 15-20 of the same ones. Making a frame for a large painting or photograph without a tape clamp is also not so easy.
- Lever-plunger (precision clamp). When the trigger is pressed, the plunger (pusher) with the clamping stop moves smoothly forward. The trigger is released - the plunger is fixed by a spring-loaded slide, which becomes in the dead center position. Pressing again releases the slide and further advances the plunger. A good lever-plunger clamp can securely clamp a chicken egg without damaging its shell. In a home workshop, such precision clamping is unlikely to be needed, but suddenly a good precision clamp can be obtained from a mounting gun for tubes with silicone, etc. viscous compounds. A fixed jaw can be easily installed into the opening (window) for the neck of the tube, and a movable one is mounted on the rod instead of the standard pusher. If necessary, both can be removed and the tool can be used for its intended purpose.
Element gluing technology
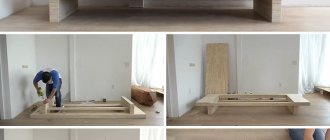
After all the bars have been prepared, you can begin gluing them directly, which will ensure a high-quality shield. This procedure is also divided into successive stages:
- a device is selected that makes it possible to glue the bars together, and it must be even, and usually a regular sheet of chipboard is used for this;
- strips are fixed along the edges of the sheet, and their height depends on the parameters of the prepared bars;
- bars are laid between these slats, and they should fit tightly to each other and an attractive pattern should be formed from them;
- if there are cracks, they can be easily eliminated with a standard jointer;
- then the bars are glued together, for which different types of glue intended for wood are used, but the use of PVA glue is considered optimal;
- the entire surface consisting of bars is completely spread with glue, and it is important that the product is evenly distributed over the surface;
- the lubricated elements are pressed tightly against each other;
- two more such planks are laid on the slats, fixed to the chipboard sheet, after which these elements are connected with self-tapping screws, and this is necessary to prevent the resulting shield from bending;
- the resulting blank is left for about an hour, after which the shield is released and left for a day.
Thus, having figured out how to glue elements to obtain a furniture panel, this process will not require significant effort. The procedure is easily carried out on your own, and the result is structures that are effectively used to create numerous furniture, doors or even full-fledged coatings, characterized not only by high strength, but also reliability, as well as an attractive appearance.
Fastening the slats
Lay out the bars
Gluing the bars
We lay two more planks
Leave to dry
Selecting a design for its intended purpose
Homemade clamps are no different in functionality from those manufactured in production. They can be used for gluing boards, assembling furniture, and gluing panels. Various tools are used for carpentry, including clamping, F-shaped, and table clamps. Depending on the purpose, it is worth choosing the right unit, taking into account its design features. For example, for frames and for an echo sounder, furniture and eccentric clamps will differ from each other.
Each of them is designed to perform a specific task and is not a universal tool.
If you plan to fix large workpieces, then a pipe structure would be the best option. Its advantage is that the length can be easily changed. However, such a unit has a complex operating mechanism. In carpentry, an angular version of the tool is often used. With its help, you can easily bring wooden blocks together at right angles. Sometimes such clamps are used for laminate flooring. Woodworkers also use band tools.
In appearance, spring units resemble a trailer. With this type of clamp, the force is generated by an installed spring. It is very easy to work with such a tool without using your second hand. The unit is used when high compression is not required, and on the contrary, this condition must be met, otherwise the workpiece may suffer, since it was made of a fragile material. There are clamps with a clamp and automatic type.
It’s difficult to make one yourself, but it’s possible if you have the skills to work with electronics. This type is referred to as quick-clamping structures. The operating principle of the unit is simple and clear.
It is very important for the guide bar how much compression is applied. Poorly made and inexpensive instruments have weak fixation. End models have found their application in the furniture industry. There they are used when working with overlays on countertops. There is another budget version of the clamp - G-shaped. To work with such a unit, you will first need to fix it on a tabletop or any other plane. The clamp will become an indispensable assistant when gluing, grinding or sharpening workpieces.
Its advantage is the great possibilities for adjusting the guide. You can change the width, so the processed parts can be of different thicknesses.
WHAT YOU NEED TO GLUE WOODEN BOARDS INTO A SHIELD
- Plane;
- A circular saw;
- Clamps;
- Hammer;
- Gauge for marking;
- Measuring and drawing instruments;
- Equipment for wood processing (surface grinding and belt units). If they are not available, then you can use sandpaper, but then leveling will take longer;
- Wood material;
- Wood glue;
- Electric planer.
IMPORTANT: You need to use good glue to ensure that the boards are joined together well.
- Impeccable high-quality wood glue Kleiberit 303.2. It has excellent moisture resistance and is characterized by powerful fixation. Suitable for both indoor and outdoor use, for gluing various types of wood. Product price starts from 6,600 rubles per unit of 28 kg.
- Kleiberit pur-glue 501. Excellent quality glue suitable for all types of wood, slabs, and ceramics.
How to do which
Any of the clamps described above can be made independently in a home workshop. Carpentry clamps are made of metal - the wooden frame and jaws of the tool will not withstand the back pressure of the material of the part(s), the clamp will weaken during operation, and the clamp itself will become unusable. With welded and soldered clamps it’s already clear: only metal; wood is a flammable material.
Carpentry clamps for working with valuable wood or products are best made of wood, but you can also use metal ones with spacers made of plywood or even shingles. It is better to use wooden clamps for gluing into a layer (on thick workpieces from several thin ones), even if metal or plastic is being glued - wooden jaws provide a more uniform distribution of pressure over the plane and, accordingly, better gluing quality. Fragile parts (glass, etc.) are compressed for gluing only with wooden clamps.
G-shaped
The frames of factory-produced G-clamps are cast. It is impossible to organize a steel foundry in a garage or barn, even in a forge on your own property. Since G-clamps, being the most “graspy” ones, are used mainly in metalworking and welding work with rather long and/or heavy parts, a homemade G-shaped clamp must be made of welded or solid metal.
Craftsmen often weld themselves clamps from sheet steel, pos. 1 in Fig.:
Apparently, copying the profile of the frames of factory products, which in this case is incorrect. Profiles of cast frames of clamps are shown in pos. 2. Pay attention to the fairings and fillets (shown by arrows). Smoothing the profile is necessary to avoid the concentration of mechanical stress: they “love” corners and crevices, like bed bugs. But the weld does not work like a fillet! No, the clamp most likely will not break or bend. However, the recoil of the clamped part will move the frame a little, and it will be difficult to achieve precise fixation, and it is possible that the part may rotate when the clamp is tightened.
Homemade clamps made from channel sections are quite reliable (item 3). Disadvantages: labor-intensive, disproportionately heavy compared to the working width. You can cut a channel into clamp frames if you need to compress the parts very tightly. The best option for clamp frames for normal work is made from a square profile pipe, pos. 4. Depending on the size and wall thickness of the workpiece, clamps from corrugated pipe can be made for a working width of up to 1 m or more.
Quick-clamping
Pistol type clamp. When the trigger is pressed, the jaws move apart. By releasing the locking screw, you can change the gap between the jaws. The clamping force is small. You can make it yourself, but it is not economically profitable. It's a lot of work, but it's inexpensive.
Clamp in the form of a caliper
Devices that are shaped like calipers are used to firmly hold small parts. For a homemade clamp, you will need, as before, plywood and small thickness bars.
For screws, it is best to take studs with rectangular or trapezoidal threads. The thread pitch is 2 turns per cm. It is very good if the stud has a rear sight on one side of a slightly smaller diameter than the thread. It can be used to seat the handle. On the other hand, a rear sight with a slightly larger diameter to accommodate the bearing is desirable.
So, in the simplest clamp, one end will be stationary, and the second will move through a worm gear.
To release the workpiece, you need to move the bracket to the required distance and turn the knob a few turns. This will fix the element. After this, you can release the mechanism and the workpiece will be released.
The simplest version of this model is equipped with a rail structure. The guides, which are arranged in parallel, have cut grooves at equal distances. Fixed stops are secured using rods made of metal. They can move exactly along the width of the workpieces. At the end of the beams, fixed stops should be installed, which have a worm mechanism. The usual method is to clamp it with a hairpin and a furniture nut.
Self-clamping option
For gluing parts, it is better to choose the simplest clamp model, which has an F-shape. The stores sell various models that consist not only of wood, but also of metal. The cost of such instruments is high. Therefore, many craftsmen prefer to make them with their own hands.
For small jobs, a cam-type clamp is ideal. For example, if you need to glue small parts or fix workpieces. This model works in the same way as the f-shaped element. The tool includes 2 jaws and guide bars. Sponges: movable and fixed. For reliable clamping, it is necessary to fix the workpiece well and rotate the cam 90 degrees.
You can make such a tool yourself with a minimum set of tools and materials. Before you begin, you should draw a drawing of the product. You can use any material for manufacturing, and also change the standard sizes as you wish.
The tire is made of wood or metal. Small bolts and rivets can be used instead of metal pins. It is recommended to make movable and fixed jaws at the same time, since they mirror each other. Their width and length can be changed to increase the grip of the product.
For gluing boards (boards)
Clamps are needed for fixing sections, which, after the glue has dried, are used for furniture panels. Such products differ from simple ones in their length. In other words, they have a large jaw span. If you buy such material in a store, you will have to pay a decent amount. Therefore, craftsmen prefer to make clamping mechanisms themselves.
Step-by-step instructions for making furniture panels
- We lay the boards in the desired position, achieving the optimal location of the annual rings. Before disassembling the structure, we mark the material in a way that we understand (for example, by drawing a triangle). The markings will help you quickly find the desired lamella in the future. The ends of the boards must be sanded before gluing.
- To make making furniture panels with your own hands faster, we put the boards in a pack and coat the ends with glue. If you put the plots in a plastic bag, the glue will set more slowly, and we will have time to assemble the workpieces into a shield.
- If the farm has large clamps, we tighten the glued wood with them. Many craftsmen use such a device as a clamp assembled from scraps of boards. The tightening moment is ensured by driving wedges between the stop and the end of the board. You can squeeze the boards between the brackets of metal shelving. The principle is the same - the edges are joined together using wedges and wooden blocks.
- Carefully, sparing no time, dry the glued board. To obtain a flat and smooth surface, we plan and sand the wood, while simultaneously removing traces of glue.
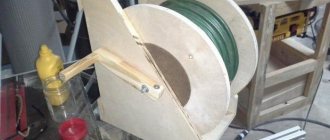
Materials and assembly steps
In order to make tree clamps, you will need the following elements:
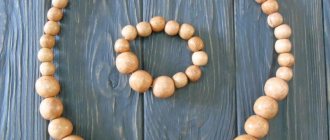
- beech or birch block;
- feather drill;
- pipe 2.5 cm;
- mortise nuts of suitable diameter;
- a nut that has a rounded knob (used for decoration);
- a cutter with a diameter of 2.5 cm and a long pin.
- The basis of the material is a pipe, from which a piece of the required length is cut. Depending on the size of the jaws, it is necessary to cut the block. The pieces should be from 15 to 20 cm. For free movement of the timber along the pipe, a hole with a diameter of 2.5 cm should be made at a distance of 2.5 cm from the edge. Parallel to the hole, a cut should be made from the same end. To fix the sponge on the pipe, connect the hole to the end.
- For the driving nut, you need to drill an additional hole on the side of the cut. You need to drive a nut into it and tighten it with a bolt on the back side. To fix the sponge, clamp the pipe in the hole. To move the pipe, you need to unscrew the bolt, then move the element and repeat all the steps again.
- The lower clamping part has 2 jaws; it is slightly larger than the upper one and has an additional nut. The structure of both parts is identical. An additional driving nut is located at the opposite end of the pipe into which a stud with a wing nut is installed.
- In the second collapsible moving part there are no clamping parts such as cuts and nuts. The dimensions of such an element are also rather large. In this part it is necessary to make a recess for the stud device.
Operating principle
The principle of operation of the clamp is very simple. It is necessary to separate the jaws so that they are separated from each other at a distance of 3 cm greater than the width of the shield that will be installed. Next you need to fix them on the pipe. To do this, tighten the nuts that are located at the edges. The blanks must be placed on the tubes and sealed with glue. Then they need to be pulled together by rotating the “lamb”.
If you know how to use a grinder and a welding machine, you can make the same clamp for gluing wood from metal.
To maintain the plane of the plot with tubes, it is recommended to arrange the clamps in a checkerboard pattern. The main advantage of such a tool is its ease of manufacture and operation.
Preparing materials for homemade clamps
To make three clamps yourself, first prepare the following materials:
- 6 meters of rectangular pipe 20x40 mm - for guides;
- 1.4 meters of metal strip 25x4 mm - for earrings;
- 1 meter of M12 threaded rod - for studs.
Blanks for clamps
M12 bolts and nuts are used as fasteners.
Fasteners for clamps
Special clamp designs
Having mastered the skills of making simple-shaped clamps, you can improve them and make devices for connecting complex parts.
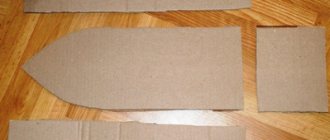
There are homemade clamps made from a wooden hanger, which is sawn into pieces. They combine wood and steel and make more comfortable handles that allow you to quickly tighten the screw. This is especially important if you need to frequently change position or use several clamps at the same time. In the case of complex pieces, you can first cut them out of paper and then transfer them to plywood.
Useful tips
The clamp, like any other tool, must lie in the designated place. You can use a shelf in your garage or a toolbox for this. If you don’t have time to make a tool, then you can use your own ingenuity. It is easy to fix the round workpiece on the rings that are pre-stuffed onto the frame. The simplest clamp looks like a pair of bars wrapped in tape. In such a tool you can clamp a pipe or metal rod.
DIY wooden universal clamp
The easiest way is to make a clamp from a wooden plank and timber. Wood is a fairly affordable material, so if you mark the parts correctly and use the proper tools, you can make a clamp of any level of complexity without much effort.
To make a wooden clamp, you will need the following tools and accessories:
- Tabletop drilling machine with a power of 400-500 W for drills from 1-15 mm. The vertical stroke of the drill chuck must be at least 120 mm;
- Electric grinding wheel. You can do it yourself; to do this, instead of an abrasive stone, use an electric sharpener to install a circle of plywood, 10 mm thick and 350 mm in diameter, on which sandpaper sheets are glued on both sides;
- Hand-held circular saw for wood with a blade diameter of at least 150 mm. You can use a grinder or a band saw.
- All other operations can be done using hand tools. Of course, you can also drill holes and cut grooves with a hand drill and hacksaw, but achieving the required quality and manufacturing accuracy using hand tools will be very difficult.
How to make a furniture panel. Gluing furniture panels
Currently, furniture made independently from natural materials is very widespread. Furniture panels are often used to create such fittings. After all, it has many advantages over similar samples, such as MDF and chipboard, and is distinguished by its practicality and presentable appearance.
People making furniture for the first time are wondering: where to buy the right furniture panel? It happens that the samples provided in stores are not always suitable for the intended design. Experienced craftsmen almost always have wooden boards available. Using them, you can, without much effort, build a furniture panel yourself, relying on the basics of manufacturing technology.
You will need glue, tools and a certain procedure.
Classic F-shaped clamp
The design of the simplest wooden clamp looks like the Latin letter F. The vertical and upper horizontal strips are one whole - a fixed guide connected by a stop of one of the jaws. The central bridge of the letter F is the movable or mating part of the jaws, which is driven by the lead screw. The third part of the clamp with the drive screw is manufactured in a removable version. The clamp can be rearranged along the length of the guide bar; the distance between the jaws can be made smaller or larger, as long as the length of the base rail allows.
The general view of the clamp is shown in the photo.
First you need to make a guide rail. Larch or spruce board is suitable for these purposes. All other parts of the clamp can be made from any wood, except soft varieties - poplar, linden, birch.
Important! For the manufacture of any fixtures and auxiliary equipment, only defect-free wood is used. If there is none, then it is best to make a clamp from ordinary plywood with a thickness of 15-20 mm.
The base strip is cut to the length of the future fixture. The supporting stationary part of the clamp jaws bears the lion's share of the load, so it is best to make the guide from the strongest wood or use a little trick.
A semicircular groove is cut out along the side end of the slats, into which a steel rod with a diameter of 8-10 mm is placed. On one side, the end is bent around the end; on the other end, the rod is connected to a fixed jaw with a nut screwed onto a pre-cut thread.
- The fixed part of the jaws is glued to the guide bar with wood glue; after the glue has dried, the supporting surface is carefully cut at an angle of 90° to the guide bar. This part can be made glued, or the mounting groove can be cut using a hand-held circular saw.
- The mating or movable part of the jaws is cut out together with the support for the screw from one block. Next, you need to make U-shaped cuts in both blanks, allowing you to fit the parts onto the guide bar.
- After removing the burr, the workpiece is placed in a package in a drilling machine and a hole is drilled for the lead screw.
- If you plan to use the clamp quite intensively, then you need to press a brass tube into the hole for the screw and make a sliding bearing. Otherwise, the lead screw will quickly break the hole by 2-5 mm, which will make the tool unsuitable for work.
Glue selection
What adhesives are used for gluing wooden pieces?
In general, any specialized carpentry:
- Casein (made from crushed low-fat cottage cheese);
- Albumin (on egg white);
- Bone (boiled from animal bones);
- Imported Titebond II, etc.
General construction adhesives, no matter how attractive their price, are strongly not recommended for use on wood. The only exception is polyvinyl acetate glue (PVA): its adhesive seam is noticeably stronger than wood in tensile strength in the direction perpendicular to the grain.
When gluing wooden parts using Moment SUPER PVA D3 and subsequent destruction of the structure, fragments of workpieces remain on both sides of the seam; the seam itself does not collapse.
High-quality wood glue from Henkel.
An important point: when using protein-based wood glues (casein, albumin and bone), they are soaked for a long time to swell. The glue is ready for use 1-24 hours after it is poured with warm water.
Clamp assembled from wood and steel
A wooden clamp is convenient to use if you need to apply a little pressure to secure a package of several planks or glue two parts. If you plan to process timber or boards with carpentry tools, a plane or a grinder, then it is best to make a clamp for fixing the material with a metal guide.
The process of making a clamp from wood and steel is as follows:
- Initially, you need to select a steel rail, preferably a tire with a thickness of at least 5 mm and a width of 25-30 mm. Along the length of the tire on a drilling machine, you need to make a series of grooves or holes to fix the rearranged part of the jaws;
- The clamp and the corresponding fixed part of the jaws are cut from one block of wood; it is best to make it from oak or larch. In both workpieces, mounting grooves are cut and steel plates are fastened;
- Next, holes are drilled in the adjustable support for installing the lead screw; this must be done on a machine or guide;
- The fixed part of the jaws is installed on a steel rail and fixed with a clamp to maintain an angle of 90°, after which it is necessary to make two holes and secure the part with rivets or screws;
- The moving part of the jaws is made of maple or ash to make precise alignment; the workpiece is joined to an adjustable support and drilled with a drill with a diameter equal to the size of the lead screw.
All that remains is to assemble the clamp, the rearranged part is drilled under the fixing bolt, the bolt or pin is installed and tightened with a nut. At the end of the assembly, you need to make two or three idle runs to settle the walls and facilitate the rotation of the screw.
Corner option
Regardless of the type of clamp, it must firmly clamp the parts for joining or processing. A corner joiner helps to fasten wood pieces at a certain angle (most often 90°, but there are others). You cannot do without this when assembling furniture and frames.
In order to make such a clamp from wood with your own hands, you will need the following materials:
- two wooden blocks 25 mm thick made of hardwood;
- plywood 12 mm thick or more;
- screws, studs;
- jigsaw or hacksaw;
- drill.
A square board with a side of 25 or 30 cm is cut out of plywood. Two bars are fixed on it at an angle of 90 °.
Important! The angle must be measured with high precision, since the correct fixation of parts depends on it.
First, the bars are glued, then countersunk, holes are drilled and screws or other fasteners are tightened. Perpendiculars are drawn from the center of the bars - screw studs will pass here.
At a distance of 20 mm from the corners, thrust bars are attached, maintaining a gap between them. It should be slightly larger than the width of the parts that are to be clamped with a homemade clamp. It is better to screw in the studs immediately, before fixing the stops. You will also need to cut out the movable blocks that will be connected to the pin (when it is unscrewed, the workpiece will be pressed against the corner bar).
In the same way, a clamp is made from plywood or chipboard sheets. In it, instead of wooden blocks, a thick plywood sheet is taken. There are other options for making clamps yourself, but the principle of their assembly is generally similar.