An item that has served its purpose sadly wanders to be melted down, recycled or to a landfill. But sometimes on this bleak path, full of hopelessness and disappointment, you meet masters who are ready to breathe new life into it. Our review shows how to create original interior items from old auto parts.
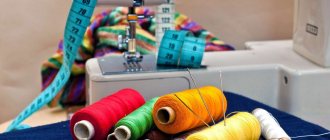
Table
Just a table is boring. Shafts, heads, and gears migrated from automobile to mobile to become elegant and monumental, brutal and graceful tables.
If your own car is in excellent condition, then you really want to get creative, you should go to one of the 10 largest vehicle cemeteries in the world. You can definitely profit from old spare parts there.
11.06.2015 / 13:30
Source
Post Views: 393
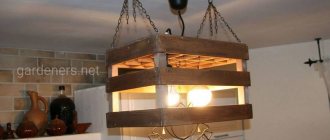
Bake
Wheel rims from trucks or tractors will make a large oven, but you can always make a small one from car rims.
If you place a grate on top of such an oven, you can cook delicious kebab.
One of the most beautiful nations: photos of Ossetians from which you can’t take your eyes off
The average family uses 2250 liters of water: March 22 is World Water Day
You can make a pet bed with your own hands. It is soft and very comfortable
Bra
In this case, an item made from computer hardware parts is unlikely to be used for its intended purpose, because it is unlikely that anyone will be comfortable in such exotic underwear. But the idea is interesting.
A bra made from computer trash will definitely appeal to some notorious gamer. And to be honest, many active male users would also be happy to place such a decorative item on their desk.
The main thing is that the bosses are not indignant about the element of women's underwear in the workplace, even if in such an original design.
Cool DIY machine made from Bearing!
I'll show you what can be made from a bearing and old metal scraps, yet another homemade product exceeded all my expectations.
Products for inventors Link to the store.
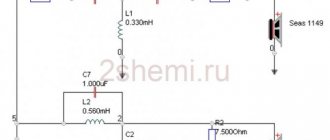
The conductor should be an ideal shape, like a snail's curl, an even circle with an exit, like mosquito coils, only there are fewer rings. And your jig is angled and oval, so the curls are ovoid. Try to make another conductor, from the sole under the railway rails, where the nails are driven into the sleepers. Just make the jig in the shape of a drop with a curved tail, and it’s easier to cut, and smooth shapes look better, even if there is only one curl Source
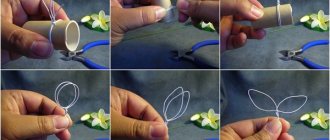
Making a drill
You need to select a ball that matches the diameter of the required hole. It can be taken from a new or old used bearing. To quickly remove the bearing, it is better to wrap it in cloth and break it with a hammer. The rag will prevent the balls from flying around the workshop.
A regular black wood screw will be used as the base of the drill. The main thing is that its length is enough for the required drilling depth. The screw head is ground down so that its diameter becomes slightly smaller than the ball.
A small nut is clamped in a vice and the ball is placed on it. The nut is used as a temporary stand, so the quality of its thread and the condition of the edges do not matter.
The head of the screw is attached to the ball and they are welded together.
The weld protruding beyond the diameter of the ball must be sanded off. In this case, it is important to turn the self-tapping screw in order to obtain a cylinder without corners.
The ball is then ground for a twist drill. If you need to drill a tile, then it is given the shape of a feather.
Having received the desired shape, the drill is hardened. After welding and grooving, the ball loses its hardness, so it needs to be restored. To do this, the tip of the drill is heated with a gas burner until it turns orange and is immersed in oil for a few seconds. At the same time, the screw itself and the welding do not need to be cooled so that they do not become brittle.
After hardening, the drill tip is finally sharpened. This should not be done on tempered metal before hardening, since then the quality of the cutting edge will be worse.
The resulting drill drills well into almost any hard metal, be it a bearing race or a file. The main thing is not to overcool it. If you don’t have oil on hand, you need to add at least water into the hole.
When drilling very thick steel plates, so as not to suffer from constant cooling, you can put a rubber ring around the punched point and add water to it. The liquid will be held by surface tension and constantly cool the drill.
Watch the video
sdelaysam-svoimirukami.ru
Crafts from CDs
Using your creativity and imagination, you can do many incredible things using simple CDs. Crafts made from computer disks can be both children's creativity and a real work of art.
Diary
And this option will save those who are scratching their heads over a gift for a gamer. And the average user who spends a lot of time at the computer will like this diary.
Of course, you can’t get away with five minutes, as in the previous case – after all, there are far from 12 buttons.
But such a handmade project won’t take much time either. The main thing is that the glue is good, and everything else is a matter of time and patience of Samodelkin, who took up this matter.
Hedgehog slicker for a cat
Tired of collecting fur that your cat generously scatters throughout the house? An old mouse and cable is all you need to make a cat slicker.
Half an hour of simple work, and – voila – a new comb for your furry pet is ready!
Another thing is that the cat himself is unlikely to be happy with such a gift of fate. But this, as they say, is the cat’s problem.
Truck in the backyard
In this form, you can use any old car that you don’t mind. Under the hood there is a place for a barbecue, in the cabin there is a bench for stargazing. Beauty should not perish in a landfill.
I decided to grow above myself and do something bigger than my usual crafts. In addition, channel subscribers donated a crankshaft and a pair of springs with a variable radius of turns. In general, I’ve long wanted to do something based on a crankshaft (some kind of dog), but I’m always too lazy.
After looking at a sea of information on the Internet, I saw that dog crafts, as a rule, are divided into 2 types, either completely primitive or a high level of production that is not available to me. That's why I decided to do something in between.
In the water it’s simple, I’m making a bulldog type dog, short powerful legs, big head. Material - use ready-made materials to the maximum, with minimal changes and minimal manufacturing of your elements.
As it turned out, using a spring with a variable radius is a very sound idea. and the ribs are very similar and the trimmings are scattered throughout the dog’s carcass without a trace.
Having made the case, it became clear what dimensions the product would have.
Having gone to a local metal collection shop where they know me, for an inexpensive price, I managed to find such a hub from a car of unknown origin. Just the size I needed. Ball joints were used for the eyes and nose, which gave an interesting effect, the ability to set the direction of the dog’s gaze as desired, changing the expression of the muzzle.
A motorcycle chain of size 530 was used on my jaw.
Welded the nose. It would be necessary to sink it into the jaw a little, but it will do. The front fangs and teeth are scraps from the spring that we used for the ribs.
I made the ears from a square pipe, cutting it bluntly at an angle. The eye sockets are still the same spring trims. I found a part of a saw from which I cut off the teeth, they were only enough for the upper jaw, and therefore on the lower one I simply welded buns in the shape of teeth by welding. The engine part from the Ural motorcycle came to mind.
Read more: How to spot a fake trw
He welded the head to the body. It turns out to be a heavy thing. For the front paw blades I used some gears found in a landfill.
Welded the paws. The front ones are shock absorbers from a Ural motorcycle, the rear ones are from a burnt-out Chinese quad. the pelvis of the body is also some kind of small hubs donated by kind people. All that remains now is to dress the whole thing in meat, a powerful front part and a smaller rear part. But at the same time, I want there to be transparency and the appearance that the dog is made precisely from parts. and not upholstered with solid sheet iron.
Well, I think this is quite enough. in order to close the empty space on the neck, I welded a collar with bolts. I welded a spring from the fork of a Ural motorcycle, inserted the spring itself into the crankshaft mat from a scooter, and to make the tail flapping more strongly, welded a weight on top in the form of a cage with bearings.
Tum