Many people probably know that feeling when you wake up early on a sunny morning and a freshly prepared breakfast is waiting for you in front of your bed. A cup of hot tea will invigorate you and make your morning truly enjoyable. Typically, such breakfasts in bed are served on serving tables. We will devote today's article to an overview of the types of serving tables and how to assemble a serving table on wheels with your own hands. Let us immediately note that in order to complete the project presented below, you do not need to be a carpentry master - any man can easily cope with this.
Making a coffee table on wheels with your own hands
So, how can we make a coffee table with our own hands at the lowest cost and at the same time so that it has an original shape?
First of all, we turn on our imagination and come up with the shape of the table, then we draw its diagram and decide on the dimensions. I came up with my own diagram of a coffee table and this is what its drawing will look like.
Coffee table diagram
The dimensions of the top cover of my future piece of handmade furniture are 75x55 cm, and the bottom cover is 65x45 cm. The side parts have an arbitrary shaped configuration. The middle shelf will serve as a stiffener with dimensions of 55x25 cm. The height of the coffee table will be 50 cm, excluding the height of the wheels. Having marked all the elements on the slab using templates, you can start cutting them out.
Marking the chipboard
To ensure that as few chips as possible are formed when sawing with a jigsaw, you need to strongly run a sharp knife along the cut lines several times.
To saw a chipboard board, we use a file with the smallest tooth and set the jigsaw to a reduced speed. When working, we try to guide the jigsaw evenly along the cutting line, eliminating the appearance of waves. If one does appear, then you can trim the cut with a rasp, using a “pull-away” movement. So, first we cut out the rectangular parts of the coffee table with our own hands.
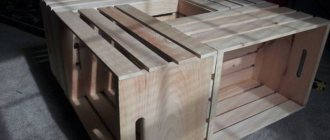
We cut rectangular pieces of chipboard
Then we proceed to the side ones. To make both sides exactly the same, we will cut them together. To do this, we fold two blanks “facing” each other and tighten it all with clamps. Then we apply markings according to the template and cut out the outer outline. To saw inside the workpieces, you need to drill holes with a diameter of at least 10 mm in the corners of the drawing. Insert the jigsaw blade into the hole and begin sawing. This way we get rid of the internal areas and get the same sides.
Cutting out the inner parts of the side panels
All our components of the table are ready, now we need to cover all the cuts with decorative furniture edges (and if we slightly modernize this checkerboard pattern, then the edge of the table will look much more decorative). This is done using a hot iron. We place the tape with the adhesive side on the cut side and align it with the edges. Then, holding it, iron it on top with a hot iron. We do this with our own hands with all the external and internal sections of the elements of the coffee table.
Glue the decorative edge
If the width of the tape is larger than the end of the slab, then cut off the excess part with a sharp knife, and carefully blot the cut of the tape with stain (you can use an ear stick).
Now we mark the fastening places for the middle part of the table - the shelf and the sides. The fastening here will be special screws for furniture - confirmats. Given the special structure of this fastener, you will need a special drill to drill holes for it. If there is none, then you can use three ordinary ones: under the screw part, under the expanded part and under the cap. By drilling holes you can fasten the shelf and sides.
Assembling the middle part of the coffee table
Next we will attach the completed middle part to the top cover. To do this, we will place our elements in the position in which they should be in the finished table and mark the places for metal corners and holes for screws. Then we will fasten these parts of our table.
Screw the middle to the top cover
We turn the coffee table over with our own hands and similarly connect the structure to the bottom lid, using the same furniture metal corners. Next, we put our table on wheels. We mark the installation locations of the rollers on the bottom side and secure them with screws.
Screw on the wheels
That's all! Our handmade coffee table is ready! On New Year's holidays, you can successfully place a Christmas wreath on it or beautifully serve a romantic dinner. This is how, without using much effort and without calling in specialists for help, and especially without spending the family budget, you can acquire a very useful piece of furniture.
Our original coffee table
By the way, such a piece of furniture can be used for further decoration - decoupage, painting or appliqué, it all depends on you and your desire to decorate the interior of the room.
Detailed instructions for cutting blanks and assembling a serving table
- We mark the parts of the table top and bottom shelf on the wood block, having the same rounding radius (about 225 mm). We cut it out using a jigsaw or a router with a compass.
- When deciding how to make a serving table according to all the rules, we mill the blanks along the radius in several passes, each time going deeper by about 5 mm. Having cut out both elements, we round their edges with a milling cutter (radius 9.5 mm).
- Using a template, we select a round hole for the handle in the tabletop, installing a groove cutter and a copy sleeve on the milling machine.
- Take a blank for the side wall. We cut out a rotary stop from it, which will hold the folding element of the lid. For work we use a jigsaw with a fine-toothed file. We cut at high speeds, then the cut will be smooth.
- We drill holes for dowels in the ends of the side walls and in the table top. To create an ideal pairing, we use markers (for marking mating sockets) and a stencil jig (for precise drilling). Trying to make the serving table beautiful, we carefully sand the parts before assembly. We round the open edges with a cutter with a radius of 6.35 mm. We connect the tabletop with the lower shelf with the side walls, coating the dowels and the walls of the sockets with glue. First, we fasten the side panel with the cutout to the shelf, then install the second side wall.
- Before gluing the table top and side walls on dowels, we insert a rotary stop with a radius of 120 mm into place. We don't use glue here. A washer must be put on the lower dowel with a diameter of 6 mm.
- We assemble the drawers on dowels or connect them using the dovetail method. In the sides of the drawers, we cut out grooves for the bottoms using a milling cutter. We glue plywood parts into them. We attach telescopic guides to the outer side of the sidewalls.
- We cut out homemade rollers with a diameter of 140 mm. On the end side of the roller we cut out a groove 12 mm wide with a milling cutter. We will install an O-ring in it with glue, which will work like a wheel tire. The axles of the wheels are dowels ∅ 15 mm, recessed (also with glue) into the bottom shelf by 40 mm.
- We attach guides to the inner sides of the side walls. After this, we drill ∅ 25 mm handle holes in the front panels of the drawers. We put the boxes in place.
- To hide the piano hinge for folding the table top, we select 1.5 mm deep folds on the edges of the lid and the folding part.
- We are preparing a 4 mm thick template for bending the duralumin tube. We adjust the tube, bent along a radius of 200 mm, to the planned length of the fence.
- We put the racks on the duralumin arch. We insert the ends of the tube into 8 mm sockets drilled in the inner side of the table. At the same time, install the racks in the pre-drilled holes.
Making furniture with your own hands is not only a way to save money, but also a fun activity. You can bring your wildest ideas to life, for example, creating a coffee table. After all, this is not only a stylish accent in the interior, but also a functional element of the room.
The procedure for making a table at home is as follows:
- We take a beam with a cross-section of 5x10 cm, cut it into three parts, several pieces each. For example: the length of the first part is 130 cm, it is necessary to cut 9 pieces of beams with this length. The length of the second part is 21 cm - 12 pieces. The length of the third part is 34 cm - 2 pieces. You can start by making a drawing of the table.
- The timber is placed in three rows. At this stage, you need to leave a small gap so that you can place the table legs there later.
- Remove two rows from the top. We begin to move the rest of the timber. This will give the table an original appearance. Then we make markings for the transverse parts.
- We lay the outer bars of the second row and put marks for the cuts. The cuts can be made with a hacksaw or saw. After which we secure the bars with screws.
- Let's move on to the third row. We shift the parts a little and secure them.
- Empty spaces appeared under the tabletop. They are for feet.
- The table must be treated with a protective compound.
How to make a serving table on wheels with your own hands
In the modern world you can find a varied number of serving tables, which will differ in shape and design. This is an indispensable assistant during various events.
A serving table differs from a coffee table in that it has small wheels. They allow him to move around the room with ease, without having to worry about the dishes breaking. Such tables are usually used in restaurants or hotels as it is convenient to transport various dishes and cutlery.
A self-made serving table will simplify the process of carrying food. With its help, you can bring breakfast in bed for your significant other.
Required Tools
For convenience, while fastening the frame with screws, you can secure it with clamps.
From the tools you need to make sure you have:
- circular saw;
- drills;
- screwdriver;
- hammer, preferably pneumatic;
- grinding machine;
- office supplies.
Carpentry tools will be indispensable in your work.
On a note! When preparing for work, it is important not to forget about safety. Protective equipment such as goggles, a respirator, and gloves will be useful here.
For edging, slats are cut and fixed on the sides.
§ To make this mobile table, you need the following tools and materials ↓
Tools – workbench with vice and clamps; compass; pencil; ruler; square; lamellar router; 4 weima; good set of clamps; electric hacksaw; end plane; tzinubel; drilling machine; Forstner drill with a diameter of 25 mm; twist drills with a diameter of 3 and 5 mm and a twist drill corresponding to the diameter of the bolts of the swivel wheels; chisel 15 mm wide; mallet; frame bow saw; router with work table; groove cutter with a diameter of 12 mm; knife; tenon saw; jointer; screwdriver; sanding block; countersink drill; a wrench to match the size of the steering wheel bolts; brush. We will also need other useful tools: a cordless screwdriver; Grinder; electric drill; dividing compass; marking knife; band-saw.
Materials – maple blanks (see specification below); packaging of lamellas; PVA glue; sandpaper with grit from 150 to 300; 4 swivel wheels with built-in braking devices (total height of the wheel unit is about 100 mm); Danish oil for the exterior of the kitchen table; 28 stainless steel screws with countersunk heads; stainless steel hanger with fittings.
Materials and consumables
Billets and other lumber to be used in a project must be planed or sanded.
When the table is assembled, leveling the surface in some places will be very problematic. The next step after choosing a model and drawing up a drawing will be the preparation of the materials necessary for the work. So, you will need the following:
- boards for the frame (size 50mm x 100mm);
- boards for the table top (size 25 mm x 100 mm);
- slats for edging (size 25 mm x 50 mm);
- sandpaper;
- primer, paint;
- drills, screws, nails.
When connecting boards with screws, you should first drill holes of a slightly smaller diameter with a drill.
This will help prevent the lumber from splitting. You can get all this at a regular hardware store.
Organizational stage of work
We will make the serving table from pine wood panels 18 and 28 mm thick. You will also need 5mm plywood for the bottoms of the drawers. We cut the lumber according to the presented drawing, observing the parameters of the workpieces indicated below.
Serving table detailing
- Bottom shelf dimensions 28x459x782 mm.
- Stationary table cover – 28x450x800 mm.
- The hinged part of the lid is 28x300x450 mm.
- Side wall – 18x430x500 mm.
- Side wall – 18x450x528 mm.
- Rotary stop – 18x120x120 mm.
- Side walls of drawers – 18x90x393 mm – 4 pcs.
- Front and back sides of drawers – 18x90x300 mm – 4 pcs.
- Rollers – 18x140x140 mm – 2 pcs.
- Racks with a diameter of 20x90 mm – 2 pcs.
- Plywood box bottoms 5x280x385 mm – 2 pcs.
Consumables
- Guides for drawers, length 400 mm – 4 pcs.
- Piano hinge dimensions 32x445 mm.
- Furniture roller 65 mm high.
- Wooden dowels with a diameter of 6x30 and 6x40 mm.
- Round wooden block ∅15x160 mm (you can use a rolling pin).
- 4 mm rail 18x40 mm.
- Duralumin tube ∅ 8, length 1770 mm.
- Rubber rings (for plastic sewer pipes, ∅ 100 mm) – 2 pcs.
- Carpenter's glue.
Preparatory stage of work
The process of making a kitchen or coffee table-transformer for the living room begins with creating a frame for which soft wood is selected. This can be pine, spruce and other coniferous trees. However, if you rely on the experience of experienced home craftsmen, then linden is the best option. The main reason for this choice should be the ease of wood processing, as well as the long service life of furniture made from it.
To create a tabletop for a transforming table (a photo of it will allow you to imagine the future product), ready-made wooden furniture panels are most often used. If your skill level allows, then you can add a plastic or aluminum lid to it. Such furniture with an aluminum lid is perfect for use in the country. However, you don’t have to spend time and effort for this, because you can go to a store that sells goods for making and repairing furniture, where you will definitely find ready-made metal countertops in their assortment.
You will have to prepare not only the materials for making the frame of the transformable dining table, but also long furniture hinges. With their help you can assemble the folding lid. It is best if you choose copper or brass hinges. Of course, you will have to pay a little more for them than for similar fasteners, but you will be sure that they will last you longer.
Materials for making a transformer table
If you consider yourself one of those home craftsmen who are not accustomed to using store-bought ingredients for homemade crafts, then you will have to prepare the following materials:
- A board or ready-made furniture board 2-2.5 cm thick. If you decide not to limit yourself to using this table as a coffee table and dine at it, then you can use a sheet of thick plywood as a material for the tabletop. If you initially decided to make a dining table, then you should use more durable and reliable materials.
- Material for decorating the edges of the table top. A couple of decades ago, strips of thin plywood or thin veneer were used for these purposes. Today, every home craftsman has access to a more advanced part called a plastic edging, which you can easily install yourself.
- Beam or furniture panel for table legs. In order not to make a mistake when choosing the material for a transformable dining table for the living room, be guided by the model of furniture that you are going to make. To make the legs, you can use available materials, such as a metal pipe or corners.
- Load-bearing tires. Of course, you can make them yourself, but you will save a lot of time if you buy ready-made ones. Today, many stores offer tires made of wood and metal, which can be equipped with transformable furniture. Moreover, they often provide all the necessary fasteners, so you don’t have to spend extra money and time searching for them.
To fasten the parts, you will have to prepare nails and self-tapping screws, although you can also use a more modern option - Eurobolts. For furniture that will be used outdoors, it is recommended to use special plastic plugs in addition to fasteners.
Required Tools
To do this job quickly and efficiently, you will have to prepare a set of the following tools:
- Hacksaw;
- Plane;
- Electric drill complete with drills designed for woodworking;
- A grinding machine, instead of which you can use a special grinding attachment.
- A set of sandpaper of varying degrees of grit.
You will also need measuring tools. Therefore, prepare a centimeter ruler, a construction tape measure and a square. To meet the requirement for a horizontal countertop, you must have a building level available.
Installation of wheels
One of the main functional parts of the table is the wheels. Without it, the table will not become truly serving and will not be as convenient to use. We mount the wheels using screws.
Attaching the wheels to the frame
Today, in specialized stores you can find a huge assortment of different swivel wheels for furniture, differing in design, diameter, material, fastening design, as well as the presence of a brake. For ease of use, it is recommended to choose wheels of a metal structure with a diameter of at least 80 mm.
Handle installation
So, we got this spectacular wooden serving table, no worse than those sold in stores, and assembling it with your own hands, as you have already seen, was quite simple.
Design options
The design of the product can be anything and depends solely on your taste and preferences. You can make a simple and unpretentious table, or you can equip it with many shelves and drawers, using it as an additional tabletop. The style is also individual and matched to the interior decoration of the home, and it is advisable to use natural, eco-friendly materials (MDF, wood) for production. In rooms with a modern design, metal or glass structures would be appropriate: colored, tinted or transparent.
The most comfortable are tables equipped with wheels, since they are mobile and easy to control. A handle installed on one side will help guide the product, and various hooks, shelves and a cutting board will help make it more functional.
Wooden tables
The classic version of a serving table is wooden. It is not fragile, but at the same time it is not as heavy as, for example, glass.
Most often it is made in golden or chocolate shades using noble fittings.
There are options for using painted or carved patterns that give the table additional chic.
The only drawback of such a table is the need for regular maintenance, since wood is many times more capricious than, for example, glass.
When choosing a serving table for your home, it is important to take your time and evaluate as many different options as possible so that the final choice will please you for many years.
Mini bar
A very useful model is a minibar on wheels. There are models on sale in different sizes and functions. A bar can usually hold up to 18-25 glasses, as well as a number of bottles. The design allows the stand to be used as a serving table.
Such a serving table - a bar on wheels made of glass, wood or metal will be a wonderful addition to the holiday table.
A mobile alcohol bar is a real pride of every home owner who wants to receive guests. This furniture is designed for storing and presenting drinks. Larger homes often have full, built-in bars that hide a large collection of alcoholic beverages.
Most often it consists of two levels. The upper level serves as a place where mostly open bottles and glasses are kept. In turn, the lower level is nothing more than a small “reserve”, used in case the party lasted a little longer than planned.
Practical and aesthetic furniture
A serving table is an extremely practical solution that allows you to collect the most necessary foods, drinks or dishes in one place. It can be equipped with a cabinet, drawers, side shelves and wheels, allowing you to move it freely around the kitchen, dining room or living room.
On sale you can find both small and quite large mobile tables on wheels, which are usually much larger and often serve as an additional tabletop. Folding tables help us save space in the apartment when they are not in use. And if necessary, they provide additional countertops for serving the necessary dishes, drinks, and products.
Folding wooden serving table with shelves on wheels, photo
Functional aesthetics
Serving tables, due to their universal design, as well as the presence of a certain number of tabletops, are quite popular among those who want to enjoy its countless amenities. Such a table is indispensable in matters of economical use of time and space: with its help, you can simultaneously serve a significant number of dishes at a party, while, installed in the corner of the room, this compact item will not interfere with your guests.
The serving table has become an integral attribute in the catering industry, since its universal shape allows you to serve several customers at once in a matter of minutes.
This fact invariably stimulates labor productivity and evokes positive responses: both from satisfied visitors and grateful employees of the establishment.
An elegant serving table often crosses the thresholds of the private sector. This aesthetic item is needed not only in luxurious country villas, but also in cozy small apartments where guests are often received. In the latter case, an additional work area or quick setting of a mobile buffet table is often required.
Ikea Eplaro wooden serving table (photo)
It can be used to organize a temporary workplace and a mini-playground for children. This is an absolute way out for the elderly and those people who find it difficult to move independently: it is much more convenient to bring them dishes on a served table.
This bright and “emotional” decor item, which has a simple but ergonomic design, in addition to its main purpose, can decorate any interior and serve you as an elite stand for designer small items, indoor plants, books, CDs, electronics, soft toys, etc. Further.
Advantages
This amazing furniture attribute performs a variety of functions:
- An auxiliary surface during cooking and serving;
- Temporary workplace;
- Surface for placing decorative interior items.
Important! A convenient ergonomic design, equipped with wheels and comfortable lifting tabletops, will help get rid of the annoying running from the living room to the kitchen and back. It is enough to load everything you need onto the table once and bring it where you need it.
Design advantages:
- Anything that a regular dining table can't accommodate can be displayed on the compact serving hybrid. This is made possible by the fact that the table has additional opening parts and universal compartments in which you can put bottles or smaller household utensils.
- The lower shelves often have additional protective sides, mesh shelves and removable compartments.
- The structure usually weighs a little - up to 9 kg. Typically, this indicator depends on the material of the countertop.
- Minimal storage space required. And if the model is equipped with folding legs, the table instantly turns into a tray on which you can store food and drinks.
Important! The main advantage of a folding serving table is its ergonomic design details.
Other design options for a small kitchen table on wheels (⇓)
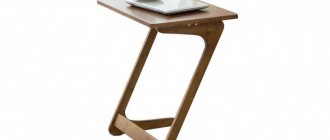
Make a wooden table on wheels that can be moved anywhere. It will be indispensable for outdoor recreation.
All materials are taken from cut down trees, so there is no need to destroy living trees specifically for this purpose.
All table dimensions are arbitrary - the article only describes the method.
Consider the height of the table before you start cutting the wood.
Tabletop
We cut the wood to the required thickness. Use a chainsaw, which will greatly speed up the whole process.
Table base
We cut off a small piece for the table top with a lid. We cut out small pieces at the same distance from each other, as in the photo above. We insert prepared boards of the same size into these slots. There is little space left in the center: the boards do not fit tightly together. Then we will put a “lid” on top.
The boards may not be enough for stability - install three boards for the legs.
We attach the rollers with regular bolts to the bottom of the legs.
In the center of the log in the upper part we drive an iron rod or screw; the table top will be attached to it.
Tabletop installation
The base must be stable and not tilt to one side, otherwise the tabletop will not hold up.
If the base is still a little uneven, do your best to correct it.
We fix the tabletop to the base using a rod or screw.
Finishing touches
The table is ready! It stands level, the tabletop is tightly secured to the base, and can be moved to any location on casters. Next, you can paint the table in any suitable color.
Guests came to the house. Having seated them on the sofa, the owners begin to run from the kitchen to the living room, rattling dishes. At this time, visitors are toiling around unattended. The most conscientious ones try to help by pushing in doorways. Now imagine that you have made a serving table with your own hands. You fill it with various delicacies and solemnly, to the applause of hungry guests, roll it into the room.
It will be impressive and tasteful. Therefore, putting aside our non-urgent matters, we set about making a two-level model with drawers and a partially folding tabletop. The hinged part will increase the lid area from 80 to 100 mm.
General recommendations for making coffee tables
What a modern coffee table it is today, a modern coffee table that has survived more than one generation of Russians. The answer is not at all that simple. The only thing that this name sometimes has in common is just a collective phenomenon relating to a certain type of furniture with completely understandable tasks. The rest is a problem.
Or pallets of fruits and vegetables will suddenly find a new home, strikingly different from the once traditional landfill
Sometimes it seems that a person has gone a little crazy and is dragging all sorts of garbage home. But no... This is also a work of furniture art.
History, alas, will not preserve the brand of this unit, which was wasted for the sake of such an art object
It would seem that there is no rational grain in this chaos. But no! It turns out that each of these samples must meet both aesthetic standards and correspond to some functionality.
Indeed, there is a whole list of standards and specifications for factory products. For example, they must be stable and safe. Forms are “perfect, providing ease of use.” And the materials should be simple and environmentally friendly. In fact, a coffee table is one of the simplest designs. You can’t argue with this when looking at some amazingly simple and elegant masterpieces.
This table is assembled using a surprisingly simple technology, conventionally called “three boards, four nails”
Simple, but so elegant! Another recommendation that furniture makers talk about is that the coffee table should be assembled and disassembled. More complex models may have pull-out cabinets, for example, like this. And even if some of them are slightly non-standard, such a table will definitely attract the attention of guests.
Another requirement is the accuracy and cleanliness of assembly and fitting of elements. Here again questions arise. And if the table was practically not processed. What to do in these cases?
You will be surprised, but every table that comes out of the factory has a long history of creation. From a simple sketch to a whole pile of papers. All details must be unified. That is why in Soviet times factory tables created such a dull impression.
A masterpiece of design thought from the USSR era - a coffee table on wheels
And it’s great that today there are enough art workshops, videos and other ways of exchanging information and knowledge to try to spy on really interesting projects to create such small works of art.
The main thing to remember is that the coffee table really should be stable and safe. And even like the one in the photo.
Coffee table with fire
How to prepare your own drawings with dimensions for a coffee table
Drawings are the most important part of working on your own table project. Here it is important to choose the golden mean between functionality and originality. You can take ready-made drawings as a basis, and there are a huge number of them today, and modernize it during the process. Scheme options that may be useful during work.
And here’s how a seemingly ordinary table at first glance can be turned into a small front garden. The main thing is to imagine in advance what your table will be like, and the solution will arise by itself.
Advice! To build your own drawing, prepare a sheet of paper, a pencil and a tape measure. Using a centimeter, you need to measure the area of the space where you plan to place your creation. Based on the data obtained, prepare a drawing.
A schematic drawing is the basis for further work on creating furniture. The drawing will help you choose the right base for the structure, calculate the load on the frame, prepare the required number of corners, screws or clamps, as well as supports or legs on wheels. Do not forget that in the drawings, in addition to the dimensions of other materials, the thickness of the countertop is indicated.
Wooden serving table
Such a serving table on wheels will be useful in a modern apartment, in a country house, or in the courtyard of a house. Its production will not take much time and will not require any special professional skills. A list of materials, a drawing and a detailed description will make the work easier.
The design of the table traditionally consists of two surfaces. Their area is enough to accommodate breakfast for two people. Rotating roller wheels make it easy to move the structure, and a metal handle installed on one side will help you conveniently control the movement of the table. The bright red color will create a good mood and invite you to a treat.
Materials and tools
Make sure to purchase the necessary materials from a specialized store:
- Board 50x100 mm for creating a frame.
- Board 25x100 mm for two tabletops.
- Wooden slats 25x50 mm - for edging table tops.
- 4 roller furniture wheels on a metal base.
- Massive metal handle.
- Screws for fastenings.
- Nails.
- Putty.
- Primer.
- Paint (in a can).
The following tools will be useful: a circular saw, an electric drill, a set of drills, a pneumatic hammer, a grinder, a square, a pencil, and a tape measure. To avoid injury during work, use special equipment: safety glasses, headphones, gloves.
Start by cutting out the pieces for the serving table. Use a circular saw.
- 4 blanks for short tabletop sides, 32 cm long;
- 4 blanks for long sidewalls of tabletops, 93 cm each;
- 4 legs 78 cm long;
- 2 short strips of the lower tabletop 32 cm;
- 18 strips for the surfaces of the upper and lower shelves - 42 cm each;
- 4 long end strips 93 cm each.
Attention! Before starting assembly, sand the surface of the parts used in the design to remove burrs and roughness. It will be more difficult to complete this work in finished form.
Use a sander.
Prepare a work surface for assembling the table. It should be smooth. Clean this area of contaminants.
Sequence of process execution
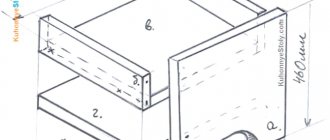
- Start by assembling the frames for the serving table shelves. From parts 93 and 32 cm long, assemble 2 identical structures. First prepare the holes for the screws. Widen it at the base so that the screw heads do not protrude above the surface of the part. Apply wood glue to the joints. Tighten the strips with 5 cm screws. Use 2 screws per connection. Part of the glue that protrudes on the surface of the joint must be removed immediately. Adhesive that has soaked into the wood or dried out will not allow for quality painting.
- Connect the finished tabletop base frames by installing vertical posts (78 cm each). How to correctly compose the parts is shown in the image below. To attach the legs, drill holes on the outside, apply glue, and screw in screws.
To ensure strong connections and the parts fit tightly together, fasten them with clamps until the glue dries.
- Now you can begin to form the upper and lower tabletops from prepared planks 10 cm wide (18 planks 42 cm long and 2 32 cm long). We lay 10 planks on the top frame. To ensure that the distance between them is the same, you can use a sliver of board as a stencil. Attach the planks to the frame using nails and glue.
- We install the boards on the lower base in the same way. Short strips 32 cm long are laid first and last (between the vertical posts).
- We install (using nails and glue) thin facade end strips, covering the ends of the boards of both tabletops.
- Start finishing work. Use putty to fill uneven areas and screw holes. Leave the table until completely dry.
- Sand the table surface to remove any excess putty. Wipe off the dust.
- Apply a coat of primer to the wood.
- Start painting the piece with red acrylic paint. Apply the substance to a dry surface. To achieve an even and rich color, paint in two or three steps.
- When the paint has dried, attach furniture roller wheels to the bottom of the table (with screws and glue). And at the end of the upper tier there is a metal handle.
Drawing up drawings
Initially, a detailed drawing of the future product is drawn up. At this stage, you can let your imagination run wild, or you can use ready-made schemes.
The diagram is applied to a sheet of paper indicating all the sizes of the elements, places of their attachment, and finishing materials.
Having decided on the model, it is necessary to draw a drawing on paper, indicating the dimensions, dimensions of the parts, and the places where they are fixed to each other. All these parameters must be strictly controlled in the future.
The serving table consists of an upper and lower base, connected to each other by vertical posts.
When you decide to assemble such a table for the first time, it is better to opt for a simpler model. The best option is a two-tier serving table on 4 wheels.
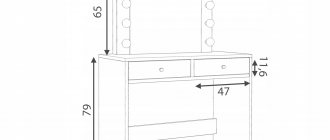
Dimensions:
- height 78 cm;
- length 93 cm;
- width 42 cm.
Schematic drawing of the product:
Benefits and Use Cases
Compared to a regular dining table, a serving table has a completely different purpose. It can be used:
- like a small shelf or bookcase - installed in the corner of the kitchen or dining room, it will perfectly accommodate a vase of flowers, some dishes, a few elegant trinkets and will look like a decoration of the room, and not a useless structure;
- like a buffet table at a party - you can place dishes with salads, sweets and sandwiches on it while waiting for the main course, or you can arrange a children's table for children who are still too small for an adult feast;
- like a breakfast table - after all, there are few people who refuse to have breakfast without getting out of bed;
- as a coffee table - in the living room you can place it so that it looks advantageous and use it for books, magazines or even a laptop;
- as a bedside table - in a small room (or if a sofa is assigned as a bed every evening), the table will become an excellent stand for all those little things that may be useful to a person who has just woken up.
From the list of situations in which serving tables can be used (whether they are on wheels or not), an impressive list of their advantages flows smoothly:
- Mobility. A serving table on wheels can easily be moved to any part of the house - even a weak person or a person with a bad back can do this, since most tables are equipped with a convenient handle.
- Compactness. Folding models are especially distinguished by this, but even the classics, which cannot be folded, will not take up too much space.
- Elegance. Even the simplest designs are usually designed to look good, but complex designs can even look like works of art.
- Versatility. The use of wooden, metal or plastic serving tables is at your discretion, and the only possible limitation is a lack of imagination. A child can draw on them, flowers can stand on them, they can serve as the main dining table - the main thing is that it is convenient for the person using it.
- Variability. There are a huge number of tables from which you can choose to suit your taste; moreover, you can order a model according to your own drawings, if you have enough funds for it.
- Availability of additional accessories. The table can be equipped with a height-adjustable handle, it can have several additional shelves or a stand for glasses - and each such device increases the convenience of its use.
A serving table - wooden or glass - cannot be called the dream of every housewife. But in a large house, where they attach great importance to the beauty of presentation, or in a small apartment, where it is difficult to find a place for a large table, it can be very useful.
What to look for when choosing a serving table?
Having decided that you definitely need a table in your interior, it is very important to pay attention to such characteristics as aesthetics, reliability of all accessories, and ergonomics. And of course it is important to dwell separately on the material chosen for its manufacture.
The maximum load on a serving table of any size falls upon the moment of delivery of ready-made dishes to the common dining table. It is for this reason that the stronger the chosen material, the better it is for you.
Various models made of valuable wood or expensive glass and metal are especially popular and in demand today.
Today, many consider wheels to be one of the most important parts for any type of serving table. The service life of the selected table will ultimately depend on how reliable they are.
The ideal option is when the manufacturer is so confident in the quality of its products that it easily provides a guarantee on all parts, including mechanisms for quickly changing the look of your table.
It is especially convenient if, immediately after using such a unique assistant, any housewife can quickly and compactly fold it. It is worth noting that the photo of a folding serving table in practice does not look so elegant, but at the same time it is functional.
When choosing a folding table or any other used for serving, it is very important, first of all, to proceed from the specific goals and objectives set for it. There is a huge difference between tables that should become assistants in organizing any celebration and those that are used only for tea drinking with the family.
In addition, it is very important to fit the table into the overall design of the room. That is, when choosing any table, personal preferences and financial capabilities will have a certain importance.
Making your own table
To make a serving table with your own hands, drawings can be found in specialized magazines or on the Internet. Let's consider making a simple model, with two tabletops and a handle for transportation on one side.
First of all, you will need to prepare the following tools:
- Circular saw;
- Drills and drill sets;
- Screwdriver and screws;
- Pneumatic hammer;
- Grinding machine;
- Tassels;
- Roulettes;
- Pencil;
- Safety glasses;
- Respirator;
- Gloves.
To make a table on wheels with your own hands, you need to prepare the following materials:
- Board 50x100 mm - frame;
- Board 25x100 mm - tabletops;
- Rail 25x50 mm - edging;
- Paint;
- Putty;
- Finishing nails;
- Wheels.
Assembly
The serving table includes an upper and lower base, which are connected to each other by vertical posts:
Using a circular saw, we cut out four pieces 860 mm long and four pieces 320 mm long. These will be used as a base.
- Using the drawing, we join the boards.
- We screw two screws into each joint. In this case, you should first drill holes of a smaller diameter with a drill. This is done so that the lumber does not split when screwing in the screw.
- We fasten the bases with vertical posts.
- The legs, 780 mm high, are attached from the outside to the prepared bases.
- Ten planks are secured to the top base using screws or finishing nails.
- Eight planks are fixed on the lower base, in the middle, and shorter boards are fixed on the sides.
- We fix the edging along the long sides of the tabletops. The slats should have a length of 930 mm. For fastening we use finishing nails.
- We putty the formed recesses and holes.
- We sand the tabletops with sandpaper.
- Apply primer to the surface.
- We paint the resulting table.
- We fix the wheels with screws.
In the modern world you can find a varied number of serving tables, which will differ in shape and design. This is an indispensable assistant during various events.
A serving table differs from a coffee table in that it has small wheels. They allow him to move around the room with ease, without having to worry about the dishes breaking. Such tables are usually used in restaurants or hotels as it is convenient to transport various dishes and cutlery.
A self-made serving table will simplify the process of carrying food. With its help, you can bring breakfast in bed for your significant other.
What you need to make it yourself
The simplest one to make would be a table made of wood. It doesn't take a lot of time or special skills to assemble it.
Almost every housewife dreams of having comfortable furniture that can be used to ensure a comfortable stay in the kitchen, living room or even bedroom.
Knowing the required list of materials and tools, having a clear drawing and a step-by-step description of the process, it is quite easy to make a table on wheels with your own hands.
The main advantages of the furniture are that it is multifunctional, ergonomic, and highly mobile.