Preparation of a sketch and production of lamp parts
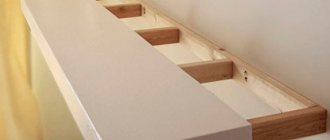
Diagram of a plywood lamp: 1,2,3 - bracket parts.
4,5,6 - details of the lampshade. For a beginner, it is best to choose model options with parts that are easier to implement. You can make an invented item yourself or choose a model you like from any source: a magazine, the Internet, etc. It is advisable to have sketches of each part and instructions for implementation. If instead of a sketch there is only a diagram, you first need to draw each detail in natural size on a sheet and cut it out, then attach them to each other and, if necessary, make adjustments, and only after that transfer the template drawing to a sheet of plywood. If you have minimal experience working with a jigsaw, it is better to choose models without a large number of openwork elements.
After all the parts have been transferred to the plywood, you can start cutting them out. The next stage is processing them with sandpaper, first coarser, then fine, and finally, to ensure the smoothest possible surface, “zero”. After this, each part can be coated with colorless varnish or paint.
It is important to take into account the fact that the surface may “heave” - then you need to go over the painted layer again with sandpaper, and then apply one or two more, depending on the required color intensity, layer of paint or varnish
Related article: How to make roller blinds with your own hands
d=v(a2+h2)
Now from the middle of the base of the face of the pyramid we raise the resulting length equal to d and from its end we draw the edges to the edges of the base. This is the edge of the pyramid. We need to make four of these. In a similar way, we calculate and cut out the second “pyramid” from plywood with a jigsaw.
Tip: the lantern will look more elegant if the lid is made slightly larger than the bottom and its edges protrude beyond the edges of the “glass” by 2-3 centimeters.
It is more convenient to glue the pyramid if you first place the four sides in a plate of a suitable size so that they take a suitable shape, and simply put the fixing corners at the junctions of the edges of the faces, with the glue previously applied to them.
After the “pyramids” have frozen, we need to glue the bottom to the lantern frame. To do this, it is not necessary to resort to the help of corners or other third-party material. It's fairly easy to apply glue to the edges and press them down. With careful work, the edges should turn out even, and gluing will occur along the entire perimeter. We will not glue the lid - it should turn out to be hinged.
How to make a wall lamp from plywood?
Correct design lies not only in the proper placement of furniture, but also in the correct lighting of the space; this can be helped by making sconces from plywood yourself; such lamps are suitable for any interior and will add a special atmosphere to the room when the overhead lighting is turned off.
There are many options for making wall lamps, which can affect the appearance of the room in different ways:
- the use of unnecessary things in addition to wood in the structure, for example, connecting parts of a water pump and a wooden structure;
- The original lamp is made from a single piece of wood with wood selected from the inside and colored glass elements.
Wall lamp from sticks Instructions on how to easily make a wall lamp (sconce) from sticks:
- you need to take a board and give it the desired shape, attach a hook to it;
- we make a lamp from sticks of the same length, assembled in the form of a well;
- we assemble an electrical circuit, a socket and an LED lamp, we route the wire through a decorative holder that is attached to a hook, the result is an almost fairy-tale sconce lamp.
Handmade lamp
Why do you need to make a chandelier yourself? Isn't it possible to buy the lamp you need in a store? Firstly, this way the master can create exactly the kind of lighting device that, in his opinion, is ideal for the interior of the room. Why waste time searching for the right model, making compromises and buying one that is at least a little similar to what you need, if you can implement your plans yourself.
Secondly, it's just fun. Handicrafts are often done not for the sake of the result, but for the sake of the process. And if the process gives an excellent result, then this is doubly wonderful.
Finally, when making a lamp from plywood, the master is limited only by his imagination. He can create any fancy shapes, cut out an openwork mesh, or make a lampshade in the shape of a human figure. You can make any lamp: a ceiling chandelier, a floor lamp, a sconce, a night light, a flashlight.
Using an old power supply for a night light
Nowadays, so many mobile phones pass through the hands of each family member that you can easily find a couple of different chargers. You can make an LED night light out of them with your own hands. This circuit will be much better than a capacitor circuit:
- Ready-made housing with plug for connection to the network;
- galvanic isolation from the network - there will be no high-voltage potential at the capacitor terminals;
- stabilized values of output voltage and current.
Underwater rocks
A story from practice: the manufacturer indicates on the charger body an output voltage of 5V and a current of 1A (may differ). When I made a night light for myself, I calculated the resistors for the LEDs for this voltage. The night light practically stopped shining after 2 nights. The LEDs dimmed, and the lampshade of the night light was always warm...
In addition, I initially, by mistake, soldered in resistors with a value slightly less than the required 100 Ohm. I became interested in why the LEDs were degrading and I measured the voltage. The charger gave out as much as 7 and a penny volts. Naturally, the LEDs were fed with twice the rated current.
Moral: do not believe what is written, but check the voltage and current of the LEDs with a multimeter.
Look at the diagram of an LED night light from a mobile charger.
To correctly assemble the circuit, select resistors that match the voltage of your charger and LEDs; learn more about how to select a resistor. But be careful and do not repeat the mistakes of others, an incorrectly set current will kill the LED.
As a result, you can get a similar LED night light. If desired, you can hide the diodes with a diffuser from a broken LED lamp.
More details on how to make a night light from LEDs and a smartphone charger are described in the video.
Many phones come with chargers with a USB connector. You can buy ready-made LED modules in USB flash drive format and get a simple LED night light. True, you will not get pleasure from designing, developing and assembling a custom night light.
A night light is the simplest and most harmless device that you can make with your own hands. On the other hand, its simplicity and lack of requirements for brightness make it possible to turn a simple and ordinary thing into a real work of art.
At the same time, you can implement many ideas, such as iridescent colors on an RGB strip, or turning on a night light when there is a clap or depending on the light level. Look at the LED acoustic switch diagram.
The circuit is quite interesting to build. As a microphone, a microphone from a mobile phone or computer headset is suitable; common Soviet transistors - KT315G reverse conduction, and KT3107B - direct conduction, can be replaced with any analogues.
Resistor R3 sets the operating point of the transistor and, accordingly, the sensitivity of the circuit
Transistor VT2 is the second stage of the amplifier, and capacitor C2 is electrolytic, pay attention to this
Please rate the article. We tried our best:)
Night light of their clothespins
We’ll start with a simple option and make a night light out of wood with our own hands. The great thing about this night light design is that there is almost no need for woodworking tools. We will need:
- Wooden clothespins for clothes;
- glue;
To assemble the electrical circuit:
- Capacitor (we will calculate);
- resistors R1 – 1 MOhm, R2 – we will select;
- wire cross-section from 0.75 sq. mm;
- fork;
- LEDs or LED strip.
First you need to disassemble the wooden clothespin; to do this, you need to bend the spring and separate the wooden halves.
From the resulting pieces of wood you need to put together any shape that you like; below you will see different options for such night lights.
All this can be easily connected using a hot glue gun or regular PVA glue.
Depending on your idea, you can make any number of “floors” from these triangles. Here is an example of the implementation of such a night light on a multicolor LED strip.
A tube of suitable diameter was placed in the middle, covered with LED strip. If you don’t want to spend money on an LED strip, power supply, RGB controller, assemble everything yourself. Use a simple and cheap LED night light circuit powered by 220V.
This circuit is called: “LED power supply circuit with a quenching (ballast) capacitor.” Our website has a detailed article on how to calculate a capacitor. The cost of such an assembly is minimal, and often you can find all the necessary components by disassembling several energy-saving lamps.
Resistor R1 is parallel to the capacitor; it has a fairly high resistance and does not affect the operation of the circuit. When the night light is turned off, it discharges the capacitor, protecting you from electric shock. R2 is an optional element; it will help you select the LED current more accurately. I recommend starting its selection from a value of 1 kOhm, measuring the current value of the LEDs and deciding on changing it.
Here is another interesting solution for making a night light using clothespins.
How to make a night light from a jar
One of the materials for creating decor in the house is a tin can. How to make a night light from a jar, read on:
For this you will need:
- ordinary tin can;
- long nail;
- paint (blue, purple, black);
- base with lamp.
Algorithm of actions:
- Wash the tin thoroughly to remove all excess, including the label.
- Using a nail, we make holes on the can and on its sides; you can either scatter them or form a pattern of dots.
- We paint the jar, for example, dark blue, because... it is associated with the sky.
- We fix the base with the lamp in the jar.
- The night light for the nursery is ready.
In complete darkness, such a lamp will look chic.
How to make a chandelier with your own hands from thread tassels and hoops
CBC Life YouTube channel
What do you need
- Yarn;
- small photo frame;
- scissors;
- 3 sets of wooden hoops of different diameters;
- 3 identical short and 1 long metal chains;
- pliers;
- bulb;
- lamp pendant.
How to do
1. Wrap the yarn around the photo frame many times and cut. Take a small piece of thread and tie it on top of the yarn so that the ends remain. Cut the threads on one side, where the frame hole is located.
CBC Life YouTube channel
2. Remove the yarn from the frame and fold it in half. Place the knotted thread in the middle so that its ends are at the bottom and the loop is at the top. Details are in the video below. Cut another piece of thread and use it to tie a tassel just below the loop.
CBC Life YouTube channel
3. Make the rest of the tassels in the same way. The quantity depends on the diameter of the hoop. The threads should frame them tightly.
CBC Life YouTube channel
4. Remove the center hoops from all hoops - you won't need them. Open the large hoop and put some of the tassels on them by the loops.
CBC Life YouTube channel
5. Close the large hoop. Place the tassels on the rest in the same way.
CBC Life YouTube channel
6. Make nine pieces of thread. Place the middle hoop into the large one and tie them in three places at the same distance from each other.
CBC Life YouTube channel
7. Place a small hoop inside and tie it to the middle one in three places. These threads should be located approximately in the middle between those that connect the large and medium ones.
CBC Life YouTube channel
8. Turn the design over and straighten the tassels. Tie short chains to a large hoop at equal distances from each other.
CBC Life YouTube channel
9. Use pliers to open the end link of the long chain. Place the attached chains on it and close it.
CBC Life YouTube channel
10. Attach the pendant to the ceiling, screw in the light bulb and thread the lampshade through the bottom. A long chain can be hung, for example, on a hook mounted on the ceiling next to the base of the chandelier.
What other options are there?
There is another way to mount a chandelier. Place a metal ring on the lamp hanger and attach chains tied to the hoop to it. The detailed process is shown in the video below. By the way, the technology for making brushes in it is slightly different. And the author does not use a hoop, but metal hoops.
The tips of the brushes can be painted in a contrasting color:
Or make a gradient chandelier from colored threads, like here:
Using the “gifts of the forests”
Street light
But this is not a troublesome option at all. Make a hole in the trunk of a dead tree in the area and insert a kerosene stove or solar-powered LED lamp inside. Original, simple and sincere! This street lamp is well protected from bad weather and warms the soul on long winter evenings, shining from under the snow cap.
By the way, there is another plus - you don’t have to worry about uprooting the stump.
Very unusual lampshades are made from birch bark; cover it with a finished lampshade made of thick paper or fabric
Just use this lamp with caution
Bark lampshade
Since strong heat can quickly dry out the bark, crack and even ignite - safety comes first. It is preferable to install fluorescent or LED lamps - they heat up significantly less than conventional ones, and they consume significantly more energy.
Or you can simply cut a birch log, drill holes (not through holes - to the size of the base), screw several light bulbs in a row and attach them above the dining area or work table.
Birch lamp
During the New Year holidays, lampshades decorated with pine cones would be appropriate. Provide them with small, barely noticeable LEDs and the lamp will shine, spreading intricate patterns of chiaroscuro on the walls, which will further emphasize the festive atmosphere.
Lampshades with cones
Paint the pine cones with white paint to create a frost effect; you can dust them with salt crystals on top.
Advantages and disadvantages
The undeniable advantages of wooden lamps: • environmentally friendly raw materials, the product is absolutely hypoallergenic; • ease of processing and installation; • presentable colorful design; • high strength. Among the disadvantages: the flammability of the material, the need for certain temperature conditions and humidity parameters, and the possibility of damage by insects.
To avoid the effects of negative factors, the product is coated with a special composition. Impregnated with the necessary substances, the tree is not subject to delamination, ignition, deformation and damage by insects.
Tip: it is better to use LED or energy-saving lamps, as they heat up less during operation.
The best option for a wooden lamp in the interior is a living room or bedroom. In rooms with high humidity (kitchen or bathroom), it is still better to use appliances made of other materials. Wooden products in a damp room require more careful care, but still lose their former luster over time. When exposed to moisture, the material may shrink or swell.
Outdoor materials
The choice depends on the owners, since different materials can be used for street lamps, the main thing is that they are not afraid of water. Popular plastic falls into this category, but it has one big drawback - fragility. For this reason, it is not the best solution, since sooner or later such a flashlight will definitely break.
Metal is the ideal material
The best option is to make a street lamp from metal. And here there are three worthy candidates: bronze, brass, copper. However, the first alloy will constantly darken, so the owners will have to sacrifice time cleaning the lantern. Copper will oxidize over time, and such a lamp will acquire an unsightly greenish tint.
Candidate materials at hand
It is not always possible (and passionate desire) to make something designed to last forever. For example, in summer cottages it is more logical to build a structure from a simple material that does not require serious processing. Therefore, the owners, whose “bins” are full of all sorts of goods that are a pity to throw away, make street lamps from any raw material. Suitable for this:
- jars: tin or glass;
- clay;
- wood (for example, twigs, wood chips);
- cardboard boxes (requiring good moisture protection);
- plastic containers;
- old dishes;
- building materials;
- PVC pipes.
Such street lamps have a great advantage: they almost always attract attention, as they turn out to be unusual and original. Another plus is the ease of their manufacture, because their creation does not require a welding machine or a lot of time
Yes, there is a minus - it is fragility, but to replace the old product, you can easily and quickly build a new one, but already having a completely different - “fresh” - look.
DIY wooden masterpieces
To assemble a wooden chandelier with your own hands, experience with wood will not be enough. You will also need basic electrical knowledge. You can take a ready-made wooden model as a basis or develop your own original design.
Depending on your skills in handling metal, choose an exclusively wooden lamp or a lighting device supplemented with metal elements. The photo gallery will once again demonstrate the possible options for making a wooden chandelier with your own hands.
May be interesting Curtains for curtains under a suspended ceiling: photos, which ones are better, types, how to hang them on a hidden structure
Wooden chandeliers are a stylish interior element that is suitable not only for rustic design trends with a national flavor, but also for modern room design ideas. Country and chalet, Scandinavian and eco style, modern and loft - for each style you can choose a successful model of a wooden lamp.
Choosing a lamp for a homemade chandelier
To make a chandelier made by you from scrap materials look even more attractive, you need to choose the right light bulbs for it. The following recommendations will help you:
Choose a lamp of suitable power. Remember that overly powerful products can cause a fire. Look at the number of lumens. The larger it is, the more natural the lighting. Consider whether the shape of the light bulb matches your device. Some chandelier models require bulbs of a strictly defined shape. Only then will they work efficiently and correctly reflect light rays. Be sure to look at the expiration date. If you plan to use the lamp frequently, then take a closer look at the lamps with the longest life expectancy. Ask what kind of light the lamp will glow - cold or warm. For your home, it is better to purchase an option with a warm shade of light.
This will make the atmosphere seem more comfortable. Don't ignore the energy consumption of a light bulb. Products with low energy consumption are considered the best choice. Check for the presence of mercury in the lamp - this determines how it is disposed of
Products containing mercury cannot simply be thrown into the trash. They must be handed over to special collection points.
What lamps to use
Conventional incandescent lamps get very hot and are therefore not suitable for installation in wooden chandeliers, the same applies to halogen lamps. Instead, it is better to use LED, fluorescent light sources.
How to choose a tree
Almost any available species is suitable as a material for making a wooden chandelier. The main condition is that the material is dry
Pay attention to signs of rot, mold and signs of vermin.
Let us describe the properties of the most commonly used rocks:
- Pine blanks lend themselves well to processing. The tree circles are separated by resin, so it is not used for making small parts.
- Cedar is famous for its beautiful pink base. The wood has a high density, so it can be used to make small jewelry.
- Hardwoods are stronger than pine and do not rot.
- Oak has a high density, but splits easily. It's difficult to process. It should not be used as a material for a lamp by novice craftsmen.
Safety precautions
Basic safety precautions are required for all types of physical work.
- The workplace must be properly prepared. It should not be cluttered with unnecessary objects or tools.
- The work table or workbench must be well secured and set to the individually required height.
- The workplace should be well lit.
- When working, you should use personal protective equipment, such as gloves, safety glasses, etc.
- When using a power tool, make sure it is in good working order. For beginners, study the technical documentation of the tool they use.
—>
| Vases |
| Mirrors |
| Baskets |
| Lamps |
| Furniture |
| Ship models |
| New Year |
| Candlesticks |
| Stands and frames |
| Religion |
| Watch |
| Miscellaneous |
Read also: Apparatus for producing beer at home
—>
—>
| "August 2022" | ||||||
| Mon | W | Wed | Thu | Fri | Sat | Sun |
| 1 | 2 | 3 | 4 | |||
| 5 | 6 | 7 | 8 | 9 | 10 | 11 |
| 12 | 13 | 14 | 15 | 16 | 17 | 18 |
| 19 | 20 | 21 | 22 | 23 | 24 | 25 |
| 26 | 27 | 28 | 29 | 30 | 31 |
—>
DIY kitchen facades
The outer panels of kitchen cabinets and tables, the doors of cabinets and hanging racks - without exception, this is what is considered the facade of the kitchen, and can be assembled without the help of professionals. Of course, handmade furnishings are in some ways inferior to factory furnishings, but they always look extraordinary and are more economical in terms of money. Making your own kitchen fronts requires experienced handles, carpentry skills and the proper tools.
HOW TO CHOOSE AN EVENING DRESS
The main thing when choosing an evening outfit is to understand how much to wear it? TBEAUTY.RU will tell you how to choose the right combination.
Finding the perfect evening outfit of your dreams is not an easy goal! A selection constantly appears before you, what to choose: large or short, in sequins or rhinestones, with an open back or with a deep neckline? . Read more "
Wood carving with a jigsaw is rapidly gaining popularity: many people want to purchase an interesting decorative item to decorate their home, furniture, and even clothes! Carved objects made of plywood of various thicknesses fit organically into any interior style; people often purchase photo frames for photographs with ornaments, cut-out words and letters, or order intricate shelves and other interesting products. Few people know that artistic cutting out of plywood with a jigsaw is a task accessible to anyone, even the untrained and inexperienced. You just need to understand how to work with the tool.
Manufacturing stages
First of all, you need to decide on the type and size of the product. You can think about the project yourself, you can use a ready-made one, or you can spy on an idea and take it as a basis, finishing and improving it. The step-by-step manufacturing steps are as follows:
- Templates of parts are drawn on a sheet of cardboard. They are made to full scale and cut out with a utility knife or scissors.
- Cardboard mock-ups of parts are placed on a sheet of plywood and outlined with a pencil. It is necessary to place them so as to use the material as economically as possible. If the patterns are large, then they can be fixed to the sheet with tape so that they do not move.
- Using a jigsaw, cut out parts from plywood along the contour. For ease of use, the sheet can be secured with clamps on the edge of the table. Small parts are cut out by hand. If you need to make holes in the middle, then first drill a hole large enough for the edge of the jigsaw to fit in, and then cut out the pattern.
- After the parts are cut, they are sanded with sandpaper until the surface is smooth. First you need to use coarse-grained paper, and finally sand with fine-grained paper.
- When all the elements are prepared, they are fastened together according to the project. You will need glue here.
- The finished product is varnished.
- A socket is installed inside the lampshade, connected to the electrical wire and the lamp is screwed in.
That's it, the lamp is ready! Since this is painstaking work and requires great precision and perseverance, you can first practice on small floor lamps, and only then start making ceiling chandeliers.
Plywood lamps can be an excellent interior decoration. If you gradually improve your skills and move from simple lampshades to more complex openwork lamps, you can hang them not only at home, but also delight your friends with an original element of interior decoration.
Important nuances of working with plywood
Plywood is a convenient material for carpentry, but certain rules must be followed. In particular, a special approach is needed when cutting sheets. To avoid defects, make an even cut with a jigsaw or circular saw, apply a ruler to the drawn line and follow the mark with a stationery knife. Another option is to place sticky tape on both sides of the pencil line.
The cutting technique is affected by the thickness of the plywood. When cutting, you must hold the saw so that the blade protrudes 5 mm beyond the sheet. That is, with a plate thickness of 15 mm, the immersion depth of the cutting tool is 20 mm. In this case, the sheet should lie face down on the support. The direction of the cut depends on the device used. A jigsaw allows you to cut material straight and curved. Use a circular saw to cut in a straight direction.
Independent production of curved glued forms also requires compliance with some nuances. The rounded product is tightened with rigging straps for 3–4 days until the shape is fixed. Pre-steaming the plywood sheets makes bending easier.
Due to the large number of advantages, this type of raw material is included in the group of popular modern materials. Making your own pieces of furniture from plywood is not difficult if the class and thickness of the slabs are selected correctly, the drawing is correctly executed, and all technological stages of assembly are followed. Finished interior items are practically not inferior in appearance and performance to their analogues made from natural wood.
DIY driftwood lamp
Any snag in the forest has its own unique curve, created by nature itself, which you must try not to disturb during processing. First you need to clean the driftwood from bark and damaged wood, then dry it. After this, sand the wooden surface with sandpaper. Then it was time to select components and select lamps. Since wood is a flammable material, you should decide in favor of LED and energy-saving ones, they will not heat up.
After this, you should drill holes for the wires with a long and thin drill. After laying the wires, the holes are filled with putty matched to the color of the wood. Or you can use a narrow-bladed chisel to make grooves for the wires in the wood from the ceiling side. All wooden parts are varnished several times. Cartridges with lamps and shades are attached to the ends of the driftwood.
Operating procedure
To obtain a high-quality product and minimize the formation of defects, you need to do the work slowly and focus on the process. Before starting work, it is recommended to make sure that the thickness of the plywood is equal to the height of the groove on the printed sketch.
Preparing the stencil
Schemes for sawing with a tool can be of different sizes. To create a drawing of an interior item, for example a shelf, you will need to use whatman paper in A1 or A0 format, and for toys you can use a standard sheet of cardboard.
The contour of the product is applied to the surface in compliance with the exact dimensions. Templates for cutting with a hand jigsaw can be found on special resources. But it’s easier to come up with your own compositions based on the type of workpiece. An individual approach to developing a product design will highlight the texture of the wood.
Transferring an image to the surface of plywood or boards
To accurately apply a contour to the surface of plywood or wood, print the template on thick paper. Transferring a drawing from an A4 drawing can cause a lot of trouble if you draw the ornament with a pencil.
The drawing can be glued to the plywood with 2-sided tape. When using glue, you need to clean the surface with sandpaper. An accessible method involves using a stencil made using nail scissors. After preparation, the template is applied to the surface and each fragment is outlined with a pencil.
For convenience, the sheet is secured with tape or insulating tape. The design can be applied thermally. For this, an inkjet printer is used, with which the diagram is printed. After this, the design is applied to the surface with the front side and processed with a heated iron.
Sawing process technology
Sawing from plywood is carried out after applying the drawing to the workpiece. Processing begins with the internal elements of the product, and then the outer contour is cut out. This order of work allows you to get a straight line and provides convenient fastening of the workpiece.
Holes for the blade must be drilled in sharp places on the internal contour. This requires attention as chips may form on the back side. To avoid this, it is recommended not to make the holes completely.
You can limit the depth using insulating tape that is wrapped around the drill. After this, turn the workpiece over and process the hole with an awl. After finishing the work, the product is polished using a file or needle file.
Sawing with hand tools requires the equipment of a special machine with a clamp. This device is used as a base. During processing, the workpiece is fixed at chest level, which provides convenience and allows you to closely monitor the process.
For beginners, it is important to be careful when using a jigsaw in order to practice smooth movements. The cutting blade for a jigsaw is fragile, so it is recommended to avoid distortions, sudden movements, and overheating
When processing a workpiece, the movements must be reciprocating, and the tool must be positioned vertically. Using an electric jigsaw requires securing the workpiece to a workbench. When using this equipment, workpieces up to 5 cm thick can be processed.
Defects in work
If the workpiece processing technology is violated, the tool may shift. A jigsaw may cut crookedly if the tool is tilted or improperly fastened. If the blade gets stuck at the stage of forming the figured elements, then you will need to carefully draw a new line located parallel to the fragment with the defect.
Openwork decoration
For those who want to update their interior and replace old things with something more original, it is not easy to decide where to start, and there is not always enough money for repairs and renovations. Therefore, you can make some elements for decorating your apartment yourself. In this master class we will learn how to make a beautiful openwork chandelier from plywood yourself. Before you start work, first of all you need to select a lampshade model and find drawings.
What we need for this:
- main material – plywood;
- beautiful fabric or lace;
- glue, it is better to use PVA.
We take plywood and draw identical circles on it, after which we cut everything out. We make sure everything is one to one. Next we need to fold them into hexagons, inside of which we cut out round holes. Now we move on to the fabric from which we need to cut circles; the diameter is greater than in plywood. All that remains is to decorate our lampshade with fabric.
Related article: DIY box painting: master class with photos and videos
To do this, we stretch the fabric and glue it to the round parts. But we should leave two untouched in order to insert the socket and lamp, and we also need an outlet for hot air. You need to use a file to make such entries in order to fold these hexagons one into one. This is how we fold our chandelier.
Let's look at the main photo of how it should look:
Cutting out a table lamp with a jigsaw
There are many rules for cutting, but you need to rely on the most common ones. First you should cut out the internal elements and then start cutting out the outline. There is no need to rush when cutting. The main thing is to always keep the jigsaw straight at a 90-degree angle when cutting. Saw out the parts along precisely marked lines. The movements of the jigsaw should always be smooth up and down. Also, do not forget to monitor your posture. Try to avoid bevels and unevenness. If you go off the line while cutting, don't worry. Such bevels and irregularities can later be removed using a flat file or “coarse-grained” sandpaper.
Rest
When sawing, we often get tired. Fingers and eyes, which are always tense, often get tired. When working, of course, everyone gets tired. In order to reduce the load, you need to do a couple of exercises. You can view the exercises here. Do the exercises several times during work.
How to make a lamp from a can
Shot: @5‑Minute Crafts PLAY / YouTube
What do you need
- Glass jar;
- glass stones (they can be found, for example, in aquarium supply departments);
- glue gun;
- electric candle or garland.
How to do
Glue one pebble to the jar.
Shot: @5‑Minute Crafts PLAY / YouTube
Continue gluing the remaining stones in rows in a circle.
Shot: @5‑Minute Crafts PLAY / YouTube
Decorate the entire jar in this manner.
Shot: @5‑Minute Crafts PLAY / YouTube
Glue a candle to the inside of the lid. If using a garland, place it in a jar.
Shot: @5‑Minute Crafts PLAY / YouTube
Close the jar.
What other options are there?
This is the kind of non-standard glass lamp you can get if you glue a jar with a garland onto a high base:
Types and shapes of chandeliers
The world of modern design offers a wide selection of various chandeliers, lamps and sconces made of wood. They can be of a traditional classic look or have an unusual shape, developed according to a special design idea.
Depending on the type of mounting, chandeliers and lamps made of wood are divided into three types:
- Ceiling models are placed and fixed directly on the ceiling and are considered the optimal solution for creating a good level of illumination in a room with a low ceiling.
- Hanging chandeliers are attached to the ceiling with chains or suspensions, thanks to which the level of rise of the product is adjusted. This is an excellent option for rooms with high ceilings.
- Portable lamps – used as a secondary light source. They can be easily moved and installed in different places.
The shapes of wooden chandeliers vary between standard figured models and non-standard options. Models of geometric shapes are very common. Equally popular are unconventional eccentric solutions. Chandeliers can be made in the form of an anchor, a pyramid, a guitar, a shelf with old books, etc. This lighting format is appropriate if you need to create an emphasis on the chandelier and add zest to the interior.
Tool for making decorative and openwork crafts
Sawing with a jigsaw is a type of creative activity that most people are familiar with from childhood, from school. At least it wasn't that long ago. When labor lessons began at school and girls learned sewing and needlework, boys were introduced to such a tool as a jigsaw.
It is not difficult to use, and crafts made with a jigsaw from plywood carry not only artistic value, but also practical application. Manufactured products can act as souvenirs: various boxes and toys, and also have practical applications in everyday life. Decorated elements of the porch of a house, windows, stylish benches with carved legs, beautiful kitchen furniture and many other useful wood products can be made using this wonderful tool.
Ideal hobby tool
A hand jigsaw is a tool for cutting shapes out of plywood or some other material, for example, plastic. Its manual version is budget-friendly - its cost does not exceed several hundred rubles, and its scope is very wide. Figure cutting with a hand jigsaw is a very interesting activity. This is not only a pleasant pastime, but also practical benefits, not only financial, but also moral.
The design of this tool is very simple:
- U-shaped frame. It can be either tubular or lamellar.
- Saw handle.
- Two fastenings for a file. These mounts can rotate, thereby creating different planes, allowing you to perform cutting of varying complexity.
- Jigsaw blade. Sets of such files of 50 pieces are available for sale. The blades are distinguished by the thickness and size of the teeth. Thick blades are used for cutting out contours, and thin blades are used for openwork work with small elements of the workpiece.
Electromechanical jigsaws
The electric hand jigsaw has become an indispensable tool in the household. It can be used to cut various materials: plywood, wood, plastic, metal, ceramics, etc.
This tool operates from a 220 W electrical network and is a plastic case with working elements, equipped with a control handle. Its main component is the saw blade, which is mounted on a rod located in the front of the device.
The rod is driven by an electric motor. The movement of the cutting blade is reciprocating. To speed up the sawing process, some samples of this tool use the pendulum principle, that is, the file moves not only up and down, but also back and forth.
Cutting blades are consumables and need to be replaced from time to time. They are functionally different from each other - there are attachments for wood, metal, and ceramics. There are thicker blades, with more or less rigidity, with larger or finer teeth
An important characteristic of files is their shank. The most common ones nowadays are files with U-shaped and T-shaped shanks.
It is with such files that you need to purchase a jigsaw - then there will be no shortage of consumables.
Electric tools differ in many respects, but in this article we will pay attention to only one important factor - the backlash of the saw. This characteristic affects the pull towards the cutting blade during figure cutting
Many brands of jigsaws cannot cope with the task of perpendicular cutting, this is especially sensitive when cutting thick wood - the error can be up to 5 mm.
Experiments on cutting wood to shape showed that the best jigsaw was a tool from Festool. The popular company Makita did not show its best side in this competition - the error of the perpendicular-shaped cut turned out to be quite large (up to 5 mm), and the jigsaw of this brand entered the tree with large chips.
An electric stationary jigsaw is already professional equipment for cutting. Its design is more complex than the equipment discussed above. The principle of its operation can be compared to a sewing machine, which has a jigsaw blade instead of a needle. The quality of the products obtained using this unit is incomparably better. The error of a perpendicular cut with a large workpiece thickness is zero.
The only disadvantage of this electromechanical device is its high price. But this is compensated by the comfort of working on it and high productivity with the highest quality of the resulting products.
Timeless classic
Massive wooden ceiling chandeliers appeared at the dawn of the 16th century. Most often, the main ones were tree branches, the edges of which were crowned with candles. Castles of wealthy gentlemen and churches were the main area of application for unique lighting devices at that time
But if previously wooden chandeliers performed a purely practical lighting function, now more attention is paid to the appearance from the point of view of decorating the room
The emergence of new practical materials and the development of technology have not weakened interest in natural sources. The tendency to care about the environmental friendliness of surrounding objects and one’s own health is one of the reasons for the growing popularity of wooden chandeliers.
Attention! The variety of forms of wooden lamps allows them to be used not only in traditional rustic styles, but harmoniously introduced into more modern interior trends. Antique wooden chandeliers are still relevant for country and chalets
Adherents of a brutalist interior can easily assemble a simple chandelier with their own hands, where the frame is a powerful wooden beam. For lovers of original configurations, the designers have prepared a lot of interesting ideas, many of which can be implemented independently
For country and chalets, antique wooden chandeliers are still relevant. Adherents of a brutalist interior can easily assemble a simple chandelier with their own hands, where the frame is a powerful wooden beam. For lovers of original configurations, the designers have prepared a lot of interesting ideas, many of which can be implemented independently.
Concern about the high cost of a chandelier is justified only when choosing complex configurations that require jewelry processing of the array or where additional expensive materials are present. In most cases, the price is in the budget category.
A variety of wooden chandeliers are shown in the photo:
Tips and tricks at work
Experts recommend that novice lighting equipment designers pay attention to the following recommendations and tips:
- When working with plywood or wood, use safety glasses or a mask;
- from a lamp with one light bulb there are two wire strands - one phase, the second zero, the phase always goes through the switch, zero is connected to zero directly;
- when a lamp has many bulbs, there will be more wires, but the switching circuit works on the same principle;
- It is optimal to place wall lamps at a height from the floor covering from 1 meter 20 centimeters to 1 meter 60 centimeters;
- in corridors, the installation height of sconces is recommended at 2 meters.
We can conclude that anyone with skills in working with a jigsaw and knowledge of electrics can make their own lighting device from plywood or wood, not only in the form of a chandelier or floor lamp, but also in the form of a wall lamp for a children’s room.
Advantages of material selection
Plywood sheets are produced by pressing wood shavings. For this reason, like solid wood, plywood is a fairly durable and natural material.
Due to its natural origin, the structure does not emit toxins or allergens. Due to the small thickness of the sheets produced for wounds, the material is easy to work with (just use a jigsaw).
Crafts made from plywood with your own hands have an undoubted advantage:
- Stylish look.
- An excellent preparation for subsequent decoration.
- Particular strength.
- Safety for humans, in particular for children.
- An extensive collection of drawings for crafts made from plywood (for working with a jigsaw).
With optimal treatment with antiseptics, antipyretics and moisture-resistant compounds, the maximum possible service life of the product can be achieved.
Choosing a lamp for a homemade chandelier
To make a chandelier made by you from scrap materials look even more attractive, you need to choose the right light bulbs for it. The following recommendations will help you:
Choose a lamp of suitable power. Remember that overly powerful products can cause a fire. Look at the number of lumens. The larger it is, the more natural the lighting. Consider whether the shape of the light bulb matches your device. Some chandelier models require bulbs of a strictly defined shape. Only then will they work efficiently and correctly reflect light rays. Be sure to look at the expiration date. If you plan to use the lamp frequently, then take a closer look at the lamps with the longest life expectancy. Ask what kind of light the lamp will glow - cold or warm. For your home, it is better to purchase an option with a warm shade of light.
This will make the atmosphere seem more comfortable. Don't ignore the energy consumption of a light bulb. Products with low energy consumption are considered the best choice. Check for the presence of mercury in the lamp - this determines how it is disposed of
Products containing mercury cannot simply be thrown into the trash. They must be handed over to special collection points.
Lamp made of boards and coffee service
This interesting design can be mounted on a wall or ceiling. How to make:
- A board made of ash, oak or pine is taken and treated with stain or varnish.
- Using a diamond drill, holes are drilled in the bottoms of cups and saucers; for greater decorativeness, translucent, thin cups are better suited.
- Connect the wires to the electrical sockets, insert the cups and saucers into the holes, and then attach them to the board.
- On the back side of the board, the wires are connected to each other and the supply wire.
- Using a twisted cord or chains, the structure is suspended from the ceiling.
If cups and saucers are replaced with clay pots, and the board is artificially aged, the composition will become completely different.