Making branches
You will need 7.6 m of 0.5 mm wire, which must be cut into 10 pieces of 76 cm using wire cutters. You should also prepare 30 large beads. They are needed for decoration.
To make a tree from beads and wire with your own hands, take one piece and string a ball onto it. We lower it to the center and twist the wire tightly, moving down from the bead by about 19 mm.
We string another one onto one end of the wire. Bend and twist the wire around the bead. Scroll the wire 19 mm down and repeat the same steps with another bead.
Form the blank into a shape in the shape of a chicken foot so that there are beads at three ends. From the remaining strips and beads, make 9 more of these blanks.
“Tree of Life”: creating a simple and beautiful pendant from wire
Autumn is perhaps the most beautiful time of the year. The forest blooms with colorful colors. The sky is blue, blue, and the air is transparent and clean, as it never is in summer. I want to somehow hold on to and capture this beauty. Today I want to share a simple way to create your own tree, or maybe even a grove! It can be a pendant, earrings, or interior decoration, but today I propose to make a pendant. Since this is my first master class, I welcome criticism and suggestions!
The tree of life is a fairly common and easy-to-make decoration, but I couldn’t find a master class on this technique in YAM. Well, let's fill the gap.
First, we need inspiration. Well, this is easy, just go for a walk and carefully look around, you will surely come across a tree worthy of being embodied in a decoration! But let me give you a little advice. In this work it looks very beautiful when the branches and roots have complex curves - this creates the impression of an old mighty tree. The same technique is used by people who grow dwarf Bonsai trees. If you search online, you can find many photos that will give you a new and fresh look at trees and saplings. Here is the photo that inspired me to create this work. Bonsai - red maple.
On this maple tree, I will show the main stages of the technique, and then I will also tell you how to create a Tree with the Moon and a Grove. Or the Grove with the Moon!
You will also need, of course, materials and tools!
- Knife for removing insulation from wire.
- Round nose pliers for bending.
- Pressing pliers.
- Side cutters for cutting.
- File for smoothness.
Materials: for Maple and Grove - copper wire with a cross-section of 1.0 mm and 0.3 mm and 0.5 mm, and for one tree - silver wire with a thickness of 0.8 and 0.3 mm, as well as small beads or seed beads suitable shades and sizes. Don’t be intimidated by the abundance and variety of materials, it’s just that my soul took a swing - I decided to show three trees at once, and then I decided that there was a lot - I’ll split it into 2 master classes!
First, let's strip the wire of insulation. Press it to the table and use a knife to cut off the top part of the insulation. It looks complicated, but if you get used to it, it turns out very simple and fast.
And then we simply remove the remaining insulation.
Now you need to make the basis for the future decoration. The easiest way is to find a solid cylindrical object in the house and wrap it tightly and tightly with wire. In my case it is a glass vial. The wire should be straight, try not to bend it after removing the insulation (in extreme cases, carefully roll it in large turns). If the wire is still uneven, it can be straightened by pulling it around a solid object - a battery or a door handle. The thicker the wire, the more difficult this is, so don't tear off the handle and battery! Small bends can be straightened with pliers by squeezing them from all sides.
Remove the resulting ring from the bottle, cut off the ends, leaving only a couple of centimeters for fastening, and for beauty. We round these ends with pliers in different directions - it turns out something like a figure eight.
Now take a thin copper wire. We will need 6 pieces for 12 branches, approximately 30 cm long. In fact, less will be used (about 20 cm), but the wire consumption may vary, so it’s better to play it safe and then cut off the excess.
Usually they take as many separate pieces of wire as there are branches and wind each one separately, but I suggest making two branches at once from one long piece. This also helps to minimize work with ends, which traditionally no one likes to hide and handle with a file.
We take our base, one of the wires, and start winding it approximately from the middle. Please note that the end that you will wind should be 3 cm longer than the one you are holding, then after winding the ends will be the same length!
You can wind it tightly, or you can place the turns at an equal distance - as you like. And so, and so beautiful.
Now it's time to put the leaves on the branches. I chose terracotta beads and some irregularly shaped carnelian beads to capture the shape of the fox maple. How much to wear depends on the size of the ropes and leaves. My scheme turned out like this: 3-3, 3-4, 4-5, 3-2, 3-3,2-3. Moreover, at first I wanted to make the last branch 4-5, but then I realized that it didn’t fit and changed it to 2-3. It is not necessary to wind the branches in order - they can be moved along the canvas as you work.
Then we cross the ends of the wire and begin to form a twig, that is, twist them together. I recommend doing a couple of wraps first to secure it so you can change the number of leaves as needed. But as you can see from the photographs below, I myself rarely follow my own advice.
Next, we continue to form branches using the same algorithm.
It is more convenient to turn the branches outside the circle so that they do not get confused with each other.
So we have all 6 branches ready and the fun begins! We will form the tree itself.
We move the unnecessary branches to the side so that they do not interfere, and from the top two we begin to weave a thicker branch. Here it is good to leave some distance for a beautiful bend or form it right away. The main thing is that the branches should not be “tight”, because when twisting, the shape of the base circle can be ruined due to tension. There is a lot of twisting involved here, especially the thinnest branches, where you don’t need to invent anything - this takes up most of the time of the entire work. But I usually do this with a movie or an interesting program.
Then, forming a beautiful bend on top, we wrap the third branch. All branches should curl in the same direction. As you started hourly, for example, continue like this. It doesn’t matter if it curls unevenly - this is actually good, as it imitates unevenness on a tree trunk. In nature, everything is not equal and not equal, but this makes it no less beautiful and unique.
We also wind up the branches on the other side and wrap them to the trunk.
Here, as you can see, it seemed to me that there were too many beads on the lower branch - I had to unwind and redo it - this is very inconvenient, since when bent repeatedly, the wire becomes fragile and can break off, but no one is immune from mistakes. After all, it doesn’t take that long to wind a new branch, but the tree will turn out more expressive!
And now our Maple is almost ready, all that remains is to give it a beautiful and expressive root system!
We straighten the branches, which are now roots. You can roll one at a time or roll two at a time - then the root will be thicker and more impressive. The main thing here is not to get carried away with twisting, because we will be securing the edges to the base and, of course, doing this with single wires.
At the end, we fix the free end of the root with several turns around the base. We cut off the excess wire, press the edge well with pliers (in a circular motion) so that it does not stick out or prick, and, for reliability, we go through it with a file so that the tip does not cling to one side or the other.
We also wrap all the loose roots! Now the last step remains - to secure the base. We take a piece of wire of the same thickness as for the branches and wind it around the middle of the eight. Now everything is safe and beautiful!
You can leave the pendant just like that, but I prefer to “age” the copper, giving it a noble and vintage tone.
To do this, you need ammonia (ammonia), which is sold in pharmacies. We take a jar of a suitable size, put a cotton pad inside and pour in a little ammonia, literally a couple of teaspoons, although, of course, there is no need to measure it. Be careful - the smell is very pungent, it is better to do pouring and other operations with ammonia on the balcony or hold your breath. But it is not harmful and disappears instantly. Now we hang the product on a string in ammonia vapor. The pendant must not be immersed in liquid!
At room temperature, ammonia vapor gives copper a brownish color in just 15 minutes. With longer exposure, the color becomes more saturated. You can watch the color changes.
Then the pendant needs to be taken out and dried so that the patina “sits” more firmly. You can polish some parts to give the product volume, but this time I did without it.
All that remains is to hang the pendant on a suitable cord or chain and the autumn “Tree of Life” pendant is ready!
And I’ll tell you how to make a grove and other ideas using a similar technique in the next master class! In the meantime, I’m gathering my courage, you can see them in my works!
Thank you for your attention!
How to put a tree in a pot
To place the tree in a pot or other container, add a sufficient amount of glue to the bottom of the container using a glue gun. Then place the tree in hot glue and press it to the bottom.
Hold in position until the glue dries. Also, before the glue has cooled, you need to put a layer of small pebbles on the bottom to give the wood more stability.
Add more glue to the first layer of stones and, holding the trunk, lay out the next row of stones. In this way, lay the stones in layers up to the very top of the pot.
After the glue has dried, you can bend the wire branches so that the composition takes the shape you want.
Beaded money tree: financial well-being as a bonus
The money tree is considered a symbol of prosperity in the home, so it is customary to give such decorations to family and friends. Making it is not as difficult as it seems at first glance. Hardware and craft stores sell coins with a loop through which you can thread a thread or wire. Instead of one of the leaves, thread a coin onto each branch. There is no need for excess; make sure the structure is harmoniously arranged. Most often, white or gold beads are used, but you can make the product in the form of sakura or any other tree, the meaning will not change.
You can make the gift more original: add rhinestones, beads or any interesting details to the composition.
Making the base for the tree and preparing the workplace
Before you make a wire tree with your own hands, you should form a base that will help in creating the craft. You can also use this base to make other wire trees in the future.
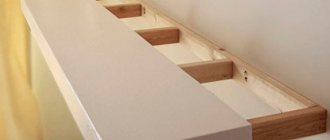
First, use a hammer to drive nails into a wooden board. Make the distance between them 1-1.5 cm wider than the height of your tree. We drive the nails one or two centimeters deep so that they do not wobble.
Cut off the nail heads with pliers. However, be careful! Their caps fly off very sharply, so as not to damage your eyes, it is better to wear safety glasses.
Having prepared your base for work, you should also take care of your workplace. To do this, use two clamps on the edge of the table to secure your board.
Artificial Bonsai Tree: What is it?
Usually work on creating such a tree begins by looking for a good branch for the trunk. Sometimes the branch is a slow-growing plant that, for example, no longer develops. Due to improper growth conditions, the plant acquired an not entirely correct shape - thickening, unevenness, curvature. And these defects can, paradoxically as it sounds, be turned into art.
The crown for bonsai is the most interesting thing. The use of juniper, foamiran, and azalea is widespread
The base is a container that must be filled with clay, plaster, even plasticine. In a word, something that will hold the mini-tree.
Wire winding
Having prepared the workspace, we begin to create the tree. Taking one end of the wire in your left hand, begin to tightly wind it clockwise around both nails.
Each circle made will eventually create 2 branches, so consider how dense you want your tree to be. Be sure to finish the wrap in a full circle. The ends of the wire left at the beginning and end of winding should be on the same nail.
How to make a pine bonsai: decorating the area
Pine bonsai is a garden bonsai. That is, a tree that will delight you not in the house, but on the site. This bonsai cannot be called completely artificial; nevertheless, real pine seedlings are taken. But there are a lot of manipulations, since you yourself regulate the growth and development of the plant.
Pine bonsai is a living copy of a coniferous tree in a reduced form
The main stages of growing pine bonsai:
- Several pine seedlings should be provided with good drainage and lighting, and should not be subjected to any special manipulations in the first year;
- In the second year, the seedlings are already pruned to 12 cm, while the remaining shoot should have good needles that cannot be pruned;
- Pruning is done at the end of March, at an angle of 45 degrees.
Pruned plants will thicken. If the needles are too lush, you can thin them out. Then a wire frame is placed on the seedling to give the plant the required shape. When the wire cuts into the trunk, it will be removed.
Pine bonsai: planting seeds (video)
Fastening the wire
In this step you trim one edge of the wire. This is necessary to create a V-shape. Which will later become the trunk and branches of a homemade wire tree:
- Using your thumb and forefinger, pinch the piece at the opposite end from the edges created in the previous step.
- Using wire cutters, cut the piece next to the opposite nail from where you are holding the piece. Be sure to cut all wires. If you cannot handle all the wires at once with your wire cutters, then cut them in pieces. You should end up with a lot of little V-shaped parts. Anything left over can be thrown away.
Ending a Workflow
Once the glue is dry, you can adjust the tree branches. Bend the wire branches to form the tree into the desired shape. Bend the branches down so that the tree resembles a weeping willow. Bend the branches slightly upward if you want your creation to resemble a maple or oak.
Everything is ready, you can now put the decorative wire tree in the most visible place.
Twisting the barrel
Using the V-shaped parts, you can start twisting the trunk for your craft - a wire tree - with your own hands:
- Rotate the pieces into a V shape on the nail so that both cuts are facing towards you.
- Now with two fingers of your left hand you need to grab the left side of the bundle of wires, and with two fingers of your right hand you need to grab the right side. Move the wires from the right side to the left, on top of the bundle of wires in your left hand. At the same time, start moving the wires from the left side to the right, keeping them under the right wires.
- Repeat the previous step until you have twisted a little less than half the entire length. The number of rotations needed may vary depending on the trunk height you want to give your tree.
- Hold the stem and pull upward to remove it from the nail. As a result, your tree should resemble the letter Y. If you get something different, re-hook the workpiece onto the nail, untwist the wires and repeat the steps described in steps 1-3 again.
tree decoration
So, the tree model is ready, and now you can decorate it in any way you like:
- you can cover the surfaces with glue and sprinkle with flock;
- there is an option with stretching steel wool or cotton between the branches;
- the option of painting the wood with regular paint is not excluded;
You can also choose your own method, which involves using scrap materials such as buttons, polystyrene foam, candy or anything else.
Decorative trees are considered a worthy decoration for a home. They are appropriate in any interior; you just need to think in advance about the color scheme that fits into the finished design project. Ornamental trees do not require special conditions of maintenance and care. They do not need to be watered as they are artificial plants. These decorative items are freely sold in stores, but it is better to make topiary with your own hands. It will take some time to make it, but in the end you will get a unique decorative tree that fits perfectly into the existing interior of the room. And it’s better to build a topiary yourself, because according to the ancient Chinese teachings of Feng Shui, this tree brings joy to the house. By making a decorative tree, a person charges it. According to legend, topiary can only bring happiness to its creator.
Creating branches
Now that the trunk of the DIY wire tree is ready, you need to add a few branches:
- Divide the bundles that are not yet twisted at the top into 2-5 parts. These parts should be of different sizes. Each group should have at least 2 and no more than 20 wires. Different numbers of wires in groups will give the tree a more natural, natural shape.
- Start with one of the separated sections and twist the bun 4 or 5 times. After several turns, separate 1 to 5 wires from the group and continue twisting the rest.
- After making 3-5 turns, bend a few wires and continue twisting the rest until there is 1-1.5 cm of untwisted wire left. Once you have reached this point, go back and twist the previously bent bunches until there is again 1-1.5 cm left.
- To make your tree look more realistic, you can bend some branches in different directions. This is what should happen in the end.
Materials and tools:
- copper wire: a piece of about 20 centimeters thick (1.2 mm in diameter) and five pieces of thinner wire, about 50 centimeters long;
- a few beads made of natural stones (or any other material that you like);
- pliers;
- round nose pliers;
- an anvil (or any metal block with a flat surface; a part from a dumbbell serves me well);
- hammer;
- a handy round object, the size of a rim for our tree (mine is a glass vial, 4.5 cm in diameter).
Satin ribbons
This tree will be a wonderful decoration for a wedding celebration. It's very easy to make. It is enough to show a little patience and imagination. The only difficulty that can arise is making flowers from satin ribbons.
So, to create a topiary you will need:
- About seven meters of satin ribbons.
- Threads, beads, yarn, lace for decoration.
- Glue.
- Wooden stick or plastic pipe.
- Flower pot.
- Crumpled newspaper or papier-mâché.
- Earth, decorative stones, shells.
Progress:
- According to the photo above, flowers are made from ribbons. On average, one topiary will require 15-19 roses.
- Now the crown is made. You can take ready-made papier-mâché, or you can crumple newspaper into a ball shape. The workpiece should be wrapped with yarn for greater density.
- The trunk is made from a branch or plastic pipe. Then it is wrapped with ribbon or decorated with lace.
- Next, using glue, the trunk is glued to the crown of the tree. The bottom of the trunk is placed in a pot and covered with earth and pebbles to make it heavier.
- Using threads, satin roses are sewn to the crown. In order for the flowers to hold more firmly, the workpiece is additionally fixed with glue.
- The pot is decorated with bows, lace and yarn. Flowers should be carefully straightened and, if necessary, decorated with decorative ribbons and rhinestones.
LED trees for outdoors
Artificial trees with LEDs can be installed in any place to decorate the landscape and surrounding areas. The attractive power of beauty actively attracts visitors to restaurants and cafes, shopping centers and boutiques, offices and other public places. Each luminous tree, with its configuration, largely resembles real plants, and sometimes completely imitates them. Artificial bark is used to cover metal branches. Maximum resemblance can be achieved thanks to silicone or plastic leaves and flowers made in life-size.
The entire structure of the artificial tree is decorated with multi-colored LEDs. Most often they operate from the electrical network, but in some cases autonomous power supply can be used, which leads to a slight increase in the cost of the design. Sometimes LED garlands are used, but they do not give the same effect as LEDs used separately.
Advantages of artificial trees with LEDs:
- Long service life of at least 5 years.
- Artificial structures do not require the maintenance required by real trees.
- Low power consumption. Even the largest trees consume electricity in quantities not exceeding 700 W.
- The simplicity of the design allows you to install it yourself, without involving specialists.
- Resistance of the structure to low temperatures, dust, high humidity and other negative influences.
- If one or more LEDs burn out, the rest of the chain will continue to work, and faulty elements can be easily replaced with others.
- The right choice of artificial trees and bushes allows you to advantageously emphasize and complement the elements of landscape design.
Sakura is especially popular among LED plants. These trees are especially beautiful thanks to the highly durable coating of the branches with plastic or aluminum alloy. Their appearance is as close to the real thing as possible. Despite its relatively small size, this tree provides as much light as taller structures. Sakura has a soft and delicate light spectrum, mainly white, pink and golden tones.
DIY New Year's bonsai: artful decor for the long-awaited holiday
New Year's bonsai is the same artificial leaves or needles, which is more appropriate, only snow-covered. The question is how to make snow. Take into account how other crafts are made. There may be snow from broken polystyrene foam, snow from PVA glue and sea salt, beads, white sequins, etc.
A New Year's bonsai can be made from any small tree, decorating it with Christmas tree decorations
But you can make a New Year’s tree in another way: for example, create a bonsai from a money tree with your own hands. Since the money tree is grown for financial well-being, this will be the best wish for the New Year. Well, the New Year's atmosphere will be created by festive decor - tinsel, pine cones, decorations.
DIY bonsai in an aquarium
And you can place an artificial mini bonsai in the aquarium, which, by the way, looks healthy. The important step here is to choose the right driftwood. It has to be cooked.
Features of making bonsai in an aquarium:
- Take a whole bucket of water, throw in at least ten tablespoons of salt, put the water on the fire;
- Throw a snag into this water;
- You need to boil the driftwood for five hours, and then keep it in a bucket of cold water for another two days;
- Plant the dried driftwood “head down” in a clay flower pot;
- Place several large stones around the resulting trunk; pebbles and sand will also be needed;
- Java moss, disassembled into pieces, should be placed on the tree branches, and they should be carefully secured with a thin fishing line;
- You also need to put moss at the very base of such a tree.
Instead of driftwood, you can make a trunk from Crassula; such a plant often vegetates on windowsills
The tree can be placed in the center of the aquarium. There are instructions that describe all the manipulations in more detail, but a lot is thought out by the master himself right in the process. For example, you can make a mountain out of sand and pebbles right in an aquarium, where a tree will grow, it looks exotic and very Japanese.
Bonsai in an aquarium (video)
Bonsai is an oriental decor that has long been loved in our latitudes. Such a tree will decorate a greenhouse, living room, office, loggia. If you love Japanese culture, then a mini bonsai will harmoniously complement your bookshelf with volumes of Japanese authors.
Bonsai is a type of gardening art. This art form originated in China between the 8th and 10th centuries. Its essence is that trees that grow in nature and become large enough over time are planted in pots and various kinds of stands. Due to constant pruning of the crown and the fact that the root system becomes flat, dwarf trees like these are obtained.
In order to grow a pine bonsai, it will take a lot of time and effort, but the result is worth it.
You should start by collecting seedlings. It is best to take more than one, so that during the process of their growth you can choose the tree you like best, and it is easier to conduct experiments with the crown on several samples. An important point when growing pine bonsai is that it has 2 growth phases per year: late summer and late spring.
In the first year of bonsai growth, there is no particular hassle with it, since the tree is just beginning to take root and buds appear, that is, there is no need to trim anything. In late spring, in the first phase of growth, the branches of the pine tree lengthen, but at the end of summer, in the second phase, the branches of the tree become thicker and the roots begin to accumulate substances necessary for growth. Therefore, the roots of the tree should not be trimmed during the second phase. Another important detail is that young pine seedlings require a lot of light, as well as good drainage, otherwise the roots will simply begin to rot. The pot with pine should be placed away from drafts, as the plant is very afraid of wind.
In the second year of growth, first of all, the seedlings are cut off by 7-12 cm, but it is very important to ensure that healthy needles remain on the shoot after this, which should not be damaged under any circumstances. Pruning should be done at an angle of 45° and always at the end of March. Before you get a finished bonsai, its root system needs to be trimmed every year.
But if suddenly the needles of your tree grow above the required level, then it is better not to touch anything for now, and come up with another way to grow the bonsai crown.
After cutting the shoot, the pine trunk will begin to thicken. Also, the needles can become very lush, so you need to thin them out so that each needle receives sunlight. The main thing is not to overdo it. For pruning, you need to purchase a special pruning shears, which will cause much less harm to the plant.
After these manipulations, wire is placed on the seedling to form the shape of the trunk. The main thing is to ensure that the frame does not grow into the trunk, since as it thickens it will cut into the trunk, and as soon as this begins to happen, the wire should be removed and replaced. During this period, the tips of the branches are pinched, then they begin to branch better.
The tree will now grow the way you want by guiding it with the wire. During this period, you need to regularly shorten the young shoots, then it will remain the correct shape and will continue to branch.
Then you need to continue in the same direction, but without the wire. All that is necessary is to regularly monitor the formation of the crown, removing excess. Now the tree can be transplanted into a permanent bowl, decorating it to your liking.
Your bonsai is ready!
Bonsai is a wonderful decoration for your home, but as you know, it takes a lot of time to create such beauty. But you want to decorate your home with a decorative tree in this style now. Of course, such a problem can be solved within a day - buy it, but it’s much more pleasant to create such a tree with your own hands. This is where numerous ways to create such a decorative item from artificial materials come to the rescue.
Material we need for work
- Any ceramic plate or flowerpot will become a tree stand.
- Three-core wire, three pieces, 40 cm each. It will be needed to form the frame of the trunk and branches of the future bonsai.
- Glue gun.
- Gypsum, which will be needed to form the trunk and branches on the frame.
- PVA glue.
- Acrylic paints for the final design of the work.
- Artificial greenery, which will need to be divided into inflorescences.
Creating a trunk and branches
Take a three-core wire and strip 10-12 cm from one end; future branches will be on this side. Do the same with the other two.
Now secure all three wires to the future stand using a heat gun. Connect them together and also fasten them with hot glue, then coat the entire structure with PVA glue.
Next, you need to dilute the plaster as indicated on the package, also add PVA to the mixture. The consistency of the solution should be like thick sour cream. Apply to the tree frame and form the trunk and branches. Leave the tree for a day, it should dry thoroughly.
After a day has passed, take PVA glue and coat the entire tree again. Once the glue is dry, paint the trunk brown. The paint must be mixed with PVA in a ratio of 3:1 and applied with a sponge. After this, ocher can be applied on top. You need to wait two hours to dry.