Your own style, your own style, an interior design unlike anyone else. And you can create all this with your own hands, turning the kitchen or living room into a cozy corner. Let's play with jars, bottles, old boxes and various unnecessary packaging. Believe me, from all this “garbage” you can create small works of art. Turn on your imagination and give yourself and the world hand-made masterpieces. You will feel how much warmth such crafts will bring into your life, create a special mood and add harmony to your way of life. Let's start with the simplest thing - decoupage of a glass jar.
Decoupage glass jar
Don't rush to throw the glass jar in the trash. Let's create a kitchen masterpiece out of it.
What we need for work:
- beautiful napkin;
- acrylic paint or acrylic primer;
- PVA glue;
- decoupage varnish;
- polyethylene file;
- brush;
- sponge;
- alcohol or alcohol-containing liquid.
First you need to treat the surface with an alcohol-containing liquid, then the paint will lie smoothly. Then use a sponge to apply a thin layer of primer or PVA glue. Choose a paint color to match the decoupage napkin. For a deeper shade, cover the jar with acrylic again. Let the jar dry between coats. You can go over the surface with fine sandpaper to remove any unevenness.
And then the most interesting and creative activity. We take a napkin with a beautiful pattern, a flower, a picture of a children’s theme, and carefully tear off the drawing. We work not with scissors, but with our hands. Separate the colored layer with the pattern from the two white layers. We do this very carefully.
Place a piece of napkin on the file, pattern down, and lightly spray it with water. We try to smooth out all the irregularities, folds and bubbles with a soft brush. We tilt the file and let the excess water drain.
Place the napkin (along with the file) on the jar and carefully smooth out the design. After this, the file can be removed. Again we smooth the fragment of napkin on the jar with a damp brush and then cover the image with decoupage varnish. This is the most painstaking part of the work.
When the napkin dries, you can add another layer with a pattern (then the applique will be more saturated). If desired, you can paint the surface with patterns and elements of vegetation.
At the end of the work, we cover the dried surface with decoupage varnish, it is advisable to apply several layers. Be sure to dry each layer of varnish; this will give the vessel smoothness and protection from moisture.
You can decoupage coffee cans, decorate baby food jars, and use pretty bottles and any glassware.
Large jars are good for storing cereals, and smaller jars are good for storing spices. They will not only decorate your kitchen, but also create a unique atmosphere of comfort and celebration.
How to make decoupage
In simple words, to create decoupage means to glue a drawing on paper or an ornament to the surface of some unsightly thing.
This technique will turn a glass ugly duckling into a real beautiful swan:
- We take a fashion catalog, a glossy magazine (if you don’t mind) or any other reading material with thin, smooth paper. We cut the leaves into pieces (the shape does not matter).
- We coat each piece with PVA glue and begin gluing it to the jar and its lid. We try to ensure that there are no empty spaces. You can glue one piece on top of another.
- We take a cloth, moisten it in acetone, and then begin to rub it over the glued glossy leaves to remove printing ink and inscriptions.
- On top of the worn, bleached “gloss” we place some picture, photo or regular thin paper wrapper. Do not touch until it dries.
- We wet the sponge with acrylic varnish and carefully apply it to the surface. We don't touch it for several hours. Then we repeat the procedure with varnish several more times.
Now the decoupage is ready.
You can transform a jar using paper napkins for decoupage with an original image.
For this we will use:
- synthetic flat brushes;
- napkins with a pattern;
- acrylic primer, paints and matte varnish;
- sandpaper;
- sponge
We do this:
- First, prepare the surface: degrease it, apply acrylic primer in 2 layers. Dry the jar between “primers”.
- Paint the background color in 2 layers. We use a sponge for this.
- Take a napkin and cut out the motif. We separate the excess paper layer.
Decoupage napkins consist of several layers. We use the top one (the one that is brightest).
- We apply a napkin to the jar and carefully spread glue on top. Apply it from the center to the edges. Don't touch it, let it dry.
- Apply 4 layers of acrylic matte varnish alternately. After drying it will become completely transparent.
And here is the approximate result:
Vintage style or distressed
If you love vintage and antique items, you can do the work using the craquelure technique. To do this, you need to purchase craquelure varnish.
Master class in aging techniques:
- We treat the base of the jar with an alcohol-containing solution and apply the first layer of acrylic paint. It is this that will then shine through the cracks created by the varnish. We dry the workpiece.
- We do the second coating with craquelure varnish. We also dry the surface.
- Apply a third layer of paint of a different color.
When this entire “sandwich” dries, you will see a network of cracks on the surface of the jar, like in old paintings by Flemish painters.
This is a very beautiful technique. You can combine both techniques: decoupage and craquelure in one work and create a coffee set from jars and a tray.
Original ideas for decoupage
By decoupaging a small glass jar, you can get an original candlestick. The jar can be coated with primer completely or partially, only in places where decorative fragments are glued. Through the glass the candle will shine even more effectively.
Using the above master class on decoupage of cans, you can make an original vase or flower pots from a tin can. Relief patterns created using a stencil and texture paste will be an effective addition.
Decoupage jars with napkins for an eco-style kitchen can be complemented with decor made from natural materials. Twine, pine cones, and artificial berries will help you create original New Year's compositions.
An original way to decorate a jar is decoupage on eggshells. To do this, small pieces of eggshell, previously thoroughly washed and cleared of the inner film, are carefully glued onto the primed surface.
Then the relief surface is once again covered with glue and decoupage is performed using a napkin or fragments of a decoupage card or rice paper. The result is a spectacular piece of furniture.
Banks do not always have a smooth surface. You can decoupage a tin can with a relief surface in the same way, you just need to be very careful when gluing the motifs.
Objects made using the craquelure technique have an unusual appearance. This will require a special varnish. The base is covered with paint, which will then be visible through the cracks, then a layer of varnish is applied, and after drying, the top is painted with acrylic paint.
The last step is to glue the napkin. The top layer cracks when it dries, and the jar takes on its original appearance. With reverse decoupage and two-component craquelure, the technology changes slightly.
Rice paper for decoupage - step-by-step instructions for use, features and subtleties of use (110 photos)- Decoupage of bottles - step-by-step instructions and description of the progress of decorating with various materials (110 photos)
- Napkins for decoupage - manufacturing features and tips for use (85 photos)
This technique is suitable for jars of unusual shape, clay vases and jugs. They will be appropriate in eco-styles, vintage and retro.
The simple decoupage technique will allow you to turn ordinary objects into original ones that will complement the style of your home, giving it charm and comfort.
Decoupage tin can
Don’t rush to throw away baby food containers. It has wonderful airtight plastic lids. Tin can decoupage, a master class of which we will now look at, will undoubtedly decorate your kitchen.
Materials and tools
To work we will need:
- alcohol or alcohol wipe;
- acrylic primer and paint;
- PVA glue;
- beautiful napkin;
- decoupage varnish;
- brushes, sponge or piece of foam rubber;
- and, most importantly, a good mood!
Master Class
- Degrease the surface of the jar with alcohol or an alcohol wipe.
- Apply acrylic primer in a thin layer. Let's dry it.
- Use a sponge to cover the surface of the container with white acrylic paint.
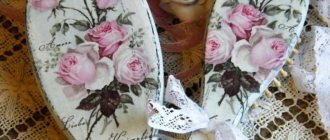
- Let's cut out a fragment of the picture, for example, a bouquet of roses. Separate the 2 bottom layers of the napkin from the colored one.
- Carefully place the drawing and cover the surface of the napkin with PVA glue (from the center to the edges). Try to smooth out all bubbles and wrinkles. Let the layer dry.
- Let's paint the product with a second layer of acrylic paint. You can take pink, gray or beige. It's better to work with a sponge. Around the drawing we make the color deeper and more intense. This will add depth and volume to the bouquet. Let the paint dry.
- Cover the entire jar with 2-3 layers of varnish.
- You can glue thin lace along the top edge.
Voila! Your beauty is ready. You can put hairpins, small items for a sewing machine, combs and even candies there.
How to make decoupage coffee cans the best way
I washed the jar and then wiped it with an alcohol wipe.
I wiped the lid with a napkin.
Another interesting article:
Before priming the jar and lid, I covered it with a thin layer of PVA glue for better adhesion of the paint to glass and plastic.
Using small dipping movements using a clothespin and foam rubber, I covered the surface of the jar with white paint.
Left it to dry. At this time I painted the lid.
The jar is large in volume. This allows you to select a large napkin fragment for it. I tore out a picture of a coffee cup from a napkin and divided it into layers. I glued the top layer onto the surface of the jar using PVA.
More MK for home:
I also glued a fragment with letters
and coffee beans cut from a napkin.
Everything dried well. For the lid, I selected a pattern with a coffee heart, just the size of the lid, and layered it.
I pasted a drawing onto the surface of the lid.
I pasted inscriptions along the edge of the lid, and pasted a drawing with a smaller heart onto the jar so that the drawings of the lid and the jar would overlap.
I slightly diluted the brown paint with water and sprayed it on the can using a stick and a toothbrush.
Every housewife regularly buys various food products from the supermarket in jars of various intricate shapes. Often it is a beautiful jar that catches our eye, and we make a purchase without even thinking about the quality of the product it contains. After a certain time, quite a lot of these cans from various materials accumulate in our house. However, do not rush to throw them all away or try to sell them to someone. Today we will look at decoupage of a coffee can; the best thing we can get is a container for regular use.
Decoupage of plastic jars
You can always find empty plastic cans and bottles in any home. You can also keep your child and yourself busy with useful creative activities. Let's play with objects together and create a beautiful thing.
We will prepare the following tools and materials:
- clean plastic jar or bottle;
- scissors;
- acrylic primer;
- paints or varnishes;
- three-layer napkin or decoupage card;
- accessories for decoration;
- decoupage glue or PVA glue;
- fixing varnish.
- We clean the surface from grease and dust using alcohol or an alcohol-containing liquid.
- Cover the entire surface with primer.
- Apply two layers of white paint.
- We place a fragment of a napkin or decoupage card on the surface of the jar and carefully apply PVA glue. Try to do everything slowly so that the surface becomes smooth and free of bubbles. Let the layer dry.
- Apply a second layer of paint to match the napkin.
- You can draw an outline of individual elements that complement the central design.
- We decorate the jar with sparkles, shells, and lace. This is your field of creativity.
- We cover all this splendor with decoupage or any other varnish that you have at home.
This is interesting: Vlad Sokolovsky and Rita Dakota
We rejoice together with the children in beautiful interior items!
Handmade: decoupage on coffee cans
Decoupage on jars from Irina Abramova. Master Class
Materials we will need:
– acrylic primer, paint white, green, ocher, black;
– putty, bitumen patina;
– water-based varnish;
– sandpaper, brushes, foam sponges, toothbrush.
First, of course, we get rid of all the labels. Soak overnight, wash and dry:
Degrease with alcohol, vodka or nail polish remover (I use vodka). Plastic covers need to be sanded for better adhesion to the ground:
Decoupage of enamel dishes
Often our enamel dishes begin to deteriorate: the enamel comes off, the design wears off from washing, and the color becomes dirty. Rust appears in some places. What to do?
We turn on creativity, roll up our sleeves, prepare a place for “dirty” work and dive headfirst into the process. And so that our loved ones do not interfere, we involve them in this sacred rite.
Tools and materials for utensils:
- rust converter;
- alcohol;
- primer-enamel for rust;
- white enamel;
- napkins, prints, decoupage cards;
- alkyd-urethane varnish;
- brushes
Let's start processing the container:
- If there is rust on the dishes, be sure to treat them with a rust converter. Repeat the treatment several times, otherwise the corrosion will go further and the entire decor will be ruined.
- Degrease the surface of the dishes and remove excess rust converter.
- We prime the surface with a special primer-enamel for rust. Apply three layers. Sand after each layer.
- We paint the surface with white enamel.
- Prints, napkins and decoupage cards are glued to urethane varnish. It grips well on flat surfaces.
- For the background and drawing, you can use the same primer-enamel for rust, mixed with acrylic paints to the desired color.
- Additional surface decoration elements can be used.
- We sand the surface well and apply alkyd-urethane varnish. It is self-leveling and self-leveling.
Working with enamel and metal utensils is more labor-intensive, but the effect will not be long in coming. You can update your pots, jars, teapots and decorate your kitchen with exquisite dishes.
Coffee decoupage: original jars for storing food
Many housewives make sure that bulk products are stored neatly in beautiful jars. Coffee beans require special storage, so it is very important to create the right conditions.
Jars for various grains and cereals can be made to suit your home interior. Housewives can show their imagination and involve the whole family in creating jars. Children are always delighted with various crafts.
Of course, stores now have a wide range of storage containers. But they do not differ in design, and things of the same type often look sparse. To create an unusual jar, you don’t have to buy a glass craft jar. If you love coffee, use coffee cans. You can decorate them in all possible ways. Let's look at some of them.
Decoupage of glass, tin and coffee cans: master classes
Your own style, your own style, an interior design unlike anyone else. And you can create all this with your own hands, turning the kitchen or living room into a cozy corner. Let's play with jars, bottles, old boxes and various unnecessary packaging. Believe me, from all this “garbage” you can create small works of art. Turn on your imagination and give yourself and the world hand-made masterpieces. You will feel how much warmth such crafts will bring into your life, create a special mood and add harmony to your way of life. Let's start with the simplest thing - decoupage of a glass jar.
Coffee can decoupage ideas
To create interesting coffee jars, you can use several options for materials:
- Textile;
- Paints;
- Polymer clay;
- Handy items (grains, twigs, pebbles);
- Mixed materials (involves all of the above components).
They often use scrap materials and decorate the product with plastic inserts, old toys and other things. If you have extra things that can be used in the art of decoupage, be sure to use them.
Master class on creating a decorative coffee can
Coffee beans are almost always sold in paper bags, so many housewives pour it into more suitable containers. This is the right decision, since coffee requires careful storage. This way the taste of the future drink will retain its aroma. The first master class involves creating a jar for cereals and grains using paints. To create a decorative element you will need:
- Glass coffee jar;
- Acrylic paints;
- PVA glue for children;
- Sponge;
- Glass varnish (if the surface with paint is small, you can also use colorless nail varnish);
- Brush;
- Hairdryer and scissors (to complete the composition).
Stages of creating a decorative container:
- In order for paints and varnish to adhere well to the surface of the glass and last a long time, the jar must be degreased. Don't hesitate at this stage, even if you think the jar is perfectly clean, handprints will still leave marks on it. To remove them, use alcohol or nail polish remover. Thoroughly wipe the entire surface, including the lid of the jar, with a cotton swab.
- The second item is to select the drawing style. It can be a romantic rustic style or an urban classic, royal with ornaments or picturesque with a forest. Choose a design that matches the style of kitchen you can depict.
- The first layer is the background layer. It is better to use a white background, it harmoniously combines with many decorative elements, and it is better to apply the main pattern on it (it will be clearer this way). When depicting the sky and the greenery of the trees, you can use a sponge, so the jar will get a romantic style.
- If you don't have artistic skills, use the decoupage technique. To do this, apply a napkin with a beautiful pattern to the jar and apply 1/3 PVA diluted with water on top, hold it for several minutes, and then remove the light layer of the napkin. The drawing remains on the can. In this case, it is very important to coat only the part of the napkin that you want to apply (i.e. with the pattern).
- It’s an interesting option to depict an ornament with children, this will create not only a useful jar, but also a memorable souvenir. You can make plastic inserts from old toys, just be sure to make sure there are no sharp protruding parts.
- To create a spring ornament, you can use only a sponge and paints, draw a design, and after it dries, cover the work surface with varnish. You can attach polymer clay products (flowers, leaves, curls).
- If you want a royal style, use the colors: dark blue, gold and white. It is assumed that there is a lace trim on the top of the jar: it is coated with glue and lace is applied. If you have extra old brooches at home, be sure to use them.
What to make from an ordinary glass jar 50 ideas
Don’t rush to put them away until summer, because you can use them to make a lot of cool things for home decor.
4,25 5 8
WANT.ua will tell you exactly what you can turn a glass jar into.
CANDLESTICKS
Read also New Year's wreaths: how to make at home (PHOTO 60+)
Glass jars make amazing candle holders. Making a candlestick is simple - just decorate the jar beautifully and put a candle inside. Glass candlesticks add warmth to the interior, creating a special mood and comfort.
Whatever the season, candlesticks are always appropriate, and beautifully decorated ones with your own hands are always held in high esteem. Decor options can be very different: painting; decoupage; decoration with threads, paper strands, decorative straw, old photos, lace, fabric; decorate with aerosol paints; make a stained glass window.
KITCHEN OPTION
Where else in the kitchen should glass jars be? They will become indispensable assistants for storing cereals, spices, other bulk products and cutlery (knives, forks, spoons).
Read also New fashion for indoor flowers - florariums (where to buy and how to care)
Also, a beautiful napkin holder will come out of an ordinary glass jar, and if you decorate it with twine and lace, you will significantly liven up the situation in the kitchen and you won’t have to spend money on a new napkin holder and spice sets.
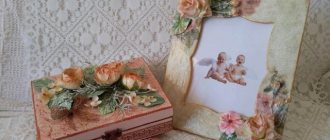
PICTURE FRAME
Tired of ordinary photo frames, of which there are more than one in each apartment? By placing a photograph in an ordinary jar, it will definitely not go unnoticed. Simply place the photo upside down in the jar so that it fits snugly against the sides of the jar. Turn the jar over and place it in a visible place.
BEAUTIFUL VASE
When there is no vase in the house, this is a real problem. No, don't laugh, not everyone has a flower vase, we're serious, by the way. A wonderful vase can easily be made from an ordinary glass jar left over from canned tomatoes.
Read also How to update an old refrigerator: 8 cool ways to suit different interiors (PHOTO)
You can decorate a homemade vase in any way: paints, lace, fabric, decoupage, shells, beads, decorative stones. In general, choose the decor to suit your taste and go ahead – decorate the vase of your dreams.
CREATIVE ORGANIZER
You can store not only cereals, pasta and spices in jars, but also all sorts of trinkets. For example, cosmetics, stationery, jewelry, makeup brushes, hygiene items, and sewing accessories look great in a glass jar. This organizer looks very stylish; you will have to decorate it to a minimum.
You can store anything in jars, not just cereals and pasta. This even applies to nuts and nails! If you are an avid crafter, then you are familiar with the issue of storing all sorts of small decorative things! Ribbons that tend to unravel and intertwine with each other, “harmful” floss, buttons and spools of thread...
Spending an evening beautifully decorating a couple of glass jars will solve this problem once and for all! Even knitting threads are tamed with a jar with a tight lid - cut a hole in the middle of the lid, the size of a pencil, and pull out the “tail” of the thread. All! You have a “house” for the ball in your hands. He won't run away from there and he certainly won't get confused.
PARTY IDEA
Read also Floor lamps and table lamps in the interior: ideas and photos
Bright lemonade and other drinks poured into cans? I think it's original. And if the jars are small, and even of an unusual shape, you can safely use them instead of glasses!
STYLISH PENCIL POCKET
You can’t even take a step in the nursery without bumping into a paperclip or pencil? Are your office supplies lying around on your desk? The house is clearly missing a stylish pencil holder!
NEW YEAR'S DECOR
Using glue and unnecessary Christmas tree decorations, make a New Year or Christmas composition on the lid of the jar (on the inside, which will then “go” inside), fill the jar with confetti or foam chips, close it and shake it well! You need to place the container on the lid, so check in advance, before you decorate, whether your jar is stable “on its head”
AQUARIUM OR MINI-GARDEN
Read also: Designer carpet for the floor: a new look at room decoration
Such miniature “living corners” very well refresh the decor of the room. What if there are several of them? That's it! I hope now you don’t doubt the ability of an ordinary jar to become a stylish decorative element!
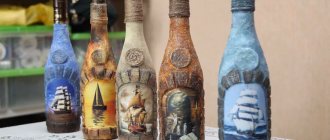
Coffee decoupage
To create a decorative coffee can in an urban style, prepare:
- PVA glue;
- Coffee beans;
- Glass jar;
- Jute rope;
- Lace;
- Acetone;
- Napkin with a picture of a cup;
- Varnish;
- Paints.
The creation process is very simple:
- Degrease the jar as in the previous version.
- Apply beige background paint.
- Coat a napkin with glue and apply to the surface.
- Remove any remaining paper and process the jar.
- Glue the grains beautifully on the top, lace on the bottom.
- Cover the entire surface of the jar with varnish and let dry for several hours.
This is interesting: Knitted suits for newborns
In this way, you will not only get a neat coffee jar, but also an excellent gift, carefully made with your own hands. You can't exactly recreate a drawing, but coming up with a new one is much more interesting. Experiment and you will achieve great heights in the art of decoupage.
Interesting decor of a coffee can
Greetings to all!
Friends, this time we will make a very interesting decor for a glass jar.
The contents of the jar are coffee and, accordingly, coffee beans will participate in the decor. The craft will turn out to be very original and can serve as a wonderful gift.
What we need:
- Coffee can;
- Coffee beans;
- Fastener: zipper (preferably black or brown);
- Paper napkins;
- Napkin for decoupage;
- Thin dark braid;
- Masking tape;
- Hot glue;
- PVA glue;
- Aerosol paint black;
- Acrylic paints;
- Acrylic lacquer.
Step 1.
We take a can of coffee, a zipper and measure its length so that it fits on the side surface of the can, cut off the excess. We glue the two cut ends together with hot glue and use it to glue the clasp to the jar in an unfastened form.
Step 2.
We make a solution of PVA glue and a small amount of water, and then cover the entire surface of the jar (except the bottom) with paper napkins to create a texture. Don't forget to stick napkins on the fabric part of the fastener as well. Dry the glue.
Step 3.
We seal the threaded part of the can with masking tape and paint the entire surface with black spray paint.
Step 4.
After the paint has dried, select whole, beautiful coffee beans and glue them into the space of the open zipper.
Step 5.
Now you need to decorate the lid. Using the same solution of PVA glue and water, glue a decoupage napkin to the lid in a design style that matches the coffee theme. We dry the glue and hot glue a thin braid to the edge of the lid, thereby hiding the unsightly edge. If the napkin covers the entire outer surface of the lid, then this is not necessary.
Step 6.
We apply the first layer of bronze-colored acrylic paint using the dry brush method, thereby revealing the relief areas of the decor. There is no need to paint the grains. Let's dry it.
Step 7
We paint the second layer, also using the “dry brush method,” with golden-colored paint.
Step 8
In the final step, you need to cover the entire decor with colorless acrylic varnish.
It turned out very cool and beautiful, isn’t it! In my opinion, such a craft would be a great gift!
Friends, if you liked this MK, share it on social networks! All the best and peace!
Features and technique of decoupage of a tin can
Ideas for decorating tin cans using the decoupage technique is the best solution for designing kitchen utensils, it is also practical and unique.
Reasons to choose the tin can decoupage technique:
- Ease of doing the work yourself;
- Fascinating handicraft technique;
- Cheapness of available materials for manufacturing;
- Using iron baby food jars or glassware.
It is important to remember before you start decorating that the surface must be disinfected and thoroughly cleaned; this can be done with a solvent. In order for the pattern to lie beautifully, the surface is in most cases covered with acrylic paint; the tone will become more even.
When choosing the external decor for a jar, you can choose a more voluminous option in the form of coffee beans or choose to use napkins with pictures.
The use of napkins is convenient, as they fit perfectly on the surface of the jar, displaying clear lines of the design. Their advantage over simple photographic paper is that there is no need to hide defects with more massive decor.
Ideas for decoupaging coffee cans in different styles
The simplicity and ingenuity of tin can decoupage styles exceeds all expectations. You can choose absolutely any style. It all depends on the mood and the occasion.
But the most popular are:
- Shabby chic;
- Holiday decoration ideas: for March 8 or the New Year, Christmas ideas will also come in handy;
- Provence;
- Vintage.
The most common decor option is shabby chic ideas; only variations on a vintage or Provence theme can be better than this.
It is the shabby style that will look like aging of interior items, including tin cans. Romantic notes on the jars in the form of applying the decoupage technique are all kinds of flowers and landscapes.
Vintage style is used to decorate iron cans or glassware using napkins, the main idea of which is to convey the era of past centuries. Provence, as a type of French decor, is depicted in the form of drawings with vegetation and baskets of fruit, in addition to animals and portraits. This style is interesting due to its rustic motifs in the interior of kitchens; pastel colors will complement the harmonious atmosphere.
Science buffs may enjoy decoupage techniques, in which drawings are applied in the form of an aged atlas or world map. You can refresh and make a thing better by decorating the decoupage in a festive New Year theme or in accordance with the date, it can be an image of a person or thematic drawings.
Detailed master class on decoupage of a tin can
For lovers of handmade techniques, using decoupage will be a simple way to transform an old item and breathe new life into it. The topic of decorating iron cans is very relevant, since families with children have a lot of baby food containers left over. The material is cheap, so it wouldn’t be a shame to throw it in the trash if things go wrong.
Tin jars appear in the kitchen and from grocery stores, selling peas or corn, pasta and all kinds of pickles.
From such tin utensils you can make not only a jar for spices, but also a beautiful piece of furniture, a box. To help beginners, a master class on decoupage of iron cans is presented.
All necessary materials for work:
- The iron can itself;
- Selected napkin for applying a pattern to the surface;
- Special glue;
- Varnish for coating the can;
- Acrylic paint is required;
- Oil paints if necessary;
- For disinfection, alcohol solution;
- Scissors for cutting out the design;
- Brush for applying paint.
- Alcohol or any other alcohol-containing liquid to degrease the jar;
- A microfiber cloth for wiping away defects during the work process.
The work begins with the fact that the decorative item, in this case a tin can, must be thoroughly washed and dried. Using the existing alcohol solution, the surface is wiped, after which acrylic paint is taken, most often white, which will look harmonious with the pattern of the adhesive napkin. To prevent the material of the can from being visible, you need to paint it at least twice, and possibly three times. The selected design can be cut out, or it can be torn out of a napkin, which usually consists of several layers.
Having first applied the glue and then the napkin itself, the decoupage artist checks for bubbles in order to push them all out. After waiting for the finished product to dry, you can then coat it with varnish or additionally use oil paints for a specific style.
The napkin is glued separately to each layer, and as you work it will be clear how many are needed. Thus, the desired decoupage technique is achieved and visually it corresponds to the theme and place in the interior.
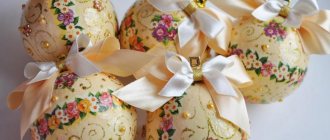
Magic ball from a glass jar
To create magic and magic with your own hands, you will need the following materials:
- Glass baby food jars with a screw-on lid;
- Glycerol;
- Glitter or small sequins - 1 teaspoon;
- Instant glue;
- Small figures of animals, houses or trees.
First, you need to clean the surface of the container from the label by washing it well or wiping it with acetone. Then glue a suitable figure onto the lid of the jar and leave it until it dries completely, preferably for a day.
Then they start filling the jar itself. To do this, you need to dilute 5 drops of glycerin in the required volume of water, pour glitter or sequins into the bottom of the jar and fill with the resulting mixture.
Then screw the lid tightly, turn it over and enjoy the wonderful spectacle.
Eggshells in decoupaged iron cans
Ideas and themes of decoupage can be realized by applying eggshells, especially since this does not require a lot of available materials. It is enough that the surface is properly cleaned and glue is applied.
It is important to glue the eggshells sequentially, section by section, and not cover the entire surface with glue at once.
When making decoupage, you can combine eggshells with three-layer napkins for decoration.
Stages of work on decoupage with eggshells:
- First, the shell should be properly prepared; it should be taken from a fresh egg, cleaned of the inner film and well dried;
- The jar must have a flat surface that is cleaned of dirt and disinfected;
- After applying glue to the base, pieces of shell are placed on top of it, imitating the desired pattern;
- It is important to glue the shell before the glue has time to dry;
- You can fix the eggshell with your fingers to ensure a tight fit to the surface;
- The gaps between the elements of the shell are adjusted by each at will, depending on the pattern.
When the decoupage process is already at the final stage, you can see the overall picture of the design and complement it by adding colors of paint. The shell holds tightly if everything is done correctly. Decoration with coffee decoupage can thus be applied to both an iron jar and a glass one.
This is interesting: Evelina Bledans Pregnant 2018
Decoupage of coffee cans: interesting ideas and master class
join the discussion
Share with your friends
Drinking a cup of coffee in the morning is not just about enjoying a delicious, invigorating drink. For many people, such an event is almost a sacred act. It is recommended to decorate it at a decent level, with all the necessary surroundings. The following should be present: a beautiful teapot, a capacious Turk, exclusive dishes and, of course, a spectacular jar where ground coffee is stored. You can make it beautiful, with original colors and textures with your own hands.
Preparation for decoupage
A master class on creating an original coffee product is simple. You will need any glass container that is easy to find. You can also decoupage coffee cans. Although glass jars are usually more affordable, it is better to use them for work. You will also need acrylic paint; it is non-toxic and ideal for this type of operation. The paint can be taken in several colors, for example, brown, white and yellow. You will also need:
- brushes (wide and thin);
- napkins with your favorite images;
- scissors;
- knife, blades;
- cotton swabs;
- acetone or paint thinner (to remove old glue);
- coffee beans;
- supercement glue “Second”;
- glue gun;
- rope;
- figures cut out of plywood (heart, coat of arms of your favorite city, ideas may vary);
- cotton rag.
The process should begin by removing the label. This can be done simply: put the jar in a pan of boiling water, “boil” it there for about 10 minutes. After this, the label can be easily scraped off with a knife or blade, and the remaining glue can be removed using a rag soaked in acetone or solvent. After completing the operation, it is recommended to wipe and dry the jar.
After the preparatory manipulations, white paint is prepared, brown is added to it, this will be more in harmony with the coffee theme.