If you are thinking about radically changing the look of your room or want to complement your home interior with a loft chandelier, then try making a loft-style chandelier from pipes with your own hands! Master classes with photos will help you with this.
By the way, the loft settled into interiors relatively recently - about 60 years ago, and to this day it is interesting for its variety of design concepts. It is appropriate both in large studios, where the living room is combined with a dining room, and in small rooms. DIY loft-style lamps are a compromise between fashion and style, extravagance and everyday life.
Familiar objects appear before us in a new light - this is a DIY loft lamp. Features include long chains for hanging from the ceiling, custom lampshades or compositions of many simple lamps and use.
Making a loft-style lamp from pipes is quite simple, read master class 4 - see for yourself!
Lamp made of pipes - features of working with the material and assembling the structure
Lighting devices made independently from plumbing fittings have undeniable advantages over factory-made ones.
Among them:
- Unique design. Craftsmen can be sure that their work will exist in a single copy. Such an item takes into account the interior features of the room and will fit well into it.
- Availability of components. The lamps are made from materials left over from repairs.
- Low cost. Chucks, adapters, and switches can be purchased at a building materials store. Components from unnecessary lamps are also used, so manufacturing costs are minimal.
When choosing materials, keep in mind that:
- Plastic segments should be made of a material that bends easily when heated. Polypropylene or polyvinyl chloride is suitable.
- Plastic is sensitive to heat, so it is better to use LED or LED lamps in combination with it. Standard incandescent lamps are allowed in metal products.
- Although designs in the steampunk or loft style look aged and even rusty, you need to remember that these are only design elements. Materials must be free of rust and dried before work, and the antique effect is created on the finished lamp using a chemical patina.
- If structural elements are attached to each other using threads, then their main condition should be the equal diameter of the pipes.
- Adapters will be needed to secure the cartridge and other structural parts.
- Assembly must be carried out according to the diagram and in accordance with electrical and fire safety requirements.
Manufacturing and assembly process
Below are the diagrams and drawings necessary for making furniture from pipes. With their help you can make armchairs, chairs, beds, shelves, tables, and a huge number of decorative elements. The products are interesting, durable and safe.
Armchair
An original way to use plastic pipes is to make a chair out of them. There are many options for making it. It all depends on the desire, capabilities and imagination of the master. Plastic pipelines can become a material for making a chair. You can make it using PVC pipes, a knife and glue.
To get an unusual chair, you need to do the following:
- First, cut pieces of different lengths. The main thing is that the longest segments should be the same length. They will act as supports;
- long ones will be needed for the backrest and armrests;
- Then the segments are glued together so that the surface of the armrests and backrest is at the same level. Towards the bottom, the length of the segments changes.
Thus, we get an interesting chair that will decorate any room in the house. To make it even more comfortable, pillows are placed on it or covered with foam fabric. You can have a good time in such a chair, read a book, watch TV.
Bed
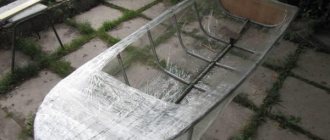
Using the method described above, a table and a bed are made. The different sections are glued together to create the base of the bed. On top of it you need to put a comfortable mattress, pillows, and blanket. This is quite a suitable place to sleep and relax.
In addition, cribs are made from this material. To do this, you need to study diagrams and drawings. Then prepare the required size pieces. They are connected using fittings. If you fasten the parts together with glue, they will be very strong and durable. Without the use of glue, the structure will be collapsible and can be removed at any time. A crib for a baby will be unusual, reliable and durable. If there is more than one child in a family, you can make several beds.
You can make such furniture from polypropylene pipes with your own hands, like a table. Its frame will be made of pipes, and the tabletop will be made of any other material. At the same time, it must be remembered that PVC pipes are not suitable for heavy loads. The lighter the countertop, the better.
The size of the tabletop in this case will be 91.5 x 203 cm. The following materials and tools will be needed:
- door leaf as a tabletop;
- fasteners for connecting parts;
- drill;
- saw.
You will also need pieces of size:
- 30 cm – 10 pcs;
- 7.5 cm – 5 pcs;
- 50 cm – 4 pcs;
- 75 cm – 4 pcs.
To assemble the frame, prepare:
- t-shaped fittings – 4 pcs;
- plugs for pipes, fittings – 10 pcs;
- 4-sided fitting – 4 pcs;
- cross fitting – 2 pcs.
According to the diagram, assemble the side elements first. Then proceed to the back of the table
Pay attention to the stability of the structure. All details must be the same
The last thing is to assemble all the elements into one structure. Inspect the product for any unevenness or sharp parts. Process everything carefully, glue the connections. This is a simple way to make a table.
Rack
Armchairs, beds, tables - this is not the entire list of products that can be made from this material. Another useful interior item is a shelving unit. Design parameters can be very different. It all depends on the size of the room where it will be installed and the wishes of the master.
First of all, it is recommended to make a drawing, a diagram of the future product. Next, use them to prepare the required quantity of a certain size of parts. Connect everything together. The base of the shelves can be plywood or other material. The only thing we must not forget is that the materials are not suitable for heavy loads.
Such racks are used for flowers and toys in a children's room. Shelving can be installed in the garage. There, the products will be a great place to store tools and other things. You can place garden tools on the shelves: pots, tools. PVC products look unusual, neat, and do not require additional decoration. Plastic shelves and racks do not harm the health of others, they are durable and environmentally friendly.
Making a wall lamp from flexible metal-plastic
From polypropylene fittings you can make an original sconce on the wall, with its help you can highlight interior items or zone a room. For this purpose, water pipes of small diameter or ventilation scraps with a diameter of 25 cm or more are used.
In the first case, the pipe can be bent under high temperature using a hair dryer. The pipe heats up to 140°C and becomes flexible. At this moment it can be given any angle. After cooling, the shape is retained. After this, an electric wire is pulled through it, plastic couplings are attached under the dies for fastening to the wall and under the cartridge. The blank can be painted in any color in accordance with the design of the room. This wall lamp would be appropriate in a country house, garage or workshop.
You can make an elegant night light from a ventilation pipe. To do this, a pattern is applied to its walls according to a template, which is then cut out using a drill with drills of different sizes. Using abrasive tips, you can remove the outer layer according to the drawing and get the effect of translucent illumination in places where the walls become thinner.
The edges of the sections are treated with a thin layer of silicone, and the desired tone is applied to the workpiece. After this, wires, a socket and an LED lamp are installed inside the pipe.
How to make a table lamp from couplings?
The table lamp algorithm is universal for most of this type of design.
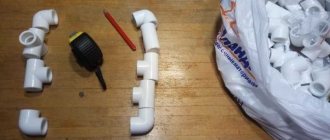
To make a 2-arm lamp you will need:
- 2 cutting cable 70 cm long;
- fumlenta;
- adapter-tee with thread – 1 pc.;
- double curved fitting – 2 pcs.;
- direct coupling – 2 pcs.;
- adapter with thread for cartridges – 2 pcs.;
- base die;
- metal paint;
- electric base – 2 pcs.;
- incandescent elements – 2 pcs.;
- acetone;
- electrical plug and switch.
All parts are pre-degreased and wiped. The cable is pulled through fittings and adapters, after which they are connected into a single structure and coated with paint. When the workpiece is dry, electrical accessories are attached to it according to the diagram. Parts that cannot be fixed with threads are installed with “liquid nails” glue or sealant.
For such a lamp, it is appropriate to use light bulbs with twisted bulbs, which create a “candle in the wind” effect.
List of required materials
Based on the simple design, I needed:
- metal spray primer;
- decorative spray paint (I wanted to take one with a craquelure effect, but settled on black, and I can’t remember the name);
- degreaser - 1 piece;
- sandpaper - 2 different coarse grits and 2 more pieces of 1000 grit;
- twisted wire loft 2x1.5 - 3 meters. Sold by the meter and used for installing indoor wiring in loft and retro style rooms, I took the darkest one I had, which is brown;
- lamp socket E14 ceramic - 1 pc. You can also buy plastic with an E14 or E27 base, it all depends on what you plan to do and the method of attaching it;
- fabric lampshade - 1 piece;
- electric plug - 1 piece;
- switch - 1 piece (attached directly to the wire);
- cast iron corner with internal thread 1⁄2 - 3 pcs;
- cast iron coupling with internal thread 1⁄2 - 2 pcs;
- galvanized threaded fitting, length 60 mm, external thread 1⁄2 - 2 pcs;
- plug external thread 1⁄2 nickel-plated brass - 1 pc.;
- corner, external thread 1⁄2 nickel-plated brass - 1 pc.;
- nipple 1⁄2 external thread, nickel-plated brass - 2 pcs.;
- We buy a thread locker at an auto parts store. There are several types of them and they differ in the degree of fixation. I took the blue one - according to the seller, it allows you to disassemble the structure without much effort.
This small design was chosen based on the fact that this lamp should sit on the bedside table, and therefore it should not be bulky.
It is worth noting that the lampshade adds some zest to the interior of the cottage living room. The selection of ready-made lampshades is quite large, both in color, texture and material.
The lamp also looks good in the bedroom. The main thing is to choose the power of the light bulb so that the light does not cause discomfort to the eyes.
Making a lamp from water pipes with your own hands
By adding pieces of plumbing fittings of equal diameter to the design, you can adjust the height and width of the lamp. The pipes are attached to couplings, and fittings for lighting elements are installed at their ends. The fastening can be installed either sequentially or using a tee.
The process is reminiscent of assembling a children's construction set and allows you to make different types of lanterns:
- wall sconce;
- floor lamp;
- table lamp;
- chandelier;
- Street light.
Adjustable Table Lamp: Initial Manufacturing Process
This DIY pipe lamp is distinguished by the fact that it can be adjusted in reach and height. Many replacement parts are available to find at home, so it is also economical and also custom.
Materials used:
- Bicycle star.
- A pair of metal pipes with a half-inch thread (length - 450 mm).
- Flange.
- Fitting.
- Two elbows at 45 and 90 degrees.
- Two ¾ copper tubes.
- Socket.
- Polymer bushing.
- Electrical cable.
The bicycle sprocket will serve as the base. Holes for the flange are drilled in its center, after which it is painted. Then an iron pipe is screwed into the flange. The upper part of the element is attached to the base of the lamp, and the second part with a larger diameter is installed in such a way that a sliding effect appears. This will allow the upper part of the structure to be folded down by moving the top tube.
The process of making a lamp from pipes in steampunk style
The word steampunk comes from the English steam, which means “steam”.
The concept of “steampunk” is broader than a design direction: it is an entire philosophy in art and a subculture with its own trends in clothing, painting and cinema. Moreover, all items of this genre exist in 1 copy, because they are made by enthusiasts, and not by workers at industrial enterprises.
The basis of the design are the details of the mechanisms:
- hinges;
- levers;
- valves;
- gears;
- chains;
- aged wood;
- pieces of old pipes;
- parts of clock mechanisms;
- Edison lamps;
- pressure gauges from steam engines.
They allow you to experiment endlessly with lamp designs. This could be a pendant chandelier made from scraps of water pipes, a futuristic table lamp in the form of a flask screwed into a water tap, or a floor lamp made of brass wire.
The manufacturing process takes from 30 minutes to several weeks, if the desired color must be achieved through the process of natural oxidation of the metal.
Now on the vaporizer market there is a whole sea of a wide variety of devices - complex and simple, powerful and not very powerful, expensive and cheap. However, it happens that you want to try to do something yourself, especially since in theory the principle of operation of a vaporizer is quite simple. In fact, what is so difficult about simply heating raw materials to produce light vapors?
Yes, it’s quite possible to make a vaporizer at home; for this you can use a small soldering iron and a hair dryer, but if you don’t go deep into the complexity, then the simplest device can be assembled from a light bulb. It will serve as a kind of housing for the device, but you will need an old-style lamp, and not modern energy-saving types. Moreover, it’s worth looking for a 100-200 Watt lamp, it has better glass and maintains a higher temperature. It should also be transparent, not matte, in order to control the evaporation process.
In addition, the following will come in handy: - a knife and scissors, that is, a cutting tool; — 1 or 2 tubes, ideally made of glass; - cap from a plastic bottle.
First, the central contact and the entire inside of the lamp are removed from the bottom, although you need to work carefully, trying not to break it or damage the base. Carefully clean the edges of the base so as not to cut yourself later. We select a lid of suitable size for it and make one or two holes in it for one or two tubes. If you decide to make a vaporizer with one tube, then the lid should not fit tightly so that there is at least a minimum air flow.
Well, after this, the raw material is loaded inside the lamp, and very, very little, and with a lighter or candle we heat the flask from below. It is advisable to keep the fire source at a distance and not let it smolder, but simply heat it until barely noticeable vapor appears. That's all in general, you'll agree, it's quite simple.
Why is even the simplest vaporizer better than a homemade one? It would seem that one made at home gives the same effect and is received for free, but is it worth it? Of course, you can find more advanced versions of homemade products, but why bother and make something out of things that are not intended for this. The vaporizer was created through trial and error, and no homemade product can offer such functionality and safety.
In addition, most vaporizer models can be taken with you; they support different modes and evaporation intensity. Proven modern technologies do not allow raw materials to smolder, but rather evaporate them, which is more beneficial. Achieving such an effect at home is extremely difficult. Of course, at first the price of these devices was relatively high, but now a budget option can be purchased at a very affordable price.
Read also: All types of medical certificates
Drug treatment version of banning incandescent light bulbs))
The other day, a colleague who works with drug-addicted patients shared the news. It turns out that drug addicts have adopted the fashion of “sticking around” with the help of ordinary ones. incandescent light bulbs. They use “putty” to do this, sealing the connection between the bulb and the light bulb base. After some processing (I will not reveal the technology, so that the temptation to “try” does not arise among the curious teenage group of readers), hallucinogenic substances are extracted from this substance and used in smoking mixtures to get a “high” and watch “cartoons.” At the same time, MoSC gradually burns out like a light bulb. However, this is the ultimate goal of drug use - to get rid of your own brain ((
So the humorous version of banning incandescent light bulbs because they are used by drug addicts has some basis. Or should we introduce the sale of light bulbs strictly according to prescriptions/coupons/permits and only for adults?)) What might be next on the list to restrict free sale due to the risk of use by drug addicts? You will be surprised, but this is ordinary. mayonnaise
The Proza.ru portal provides authors with the opportunity to freely publish their literary works on the Internet on the basis of a user agreement. All copyrights to works belong to the authors and are protected by law. Reproduction of works is possible only with the consent of its author, which you can contact on his author’s page. Authors bear responsibility for the texts of works independently on the basis of the rules of publication and the legislation of the Russian Federation. You can also view more detailed information about the portal and contact the administration.
The daily audience of the Proza.ru portal is about 100 thousand visitors, who in total view more than half a million pages according to the traffic counter, which is located to the right of this text. Each column contains two numbers: the number of views and the number of visitors.
© All rights belong to the authors, 2000-2019. The portal operates under the auspices of the Russian Writers Union. 18+
Recently, a comrade proposed the topic of creating simple devices from simple items bought in a simple store, and a topic that is currently relevant just popped up for me - vaporizers, since nothing is really written about them and there is a lot of incomprehensible stuff.
Read also: Respiratory system of rifleman reviews
Then there is a lot of bukof..
The most sensible information on this matter was on Wikipedia, although the segment where the manufacturing instructions were described was later lost somewhere... but I saved it, so take a look: (and if you’re not interested, scroll right down)
Although vaporizers are commonly bought, they are often made out of household items. For example using a lightbulb is commonly used because it is very simple to make.
To make a lightbulb vaporizer, the following steps must be used:
Materials: Lightbulb, scissors, pen, gloves, empty water bottle, knife, hockey tape or injury tape, screwdriver, and salt;
Directions 1.) First, put on saftey gloves, then use your scissors to cut off the small black circle, which is located on the bottom of the bulb
2.) Use a knife to expand the hole as large as you can without damaging anything
3.) The inside part of the bulb should be extracted, and the small parts of the inside of the bulb should be removed
4.) Pour about 1/2 cup of salt into the bulb, and swish it around in the bulb to remove the white coating
5.) Cut a water bottle to only have the drinking end, very close to the top
6.) Take the cap of the water bottle and push a hole in it with the screwdriver (use a hammer to create more force)
7.) Cut off two ends of a pen and take the ink sticks out of the pen
8.) Force the hollow pen through the whole in the bottle top
9.) Now screw the cap back onto the cut bottle
10.) Now push the lightbulb to the bottle cap, so the bottle top is facing out
11.) Use tape to seal the light bulb and battle cap contraption together
12.) Now that these are attached you should be able to unscrew the cap and pour you desired substance into the lightbulb
13.) Now screw the cap back on and hold a lighter about an inch under the bulb
14.) While the lighter is lit do not suck in, just cover the pen hole
Read also: How to make coconut liqueur
15.) When a desired amount of vapors (looks like smoke) is in the bulb inhale
In short, you don’t need to burn, but warm.