We make the collet chuck required for the engine shaft
- AliExpress
- Made by hands
- Goods for home and garden
In general, I needed a collet chuck for an excellent high-speed aircraft engine, with an electromagnetic brake. Its flange is also very convenient for creating a spindle on a small CNC machine for an electronics engineer. Well, the weight is 0.5 kg. To buy offline, it’s hard to find the right diameter so that it’s of high quality, and the price is reasonable. I remember a long time ago I took about 500 rubles at the radio market. Now it will probably be 2 times more expensive.
Instructions for making a drill
When making small things, decorative and other products, a compact drill, engraver and similar hand tools are very convenient, and therefore remain indispensable in the home workshop. Using such equipment, you can drill and process products made of wood, plastic, textolite and other durable materials. You will also need a micro drill when drilling printed circuit boards.
To manufacture drilling equipment, select a suitable chuck and a body of suitable dimensions (plastic container). To rotate the work surfaces, you need to select an electric motor and a power supply, for which you can disassemble an old hair dryer or other electrical equipment.
To learn how to make a mini-drill, just read the following list of recommendations:
- You first need to secure the cartridge to the electric motor shaft, for which you will need adhesive materials (“cold welding”), which ensure a reliable connection between the metals.
- You will have to work very carefully, since the adhesive materials set quickly, which eliminates the possibility of eliminating errors and correcting the connection.
- After fixing the cartridge, it is better to cover its surface with a special heat-resistant glue, which will ensure the density and strength of the connection.
- On the case you need to make a hole in advance for the switch (preferably a push-button one).
- The drill will be more functional with a reverse mechanism, which is implemented using a six-pin switch.
- When connecting to the power supply, you will need a 12 V power supply or a battery (2-3 pieces) with a similar voltage.
Having assembled a mini-drill into a single structure from individual parts with your own hands, you can turn on the power and do test drilling.
From an old tape recorder
Another basis for a mini-drill can be the electric motor of a well-worn player or tape recorder that rotates a CD disc. The standard motor of such devices runs on 6V voltage, so you may need to additionally purchase a portable power supply or build a mount for a battery or battery.
Using two soldered wires, the power unit (via a switch button or without it) is attached to the motor and fixed with tape or glue in a homemade tube-shaped housing. After this, the same collet chuck is attached to the shaft, which holds the drill.
How to choose a collet chuck
The first thing to consider when choosing such a chuck is its attachment to the spindle. You can install it directly on the spindle, using a suitable adapter or by screwing it onto the thread.
Then we look at the dimensions of the flange. The diameter of the connection band or the parameters of the Morse taper will help here. If you do not know these indicators, then you will not be able to select the required cartridge, and therefore, there will be no opportunity for high-quality operation of your tools
And, finally, the number of jaws in the tool. Depending on the purpose of the tools, they can have from two to six jaws in a set. You can also choose a tool made of hard or soft alloy, for certain types of work, with different technical characteristics.
Connecting equipment to pedal control
It is not always convenient to select and manually control the operating speed of new equipment. You can add a pedal to your grinding machine as follows:
- disassemble the body;
- disconnect the electronic control;
- connect the motor directly and make the connection to the pedal.
However, you need to know that not every model is suitable for connecting to a new device. Incorrectly selected equipment will lead to engine overheating and failure. All this can end in a short circuit. It is not difficult to calculate the required power; each product has a label indicating the nominal parameters.
To calculate the optimal pedal load current, you need to divide the mixer motor power by the network voltage. In our case it is:
- 700 watts / 220 volts = 3 amps.
If the pedal has a factory rated load current higher than 3 amperes, it is quite possible to make such a connection.
This device is suitable for sharpening household knives, meat grinder knives, household tools, and can be used for polishing wooden, plastic or metal objects.
Figure 4 Foot pedal motor control frees your hands
Method No. – Idea with antiperspirant
Well, the last version of a homemade mini drill that we would like to provide to readers is using a cassette motor and an antiperspirant container. The advantage of this model is that it is controlled by a separate on/off button and has a convenient housing. Such a homemade product will be powered by a conventional power supply, which must be selected based on the characteristics of the motor.
So, first you will need to prepare the following materials:
- motor from a tape recorder;
- suitable collet with drill;
- used antiperspirant;
- RCA socket for connecting power and a mating part for it;
- power unit;
- switch from an old carrier.
The first step is to make a mini drill according to the instructions provided at the very beginning: place the collet on the shaft and secure it with bolts. Next, the motor housing is installed in the antiperspirant. As you can see from the photo, the dimensions are ideal for installing the part. If the motor has free movement inside the housing, secure it with electrical tape and hot glue.
After this, you need to drill a hole in the top cover for the exit of the collet or the drill itself. At the same time, you need to make a hole in the bottom for the power connector. Using a utility knife, you also need to cut out a window for the switch, then solder all the elements of the circuit in series and install them in a place convenient for you.
Review of various creation ideas
Second option - Self-assembly + (2 videos)
If the task is to make a miniature instrument with your own hands, then you must initially select an electric drive. A motor from various devices - a printer, an old cassette recorder, or from an ordinary children's electrified toy - can be used as an electric drive.
Depending on the power of the electric motor, you can build a mini grinder in two directions. The first direction is to use a network power source. For example, from an old mobile phone. The second direction provides for a completely autonomous model consisting of a motor that will be powered by batteries or accumulators.
The difference between the two directions is in the design of the case. In the first case, space will only be required for the electric motor, and in the second, a battery compartment will need to be installed.
It is very convenient to use a piece of PVC pipe for the body. If its diameter is slightly larger than the diameter of the electric motor, then electrical tape can be wound onto the motor. You can secure the engine using a glue gun.
As plugs, you can use plugs that are placed on PVC pipes during transportation and storage. It is necessary to make a hole in the front plug for the motor shaft, and in the rear plug for the power wire. The power connector and switch must be secured to the housing.
The ideal option would be to attach some kind of collet clamp to the shaft. This will allow you to use standard burs, drills and non-standard mini cutters and discs. If installing a collet clamp does not work, you can connect the shaft and cutting tool using a double contact from an electrical block.
In a similar way, you can make a case for a mini angle grinder with autonomous power supply. Only after installing the engine in it, it is necessary to install the battery pack. The battery wires will be connected through a switch mounted on the case.
In both cases, on mini grinders you can use both homemade tools and standard industrial ones - burs and drills.
https://www.youtube.com/watch?v=8wihkqVEz1k
AlfFisher. My work: Homemade lathe chuck
Hi all. Today I will tell you how to make a 4-jaw lathe chuck, which allows you to reliably and safely
hold workpieces. Moreover
for its manufacturewill not need
complex equipment.
A drill and a jigsaw are enough.
This cartridge is an analogue of my metal cartridge: =
It's just made from plywood. The only metal parts in this chuck are the bolts (jams), nuts and fasteners. Of course, a plywood chuck will be inferior in rigidity to a metal chuck, however, the clamping force of such a chuck is quite sufficient. The basis of the cartridge is a plywood faceplate 30 mm thick, glued together from 3 layers of 10 mm plywood. Plywood fasteners 3 are mounted on the faceplate 4, which hold nuts 5, and cam bolts are screwed into them.
The nuts are held in their sockets using plates 2, tightened with M8 - M10 bolts.
| Rice. 1 Chuck with plywood faceplate. |
I chose exactly this method of fixation (without additional keys, pins, etc.) since I do not use extreme forces when tightening the bolts,
in this case, the nuts will simply come out of the clamps. But if you wish, you can make 2 cuts on the nut and move the fastening bolts closer to the thread axis:
| Rice. 2 Nut with cutouts. |
Cams (bolts) shown in Fig. 1 made using a metal lathe. Of course, cams of this shape (with two protrusions and a center) hold the part better. But you can make cams using improvised means, using only a drill and an angle grinder. To do this, you will need to fix the drill on the table and clamp the bolt into the chuck.
Next, turn on the drill and install a small-diameter circle on the angle grinder to make a sample at the end of the head Fig. 3. Then, using a drill clamped in a screwdriver or in a hand vice, drill a hole for the center.
| Rice. 3 Radius sampling |
Now all that remains is to make a center from a suitable rod, gluing it into the cam using a “thread locker” (Loctite)
| Rice. 4 Center in cam bore. |
Well, that’s actually all the technology is. Like and ask questions :).
alfisher.blogspot.com
Replacing the blender blade
As for the blender knife, it is unlikely that you will be able to sharpen the blade at home by hand. Buy a new one, there are 3 scenarios waiting for you:
- Firstly, the knife is sold as a separate spare part. In this case, remove the old one. An old, clean towel will help. Wrap a rag around the blender blade and unscrew it from the spindle. Please note: the thread is left-handed, so you need to twist it in the opposite direction than traditionally. It happens that the knife is mounted using several nuts. A wrench and pliers will help you remove the accessory from the blender. The bowl has been removed from the output shaft, the plug has left the socket. The rotating blade of the blender can easily disfigure your fingers, and it will be difficult for doctors to put them back together. It happens that the knife is sold together with the oil seal, change both parts.
- It happens that to dismantle the knife, it is necessary to disassemble the blender bowl. A rare case. Replacement takes place using the described method; take the trouble to update the oil seal covering the spindle.
- Finally, it was discovered that the bowl was not removable. See how to proceed. For such blenders, you will have to change the bowl along with the knife and seal.
Designation of collet chucks
The designation of a collet chuck with an outer cone, intended for fixing a tool with a cylindrical shank, in the drawing is as follows.
Image No. 2: Collet for a universal machine with a cone number 50, diameter under the shank (d) 12 mm, length 90 mm
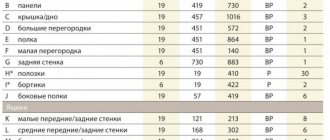
The table below shows the standard dimensions of collet chucks, which are important to take into account in the calculations:
| Cone designation | D | d | l, no more |
| 30 | 31,75 | from 2 to 12 | 90 |
| 40 | 44,45 | ||
| 50 | 69,85 | ||
| 30 | 31,75 | from 10 to 25 | 100 |
| 40 | 44,45 | ||
| 50 | 69,85 | ||
| 30 | 31,75 | from 15 to 40 | 110 |
| 40 | 44,45 | ||
| 50 | 69,85 |
Current GOSTs
The main current standard related to this type of equipment is GOST 26539-85. It introduces the characteristics and markings of the 7:24 external taper collet chuck. And the Resolution of the USSR State Committee on Standards No. 5943 gives the following recommendations:
- graphic designations of supports, clamps and installation devices (including collet chucks) used in technical documentation;
- To display supports and clamps, solid thin lines are used (GOST 2.303-68).
General information
The chucks are divided into two main groups according to the method of mounting on the machine:
- threaded connection with the machine;
- using a cone that matches the mounting hole for cone fasteners in the machine.
These features also determine the differences in their internal structure. The outer Morse cone indicates that there is a conical structure inside. The self-clamping chuck must comply with the standards in the regulatory documents in terms of the size of the internal cone. The marking has instructions on GOST, taking into account which the cartridge is made. The main parameters are indicated in the 1979 document; further parameters may have minor deviations in the tolerances of the lower limit of the drill clamp and radial runout.
Their choice is determined taking into account the need for different types of holes, the holder itself and ease of use with quick tool replacement. Morse taper, types of sizes for possible clamping from the smallest drill diameter to the largest , the presence of a key or locking and fixing ring in the design for each standard size are indicated in GOST 8522−79.
The design is:
- with or without a nut fixing ring;
- with clamping nut;
- with a key.
Regulatory documents do not limit the improvement and modification of external forms; the most important thing is that the main parameters correspond. This makes it possible, when choosing a replacement sleeve or drill, to achieve the most precise fastening of the drilling tool. This is the only way to avoid violating the permissible radial runout . A discrepancy between the chuck and the drill cone leads to an increase in error, which negatively affects the final result of the work.
Drilling chucks are:
- precision;
- quick-clamping (self-clamping);
- quick-change;
- three-jaw.
Alternative options
A mini-drill in the body of a ballpoint pen is a model whose assembly does not require large expenses. For construction you will need:
ball pen;
- miniature drill with the required diameter;
- hot glue;
- a strong pin-shaped stick along the diameter of the hole in the handle body. At the end of the pin there should be a cross, crossbar or “drum” that will ensure rotation of the stick in the body.
It is advisable that the body be made of metal or durable plastic, since it will bear the load when the pin-stick rotates inside the structure.
In order to make a dremmel, all elements are removed from the body and a drill is attached to the “writing” end instead of a rod. This is done so that part of the drill goes inside the body and is fixed with glue on a pin, which is inserted into the body from the bottom side until the rotary part stops. For greater reliability, the drum can be mounted on the body so that only the pin and the drill mounted on it rotate.
Another original option is an old hair dryer. Removing the heating element from it will not be difficult for the master, and the power of its motor, at 1500 - 1800 rpm, is enough to perform the main rotational operation.
Finally, in another mini-drill model, which can be made in a home workshop, the body is a socket from a regular incandescent lamp. Its size is just enough to mount an electric motor inside. Hot melt glue or “cold” welding are suitable for this. The power supply is placed separately, for example, in a thick plastic jar for medicine or even soap bubbles.
The wires or cord are brought out through the cover and fixed to the cartridge using a soldering iron. There may also be a switch on the cover, then the wiring wires are first connected to it.
Thus, both an experienced craftsman and a beginner who has minimal skills in working with wires and electrical equipment can use the methods presented above to make a mini-drill on their own at home.
A compact tool created with your own hands will replace an expensive industrial analogue and, if handled correctly, will cope with the tasks assigned to it and will last for a long time.
Jaw chuck for micro drills as an alternative to collet chucks
In order not to think about how to make a collet chuck or clamp with your own hands, you can purchase a jaw chuck to equip your microdrill. This clamp is an analogue of the jaw chucks used to complete conventional electric drills, and works on a similar principle. When the movable holder on the body of such a device rotates, the cams with which it is equipped move and thereby ensure reliable fixation of the tool.
Miniature jaw chuck ensures rigid fixation of working attachments
A wide variety of inexpensive jaw clamps are available today to equip micro drills. The vast majority of their models are fixed on the drive motor shaft using a threaded hole on the side of the mounting part, into which a screw is screwed. Rotation of the cam clamp cage, depending on the specific model, can be done either manually or using a special key, which is necessarily present in the factory kit of this device.
Purchasing a jaw chuck is a good opportunity for little money to equip your power tool with a universal clamping device that is easy to use and provides reliable fixation of working attachments. The main thing you should pay attention to when choosing is the material from which the main working elements of the clamp are made. If you choose a chuck whose jaws are made of durable high-carbon steel, it will last much longer and will provide precise fixation of the tool being used.
Hand blenders
Hand blenders often use commutator motors; motors can operate powered by direct and alternating currents. In simple models, power buttons and brush contacts are available. For spark extinguishing, capacitors are attached near the rotor. Let's say more, in addition to capacitors, varistors short-circuit voltage surges, protecting the windings against combustion. In the simplest models, thermal fuses are placed among the turns. If it burns out, the components should be replaced with new ones. The circuit is used in motors of commutator and asynchronous types, transformers. Repairing blenders with your own hands requires knowledge of the unwritten basics of electrical engineering and electronics. Let’s deal with the basics – knowledge – today.
Internal structure of hand blenders
Commutator motors are equipped with stabilization circuits, but the simplest blenders are devoid of any frills. Varistors form an important component of many devices; they protect more than just motors. In switching power supplies, high-frequency generators are switched off due to overload and the current is closed to the fuses. The result is that the protection is triggered. The fault is identified by replacing the fuse with a light bulb: on - turn off the power, continuing to troubleshoot.
The simplest commutator motor is formed by a pair of stator windings and a good bunch of rotor windings. Under the brushes there is a drum, divided into sections. Each pair of opposing contacts is equipped with a closing coil. To make sure the blender is working properly, ring each one by rotating the shaft by hand. Bearings are often considered the weak point. There are two nodes - anterior and posterior. The lion's share of the load falls on the latter. HADO is used for lubrication. After application, the composition causes the formation of a ceramic film, which temporarily improves glide while protecting the surface.
In hand blenders, such solutions are used reluctantly, the switching element gets very hot, and there is simply nowhere to place a huge radiator. However, using simple speed adjustments will make the owner’s life much easier.
Underwater reefs identified:
- Sudden changes in voltage consumption require filtering (jumps) along the power circuit and cause sharp changes in the external network. The effect is noted when operating from a generator.
- Speed regulation is a valuable quality, but if the power increases sharply when kneading the dough, the blender will be snatched from the hands of the owner; It is more useful for calm women to buy a blender for home, which produces constant power regardless of the dish being prepared.
In advanced models, the blender device is supplemented with speeds. More often we see individual buttons that press continuously, forcing the engine to work. Done for a reason. The developers realize that a weak female hand gets tired quickly, therefore, the key will most likely be released before the engine burns out. The adjustment technique is often not particularly complex. The output voltage is removed by paired secondary windings of the transformer. There is a change in speed.
Blenders often burn if varicaps protect against power surges; thermal fuses protect the equipment against overheating. An element with a response threshold of 120 degrees is installed in the power circuit. Sometimes a thermal fuse is placed between the turns of the motor (mentioned above). The switching power supply operates according to an ordinary circuit. At the input, the voltage is filtered by capacitors, chokes, resistors, and the signal passes through a high-frequency power transistor (even two). The process is controlled by a microcircuit generator that supplies voltage to the control gate. At the output, the voltage is filtered if necessary, and less often rectified.
A frequent breakdown is winding burnout. Try to buy products equipped with fuses. Make your life incredibly simpler.
Brushed motors are controlled using a voltage cut-off circuit when a smooth transition is required. In the case of two or three fixed speeds, there is probably no need for such a scheme. The sine wave along the positive and negative half-waves is truncated to a certain area. The effective value decreases, naturally causing a decrease in the revolutions of the commutator motor shaft. As already mentioned, kitchen appliances are often equipped with trivial controls. It is unlikely that repairing a Vitek blender will require in-depth knowledge of circuitry.
Let us add that reusable thermal fuses have been observed that, after tripping after a given period of time, restore the circuit. Others are designed for 100 cycles of operation. Decide for yourself whether the operating resource is sufficient relative to your own view of the device. Let's list what can break (power supply):
- filters;
- diode bridge;
- transformer;
- generator;
- key transistor;
- rectifier output diodes;
- varicaps;
- circuit breakers.
Repairing blenders yourself will require knowledge of basic electronics. Nothing complicated, based on requests in the comments, we will create a topic describing the topic of power supplies. Anyone who is in the know can repair a blender on their own without any problems.
How to make your own cartridge
For work on wood, soft metals and plastics, and home production of printed circuit boards, a low-power mini-drill made by yourself is suitable. The easiest way is to equip it with a ready-made mini-self-clamping mount made from a pen or pencil. But if you don’t have any at hand, it’s not at all difficult to make a mini-collet with your own hands. Required: soldering iron, 1 mm thick steel wire, solder.
- a spiral is rolled from the wire with a diameter equal to the diameter of the electric motor shaft and the drill with which to work;
- the spiral is soldered, high quality connections are ensured by soldering flux or KFET;
- the spiral is put on the shaft and the mini-collet is ready.
Video about how a qualified metal turner made a self-clamping chuck with his own hands:
A collet chuck is a special device used for clamping a tool when performing turning, milling, drilling and other operations related to the processing of metal workpieces based on the technical specifications (sequence of operations, processing technology, attached sketch of the product).
Scope of application
The mini drill is widely used to perform various tasks.
- Creating holes in plastic, circuit boards and other objects
. Of course, the device will not be able to drill through thick iron, but it will be strong enough to make a hole in a sheet up to one millimeter thick. - Screwing and unscrewing small head and thread screws
. Such fasteners are found mainly on automatic machines (switches), electrical wiring panels, office equipment, as well as in small, low-power electric motors. - Equipped with special attachments, it can be used as an engraver or grinder
; for this, spherical attachments with a rough working surface are placed in its cartridge. During rotation, the nozzle processes the part or applies the required pattern.
To improve the result and not overheat the surface, it is advisable to use an oil emulsion that minimizes the friction force.
These are the main areas where a mini-drill is used, but, in addition to them, it has found extensive use in everyday life, for example, for processing (cleaning) two objects made of plastic or glass that are being glued together. When preparing the joints, both products are cleaned, after which the surfaces are adjusted so that the pieces are closely adjacent to each other.
Do-it-yourself drill for small jobs
The drill has long ceased to be an exclusively professional dental instrument. Today, a drill with a flexible shaft is actively used to perform small decorative work, grinding, polishing, and cutting various products.
You can make a rotary drill with your own hands, similar to a mini-drill.
At the same time, it should be taken into account that for high-quality work of the homemade product you will need a fairly powerful motor. So, an 18V motor from a screwdriver is perfect for powering drills. The easiest way would be to make an engraver from an old blender.
To make a drill you will need:
- Disconnect the top part of the blender from the working part;
- Using a utility knife, remove the rubber cover on the button and use a screwdriver to unscrew the bolts located under it;
- Using a screwdriver, from the side of the power cable, pry up the top cover of the case and carefully remove it;
- Remove the circuit connected to the power cable from the blender body;
- Remove the plastic part located above the rotator from the housing;
- Remove the plastic tip from the electric motor shaft;
- Measure the diameter of the shaft with a caliper (if you don’t have one, a ruler will also work for this purpose);
- Clean the electric motor housing from oil and degrease its surface using an alcohol wipe;
- Place a collet chuck of the appropriate size onto the shaft;
- Replace the power button with a push mechanism that controls both turning the device on and off;
- Assemble the blender.
The hand drill is ready! Such a tool will be powered via a power cable with a plug. You can power the tool with batteries, but then the batteries will have to be changed or charged from time to time.
Options for homemade drilling machines
A full-fledged drilling machine can be made from a used car steering rack. According to its dimensions, a frame is made on which the electric motor is mounted. An engine from an old washing machine is perfect. The transmission of rotation is carried out using a belt drive. It is better to use a pulley with several grooves, this will allow you to regulate the speed, thereby working with material of different hardness. Do-it-yourself additive machines are made using the same scheme.
You can drill holes of small diameter on a small machine made from the frame of an old microscope, on which an electric motor from a tape recorder is installed. It is guaranteed to cope with thin sheet material. The only difficulty in making such a device is the difficulty of choosing a suitable cartridge.
A drilling machine in the workshop will make life much easier for the home craftsman. Even a simple homemade device made from an electric drill can open up new horizons for him. Drilling wood, metal, making grooves, making furniture - all this will become possible with a homemade drilling machine.
DIY mini drill
To carry out drilling work on miniature workpieces, engraving machines, the so-called “dremels,” are usually used. The name comes from the name of the most popular manufacturer. This is a convenient hand tool, but its cost is usually high (especially for high-quality branded products).
The most common area of application is amateur modeling and production of printed circuit boards. As a rule, an industrial design is redundant for such work: some of its capabilities are not in demand. Therefore, home craftsmen often create instruments with their own hands.
Materials and tools for assembly
Before starting work, first of all, you need to draw up a drawing of the drilling machine with your own hands. After this, the stage of preparation for work begins. At this stage, the necessary materials are purchased and the tool for the job is selected.
The choice of tool is important, so when assembling a classic machine you will need the following:
- Circular saw or machine.
- Electric jigsaw.
- Grinder with grinding attachment.
- Drill.
- Grinding machine.
- Hand tools as needed.
After the tool is ready, we proceed to the selection of material and blanks. Here are the parts needed for manufacturing:
- A sheet of plywood, at least 15 mm thick.
- Docks for the hull.
- Roller guides.
- Fasteners
- Sleeve.
- Making a vice for a drilling machine with your own hands
The working surface is intended for the drilling process and for fastening all other parts. The handle is made with a spring mechanism and allows you to easily lower the drill when drilling. Using these instructions, you can easily select parts for your future machine.
Types of chucks
Lathes, drilling and milling machines for metal use chucks with mechanical or manual clamping with 2, 3 or 4 jaws. Self-centering 2-jaw machines are used in the manufacture of shaped castings. In 3-jaws, hexagonal and round blanks with a Morse taper are attached. And when processing asymmetrical, rectangular or rods, 4-jaw sets are more convenient.
All clamps are divided into the following categories:
- lever;
- collet;
- drilling (quick-clamping, BZP);
- wedge;
- hydraulic chucks;
- membrane;
- thermal cartridges;
- 3-jaw;
- 4-jaw.
Self-clamping drill chuck is used on universal or special lathes. Their design allows for a stronger transfer of clamping force with a torque significantly lower than spiral chucks. The structure is made of hardened steel and the set of cams is made of the same metal.
The delivery set includes a set of mounting bolts and cams. Often the cartridges that come with a drilling or milling machine break quite quickly, as they are made of low-quality metal. A qualified turner can make a new one with his own hands.
Special jaw: a modern replacement for any collet chuck
Today, anyone can easily purchase a special cam for any type of drill. This can be done both in construction boutiques that offer equipment for sale, and on the Internet (at auctions such as Ebay or Amazon).
Such a cam will be screwed onto the threaded connection of the shaft of the rotating device. The more tightly the cam is twisted, the more firmly it compresses the drill placed in it.
The price of such a device does not exceed sixty rubles. Purchasing a cam will forever save you from searching for suitable collets for using various drills.
Of course, it is better to purchase a cam made of high-carbon, durable steel. To tighten it, it is recommended to use a special wrench, which is included in the kit.
- Find out how to connect a photo relay to lighting fixtures in an apartment.
- Recommendations regarding the choice of a construction lamp, without which an electrician will not be able to carry out effective work on site - https:///kak-vyibrat-stroitelnyiy-fonar/
Technical consultant Anton Pankratov will demonstrate the technique described above for making a homemade collet chuck in a video:
The main advantage that a self-assembled mini-drill differs from standard products is its compact size and the ability to obtain electrical equipment without significant expenditure of money, effort and time. It is easy to make such a homemade instrument at home, since it does not require special skills or highly complex devices. To get a high-speed drill or other devices for making crafts, a home craftsman only needs to be comfortable with a screwdriver and pliers and be able to perform simple technical operations.
From a fishing reel
A simple and effective version of a mini-drill can be constructed using the reel mechanism of an ordinary fishing rod as a drive. Such a tool will work like a drill, in which the torque of the handle is transmitted through a gear.
The craftsman will only need to dismantle the line spool of the reel and trim the axle, and then in their place weld or glue a collet or chuck from a non-working drill in which the drill will be fixed.
The model is mechanically driven, does not require power, and is driven manually.
Do-it-yourself flexible shaft for a drill
If you need to transfer the rotation of the motor of an engraver, drill or bur to an attachment, then you will need a flexible shaft. This device consists of a wire enclosed in flexible armor, twisted in several layers, and
can significantly expand the functionality of a rotary instrument. You can assemble the flexible shaft yourself.
For this you will need:
- Brass tube;
- Two M4 threaded bushings;
- Electrode shaft (diameter 5 mm) with M5 thread;
- Adapter from internal thread M5 and external thread M8 to 0.75;
- Mini quick-release chuck;
- Clamp made from an M12 bolt drilled along the axis;
- Protection for connection.
Assembling the flexible shaft. To do this, insert an electrode shaft into the brass tube and put M4 bushings on both sides of the tube. On one side of the tube we screw an adapter onto the sleeve, and onto it a mini-cartridge. On the back side of the tube we place a clamp, with which we connect the shaft from the electrode to the flexible one. For convenience, you can sand down the heads of the screws on the clamp. We put a special brass protection on the clamp and secure it with fasteners. We isolate the connection. The flexible shaft is ready! For convenience, a clamp with a plastic handle can be placed on the cartridge side.
Features of desktop blenders
Hand-held devices are deprived of an important ability - to prepare cocktails that people like. You need a countertop blender with a spacious bowl. At the bottom there are cross-shaped sharp knives, the junction is a real disaster. The motor rod is capped by a relatively soft lower half of the drive coupling. A ring formed by dense rubber has teeth arranged around its perimeter, forming a crown. Each fits into a corresponding recess in the upper coupling. The lower half is devoid of rigid threads. Remove the part with a screwdriver and a hammer, hitting the teeth, setting the rotation clockwise; craftsmen recommend carefully prying the coupling, pulling it up. Then the new part is screwed counterclockwise. The thread, of course, is left-handed.
The coupling is a critical part that protects the engine of the unit against overloads. When the knives jam, you will hear a clicking sound. Be too lazy to turn off the blender - after waiting a while, the lower half of the coupling will become inoperable. There is a problem with the upper half: the seals sometimes leak. Seeing an unfavorable situation, get ready to disassemble the device. Using your hands, unscrew the knife assembly from the bottom of the bowl. The rubber gasket is set aside.
The upper half of the blender coupling is screwed onto a rod fitted with knives, the thread is left-handed. The direction of rotation of the knives is recognized by the front sharp edge. Using a large adjustable wrench, grab the blades through the towel (fabric) at the position of the rod, and twist in the opposite direction of rotation. A pair of rubber sealing washers, one steel, are attached under the upper half of the coupling. Both varieties are removable, the knives can be removed from the assembly. If necessary, the blender blades are sharpened. Please note: there is an additional double rubber seal on the inside of the bowl. Replace parts with purchased ones or those that you managed to get. Reassembling the blender is carried out in a similar way. Remember: the coupling thread is left-handed. Tighten the nut, avoiding the knives. Be careful not to get cut by the blender blade. The motor in the base under the bowl is not much different when compared with manual models, but it can withstand loads better. Often speeds are 2-20, the simplest programs for food processing are included.
Blenders are often sold as part of food processors. The knife shaft is driven through the gearbox. The protection against switching on is mechanical, the drive shaft (cutting, shredding) is located separately, and does not rotate simultaneously with the side one. The rotation speed of the blender is, of course, higher; an overdrive gearbox is required.
The presentation is completed today. The presented models are similar to each other. Knowing how to repair a Tefal blender, a master can repair a Scarlett blender. Further, manufactured household appliances are similar to each other. Readers may not have heard, but 85% of washing machines, like blenders, are equipped with commutator motors. Consequently, the repair follows the same pattern. In our case, speed control is provided by the design. The advantages of commutator motors in terms of adjustment over asynchronous motors are obvious. In the latter case, the stator winding is often divided into a fixed number of sections. This method easily reproduces three speeds; the layout is not suitable for advanced solutions. The washing machine has 3-5 speeds only on the spin cycle. A circuit containing a power switch with a current cut-off mode simply suggests itself.
This is why blender repairs are similar. Connoisseurs of coffee grinders, drills, screwdrivers, mixers and even vacuum cleaners will perform the necessary sequence of actions without noticing a change in the type of equipment.
This is how you repair a blender yourself. We recommend repairing the device under warranty; disassembling an expensive model only if necessary. Consider the approximate limit of cheapness to be 3,000 rubles.
Typically, we throw away kitchen appliances that are no longer functional. Take, for example, a blender that is past its expiration date; there's really no other way for him other than to be trashed. However, don't throw away that broken blender! This DIY project is for you if you think that throwing away broken equipment is a waste. In the video below you will learn how to use an old blender and repurpose it to become a decent drill or even an engraver! The blender motor is powerful enough to handle light drilling and engraving jobs, so instead of throwing away your blender, why not repurpose it so you can still use it for your future projects? Watch the video of Evgeniy Budilov and how he successfully turned his old kitchen blender into another useful tool. Don't throw away your blender! Repurposing old products at home is one way to save money, in addition to reducing waste in the environment and giving you an extra tool to use at home. The video below shows how you can turn an unwanted blender into a mini electric drill or engraver. Many thanks to the creator of the video “Evgeniy Budilov”.
In this video you will see how an old blender can make a decent engraver, drill or hand drill machine. As shown, the motor is powerful enough to handle wood, plastic and soft metal. RPM figures are nothing short of good... Budilov
We don’t always throw things away right away; many people keep irons, hair dryers, and other household appliances in their closets. And it is quite possible to find an old one, maybe even still working, which has been replaced with a new modern unit. And it’s good that you haven’t thrown it away yet, because we’ve found some tips on what you can do with an old mixer for your home.
Figure 1 Don’t rush to throw away old things
How to make a dynamo from an old printer motor
A dynamo is a device that converts mechanical energy into electrical energy. The operation of the dynamo is based on the principle of electromagnetic induction. That is, an electric current arises in a closed circuit of a device when the flux of the magnetic induction vector penetrating the circuit changes over time.
In other words, a dynamo is the simplest direct current generator.
In everyday life, a dynamo can be used to charge audio and video equipment, a smartphone and other low-power gadgets (for example, fitness bracelets, tablets, a toy robot, etc.). In addition, the device is perfect for powering bicycle headlights, LED strips, hand-held flashlights and other devices powered by single-phase networks.
To assemble the homemade product you will need:
- Motor (electric motor) from an inkjet printer;
- Belt and gear from the same device;
- Handle with comfortable, non-slip grip;
- Two small wooden bases;
- Four 10,000 µF capacitors;
- Diode;
- Metal corners and fasteners;
- Wires and solder.
Making a dynamo is quite simple. To do this, you need to connect the capacitors in parallel, output the phase from the capacitors through a diode to the electric motor, and connect the zero of the capacitor through a jumper to the zero of the electric motor. Wires for connecting electrical appliances should be routed from the capacitor connected to the diode, observing the polarity. After this, you should place the entire structure on the base, fastening the electric motor to a second wooden plank so that the pulley sticks out of it. On the pulley side, place the gear with the handle and cover them with a belt.
Attaching the collet chuck to the machine and hand tools
The collet chuck is mounted and centered on the lathe spindle. Note that the diameters of the cartridges and methods of their installation are standardized. The most common spindle end designs include Type C and Type D (cam-lock) fasteners. Also, to install collet chucks, flanges and faceplates are often used, which are placed on the spindle.
Now we will tell you how to center a collet chuck on the motor shaft of a hand tool (electric drill). The adjustment is carried out in two planes, and first the runout is eliminated in one plane, then in the other. Work progress:
- Fix the drill on the table (in a lying position).
- Rotate the chuck until the desired pair of bolts is parallel to the table.
- Rotate the chuck 180 degrees and note the deflection of the chuck.
- Eliminate wobble by tightening and loosening a couple of screws.
Do the same with the second pair of screws. To make the deviation in two planes more noticeable, use a long drill.
Drill made from a toothbrush
At first glance, it sounds absurd. But we will talk about an electric brush, which has a completely reliable motor inside. It is enough to get to the steel shaft on which the gearbox with rotating bristles is placed, and the workpiece is in your hands.
The same collet chuck is put on the shaft, and batteries are installed instead of batteries. Or you can adapt a suitable mains power supply.
Drilling walls with such a device will not work, but holes in a printed circuit board will be easy. In principle, you can use any compact electrical appliance that has a conveniently located motor shaft. For example, an old electric razor.
Self-production
For working on wood, metal and plastics and for making a variety of printed circuit boards, a small drill is best. It should be equipped with a ready-made mini-clamp- type mount. But if you don’t have one at hand, you can easily make it yourself. Here you will need a soldering iron, millimeter-thick steel wire and solder. Next, the manufacturing process proceeds according to the following scheme:
- We roll the wire into a spiral. Its diameter must be equal to the diameter of the electric motor shaft and the drill with which it will be necessary to work;
- Solder the spiral. High quality is ensured by soldering flux or similar options;
- Then we put the spiral on the shaft - and the mini-chuck for our drill is completely ready.
Homemade collet chucks are perfect if there are no ready-made clamps for drills and if you have the appropriate skills to make such mechanisms yourself. They will also become indispensable in the household, when work with specific parts is required, and ready-made clamps may not be suitable for any specifications.
The collet is an important element in lathes of various modifications. With its help, you can carry out work on processing and milling metal and plastic parts. In addition, you can easily make it yourself using available materials . The variety of such mechanisms available today allows you to choose the optimal clamp model for your personal needs. It is also very important to take into account the method of attaching it to the spindle and the dimensions of the flange, since without them it will be impossible to select a collet. Have fun working with different types of clamps!
Method No. 2 – Use the reel!
Another original way to make a mini drill at home is using a fishing rod reel. In this case, the assembly technology is quite simple, but the principle of operation itself will be based on mechanical rotation, you will get a mini-hand drill
To make a device with your own hands you will need:
- spinning reel;
- a chuck from an old drill or a collet clamp of a suitable size;
- hot glue or cold welding;
- drill.
The assembly process is quite simple and consists of only two steps. The first step is to dismantle the spool with fishing line and cut off the remaining extra axis.
After this, the cartridge is glued to the remaining rod. You can do without a chuck and install a collet instead.
When the glue has hardened, you can check the finished mini drill. You can see all the assembly details in this video example:
How to make your own micro drill from a coil
Additional accessories
When turning thin-walled products or working with fragile wood, metal fastening rings are used. Having the skill of handling metal, you can make them yourself. Also paired with type C cams, screw inserts can be used that screw into a hole pre-drilled in the part. Chucks designed to solve specific woodworking problems:
- cam with independent adjustment - for eccentric turning;
- collet - clamps round workpieces when tightening the petals of a conical collet with a coupling nut. Has a small capture range;
- cylindrical - a tube with three or more threaded fasteners around its circumference; vice - for gripping rectangular workpieces. The parallel jaws are compressed by a screw;
- vacuum – for finishing. It works due to the difference in air pressure created by the pump;
- drilling – for fixing drills. Attached to the tailstock quill.
Set of driving cartridges MK2