Feather made of thread! Master Class
I also got the idea to make such a feather from threads. From white, red, black, orange, yellow... Oh, I’ll make it and use it somewhere. I don’t know where, but I’ll put it somewhere, such beauty will not stagnate!
And those on wooden skewers will be used for playing Indians)))
Well, let's begin!
We take wire, glue, thread (it’s better to take cotton, floss, for example), scissors. We cut the wire to the required length, this will be the shaft of the pen. Dip the thread into glue and wrap it around the wire.
Cut the threads to the required length.
And we tie each thread into a knot to the rod.
Dip the future feather into PVA or starch paste diluted with water.
Take it out and lay it flat.
It is advisable to place oilcloth to prevent the feather from sticking to the surface.
How to make feathers from threads
If you need feathers from exotic birds, you don't have to look for them in distant countries.
You can make these feathers yourself. Moreover, everything you need is available in every home! In this master class we will show you how to make feathers from threads with your own hands. For the base of the feathers we need wire. This can be any wire, for jewelry or for electrics, freed from insulation. Not the thinnest and not the thickest. We have a wire with a cross section of 0.6 mm.
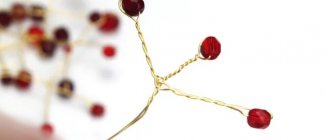
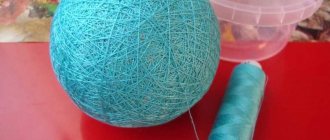
For the feathers you see in the picture, we used regular bobbin thread and floss thread (Fig. 1). In general, you can use any thread for feathers, depending on the desired result. For example, wool, acrylic, iris and others.
We made three different feathers. That is, the feathers themselves are made exactly the same, but their shape and color are different. By combining threads of different colors, you can achieve different results accordingly.
As for the auxiliary tools, we will need wire cutters, pliers, scissors, a ruler, a piece of cardboard, a comb, and one tablespoon of starch.
To create the plumage, we prepare a template from cardboard - a rectangle 9cm wide and 10-15cm long. Fold it in half. Our template is ready (Fig. 2).
We wind the threads on it - turn to turn (Fig. 3).
We cut the threads with scissors (Fig. 4).
We got these equal pieces of thread (Fig. 5). From these we will make that part of the feather, which is called the fan.
So, we have prepared everything we need and are starting to create the pen. Our finished feathers are 18cm long. Cut a piece of wire 18-19cm long. We wrap 3.5-4 cm of wire with thread in two layers - we wind the thread back and forth, starting five centimeters from the end of the wire. We tie the ends of the thread and cut them off, leaving the ends about 5 cm (Fig. 6).
Now we tie the pieces of thread (we took 2 threads together) with two knots onto the wire and move them to the end of the wire wrapped in thread (Fig. 7). The process is not fast, so you need to be patient.
When we have 12 cm of wire filled with tied pieces of thread, we compact them, moving them closer to each other. We cut off the excess part of the wire, leaving 5-6mm open ends (Fig. 8).
We bend these ends on both sides so that the threads do not fall apart. When pressing the wire between the pliers and the threads, you must place paper or plastic film so as not to damage the threads (Fig. 9, 10, 11, 12, 13).
Where to use these feathers
Even on their own, such DIY decorations look stylish. But how can you make this masterpiece visible to others? That's right, we will decorate clothes, bags and even accessories with feathers.
Oddly enough, feathers from jeans will look good with denim products. For example, you can decorate a jacket to simulate two wings on the back.
And if you want to create an unusual decor for your home in eco-style, take an ordinary piece of driftwood, tie it with thread and hang ready-made feathers on it.
And those who love collecting jewelry will love these DIY earrings.
Handbags with such decorations also look stylish.
Step-by-step plan on how to make a feather from threads with your own hands
To get started, it is recommended to determine what the decoration will be used for; its size depends on this. If this is a future brooch or hairpin, then 4–5 cm is enough, for a hat or bag – from 10 to 15 cm, for a fan – up to 50 cm.
- First you need to make a cardboard template. This is a rectangle about 10 cm wide and a length equal to the size of the future decoration. It is folded in half. Yarn is wound onto the template, preferably in an even layer. The thicker the winding, the more magnificent the “fan” will be . When the layer seems sufficient, you need to cut the threads along the template. You will get pieces of thread of the same length.
- Using wire cutters, cut a piece of wire equal to the length of the planned product. Wrap the piece of thread in 1 layer, fix the ends of the yarn on both sides with glue. It turns out to be a trunk.
- Tie cut threads one after another onto the prepared wire, starting from the base of the feather. The nodes need to be placed as close to each other as possible; the tighter the knots, the more impressive the feather will look. Both ends of the wire can be left uncovered with threads of 5 mm, or more, as required by the use of the pen. Bend them so that the threads do not slip and the feather does not fall off.
- When the feather is ready, you need to prepare a solution of starch. The instructions are usually on the package: 1 tablespoon of starch per 300 ml of water. First, stir the powder in 100 ml of cold water, pour this mixture into the remaining 200 ml brought to a boil. Stir until it becomes a jelly. If there is no starch, then thick sugar syrup will do .
- Place the pen on a flat stand. You can line it with plastic wrap to prevent it from sticking. For greater resemblance to a bird's feather, you can choose a slightly curved surface, for example, along a bottle or thermos lying on its side .
- Apply the starch solution to the surface of the product with a brush. Leave until dry.
- Remove the dried feather. Use scissors to trim the edges to give them the desired shape. The tip can be smooth or rounded. If desired, you can decorate the craft by gluing decorative elements - beads, buttons, sequins, or treat it with glitter hairspray.
DIY feather - 5 beautiful projects
A pair of hands is a beautiful and ideal instrument given to us by nature.
With its help, you can create completely unusual and unique things, which, at first glance, may seem absolutely useless, strange or unnecessary, but in fact turn out to be so cute and charming that all doubts about whether or not it was worth starting such a project are not only disappear, but also seem completely unfounded.
A DIY pen is a similar idea. On the one hand, it is not clear why this is needed at all and where to apply it. On the other hand, having started, done, implemented, in the process of work you fall so in love with what you create that you don’t understand at all how you could waste time and not start almost immediately.
A DIY feather is a wonderful decoration for anything! It can be used to decorate spaces and interiors, it can be used to coolly decorate gifts and surprises, it can turn into costume jewelry or handmade clothing items. In general, whatever one may say, this is a necessary thing, let’s do it!
How to make a feather with your own hands - 5 master classes:
Feather using macrame technique
The forgotten art of macrame, so popular in the 90s of the last century, is coming back into fashion again. Using this technique, you can create very, very interesting interior items - wall panels, flowerpots, curtains and furniture covers. In addition, this is an affordable technique for creating jewelry and jewelry. Feathers can decorate both your home and your personal accessories.
How to weave a feather using the macrame technique - master class from wonderwood
Feathers from old jeans
Do you have old, worn jeans at home? That's right, in every home you can find a pair of denim pants that no one wears or will wear, but for some reason no one throws them away. Thank yourself for your foresight and put the material to work - you can do very, very interesting things based on it. For example, absolutely elegant and stylish feathers!
How to make feathers from jeans - master class from Pillarboxblue
Polymer clay feathers
Polymer masses and light, almost weightless feathers are poorly associated with each other, however, with some effort and a certain level of skill, you can make absolutely beautiful products that - incredibly, but! - will look as airy as real feathers. Perhaps the first time you won’t be able to realize your plans the way you dream, however, with a little practice, everything will turn out great.
How to make feathers from polymer clay - master class from imaginecraftsblog
Paper feathers
We often underestimate paper as a creative material. It seems to us that if it is cheap and accessible, it is uninteresting and artisanal.
Meanwhile, from the simplest paper you can - and don’t even doubt it! - create unique and absolutely amazing things. The main thing is the desire to create.
Desire and faith that everything will work out works wonders, so don’t doubt it and at least try, it should turn out great.
How to make feathers from paper - master class from designimprovised
Bicycle tire feathers
A completely unexpected material for creativity, a bicycle tire is at the same time affordable and completely budget-friendly.
If you have never worked with such material before, do not rush to immediately take the feathers directly - cut off a small piece to try what it is all about, how rubber behaves under scissors, what the result is when choosing a particular cut width. Have you tried it? Then start creating feathers!
How to make a feather from a rubber tire - master class from chocolateandcraft
Source: https://labuda.blog/150024
How to make a feather from threads with your own hands
WHAT YOU NEED TO PREPARE:
- Thick threads (a thin cord will do);
- Scissors.
Let's start creating a pen
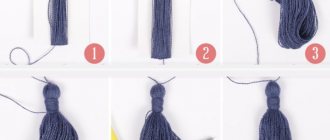
We cut a thread 20 cm long and lay it on the table with a fold in the center (see photo below). We also prepare two threads 8 cm long, bend each in the center and lay them according to the photo below.
One of these threads needs to be threaded into the loop of the other, the ends of the second thread also need to be pulled into this loop and tightened together.
We lay the next two threads below and tighten them in the same way, only on the other side.
According to this scheme, you need to create the required number of feather layers. Next, each thread of the feather needs to be unraveled so that the product takes on a magnificent shape.
At the next stage, we arm ourselves with scissors and cut the product on both sides, giving it the shape of a feather.
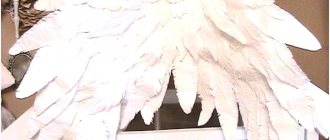
As a result of these manipulations, you get such a beautiful feather that will surely find a place in your home decor.
Features of paper feathers
When creating a pen from paper with your own hands, you should take into account some features in the work:
- In order for the finished craft to be more similar to the original, it is better to take as a basis a (real) feather of any bird, taking into account the shape, color, size;
- to create colored feathers, you should first paint the base in the desired combination of shades, and then make a blank;
- when making options for panels, it is enough to use one sheet of paper, on the underside of which a leg is glued;
- If the product will be provided for viewing from all sides in the future, then it is advisable to use a double blank, inside of which the leg will be fixed - in this case, the craft will be completely completed and neat.