Bad weather, when it snows or rains outside, is often accompanied by fogging of windows and mirrors and the formation of ice on them. Snow sticks, water partially freezes, which negatively affects the driver’s visibility.
And you need to constantly and very carefully monitor the road situation. The driver needs to watch not only what is happening in front of him, but also be aware of what is happening behind him.
For many, heated mirrors may seem like a practically useless solution. Others believe that they cannot do without it.
If the car owner is unlucky and does not have standard heating, you can always install the system yourself.
Why do you need heated mirrors?
Before installing an effective heated mirror on your car, it is worth talking about its necessity and benefits.
There are several reasons why car companies install these systems on many cars from the factory, and owners of old cars decide to install them on their own:
- Safety. This is the main aspect and the main reason. Heating provides a better view of what is happening behind, since the driver constantly uses the internal and external rear-view mirrors while driving. And if heating is not needed inside, then outside it is a necessity.
- Comfort. The driver will not have to be distracted by lowering the side window and wiping the mirror. Heating will independently remove water and dry out excess moisture.
- Anti-fog protection. During humid weather, condensation may actively form on the exterior mirrors. It blocks normal visibility.
Heating is needed to improve traffic safety and provide good visibility.
Alas, many older machines do not have this function from the factory. But there is a way out of the situation. This is a DIY system installation.
Types of heating systems
There are several types of systems that are installed on exterior mirrors. Each of them has its own characteristics.
The first versions of such units were extremely simple. An ordinary incandescent lamp was mounted inside the mirror. It turned on, heating occurred from the inside, which made it possible to melt the ice and partially dry the surface.
The modern heating method has changed, but the principle of organizing the system and its functions have not changed.
There are 3 types of exterior mirror heaters:
- Wire. Wire-based heating is quite common in cars. The heating element here is a tungsten filament. It is laid on a layer of insulation with heat-resistant characteristics. Current from the on-board network passes through the threads, which provokes heating and removal of ice.
- Printed conductors. Cars are equipped with printed circuit conductor systems, which are considered the most modern. You can easily buy such boards and install them yourself. You won't be able to make them yourself.
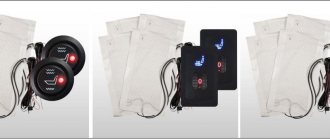
- Film. A special film heater has a corresponding base, inside of which there are heating elements.
Separately, it is worth highlighting lamp defrosters. This is a fairly outdated technology, but easy to implement. Mainly used by owners of old domestic cars. With minimal investment you can get good heating. It is enough to install and connect a small incandescent lamp of approximately 10 Watts into the mirror body.
How to install a ready-made kit
Not all motorists know how to install heated mirrors themselves, without having anything at their disposal. Not everyone can assemble a unit from scratch. But for such situations there are ready-made kits. All that remains is to install them correctly, following the instructions.
To organize heating for the side mirrors of a car with your own hands, you usually need to perform the following steps:
- remove the mirror assembly from the car;
- if the body elements are glued together, they can be heated with a hairdryer or filled with hot water;
- bolted connections are simply unscrewed with a suitable tool;
- the part is thoroughly cleaned and dried;
- the internal dimensions of the housing and the heater are compared;
- film heaters can be cut according to special marks;
- wire systems are laid according to the size of the internal space;
- the board will have to be selected to match the dimensions of the rear view mirror housing;
- the board is glued from the inside with heat-resistant glue;
- the films are fixed on the wrong side;
- Wires should be soldered to the contact thermoelements and brought out to the power source.
At this point, the installation of heated mirrors is almost complete. It is not difficult to do it yourself. But it is also important to connect the system for power supply from the mains.
Most often, the connection is made to the line that supplies power to the heated rear window. Some output a separate wire, connect a relay and its own fuse.
It's worth taking a look at the instruction manual. Many cars are equipped with heating from the factory, but it is installed only on expensive trim levels.
This allows, with more modest equipment, to use the factory connection circuits for a standard defroster by connecting a heating element purchased separately.
Electrical circuits and wiring arrangements are different on all machines. Therefore, there cannot be universal connection instructions.
Another option would be to connect a defrosting system assembled from scratch.
DVR without screen: choosing the best one, reviews
As for me, for independent implementation, films will be the simplest and most correct solution. Just keep in mind that there are 2 types of films for heating mirrors.
- Film resistor materials. Considered reliable, easy to install and effective. Installation is not much different from fixing boards. The film is attached to the back of the mirror using glue or double-sided tape. The kit already includes outlet wires that connect to the car’s wiring and the button is displayed on the panel in a convenient place;
- Simple films. No electrical connection is required here. This is an option for the lazy, since everything is done in a couple of minutes without much effort and dismantling the mirror. Such films, called anti-rain, are installed in several steps. First, the mirror is cleaned, the marks are checked, the label is separated, a film is glued to the center, air bubbles are removed and the top protective layer is removed.
With the second version of the film, we are not talking about heating, but about creating a special water-repellent layer. At the same time, the film works well, many who managed to buy it remain satisfied. Plus no work with connections, insulation, foiling, etc.
Have you used any heaters? How do you generally solve the problem of icing and fogging of the side rear view mirrors? Share your secrets and observations in the comments.
Thank you for your attention! Be sure to subscribe, leave reviews, and ask relevant questions if you have them!
Homemade heater
You need to do this kind of heating of mirrors with your own hands if you have certain skills and knowledge. Although assembling the heating system is not the most difficult.
Before you make a homemade heated car exterior mirror with your own hands, choose the appropriate type. Usually this is a simple incandescent lamp, or wire heaters.
Decide on the choice of system in advance, as this directly affects what materials and tools may be needed.
The lamp heating kit consists of:
- 10 Watt incandescent lamps;
- foil;
- wires;
- soldering iron;
- sealant;
- cartridge;
- heat-resistant material;
- assembly tools.
You can also assemble a heated rear view mirror in a car yourself using a wire system.
Here you will need:
- heat-resistant base;
- set of tungsten filaments;
- soldering iron;
- heat-resistant sealant;
- wires;
- Double-sided tape.
Which option is the most correct, everyone decides for themselves individually.
Having prepared everything you need, get to work. Here the procedure will be something like this:
- prepare the mirror for installation of equipment by removing and disassembling it;
- rinse and dry the body;
- lay a layer of heat-resistant material on the inside;
- line the top with aluminum foil of sufficient density (not ordinary food foil);
- if it is a lamp defroster, the cartridge must be installed so that after assembling the housing it does not come into contact with other structural elements;
- a light bulb is screwed into the socket;
- wires are soldered to the contacts with a soldering iron;
- insulation is performed using sealant and electrical tape;
- sealant seals the openings for wiring to power supplies;
- heating threads should be glued to the base;
- a layer of heat-resistant material is laid on both sides;
- Having received the heating structure, it must be glued inside the mirror body;
- contacts are connected to wires by soldering;
- the wiring is routed out through an existing or additionally made hole;
- All components are carefully insulated.
Procedure
Now you can begin installing the heater. First, remove the holder with the mirror from the case. On most cars, it is enough to pry it with a screwdriver or something flat from below and pull it towards you.
Based on the characteristics of the holder, we choose the method of fastening the wire. If the inner surface of the holder is smooth (as in the photo), then stick double-sided tape on it.
Then we lay a piece of wire on this surface. This can be done arbitrarily, for example, in a zigzag or something else. The main thing is to place it so that the thread covers as much of the surface of the holder as possible. In this case, the wire should not intersect anywhere. Scotch tape will hold the nichrome thread well.
If the inner surface of the holder has any protrusions or fastening elements, then it will not be possible to stick the tape. In this case, a soldering iron will help to secure the wire. Everything is simple here - we apply a nichrome thread to the surface and press it with a heated soldering iron. The plastic will begin to melt and the wire will sink into it. Once cooled, the plastic will become hard and it will hold the thread
But here it is important not to overdo it with heating the plastic, so as not to “push” it to the mirror. It is enough just to “drown” the wire in it a little and that’s it.
We recommend: Niva transfer case. Ways to eliminate vibration
In this way, we fasten the wire along the accessible surface of the holder without touching the fasteners.
When laying the wire, its ends should be placed towards the side of the holder that is closer to the door, and so that they do not touch each other. To these ends we solder terminals for connecting to the wiring or simply the ends of prepared wires. Then the resulting connections need to be insulated.
All that remains is to provide insulation. If the wire was secured with tape, then to insulate it you can simply stick several more layers of regular adhesive tape on top. This will provide thermal insulation and prevent the wire from peeling off and shorting.
As for the holder where the wire is secured with a soldering iron, you can simply fill the entire surface where the thread passes with sealant and wait until it dries. In this case, the fastening elements will not be affected, which will ensure ease of fastening, and the wire itself will be insulated.
Before installing the holder in place, we pull the wiring through the mirror body into the door, the wiring for powering the heaters. Only after this we assemble the mirror.


