In this article we will figure out how to make heated seats in a car. Let's look at what kits there are for installing heated seats, their advantages and disadvantages. This will help you decide which kit is best to choose for your car. The principle of operation of heated seats, the process of installing and connecting heating elements, and advice on proper operation are given here.
Heated seats are a good addition to a car, increasing comfort, and are installed on expensive cars or on any model as an additional option. If the vehicle is not equipped with heated seats, a kit for installing heated seats can be purchased separately. This can be either a soft substrate with heating elements inside, which is installed on top of the seat upholstery and connected to the cigarette lighter, or a kit for installation under the seat upholstery. In this article we will look at how to make heated seats using a kit that is installed under any seat upholstery (artificial, natural leather or textile). These are very thin heating elements, about 1.5 mm thick, which are not felt at all until they are turned on.
The content of the article:
- What types of heated seats are there?
- How does heated seats work?
- Preparing to install heated seats
- Removing seats and upholstery
- Installation of heating elements
- Connecting the heated seat wiring
- Assembly, installation and testing of heated seats
This article is of a general nature and will be useful as instructions for installing heated seats on any car. In the description of the installation kit you can read that it is intended for professional installation by an experienced specialist. However, the installation process is also accessible to a simple car enthusiast. It is important to carefully study the information provided in this article and do everything consistently and carefully. This can take several hours or two weekends, depending on the skills and efficiency of the installer.
What types of heated seats are there?
There are 2 types of seat heating kits: with a copper heating element and with a carbon fiber heating element (carbon fiber/carbon thread).
Seat heating kits are available in 12V and 24V versions.
Seat heating kit with copper wire heating element
A seat heater with a copper heating element is one long zigzag wire where one end has a positive polarity and the other end has a negative polarity, similar to the filament in a light bulb, which also gets hot.
Heated seats with a copper heating element have the following advantages:
- The copper heating element heats up quickly.
- Heated seats with a copper wire heating element reach a higher temperature than carbon fiber ones.
Disadvantages of heating with a copper heating element:
- The disadvantage is that the rapid heating and cooling cycles will thin the wire and eventually it will burn out.
- Since the copper wire heating element cannot be cut to fit any seat, there are no universal kits that will fit all vehicles. Various sets with a copper heating element are sold for specific car models, or for specific seat sizes. If you are going to install a seat warmer kit with a wire heating element, it must be designed specifically for your car model (to fit), or be smaller than the car seats.
Seat heating kit with carbon fiber heating element (carbon fiber/carbon thread)
The carbon fiber (carbon fiber) heating element has a honeycomb structure. Electrodes (positive and negative) are located at the edges of the heating pad, cells made of carbon fiber are located between these electrodes.
Sets with a carbon heating element have many advantages:
- The heating element of such heating is a carbon (carbon fiber) thread, which is much stronger than copper wire.
- The honeycomb structure makes the heating substrate very reliable. Damage to a single cell does not disable the functionality of the entire heating system.
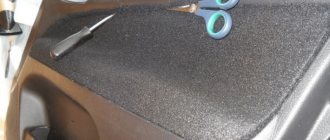
- Heating elements in the form of carbon fiber can be trimmed with scissors to reduce the size and fit it to a specific seat. This makes the seat heating kit with carbon heating element universal.
Disadvantages of sets with a carbon heating element:
- Carbon filament takes longer to heat up (about 1-2 minutes longer than a copper wire heating element).
- The carbon heating element heats up to a lower temperature (about 5 degrees lower than the copper heating element).
- Heating with carbon wire reaches the highest temperature of 50-57 degrees and the lowest 43-51 degrees Celsius, which is slightly lower than the copper wire element.
As can be seen from the listed advantages and disadvantages, heated seats with a carbon heating element are more preferable, as they are a universal and reliable option. In addition to universal kits, you can also find a seat heating kit specifically for your car on sale. It will fully match the seat configuration of your car, and will have detailed instructions for connecting to your vehicle. The universal kit may need to be adjusted to the location by trimming the lining with heating elements.
Built-in heating systems
Such systems are mounted between the upholstery of car seats and the foam filling. Covers and covers used to heat seats are less durable and convenient to use than built-in heating systems.
Structurally, they consist of multilayer mats with built-in nichrome spirals, or heat and carbon fiber heating elements.
Features of built-in heating:
- Models with nichrome spirals are cheaper than others, but in some cases their installation is difficult;
- Systems with heat and carbon fiber heating elements can be easily mounted on any seat, are easy to cut and bend, but their prices are higher than for other systems.
Advantages of built-in heating::
- Such systems are connected not to the cigarette lighter, but to a special power source that can be installed anywhere;
- Hidden electrical wiring;
- The design provides for heating of all seats, both front and rear;
- Reliability;
- The presence of a thermal relay ensures safe operation.
How does heated seats work?
- The technology used to operate heated seats is not too complicated. Heated seats work by placing heating elements under the car seat upholstery. Electricity is passed through the heating element. A heating element can be thought of as a resistor because electricity flowing through it receives resistance and produces heat.
- Like many systems in a car, heated seats are activated using a relay switch. A relay switch is a relatively simple mechanical trigger that allows a device to begin receiving power. A relay allows electricity to switch circuits from less power to more power.
- A thermostat is included in the heated seats as a precaution against overheating. If there is no thermostat, then after starting the heating element will continue to heat up indefinitely. This will cause overheating, which may cause fire, injury or damage to the vehicle. As a safety precaution, the thermostat serves as a heat limiter. Once the heating reaches the temperature set on the thermostat, power to the relay is turned off until the seats have cooled to a certain temperature. The thermostat controls both overheating and underheating. The control unit in the form of a mode switch controls the thermostat settings.
Nutrition issue
By the way, one more thing can be said about connection. Some users prefer to connect heaters not through the cigarette lighter, but through alternative sources. And there is a reason for this, especially if other consumers are connected to the only socket in the car (phone charger, recorder, etc.). Plus, if the power continues to be supplied even when the engine is turned off, as on some models, there is a chance that the battery will drain one day, especially if the heater is not equipped with a shutdown timer. So an alternative connection makes sense.
But in this case it is important to do everything wisely. Since heating is a powerful consumer (usually about 30-50 W), it should be powered from suitable sources, use the appropriate wires, fuses, and if you install switches, do not forget about the relay. If you lack knowledge in this matter, it is better to contact electricians who can provide correct and reliable power output.
Included in the package
- Pads with heating elements for the two front seats (lower and back), wiring and switches.
- Wiring includes thermostatic regulator, fuse holder with 12v fuse, and relay.
- Zip ties and adhesive tape.
- The kit usually contains everything needed for a standard installation of a heated seat kit. If you need any electrical elements (connectors, corrugation, etc.), you can purchase them in addition.
What tools will you need:
- Phillips and flathead screwdriver
- Ratchet wrench with head for removing seats
- Stripping pliers
- Crimper
- Nippers or metal scissors (for cutting the rings holding the upholstery).
- Bladed knife or scissors
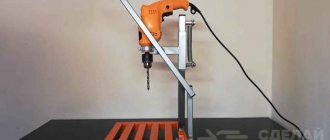
- step drill
- soldering iron with solder and solder paste
- marker
- scissors
- multimeter, 12V electrical tester with light bulb.
The photo shows a universal set of seat heating with carbon heating elements in the form of a cellular structure.
Such sets are sold both on Aliexpress and in other online and off-line stores. Additional accessories and installation kits are not required for most installations, but are used by professional installers.
The factory provides
The remaining options for resolving the issue are suitable in the case of those models where it is economically feasible and technically possible to replace the “original” seats with the same ones, but in a heated version. Yes, you just find used heated seats and install them. Of course, you will need not only the chairs themselves, but also wiring, as well as switches, then all this will need to be connected correctly, again not forgetting about fuses and relays. But first, examine the hardware to make sure everything will bolt on.
By the way, did you know that sometimes you can do without replacing seats, just by purchasing additional switches, perhaps by purchasing or replacing the cable cable. How so? It is no secret that in some cases, manufacturers immediately install equipment on the car, but connect it only when it is included in the package or paid for as an additional option. This happens, for example, with cruise control and the same heated seats. Most of the equipment is installed immediately, it simply does not connect: the buttons are replaced with plugs, and wires may be missing. So again: study the hardware for your car to understand what amount of work and set of parts will be required to get the desired option.
By the way, this also applies to other “warm” things, for example, a heated steering wheel, washer nozzles, even the windshield. If they are provided by the factory and are present in other trim levels, you can clarify what exactly is required to install them on your car. Although in this case, most likely, it is no longer possible to do without purchasing key components, which may not be cheap.
True, it is possible to reduce costs if you combine the implementation of heating with the replacement or repair of a part. For example, if you are going to replace the windshield anyway, maybe you can install it with heating? If the upholstery of the chair needs to be repaired, then the heating element can be installed. The same goes for the shiny steering wheel: since there are still thoughts about updating its leather braid, maybe you can come up with something with heating?
Preparing to install heated seats
First, disconnect the battery and let the car sit for 10-20 minutes to allow the SRS to fully discharge. Once the airbag (SRS) related connectors have been disconnected, the battery must not be reconnected until you turn on all SRS components again, otherwise an error will occur.
On vehicles with seats that have side airbags, you must follow a certain procedure before removing the seats to avoid an error (may not work on all vehicles):
- Turn off the car and leave the key in the ignition off.
- Disconnect the negative terminal of the battery and insulate it with a rag or plastic bag so that it does not accidentally reconnect. You must wait at least 5 minutes before proceeding to the next step.
- Remove the seats, disconnect the airbags, seat belts, power connectors for the power seats. Do not turn on the ignition while the seat is removed and all connectors are disconnected.
- When the seat is installed and screwed into place and all connectors are connected (the ignition key must be in the off position), connect the negative cable to the battery.
If the seats have side airbags, then before removing the seats you need to disconnect the negative terminal of the battery to avoid an error.
So, let's first look at the brief installation instructions, and then we will analyze each point in detail.
No way without a heating pad
Heated seats are not just a pleasant thing, but also useful, especially if the upholstery is made of leather or leatherette. The easiest and cheapest way to fill the missing option is to buy a heated cape, which will cost 25-50 rubles.
If the simplest options provide only one-stage heating of the pillow, then the more “advanced” ones will also warm the back, and you can choose one of several modes, and the heating will turn off automatically.
But capes also have disadvantages: whatever one may say, this is an alien element in the interior, which will differ from the seat upholstery in color and texture. It also degrades the quality of a well-designed anatomical chair, changing its profile and the friction properties of the upholstery. As a rule, it is difficult to secure the cape so that it does not move under you. And also these wires to the cigarette lighter...
If issues of aesthetics and ergonomics are not the last thing for you, you can think about alternatives. For example, buy an installation kit that is built into the chair. It will cost an average of 40-50 rubles. per seat (or $20-30 for a complete set on Aliexpress), but keep in mind that for installation you will have to remove the upholstery of the chair, and to carefully install the wiring and control panel, you will have to partially disassemble the interior. And if you do not do this yourself, but turn to specialists, you will further increase the cost of the whole undertaking. But the aesthetic result will also be appropriate.
Installation instructions:
Disconnect the negative battery terminal.
- Remove the seats from the interior.
- Remove the upholstery.
- Place a pad with heating elements on the back and seat.
- Identify a power resource that is capable of delivering a continuous 10 amps of current. Once you have determined the power resource, wire to that resource.
- Find a suitable location for the switch. Drill a hole in the desired location and pull a connector through the hole, then connect it to the switch and attach it.
- Place the seats in place in the interior and fasten them. Connect all connectors under the seat, along with the new heater connector.
- Connect the battery and turn on the ignition.
- Check heating in all modes.
Removing the seats
Disconnect the battery terminal before disconnecting the seat. Otherwise, the airbag error will light up (if the seat has one). Disconnect power from the seat last.
The seat is attached to the car floor with 4 14 mm bolts. The rear bolts are covered with plastic covering.
The plastic needs to be removed and the bolts unscrewed.
To make it easier to remove the seats, remove the headrests, seat belts and anything else that prevents the removal of the seats.
The removed seat is easy enough to stick out of the cabin. Start pulling it out from the back. Be careful as the metal runners have sharp edges that can damage the plastic. It is better to place the seat on some kind of elevation (a bench or table) to make it more convenient to work with it. Lay or place something under the seat as the metal runners can damage the surface. Remove all side plastic covers.
Our verdict
As you can see, there are various options for solving the problem, differing both in quality of execution, installation complexity, and cost. The best and easiest way is to install the “factory” one, but this is usually not cheap. But if the hands grow from the right place, then, after spending some time and effort, you can introduce heating without compromising aesthetics and reliability. The golden mean is installation kits. Well, for those who don’t want to bother, there are seat covers or steering wheel covers with all their advantages and disadvantages. But the abundance of options allows you to solve the problem, because the main thing is that in the end it will be warm. And it didn’t shorten...
Spare parts for passenger cars in the Automotive Business ad database
Removing the seat upholstery
To install a seat heater, you need to gain access under the seat upholstery and backrest. To begin removing the upholstery from the seat, you need to remove all the metal rings (hog rings) that hold the upholstery. Start at the bottom back of the seat. Turn the seat over for better access and start cutting off the rings with wire cutters.
The instruction manual, which can be purchased or downloaded on the Internet, may be useful during disassembly. The service instructions may contain information about disassembling the seat (removing the upholstery), the location of all fasteners.
When disassembling the seat, take a photo before you remove anything, so that later, when reassembling, you can look at the photo as a hint.
Once the edges of the upholstery are free, lift up the edge of the upholstery to gain access under the upholstery and begin cutting away the fasteners (rings) that secure the center section of the upholstery. Instead of fastening rings, you can use small ties. Clean the surface of the soft part of the seat, as the heating will stick to the seat.
The seat back may have 2 brackets for attaching the headrest. There is no need to remove them, as they will not interfere with the heating installation. They may also break when removed.
Installation of heating elements
- The installation process for the driver and passenger seats is the same, with the exception of one feature, which we will discuss below.
- After installing the heated seats, the only visible thing should be the heating mode switch.
- The heated pad is placed between the seat upholstery and the seat cushion.
- For the longevity and reliability of the heating elements, it is important that they are positioned correctly. Heating elements can only be placed in the middle of the seat. They should not go into the lateral support. Heating elements must be installed without folds.
- The pads can be trimmed slightly in length (the edge opposite the edge with the wiring) so that they fit well in place. Seal the edge using the adhesive tape included in the kit. You cannot cut the heated pad too wide. You can see how the long wire along the edges shows through - it cannot be cut. It is allowed to trim the edges a little to this wire. This may need to be done so that the heating elements do not come into contact with the side seams.
- Place the heating element intended for the seat and align it on the soft part of the seat. Use a marker to mark the location of the upholstery attachment points (rings or others). Using scissors, cut holes in the heating pad for these fasteners. Cut several strips of tape and cover the exposed ends of the heating elements around the hole.
The pad with heating elements has a double-sided adhesive tape for fastening under the upholstery, on the soft part of the seat.
- If the seat has recessed channels, then the heating element cannot be pushed into them. You need to cut out a heating lining for them in the places where the heating elements are located, having previously marked these places with a marker. After this, the exposed edges of the heating element must be insulated by gluing the tape from the kit.
- Never cut holes in an area covered with tape. Areas with adhesive tape should only be applied to a flat seat surface.
- The heating element should not touch any conductive surfaces (metal rings - upholstery fasteners, seat frame) to avoid a short circuit.
- The old, classic fastenings are metal rings, while the new, more modern ones are Velcro fastenings. For older fasteners, apply the included tape around the rod to insulate it. Velcro fastenings can be sewn onto the lining with heating elements. Thus, there is no need to cut heating elements for this type of mount.
- The soft seat backing must be clean before installing the heating.
- Peel off the protective layer from the back of the adhesive part of the heated pad and carefully apply it to the seat in the desired position. The strength of the heated adhesive joint is achieved by applying sufficient pressure. The heating element cannot be separated and rearranged after gluing.
Universal heating elements must be cut out at the places where the upholstery is attached. Exposed edges must be sealed with adhesive tape included in the installation kit.
- The passenger seat may have a sensor that responds to the passenger's weight to activate or disable the passenger-side airbags in the event of an accident (Occupant Detection System). After removing the seat upholstery, you need to determine whether there are sensors located on top of the seat. Toyota, Kia and Hyundai usually place the sensors on the surface of the seats (bottom). Honda usually places the sensors on the back of the seat. Heating cannot be installed on top of this sensor. In this case, you can install heating only on the part of the seat where there is no sensor (the back or vice versa, only the seat). Also made at the factory. When you buy a Toyota car with such a sensor, from the factory it only has heated backrests of the passenger seat. When you purchase a Honda, from the factory it only has heated seats, and the backrest is not heated (since the sensor is located on the backrest).
- It may be necessary to cut a channel for the temperature controller and wire with a knife in the soft part of the seat so that it is not noticeable after installing and assembling the seat.
Do-it-yourself seat heating
In order to make such a system, it is enough to purchase a heating cable. If you want to save even more, then before making heated seats yourself, you can prepare ordinary nichrome wire with a diameter of 0.5 mm. It will act as a heater. After this, all that remains is to sew it onto thick fabric and attach it under the chair. The operation scheme is extremely simple. In order to make a homemade burn you need:
- Divide 3 meters of nichrome into two equal parts (one of them will go to the “seat”, and the second will be needed for the back of the seat).
- Sew it on the fabric with a zigzag (you can use old jeans).
- Connect the completed structure to a 12 V power source.
How to check that everything is working? Very simple. To do this, you need to wait until the wiring starts to heat up. If the seat becomes warm after a few minutes, then everything is fine. If this does not happen and the wire continues to heat up, it is recommended to connect a thermostat or other device to measure resistance.
You need to be careful and avoid overheating. Otherwise, a fire may occur. That is why it is not recommended for those who are far from electricians to independently manufacture such elements.
You can also make the heating a little differently, using the same nichrome wire. Only in this case it will be needed a little more - 10 m. From nichrome you need to form 4 spirals at a distance of 40 mm from each other, curling the wire in “figure eights”. For convenience, it is better to wind spirals on nails driven into the board.
After this, the spirals are connected in parallel and attached to a dense mother (again, you can use jeans). At the next stage, all that remains is to mount the relay and connect the system to the power source.
Connecting the heated seat wiring
- It will be more convenient to conduct wiring from the seats to the power source when the seats are removed and located outside the cabin.
- The wiring must have a reserve length and be stretched so that you can change the position of the seat without any difficulties. The cable should not touch sharp edges, bend or be strained to avoid damage.
- Think about where you can hide the heating wiring. The most suitable places are under the center console, which is located between the front seats, under the carpet, at the edge of the footrest, or in the place where the threshold is located.
- Study the heating connection diagram, which is in the instructions, as well as the wiring diagram of your car. You need power for the heated seats that will turn off completely when the ignition key is removed.
Simplified connection diagram for seat heating
- The positive (usually red wire) can be connected to the positive ignition power supply.
- Securely connect the ground (black wire) with a small terminal to the body negative (ground). Improper grounding may cause the heating to not work.
- Select a suitable location for mounting the switch that is easily accessible to the driver and passenger, and ensure that there is enough space behind the switch for the wiring and switch bracket. This could be on the side of the seat, on the front of the dashboard, or on the panel that runs between the driver and passenger seats. Mark the location and drill approximately a 20mm hole to install the switch. The hole should not be too small or too large. This is important for securely attaching the switch. The most suitable place for the switch is on the plastic trim located on the side of the seat.
Select a location that is easily accessible to the driver and passenger to install the switch.
Third-party, but factory heating
Okay, but what if there is no standard heating? What to do then? Calm down, you can buy a third-party factory one, now our Russian one is highly praised and is designed for almost any car.
The main thing is to choose the size of the “seat”; it is important to understand that you do not need to heat the entire place, but strictly in the center, the side pillows (not installed for support).
The principle is also simple - we remove the standard seat covers, lay and glue the mats - then we put on the covers and connect them to the electrical system. You can do everything yourself, the kit costs about 2000 - 2500 rubles, for two seats (back + lower part). A short video, let's watch.
Assembly and installation of seats
To install the upholstery on the lower part of the seat, you can use vinyl ties instead of cut rings. Insert the zip ties into the places where there were rings holding the upholstery, but do not tighten them yet. Pull the zip ties through the holes. Starting at the back, connect the zip ties and tighten them a little so they don't come apart again. Once all the zip ties are connected, tighten them and cut off the remainder. To install the upholstery on the backrest, turn the upholstery inside out and begin to gradually tighten it, unrolling it down onto the backrest. Disassembling and assembling a car seat is also described in the article “do-it-yourself seat reupholstery.”
After assembly, the seats are installed back into the cabin, all connectors are connected, including the new one going to the heated seats. Next, you can connect the negative terminal of the battery, turn on the ignition and test the heated seats.
Bottom line
To sum it up, I personally advise you to do the internal heating yourself, if you haven’t found a standard one for your brand, take for example “EMELYA”, they are not expensive, the kit already includes buttons and regulators, and there are also instructions for connecting them yourself. So this is really a normal option.
That's all, read our AUTOBLOG.
Similar news
- Is there an automatic clutch? Let's look at the technical details...
- DIY brake caliper repair. Plus detailed video
- Spark plug gap. What should it be and what does it affect?