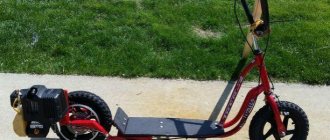
DIY garden wheelbarrow, photo
Many people are interested in the question: why do homemade workers make construction wheelbarrows if they are sold on any construction market and in construction hypermarkets? People are driven by two reasons:
- The flimsiness of factory-made garden and construction wheelbarrows.
- Poor design, which leads to increased stress on the arms and back.
MussechkaForumHouse participant
We bought a car at the store. She couldn't even stand digging a well. They carried earth on it. The metal of the frame was deformed. The wheel fell off. We need to buy a new one. In my opinion: homemade ones are stronger and last longer.
viktor50FORUMHOUSE user
About ten years ago I bought a well-made construction wheelbarrow. Its wheels are located approximately in the middle of the body. Most of the cars that are sold now are poorly designed. Their wheel is located closer to the front of the trough. When lifting a loaded wheelbarrow, half the weight falls on the user. And if the front body has a bevel at an angle, then even more.
Therefore, many people prefer to roll up their sleeves and make a garden wheelbarrow “to last forever.”
cgtwFORUMHOUSE User
I had a purchased car. She did not survive serious construction. I decided to make my own. The drawings were made at a military factory. The design is balanced. Low center of gravity, and the main weight of the load goes to the wheel. Therefore, you get much less tired when working. The metal used was second-hand. I took the wheel from a helicopter. It took only 400 rubles to make a construction wheelbarrow. I carry 50-60 kg on it. Nothing breaks. Driving it is a pleasure.
Why do tires and tubes fail quickly?
The main reason for failure is the presence of a small amount of natural rubber in the composition. Phenols are often used instead. With prolonged use or elevated temperatures, an unpleasant odor appears. At lower temperatures, the elasticity of the wheels is lost.
The choice of a garden wheelbarrow must be approached carefully, and special attention should be paid to the wheel, since it is this wheel that most often fails after 1-2 years. https://www.youtube.com/embed/IqRJN7ajmJA
In this article, the “How It’s Done” website will tell you how to repair the wheel of a garden wheelbarrow yourself.
If you have a different model of car, it’s okay, because their wheels differ only in size.
If the wheel of a garden wheelbarrow gets punctured, it is not necessary to change it entirely. You can simply replace the camera.
First, determine the wheel size using the markings on the tire and buy a new tube of the appropriate size.
Then remove the wheel from the wheelbarrow frame.
Unscrew all the wheel bolts and remove the old tube from the tire.
Make sure once again that the markings on the new tube match the markings on the wheelbarrow.
Then place the new tube into the tire and reassemble the wheel in reverse order.
The wheel with the new tube is assembled and can be installed back on the frame.
After that, use a pump to pump it up to the desired pressure.
Replacing the garden wheelbarrow wheel tube is complete.
To see clearly how to replace the camera in a garden wheelbarrow, we recommend watching the video:
Materials you will need:
- two wheels from a passenger car and one from agricultural machinery;
- engine from a walk-behind tractor (a 6.5 hp gasoline engine is used here);
- rear axle from a passenger car;
- profile pipe;
- sprockets and chains from motorcycles;
- steering wheel;
- tension rollers and timing belts;
- nuts, bolts and springs;
- sheet metal;
Here is a self-propelled cart shown in the photo.
The following shows the process of making the cart.
We take the rear axle from the car and shorten it, cut off the stockings and shorten the axle shafts.
The frame for the trolley can be welded from a profile pipe or channel.
We attach a large sprocket to the axle shaft of the differential drive gear. We will install the engine on the frame cross members and a corner welded to the left in the direction of travel outside the spar opposite the cross members.
We install a small pulley on the motor shaft, and put a belt drive on a large pulley with the required gear ratio. We attach the large pulley to the shaft on two bearings in a housing (a piece of pipe) welded to the stand. On the other side of the shaft we place a small sprocket, which we connect with a chain to the large sprocket on the axle shaft of the differential drive gear to ensure the desired gear ratio.
This design allows you to reduce engine speed and increase traction.
To install the steered wheel, we will make a narrow frame from a profile pipe and attach it to the side members of the main frame using two inclined posts and two jibs welded to the near cross member.
At the end of the narrow frame, from the inside we attach a wheel rotation unit, consisting of an axle, bearings, a housing and a paired sprocket. We weld a cross member with a stand to the lower end of the axle, at the bottom of which we attach the wheel axle. On the other side of the narrow frame, we mount a roller from below and connect it to the sprocket on the wheel axle with a chain. On top of the frame in the center we weld a steering wheel shaft rotation unit, at the lower end of which we attach a paired sprocket that presses the chain from the outside.
Now let's make a belt clutch. Under the lower branch of the belt, located closer to the wheelbarrow, we attach the tension roller to a bracket, which we weld to the axle and secure with two supports to the narrow frame. On the other side of the axle we attach the pedal, placing it on the left in the direction of travel. If you press it, the roller, rising, presses the belt against the pulleys and engages direct transmission.
Under the lower branch of the belt, located closer to the wheelbarrow, we attach the tension roller to a bracket, which we weld to the axle and secure with two supports to the narrow frame. On the other side of the axle we attach the pedal, placing it on the left in the direction of travel. If you press it, the roller, rising, presses the belt against the pulleys and engages direct transmission.
Between the wheels we create a support for a rotating frame from a profile pipe, which can tilt forward. We attach to it a container made of sheet metal and thin profile pipes with three vertical and one inclined side at the front.
Well, the self-propelled wheelbarrow is ready to go! The trolley is very convenient and easy to operate, watch the video:
Homemade author: Ildar Sunnagatulin.
How to change a wheel: detailed instructions
A broken tire is usually indicated by extraneous noise from outside, as well as a loss of speed and deterioration in controllability. If the car pulls to the side, and you have to make an effort to keep it on the road, then most likely there is a puncture on one of the front wheels. If the rear of the car starts to skid, then the problem is there.
When this happens, you will understand exactly what is going on. Don't panic under any circumstances. Level the car and, gradually reducing speed, pull over to the side of the road.
Park on the side of the road
You can’t continue driving with a punctured tire, but it’s also not a good idea to stop in the middle of the road. Therefore, do not be afraid to drive a couple of tens of meters and choose a flat, dry place on the side of the road.
It is best to stand away from moving traffic so as not to provoke an accident and risk your life.
Drivers of cars with a manual transmission must engage first gear, and owners of automatic transmissions must move the lever to the parking position (P).
And in any case, you need to put the car on the handbrake.
Set up a warning triangle and have your tools ready
Once you park your car in a safe place, be sure to turn on your hazard lights and install the warning triangle located in the trunk. In populated areas it is placed 20 meters behind the car, and on the highway - 40 meters.
There, in the trunk, find a spare tire and a jack with a wheel wrench. Usually the manufacturer places all this in a special niche under the floor, which can be reached by lifting the bottom panel.
It is good if you have a pump and a pressure gauge with you to check the pressure, as well as wheel chocks. And, of course, gloves won’t hurt, since you’ll still have to get your hands a little dirty.
Remove the wheel
Having taken out all the tools and the spare tire, place them next to the broken tire and ask all passengers to get out of the car. Even if there is severe frost or heavy rain outside, safety comes first.
Despite the handbrake and the gear being engaged, before installing the jack you need to additionally secure the wheels using stops. However, any stones or pieces of brick will do for them.
https://www.youtube.com/watch?v=R06Vi_carR0
If you need to replace the rear wheel, stops are placed on both sides of the front wheels, and vice versa.
Now you can start removing the wheel. First, release the disc from the plastic cap and use a wheelbrace to loosen the bolts. To move them, you will need a lot of force, which can be provided with the weight of your body by simply pressing the key with your foot. There is no need to completely unscrew the bolts: just unscrew them one turn.
After this, you need to jack up the car. Under no circumstances should you install it anywhere. Especially for these purposes, there are small reinforced places on the bottom, which are usually located behind the front wheel or immediately in front of the rear. The manufacturer designates them using triangles or cutouts at the bottom of the thresholds. If the weld is covered with plastic pads, they will be interrupted at the jack installation points.
Place the jack under the bottom and begin to turn its handle clockwise. Be sure to ensure that the jack rises smoothly and does not tilt.
If, under the weight of the car, the lower leg of the jack goes into the ground, you need to place something like a piece of board or brick under it.
You shouldn't raise the wheel too much. It is enough to stop 5 cm from the ground. After this, you can completely unscrew the bolts and remove the broken wheel from the hub. It’s better to slide it under the car as insurance, and put the bolts somewhere on a cloth so they don’t get lost.
Which option to choose
It is best to use a device with an industrial motor as an auxiliary transport. For example, a self-propelled trolley TS 350, photo. Unlike low-power Chinese self-propelled vehicles, the “Lunokhod”, as its owners affectionately call the car for its appearance, has a whole bunch of advantages:
- High load capacity, 450-500 kg of bulk cargo fits into the body;
- Six-wheel suspension design, providing high cross-country ability and maneuverability;
- Powerful UMZ-5B engine of 5 hp. and relatively low fuel consumption - 1.5-2.1 l/h.
The car has established itself as an indispensable self-propelled vehicle. Six wheels with all-wheel drive provide excellent stability even on extreme off-road conditions. The alignment of the trolley is done quite competently; the suspension design ensures uniform adhesion of all wheels to the ground. The design of the TC350 supporting frame allows the use of a plow or snow shovel. In general, most modern Chinese and European walk-behind tractors look rather pale against the background of the Lunokhod.
Among the shortcomings of the TC350, experts note the imperfection of the chain transmission and the lack of a cabin on the self-propelled trolley. But considering that this is a home transport, the presence of a roof is not so important. Problems with transmission can be solved by installing a more powerful double-row chain with a link pitch of 19.5, but with the purchase of a trolley, things are much worse. Most fans of this type of technology do not have the opportunity to buy a new self-propelled cart with an engine.
For your information! Production of the Lunokhod TS350 by the Tyumen Engine Plant has been discontinued.
On the secondary market, you can buy a similar self-propelled cart for 1.5-2 thousand dollars, with a badly worn engine. It is clear that any equipment, and especially a cart, can be repaired and restored, but it is often cheaper not to deal with repairs, but to make a self-propelled cart with your own hands.
Is it possible to install a tube in a tubeless tire on a car?
There is a lot of debate online about whether a tube is installed in a tubeless tire and what the consequences of repair are. Some users claim that in this case the car behaves unpredictably. Others insist that the repair method is acceptable.
Experts are also divided into two camps. On the one hand, installing such a wheel will cause damage to the car. Opponents don't see anything wrong.
Before drawing conclusions and making a decision, it is necessary to carefully weigh all the advantages and disadvantages of the procedure.
Installing a camera in a tubeless tire: pros and cons
The procedure has clear pros and cons that indicate the feasibility of repair. Advantages.
- If a tire goes flat due to an uneven rim edge or sand at the joint, the tube will maintain pressure normally.
- If the seal of the cylinder is broken (cracks in the discs, pores or punctures that do not heal), an additional rubber cylinder will hold the air inside.
- Riding on such a design is more comfortable than on a dokatka. This makes it possible to use it as a spare tire.
Flaws.
- Tubeless rims are designed for wide nipples. When installing the camera, you need to mount an additional insert or the nipple will tear out.
- The unsprung weight of the vehicle increases. The additional weight of the wheel negatively affects the durability of the bearings, arms and ball joints. Shock absorbers also wear out faster.
- The inner part of the tubeless is characterized by a reduced cylinder size. Due to the limited space, the camera does not expand completely. There are also ribbed parts here. The inserts rub the surface of the camera.
- Air-filled cavities form between the tire body and the tube. Bubbles migrate, which throws off the balance and interferes with the car's handling. The result is uneven wear and possible vibrations in the steering wheel.
- Possibility of disassembly when entering turns at high speeds.
Thus, as an emergency option, the method is suitable for carefully covering 100-200 km. With constant use, it is recommended to change the wheel.
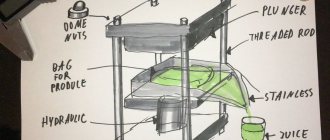
Installing a camera in a tire yourself
Self-installation in a tubeless camera is done like this.
- Disassemble the old set.
- Remove the nipple from the socket.
- From inside the tire, remove all inserts, stickers and elements that could damage the rubber.
- Fill the camera into the cylinder.
- Secure the nipple from falling through.
- Seal the wheel.
To eliminate the air bubble, some experts recommend slowly inflating the slope and at the same time lowering the nipple slightly into the socket.
The technique is relevant for all wheels, regardless of size, be it 14, 15 or r16.
Is it possible to put a tube in a tubeless tire on a cast wheel?
Installing a camera in a modern cylinder on an alloy wheel is unacceptable. The exception is the need for short-term rolling within 200 km. or use as a spare tire.
The need may be caused by damage to the rim or tire itself. The leak is corrected by inserting an independent pressure-holding cylinder.
Is it possible to put a tube in a tubeless tire with a side cut?
While receiving a side cut, some motorists place their tubeless tubes inside and continue driving. Whether it is possible to repair rubber in this way depends on the case.
If the slot is wide, the chamber can be squeezed out by internal pressure. This may cause the wheel to explode while driving. Simultaneously with the application of the “fur coat” - the reinforcing element, the operation of the cameras is possible.
Installing a tubeless tire on a regular rim
Modern discs are equipped with special annular protrusions - humps. The parts are designed to hold the tire cord pressed.
If the tire continues to be used, due to the absence of a retaining element, it will quickly be torn off its seat.
Will a camera help if there is a hernia on the wheel?
The formation of a hernia on a tire indicates damage to the inner layer of the cord. If the fabric or metal base is destroyed, further use of the product is strictly not recommended.
Main stages of work
At the next stage, we cut off a small piece of the construction angle and drill mounting holes in it. Then we attach it to the gear motor housing.
After this, we install the previously removed wheel back onto the cart, having first put the chain on the sprocket. We mark and drill holes in the trough for mounting the gear motor.
The author uses a battery from a screwdriver as a power source for the electric motor. We connect the battery to the gear motor and place it in a bag, which we attach to one of the trolley handles.
You can watch the video on our website for details on how to make an electric drive for a garden cart with your own hands from a windshield wiper gear motor.
Rate this post
[Votes: 4 Average rating: 5]
Basic information
Before carrying out work on the manufacture of a trailer, it is necessary to develop a detailed action plan and adhere to it.
The work plan for the manufacture of a trailer for a walk-behind tractor looks like this:
- At the preparatory stage, it is necessary to familiarize yourself with the structure of the mechanism and analyze its functionality depending on the power of the walk-behind tractor.
- Make a design sketch. A trailer diagram drawn up yourself will greatly simplify the work.
- Calculate the dimensions of the cart for the walk-behind tractor.
- Design a drawing of the trolley, which includes the main components, parameters and dimensions of the parts.
- Plan the operating principle of the main and additional mechanisms, think through ways to connect all the components and parts, and their functioning.
- Prepare a list of necessary materials and tools.
- Start the assembly and finishing process.
Depending on the ability to transport cargo, trailers are divided into 3 types:
- A simple 1-axle attachment for walk-behind tractors with a lifting capacity of up to 70 kg. Its design is simple and inexpensive.
- Universal cart with a carrying capacity of up to 110-120 kg. Often used in households.
- Carts for walk-behind tractors with a carrying capacity of over 120 kg. Such mechanisms are designed to move heavy loads, so they have a more complex design, which increases the cost of materials for the frame and cladding. The functionality of this technology is expanding.
Based on these parameters, a material is selected based on strength for the frame and finishing of the mechanism.
Drawings of a homemade construction wheelbarrow
Those who are interested in homemade products will find the drawings of a two-wheeled car made by VicktorVR useful.
To make it you will need:
- Profile pipe with a cross-section of 25x25x2 mm, length 6 m.
- Profile pipe with a cross-section of 15x15x1.5 mm, length 6 m.
- Galvanized metal sheet.
- Two threaded rods M10 or M12.
- M10 or M12 nuts and washers.
- Self-tapping screws for metal.
- Two wheels.
Final version.
Drawings of a garden wheelbarrow.
The length of the handles is 1.5, not 1.3 m, for a height of 1.8 m.
VicktorVRUser FORUMHOUSE
Wheels for a construction wheelbarrow cost me 1,100 rubles. The wheelbarrow weighs no more than 20 kg. Load capacity – 100 kg. It can withstand all 200 kg, but the wheels are rather weak, you need to look for a more reliable option. All that remains is to make the steps.
For ease of use, bend the handles of the wheelbarrow.
We build a self-propelled motorized cart with our own hands
According to most home-made craftsmen, the main interest in building such devices is to make a home-made self-propelled cart with minimal costs for purchasing spare parts. Moreover, there is no need to register or draw up documents for homemade transport. Even if you have to go out onto the road, there will be no complaints from drivers or the traffic police, provided that the self-propelled cart does not interfere with road users and moves at a speed of no more than 7 km/h.
Types of trolleys
Both construction and garden carts with a motor are a metal body on wheels with a steering handle, a stability system for loading and loading material.
There are 4 main types of trolleys:
- Universal. Models with four sides in a vertical position. They are mainly used for transporting soil and light bulk materials. The side walls are removable, which expands functionality.
- With a platform without side boards. Such devices are used for transporting large solid objects - bags, stumps, snags.
- Dump trucks. Trolleys with load dumping function. They are used to transport heavy bulk materials, for example, during excavation work.
- Foldable. Models with thick fabric walls are relevant if there is not a lot of storage space. The frame folds like an accordion. As a result, the carrying capacity of the product is small.
Wheelbarrows are also divided into two-wheeled and one-wheeled. The latter are lighter and more maneuverable, so they are better suited for gardening work. Models with two wheels are stable and do not roll.
Wooden wheels for a garden wheelbarrow
Practice shows that wheels are traditionally the weakest link of any construction vehicle. They cannot withstand heavy loads. Tires puncture, crack, slip off the wheel rim, etc. A radical solution to the problem is proposed by a portal member with the nickname MrGinaki. He made “indestructible” wooden wheels for the wheelbarrow.
The width of the car body is 650 mm. Length – 900 mm.
How to make homemade wheels for a wheelbarrow is clearly shown in the photo instructions.
The finished wheel has a diameter of 35 cm.
MrGinaki
I carried 6 bags of cement, 50 kg each, in a wheelbarrow. I also use it as a bucket for mixing cement.