Over the past century, the main and unshakable attribute of outerwear, used by different layers and classes of society, was the cap. This headdress was worn by presidents and leaders, scientists and athletes, representatives of the elite and the déclassé element. Today the cap is no less popular. Both men and women wear it with pleasure; the headdress is comfortable for both old people and children.
Those who love individual style, as a rule, are not satisfied with store-bought products and set themselves the task of sewing a cap with their own hands. The cap pattern in this labor-intensive process is an element that few people dare to make with their own hands. Especially when it comes to men's headdress.
Men's cap patterns
Unlike options for women, instructions for making men's caps are not particularly generously presented in special magazines and on the Internet. Needlewomen know that there is no occupation more enjoyable and at the same time responsible than sewing clothes for the man they love. Many people ask how to sew a cap for their husband with their own hands. A pattern is what craftswomen primarily need.
The article gives the necessary recommendations to seamstresses who have taken on the difficult task of making a men's headdress. We will try to answer the question: “How to sew a cap?” Patterns of the most popular styles are also presented to the attention of readers.
Homemade cap
An origami cap is a universal thing. Its role assignment depends solely on how it is decorated (painted, painted) by you. Let's figure out how to make a cap out of paper. Look at the figure below - a detailed analysis of the circuit will tell you about the process in detail. In Fig. 2 specifically shows how to make a cap from a newspaper, since its standard spread sets a sufficient size of headdress for an average head. So:
- An origami cap is folded from a rectangular sheet. Fold it in half, and then bend the upper “closed” corners of the fold inward, bringing them together corner to corner, face to face (see figure);
- Fold the top “side” up twice, then turn the workpiece over. Bend the planes on both sides towards you, setting the desired size (we are making a cap for ourselves, a teenager, a small child);
- Fold the bottom edge of the workpiece towards you without overlapping the protruding folds, unfold the edge and bend its corners along the intended line of the new fold;
- Bend the bottom plane upward twice, covering all previously made folds. Essentially, the paper cap is ready;
- Turning the workpiece over, bend the top of the roll downwards, aligning it with the base of the workpiece. Then tuck this fold over the side of the package, straighten the product - you have a pioneer cap in your hands. I managed to make a paper cap with my own hands in just a couple of minutes.
How to properly sew a men's six-piece cap?
A cap is a headdress that both men and women love to wear. Its distinctive feature is the presence of a high crown and visor. A cap can protect you from both frost and scorching sun. After all, it is known that it is sewn from a variety of materials: from natural or artificial leather, wool, cotton, corduroy, tweed, synthetic fabrics, and also from fur. The six-blade is one of the most common variants of this men's headdress.
The simplest models
The famous lifesaver of many generations is a hat made from newspaper using the origami technique. For a headdress to fit an adult, it will require a double-page spread. The folding pattern is reminiscent of another unforgettable model from childhood - a paper boat.
Step-by-step instruction:
- Fold the newspaper sheet in half lengthwise. Let's reveal.
- Fold it in half again, but now crosswise.
- We bend the upper corners towards the central axis.
- Fold the bottom edge along the dotted line.
- We repeat the same action on the back.
- We open the product from the inside. We bend it and flatten it.
- It turns out to be a rhombus. We bend its bottom corner. We do the same on the reverse side.
- Open the product from the inside again and fold it as in step 6.
- We move the folded corners to the sides along the arrows.
- The hat is ready.
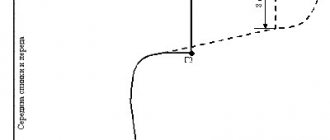
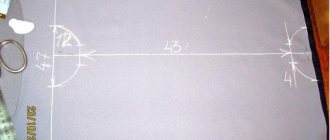
Building a pattern: the beginning
First you need to create a cap pattern. To do this, three measurements are taken: head circumference, forehead width and head length from the back of the head to the forehead. The lower part of the wedge is represented by a segment equal to 1/6 of the circumference of the head. Measure the middle of the segment, after which draw a perpendicular line, the length of which is equal to 1/2 the distance from the back of the head to the forehead. Next, a smooth line is drawn along three points, and the upper angle should be equal to 60°.
Artificial flowers made of gelatin fabric
Fabric treated with gelatin is ideal for handicrafts. It is from this material that simply perfect crafts are made. And work also brings a lot of positive emotions.
What is necessary:
- white chiffon;
- yellow and green fabric paints;
- gelatin;
- scissors;
- pliers;
- glue;
- wire;
- pencil;
- cardboard;
- gauze;
- newspapers;
- white corrugated paper;
- awl;
- beads.
Fabric treated with gelatin is ideal for handicrafts
Progress:
- Draw templates of future petals and leaves on cardboard.
- On another sheet, draw a circle, and in it there are five cloves, visually reminiscent of tongues of fiery flame.
- Cut out all templates.
- Dilute the gelatin in water and place the cloth in it, place in a water bath and leave for about five minutes. After this, remove from heat.
- Dilute the paints in a separate container and place the gelatin-treated fabric in them, immediately remove and place on newspaper, dry.
- Cut out all the necessary parts from the dried material.
- Fold the petals in half, and the prepared piece of gauze diagonally.
- Place a petal in the gauze, then hold this structure with one hand and with the other, move the gauze clockwise, twisting it a little.
- Repeat this manipulation with each of the petals.
- Pierce the backing with an awl in the central part and make a cross-shaped cut.
- Cut the corrugated paper into strips and wind it onto a wire.
- Bend the paper-wrapped wire at the tip into a loop and wrap the first petal around it.
- Coat the workpiece with glue.
- Attach all the petals to the stem one by one, twisting each of them slightly.
- Wrap the upper petals on a match to give the flower a neater appearance.
- Pull the gluing through the stem and secure it with glue.
- Glue the leaves a little back from the top.
Decorate the product with beads and straighten all the petals.
We cut out the visor
To construct a visor pattern, you should draw a segment equal in length to the width of the forehead. Two smooth lines are drawn, the resulting part will resemble a crescent. To create a pattern for a bar (band), you should draw a rectangle whose length is equal to the circumference of your head, and the width can be made arbitrarily, but not less than 2 cm.
Next, the paper pattern is laid out on the wrong side of the fabric and outlined with a pointed piece of soap or tailor's chalk. It is necessary to leave a seam allowance of 1 cm. You should cut out one part of the band, two parts of the visor and six wedges.
If you plan to sew a cap from checkered fabric, the pattern should be positioned so that the checkers on the wedges match. Similar parts are cut out from interlining and lining fabric.
Origami samurai hat
To work you will need a sheet
square shaped paper. It needs to be folded into two equal parts, and then into a small square. Then the paper structure must be straightened. Without this procedure, it will be difficult to mark future fold lines.
Regarding the technological scheme
How to make a similar origami cap, then the sheet needs to be folded in half, then bend outward one strip, which is a tenth of the entire width.
The sheet is folded inside so that each edge is folded in the center
. Then triangles should be bent from the central part in both directions. The resulting design will have certain similarities with a shirt collar. Next, the strip remaining at the bottom is folded.
Now all that remains is to straighten the hat
origami. Her “wings” will look very original. This product can be used in a theatrical production or a carnival evening. Just like a banal paper cap, which almost everyone made in childhood, such a headdress will be indispensable during repairs or cleaning.
Sew
Then they start sewing. Using a heated iron, non-woven fabric is glued from the inside of the parts made from the main fabric. This is necessary so that the product maintains its shape well. Next, the bottom wedges are ground down using a sewing machine. A finishing stitch is laid on the front side. If you do not have the necessary skills, the wedges should first be swept together, after which they can be sewn on a machine.
Next, grind off the lining parts. If you are sewing a warm cap that is intended to be worn on cool days, the lining parts should be quilted with padding polyester.
To stiffen the visor, use a non-woven insert or thick cardboard of appropriate size and shape. All parts are stitched together, notches are made on them and turned right side out. A decorative stitch should be placed along the edge of the visor.
Then a visor and a band equal in length to the circumference of the head are sewn to the crown. The lining is hemmed by hand using a hidden seam. “Ears” are sewn from the inside to the band. These are small fabric rectangles that are easy to hide in warm weather. In bad weather they can be used to cover your ears.
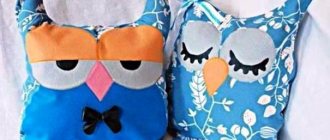
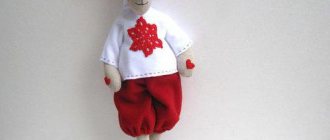
Cute hat for a girl
You can sew a cute hat with ears for a girl. To avoid wasting time taking measurements, you can use a baby’s cap. You need to trace it on paper to get two parts of the pattern. (Front and back). Using the patterns, cut out the base and lining. Then cut out triangle ears.
Before sewing, you need to fasten the parts together with the right sides facing inward with pins. Attach the ears to the top seam line, having previously covered them with seams. Then sew them on a machine. You can make an applique in the shape of an animal by sewing on eyes, a nose and a mouth, or you can decorate the product with sequins or embroidery.
We sew a cap with a visor of five wedges
This brim cap pattern is designed for a head circumference of 51 cm. The size can be increased or decreased by widening or narrowing the gussets. To do this, the difference should be distributed over all five available seams. For example, to increase a cap pattern for a girth of 51 cm to 54 cm, you need to add 3 mm on both sides of each wedge:
3 cm (difference in size): 5 (number of wedges): 2 (number of sides of each wedge) = 3 mm.
After the cap pattern is on paper, craftsmen recommend making sure its size is accurate. To do this, you need to measure the length of the bottom of the wedge and multiply it by 5. The total length should be equal to the circumference of the head. Although 5 wedges are planned, their number can be changed, for example, increased to 6. In this case, the necessary changes should be made to the cap pattern.
For sewing, 0.3 m of fabric with a width of 1.5 m is used. In addition, a visor seal or dublerin (non-woven fabric) is required. In order to create a good shape of the product, it is necessary to use stiff fabric (jeans, corduroy, etc.) for sewing. You can also duplicate it, that is, glue it with adhesive material.
Knitted turban
The turban hat is a headdress that came to Russia from Eastern culture, and which has long established itself in the global fashion industry. But in order not to spend a lot of money on a designer item, you can easily create a turban with your own hands, taking into account personal preferences and characteristics. Knitting needles, yarn and knitting patterns will help with this.
You can knit such a headdress with the simplest pattern, and a beautiful brooch can become the central decoration. The main advantage of a knitted turban hat is the fact that it is easy to put on and take off, because it does not need to be folded, unfolded and folded back every time.
Exclusive knitted turban
A knitted turban hat with knitting needles can look different, but most models of this type of headdress are knitted quite quickly and relatively simply. The turban itself has several varieties:
- classical;
- eastern;
- retro.
Visually, they differ in the way the front is folded and the volume of folds, as well as the presence of decorations. There is also a turban headband that covers the ears but leaves the top of the head exposed. This option is best for fall, while the hat is a versatile item for fall, spring, and winter.
This turban hat is knitted for beginners using the one-piece method. It will not have to be connected or stitched, twisted or disassembled with separately connected parts.
Knitted turban hat
Materials for work:
- half-wool yarn;
- knitting needles No. 5.
You need to calculate the loops. The width should be 10-11 cm, in this master class there were 19 loops. The sample should be knitted from the resulting yarn, taking into account that the number of loops should be a multiple of six and +1.
Knitting an elastic band for a turban with knitting needles:
- 1st row - purl 1, knit 2, alternating loops are repeated until the end;
- The 2nd row and the remaining even rows also need to be knitted as in the first option;
- 3rd row - 1 purl, 1 knit stitch. behind the back wall and without removing it, 1 knit stitch. you need to knit it behind the front. Thus, this method of knitting three loops is repeated until the end;
- The 5th row is the same as the third.
The elastic band needs to be knitted up to 4 cm.
Turban pattern
In each front row, five additions are made in the manner described below.
Additions:
- in the first row after two front rows (5 increases);
- in the third front row - in front of the faces. and 1 purl. (5 increments).
Options for increases alternate. This will give a uniform expansion of the turban cap.
Note! To prevent holes from forming in the fabric, it is better to make increases before the purl loops. Increases are made until there are 6 purl stitches on the outermost tracks.
Increases are made until there are 6 purl stitches on the outermost tracks.
On other tracks you need to stop adding when you reach 11 purls. Loop. edge loops should not be taken into account.
5-6 cm should be knitted without any increases. And then start making decreases: in the front rows, knit 5 times with 2 purl loops. In order to avoid distortion, decreases are placed in turn - first in front of the face, then after.
Tools for decorating a hat
Decrements are made until 1 purl remains. loop on every track except the middle one. You need to leave 2 purls on it. loops.
The loops should be divided into 10 pieces. Separately, you need to knit each half of 28-29 cm. They need to be positioned, cross-stitching the ends - the rims - along the edges.
The sequence of sewing a cap with your own hands
Lay out the pattern (visor and wedge) on the fabric. We cut out all the details according to the layout: 5 wedges, 2 visors + band. The length of the pattern should be 53 cm, width - 4 cm (the width of the finished cap is 2 cm). The allowance will be 1.5 cm of fabric. Next, you should grind the wedges, and you must clearly align the marking lines. Allowances are cut to 7 mm. Then the parts are ironed. After this, the sections are overlocked or hidden with braid, which will require a little more than allowances. The connecting seams are stitched along the front side.
Then the visor parts are sheathed. At the same time, they are folded face to face and the outer sections are ground down. The allowances are cut to 0.2-0.4 cm. Next, the visor is pulled out and ironed. A cardboard or plastic blank is inserted as a seal. The visor is sewn with decorative stitching at a distance of 1-1.5 cm from the edge.
Next, the middle line is marked on the crown and visor. The visor is ground off to the bottom of the crown, and the marks must be aligned. The band is ground into a ring and stitched to the crown at its lower edge. The visor is also attached accordingly. The seam allowances are cut to the line and ironed towards the band. It should be turned halfway inside out. At the same time, the inner half is turned away and basted with a stitching seam. The band is sewn together with the bottom of the cap or separately.
How to make flowers from fabric circles
This technique is best suited for beginners just learning this craft. In this way, you can make flowers from different materials, but fabric ones look the most impressive.
What is necessary:
- felt;
- threads;
- scissors;
- needle.
This technique is best suited for beginners just learning this craft.
How to make a flower:
- Cut out circles from felt.
- Sew the prepared parts together, twisting the petals as tightly as possible.
- Twist the last circle into a tube.
- Sew it in such a way that all stitches are covered.
Eight-piece cap (men's pattern): choose a classic
An eight-piece cap (eight-piece) is one of the most common types of men's hats. The eight-piece cap (the pattern is presented later in the article) is worn with pleasure by men of all ages. This option represents that very classic, in which both a young guy and a gray-haired old man look great.
The style favorably emphasizes the color and texture of the material from which the garment is made. An eight-piece cap is made from genuine leather or leatherette, from drape or fine natural wool. Caps in plain colors, non-marking, strict shades or, conversely, with bright and expressive colors, will fit perfectly into any wardrobe. They are sewn on a twill or silk lining, using insulating padding made of padding polyester (winter version). To protect the ears and the back of the head, such an eight-piece cap can be equipped with a special visor, which is put inside in good weather, and released outside in rain or wind.
This style of cap is considered extremely successful. Thanks to the special shape of the headdress, it fits perfectly on the head, does not move or fall. The eight-blade will be modern and stylish regardless of the vagaries of fashion.
Paper cap: varieties and variations
First of all, a paper cap is associated with a children's audience - they are interested in wearing such hats, playing games, imagining themselves as someone. Using just your hands and a few stationery or art supplies, you can create a whole range of images for your child.
The result will be:
- sailor;
- police officer;
- military rank;
- pilot;
- policeman;
- traffic cop.
You can make all the caps according to the same pattern, achieving modifications with the help of watercolors and buttons, or you can even fold the shape of the cap in different ways.
How to sew an eight-piece?
According to experienced seamstresses, making a men's eight-piece cap is no more difficult than other models. To do this, use the main fabric - a piece of approximately half a meter in length, the same piece of lining fabric, threads that match the color, and interlining.
First, a measurement is taken (the diameter of the head, the distance from the forehead to the back of the head, the width of the forehead are measured). Then a pattern is made. In this case, the width of the wedges at the bottom should be equal to 1/8 of the entire circumference of the head. On this segment, you should mark a point in the middle, through which draw a line perpendicular to the first. Its length should be equal to half the distance from the back of the head to the forehead. Next, all the points are connected. The angle of the triangle's apex should be 60°.
After this, the visor is cut out. To do this, measure a segment equal to the width of the forehead, and connect its points with smooth semicircles, similar to a month. Next you need to build a peg (base). Its length is equal to the circumference of the head, the height should be at least 2-3 cm. On the wrong side of the fabric, attaching a template, trace the elements of the headdress, and then cut them out. Do not forget to leave 0.5 cm on both sides of the parts for seams. Number of parts that should be obtained: wedges - 8 pcs., crescents for the visor - 2 pcs., bead strip - 1 pc.
Then copies of the parts are made from lining fabric and non-woven fabric. They are connected to the base material with a hot iron. Then the elements of the cap are basted and the fitting is done. If everything turned out as it should, you can sew the parts white. To create a good shape for the visor, insert a piece of cardboard into it. At the end the lining is hemmed.
Fleece hats
Fleece is a very soft and pleasant to the touch fabric. It is used to make hats and scarves for children. When making products for adults, fleece is most often used as a lining.
There are several options for women's fleece hats, for example:
- With bubo.
- Hooded hat.
- With a lapel.
- With ears.
- With a long bottom.
Buboes, flowers, and ears are used as decorations for such accessories. Today, a cat hat with ears is popular.
Four-piece hat
To sew a headdress you need to prepare:
First of all, you need to make a pattern on paper. If you do not have a sewing machine, a product made from such fabric can be sewn by hand. The seam will not be noticeable because the fabric is fluffy. It will be more convenient to sew if you first pin together the parts.
After the materials are prepared, you need to measure the circumference of your head. Divide the resulting value by four - this will be the width of one wedge. Next, you need to determine the depth of the cap. To do this, using a meter tape, you need to measure the distance from the forehead to the back of the head through the top of the head. Divide the result by two. The result is one wedge, there should be four in total. To build a wedge, you need to draw a triangle, the base of which will form the lower part of the wedge. Then, give a rounded shape to the segments that go from the base to the top.
The fleece four-piece can be lined or unlined. Since the material does not fray, internal seams do not need to be processed. But if the headdress is unlined, you should use an overlocker.
Then you need to attach the pattern to the fabric, cut out four parts and sew them together
It is important not to confuse the front side of the canvas with the back, otherwise you will have to redo everything again. The parts can be sewn together one by one
You can first sew two wedges each, you get two halves of the product. Then combine them. There are quite a lot of fleece hat patterns. In this case, the hat will have the side turned up. It can also be used as an option with the bottom seam turned up.
Read further:
Beanie hat: pattern, instructions for sewing a knitted beanie hat
Pattern and sewing of a beret: pattern of a women's beret from drape, step-by-step sewing of a children's beret
Hat-helmet pattern: how to sew a helmet hat for a child, description with pattern
Pattern for a men's fleece hat, cutting and sewing
Do-it-yourself knitwear dress without a pattern: calculation of knitwear.
Pattern of sports trousers made of jersey with an elastic band
Pattern of a hat with ears: styles of hats with ears
How to sew a lining to a knitted hat: making a fleece lining pattern, work procedure
Pattern of a women's vest: with an open back, knitted, quilted, insulated with synthetic padding, fur. how to create a pattern and sew a vest
Knitted turtleneck dress: how to make a pattern and sew it yourself
Patterning and sewing a baseball cap: how to sew a baseball cap with your own hands, step-by-step guide with patterns
DIY women's boyarka hat: boyarka hat pattern and step-by-step sewing
Pattern and sewing of women's trousers: how to create a pattern step by step and sew women's trousers with a perfect fit
Pattern for a men's windbreaker: how to build a pattern for a men's windbreaker and sew clothes using it
Components of an officer's cap
To understand how to make a military cap with your own hands from paper, you need to carefully examine the officer’s headdress. The photo below shows the cap of a Soviet officer. This is a traditional forage hat, which consists of the following parts:
- crown - upper part;
- band - an element that fits the head;
- visor;
- cockade - emblem of the military branch;
- The welt is a thin strip that is the chin strap. In the sample below it is black, but often the welt is made of twisted filigree cord of golden color.
To make a military cap for a child, it is enough to cut out the visor, band and crown from thick cardboard. The emblem can be drawn with markers or a traditional red or gold star can be glued on.
How to make a flower from synthetic fabric (video)
A wide variety of materials are used to make flowers. These can be napkins, colored or corrugated paper, beads, beads, rhinestones, lace. The most original, exquisite and unique crafts are created from fabric. It is very easy to work with this material. And in this case, the opportunities to show imagination are unlimited. It is not at all necessary to strictly follow the instructions, because each of the needlewomen has her own vision of this fascinating creative process.
Sample badge for a Russian police officer's cap
If you made a policeman’s cap with your own hands, then you must place a badge on the front. It does not have to exactly match the real cockade. You can simply write the word “police” on the rim. The country's flag in a square frame will look interesting. Before making a policeman's cap, think about the shape of the cockade in order to aesthetically place it on the rim.
If you want to make an exact copy of the Russian Ministry of Internal Affairs badge, as in the photo in the article, first draw a vertical oval with jagged edges. Then in the middle of it draw another one, only smaller. The cockade must have the same rim around its entire perimeter. You can paint it with yellow paint instead of gold. The inner oval is used for the flag of the state. Stripes of three colors look beautiful, located not evenly, but diagonally.
How to make petals from fabric
There are a huge number of ways to make flower petals from fabric. Having mastered one technique, mastering others will be quite easy.
The simplest of them comes down to the following actions:
- Cut circles of different sizes from a piece of fabric.
- Using a candle, melt the edges, causing them to become curved.
- Connect the petals together with glue or thread.
There are a huge number of ways to make flower petals from fabric.
To create more sophisticated colors, you can pre-treat the fabric with gelatin and find a suitable template. In this case, the petals need to not only be cut out, but also corrugated in any convenient way.
Another equally popular method is rolling the tape. In this case, the petals are formed by lifting and bending the strip at certain intervals.
Skilled needlewomen cut out each petal separately. In this case, the shape is given using wire or thread. Such flowers look the most natural, but the work requires some skill. It will be difficult for beginners to create such masterpieces, but if they want, everything is possible.