In hiking conditions, unforeseen situations may arise in which one of the tourists gets injured. Each member of the group must be able to provide medical assistance. A stretcher made from improvised materials will help transport the victim to a medical facility where he will receive professional assistance. You should not take risks and provide medical care yourself in case of serious injuries that can cause serious complications or lead to death.
Let's talk about ways to make stretchers from improvised materials. It’s easy to make a stretcher in the forest; you just need to know the simple rules for making it. A little logic and ingenuity will help you quickly cope with an emergency.
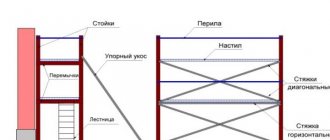
How to make a frame stretcher on the go
Transporting a victim on a frame stretcher
Frame stretcher is a classic that is used in medical institutions. They allow you to carefully fix the human body in case of severe traumatic injuries and move it to any distance.
In order to make a stretcher yourself, you need to find solid wooden sticks that will become the basis of the frame. Put on a rain jacket or other thick clothing. Pay close attention to the zipper on your rain jacket: it should always be closed so as not to cause discomfort to the victim.
A frame stretcher in the forest will help transport a person to the required distance. You can make them in 5 minutes. You need to act quickly and harmoniously so as not to waste precious time, every minute of which can cost the victim his health or even his life.
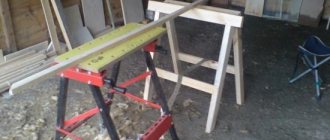
How to make a wooden construction stretcher with your own hands - step-by-step diagram
Step 1: Cutting out the handles
Curly handles are cut out of a board 10-12 cm wide and 3-4 cm thick, which will serve as the basis for all stretchers. The middle part of the board remains unchanged, and a small chamfer is removed from the edges on top, and a deep cut is made from below, to a length of 35-40 cm on each side. This reduces the overall weight of the handles and gives them a shape that is comfortable to grip.
It is best to apply the design of future cutouts on both boards according to the template and strictly adhere to it when processing. The more accurate the size of both handles, the more convenient it is to use the finished stretcher, since they will have an equilibrium balance. Cut out the handles, securing them securely in a vice or wedges.
Step 2: Assembling the stretcher base
Taking two boards exactly the same width as the uncut handles, we fix them at a distance of 50-65 cm from each other, constructing the frame of the future stretcher. The length of these cross boards determines the width of the stretcher and is 50-60 cm. The cross bars are fastened with self-tapping screws with a length of 60 mm, in increments of 3 cm, on a flat surface, checking the squareness of all nodes.
When the transverse boards are fixed, they must be reinforced with four steel corners on the inner (invisible) side of the frame. It is better to choose corners with long “shelves”, which have 3-4 mounting holes on each side. Additional fittings will give the entire structure high strength and allow it to carry loads weighing more than 100 kg.
Step 3: Build the deck
Boards with a thickness of 25 mm or more are laid on the finished frame, and this is done according to a strictly defined procedure. On one side, the flooring boards are exactly “flush” with the dimensions of the stretcher, but on the other, they should protrude about 5 cm beyond the dimensions.
The first to be attached are two boards from the ends of the flooring - they rest both on the handles themselves and on the transverse boards. Fastening is carried out with self-tapping screws with a length of 50 mm, with a high frequency of installation steps - at least 3 cm between screws. The following flooring elements are attached only from the end parts, where the handles lie under them. The middle board will have to be precisely cut to length and placed in the resulting groove, secured with at least one screw on each side.
Step 4: Raise the sides and arrange the bottom
Now you can fasten two short sides and one long one - the one on the leveled side of the flooring. For the sides use a board with a thickness of 20 mm. It is most convenient to attach the sides to steel corners, and from the outside - if the fittings are located inside the stretcher, it will become clogged with bulk cargo and can be easily damaged by massive bricks, etc.
A sheet of galvanized metal is placed on the bottom, cut exactly to its size. Galvanized fastening is carried out with short mounting nails with wide heads, in increments of 10-12 cm. At the same stage, it is convenient to put special rubberized attachments on the handles at a distance of 2-3 cm from the ends, so as not to damage the hands if the loaded stretcher accidentally hits an obstacle .
Step 5: Making a folding side
The final stage of independent “stretcher construction” is associated with the manufacture and fastening of the folding side. This part is useful when transporting light and bulk cargo, especially over long distances. A board of small thickness (from 15 mm) and length is tried on the open side of the flooring; its width may slightly exceed the height of our stretchers. Rotary hinges are attached to the protruding end of the flooring and the mobile side. Along the edges of this side it is worth providing fittings to secure it in the folded state - latches, hooks, etc.
This is an approximate “recipe” for how to make a universal stretcher from wooden boards. If carrying bulk cargo is not relevant for you, then stage 5 can be omitted - bricks, cinder blocks and bags of cement can be moved with one open side, which even makes loading and unloading easier.
During spring cleaning in the garden, you have to use a large amount of equipment. Stretchers are no exception, however, not everyone has them. Thus, it is better to make a stretcher.
If you need a service like medsantrans.ru, you can call online special transport with trained personnel. In order to make a stretcher yourself, you can use available materials: boards and sheets of iron.
These items will definitely be found on the farm, and we will use them to make stretchers for the garden. It is advisable to trim the boards a little so that they are shaped like handles. If possible, process it with a plane and then sand it thoroughly.
It is recommended to round them to make them easier to hold in your hands. Using nails, you need to nail a sheet of iron at the base. When working in the garden, you can, for example, use a bucket to carry from place to place what is needed for garden work. However, it is not very advisable to wear them; it may happen that you need to rake out leaves and old grass all day. And many people forget to get a cart. This is why stretchers are made.
When making stretchers, the boards can be slightly cut on the sides, where you will drive the nails. When the stretcher is ready, when using it, you must remember that there is no need to pull out the soil from the site. Let it remain in the garden, as it forms a fertile layer of soil. So, you have prepared a stretcher for gardening.
- Making a wooden comb is not that difficult if you have the opportunity to work on woodworking machines. First of all, we need a board, even if not edged, the thickness here is also not
- Many people have an eternal problem at home - shoes lying around in the hallway. Usually, when the whole family returns home in the evening, all the shoes get tangled underfoot. Therefore, to avoid such cases, it is necessary
- Today, progress does not stand still and there are many ways in which the life and work of summer residents and gardeners can be made easier. Of course. Everyone knows that plants need constant
- An alpine slide can become one of the most fascinating elements of your garden. This type of landscape design appeared recently, but has already gained its popularity. Approach to the structure
- Carrying firewood from the woodpile to the stove is unavoidable work. However, it is not the easiest. Some carry them in an armful, clutched to their chests, others weave boxes from wire, others sew canvas stretchers... I found
Construction stretchers and their use
If you are building a country house, you have probably encountered the problem of transporting building materials. The wheelbarrow can be difficult to use because of the uneven ground - just in case it tips over. And you can’t even lift it up the stairs. In such cases, you just have to carry everything in your hands. It’s especially inconvenient with bricks - usually they can only be carried in a column, and you can’t carry much at a time. It’s just a waste of time and the possibility that the bricks will fall down, and even on your feet. This is where you can get injured. To save yourself the hassle, make a carrier like in the picture. For it you will need a board about 200 mm wide and about half a meter long. Choose the thickness yourself, depending on the load. Place loops of strong rope on both sides of the board, securing them with nails. Place the tops of the hinges onto a suitable batten and also secure with nails.
How to make a stretcher with your own hands
You can also use construction stretchers to carry various loads.
Making this type of construction auxiliary tool is quite simple. Moreover, stretchers can be used not only in construction. They are quite suitable for carrying various types of garbage from a summer cottage, as well as the harvest of various crops collected from their own garden beds. And in general, everyone knows the use of this device. Now it’s time to move on to consider how you can make construction stretchers with your own hands. The process is quite simple and can be done by anyone. First you need to take two beams of the same length and thickness and process them using a plane, so as not to drive a splinter into your hands when using our device. These will be the handles. Then it is necessary to lay these beams in parallel and place several boards across them, the number of which depends on what capacity we are going to make the stretcher and on what physical capabilities we have. Overall ready. If desired, you can nail the sides of a small height around the perimeter of the boards so that what is being carried inside does not spill onto the ground. Now a little advice. When making carrying handles, it is better to make them somewhat thinner in those places where they will be handled by hands. This will allow the handles to fit more snugly in your palms, causing less hand fatigue during use. And to increase the service life, it is better to treat the wood with stain, and then varnish or simply paint it.
Construction stretchers have been used for repair, household and domestic purposes since the times of the ancient Egyptian pharaohs, and at the same time they have not lost their relevance in the era of space flights, innovations and microelectronics.
Assembling a stretcher without a frame
Transporting a victim on a frameless stretcher
During a hike, transporting a victim can be carried out using available means. Therefore, you don’t have to take special medical devices such as stretchers, splints, etc. on a hike.
- Backpack. Holes are cut at the bottom of the backpack for the legs. The person placed inside is then transported on his back.
- Rope. Divided into two equal parts. The victim is carried on himself and transported by another participant.
Stretchers - basic definitions
No matter how rapidly technological progress develops, it is not able to completely abolish the manual carrying of goods. Perhaps this will happen in the distant future, when there is a place for robots in every household, but today such a prospect looks fantastic. And ordinary stretchers are more than realistic and quite universal.
Using a stretcher, stones, ceramic tiles, cinder blocks for building walls and, in general, any piece of building materials are transported. They are convenient for transporting various bulk cargoes - from cement and sand to pebbles and crushed stone. On a stretcher you can remove debris from a construction site, leaves, grass and roots from personal plots. They are used for unloading feed, fertilizers and as a mobile container for many other household tasks.
The use of any stretcher requires the work of two people with relatively similar strength and endurance
. If you don’t have a partner, you will have to use a garden cart or wheelbarrow as widely as possible - it is simply impossible to use a stretcher alone. Unless you carry them in an unloaded state and move them from place to place, which is unlikely to help in repairs or construction.
Rules for transporting a victim using a stretcher
When transporting, it is important not to harm the victim. A stretcher in the forest using improvised means will help transport a person, but you need to know how to carry it out correctly.
- You need to move slowly and carefully.
- Transportation lying down: in case the stomach, spine, pelvic bones or lower extremities are injured.
- On the side: if the victim has lost consciousness or suffered a head injury.
LYou will learn more from my article: How to provide first aid for a fracture while traveling
LTo avoid mistakes when providing first aid, you should refer to the article: The most common mistakes in providing first aid to a victim during a hike with a fracture, bleeding, burn, poisoning, frostbite, snake bite
What you need to know about stretchers
Stretchers are indispensable products for urgent emergency care.
For this reason, they are subject to a number of requirements and standards.
In particular, they must be reliable, lightweight, safe, durable and easy to use.
For folding options, there is another important requirement - the structure must quickly unfold into its working position.
As for construction stretchers, they must have high strength, but at the same time be very light.
Plastic options can withstand weight up to 120 kg, while metal ones – up to 200 kg.
In this case, it is unacceptable to use a stretcher with damaged poles.
The fact is that at the moment of breaking even one pole, the risk of receiving various injuries increases sharply, ranging from a banal sprain of the tendons of the arm to serious damage to the spine and back muscles.
Advantages of plastic stretchers
They are made of heavy-duty plastic and, unlike wood or metal, do not rot or corrode. Light weight combined with good capacity makes them indispensable, especially when carrying heavy materials.
The stretcher container is shaped so that the weight of the load being carried is distributed evenly. You can even move liquid solutions in it. Construction stretchers are equipped with wooden handles, which are more comfortable than plastic ones. In order to avoid the appearance of fungus or rotting, they are treated with a special compound.
To make stretchers, manufacturers use impact-resistant plastic that can withstand significant loads. This is reflected in the durability of the equipment and the absence of deformation during operation. Plastic stretchers are resistant to temperature changes. This allows them to be used in almost any weather conditions.
Purpose of construction stretchers
This is a universal device that allows you to move various bulk loads - sand, crushed stone, cement, etc. Using a stretcher, you can also remove debris from a construction site and transport heavy loads, such as bricks, cinder blocks or ceramic tiles.
The use of this equipment requires the participation of two people, preferably with the same endurance. It is impossible to carry a loaded construction stretcher alone. Therefore, if you don’t have a partner, you will have to use a wheelbarrow or cart.
Stretchers - basic definitions
No matter how rapidly technological progress develops, it is not able to completely abolish the manual carrying of goods. Perhaps this will happen in the distant future, when there is a place for robots in every household, but today such a prospect looks fantastic. And ordinary stretchers are more than realistic and quite universal.
Using a stretcher, stones, ceramic tiles, bricks for laying fireplaces, cinder blocks for building walls, and generally any piece of building materials are carried. They are convenient for transporting various bulk cargoes - from cement and sand to pebbles and crushed stone. On a stretcher you can remove debris from a construction site, leaves, grass and roots from personal plots. They are used for unloading feed, fertilizers and as a mobile container for many other household tasks.
Using any stretcher requires the work of two people with relatively similar strength and endurance. If you don’t have a partner, you will have to use a garden cart or wheelbarrow as widely as possible - it is simply impossible to use a stretcher alone. Unless you carry them in an unloaded state and move them from place to place, which is unlikely to help in repairs or construction.
How to choose a stretcher
When choosing a construction stretcher, first of all you need to focus on its load capacity, material of manufacture and capacity.
Before purchasing, you need to inspect the product for defects.
A stretcher for carrying people requires a careful approach to selection, since among the huge selection of models for various conditions of use and tasks, it is difficult to choose the appropriate option based only on superficial knowledge.
Main criteria
When choosing a stretcher for transporting victims and wounded, it is necessary to take into account the following criteria:
Load capacity;
Construction type;
Dimensions (both in transport and in working condition);
Frame and base material;
Number of sections and the ability to adjust their tilt;
Availability of elements for securing the victim (belts, leg pockets, handrail);
Availability of clamps for installation of resuscitation equipment;
Price.
General rules for moving victims using improvised means
Depending on the nature of the injuries and their severity, there are several general principles that must be followed when moving victims:
- In case of injury to the cervical spine, it is necessary to immobilize the victim's head and neck before transportation. In other cases, the victim must be transported with his head turned to the side. In this way, it will be possible to avoid tongue retraction and asphyxia, as well as vomit from entering the respiratory tract.
- If the victim has lost a lot of blood, place him in such a way that his legs are positioned higher than his head during transportation. This is necessary to ensure blood flow to the brain.
- When climbing stairs, the victim must be carried head first. If they go down the stairs, the injured person is carried feet first.
- If the victim is transported by several people, then the one who goes ahead performs the duties of the main one. He must monitor the road, promptly informing about all possible obstacles. He should also coordinate the actions of other rescuers. It is important that others should not move in step. In this case, the person walking behind should monitor the condition of the victim.