How often do you start building or repairing something at your dacha? We are sure that such work is carried out on almost every site every season! You constantly need to cut boards, quickly assemble a workbench, or do some other work. And in this case, construction goats come to the rescue. During the period of self-isolation, we offer to learn how to make them yourself, and publish instructions in the material with the hashtag #BetteratHome. Folding construction trestles made from scrap boards for the dacha are a universal and convenient device that will not take up much space, but will serve you for many years.
Do-it-yourself production budget
For trestles with a height of 0.8 m, the following dimensions are valid:
- legs (4 pcs.) – 0.95 m
- top crossbar – 0.9 m
- spacers (3 pcs.) – 0.85 m, 0.77 m and 0.7 m
Therefore, to manufacture two sets of devices you will need lumber and fasteners in the following quantities:
- board 95 x 45 mm – 5 pieces 2 m each
- board 90 x 20 mm – 1 piece 2 m
- board 90 x20 – 1 piece 3 m
- furniture bolt M10 x 100 with nut – 4 pieces
- M10 washers – 12 pieces
- self-tapping screws 4 x 45 – 50 pieces (for wood)
- belt – 2 pieces
Attention: The main problem when buying boards is choosing dry wood with stable geometry. The trestles do not have a rigid frame, so “propellers”, boards with a difference in thickness, or chips are not suitable
An approximate estimate for the production of universal folding trestles is as follows:
- belt – 140 rub. (2 pieces per pack)
- bolts included – 75 RUR.
- self-tapping screws – 30 rub.
- board – 1000 rub.
You can meet the amount of 1.25 thousand rubles, that is, at least four times cheaper than when buying ready-made trestles.
Types and components of metal scaffolding
When building a house from stone or building blocks, metal scaffolding is more suitable. They are able to withstand any load. They are less popular only for the reason that in many regions wood is still the cheapest type of building materials. The second point, which is often decisive, is that after dismantling the wooden scaffolding, the boards can be put to work - used in further construction. And metal parts should gather dust in the shed.
But metal scaffolding also has its advantages. When disassembled, they do not take up much space. Owners of wooden houses still have to use them periodically: the log house requires maintenance, so scaffolding is needed every two to three years. In this case, it is more practical to use metal rather than wooden ones. They are easier to assemble, more durable and stronger.
All metal scaffolding has the same shape - vertical posts connected by crossbars and slopes. The only difference is the way the parts are attached to each other:
Pin scaffolding. They are called so because the crossbars and posts are connected using pins. Pieces of pipe or perforated disks are welded on the racks, and bent pins are on the crossbars. This system is very easy to assemble and can withstand heavy loads. Pin scaffolding for buildings of simple shape is very easy to implement; going around bay windows and projections is much more difficult. The principle of connecting pin scaffolds Clamps. For racks and crossbars, round pipes are used, which are fastened together using specially designed clamps. The system turns out to be very mobile and movable; you can easily get around any curved facades. The downside is the limited load capacity and height (according to GOST - no higher than 40 meters). Clamp scaffolding - quick installation/dismantling Frame scaffolding. Frames of the same size are welded from a round or rectangular pipe. They are connected to each other by transverse pipes and jibs. They have a modular structure and can be easily expanded both in height and in length. They have a certain step in length - 1.5/2/2.5/3 meters, in height one section is usually 2 meters, the standard depth is 1 m. Some frames have wheels for easier movement on a flat surface. Connection of flag-type elements - pins with a slot into which the flag is inserted are welded on the frame. Holes are made in the crossbars and slopes. The elements are put on a pin and secured with a flag. Sections are built up using connecting pipes of smaller diameter welded to the frame posts on one side
With this method, it is important to have perfectly selected pipe sizes so that there is no backlash. Frame scaffolding - the principle of fastening the crossbars and wedges. Although generally similar, the designs differ in the form of the connection
On the jays with a certain pitch (usually 2 meters), perforated discs are welded. Special cleft-mouth type locks are welded onto the jumpers at both ends. The locks are fixed to the disk using a specially shaped wedge. Such scaffolding connects and disconnects quickly, has high mobility, and can be used on facades of complex shapes. Wedge scaffolding racks and crossbars are connected using wedges and specially shaped locks
When making metal scaffolding yourself, pin scaffolding is most often used. They are the easiest to implement, however, they are only good on rectangular facades; to bypass more complex shapes, you have to weld additional tubes.
Work area
Actually, that’s why we assemble construction trestles with our own hands - a platform. Depending on the nature of the work performed, the size of the site is also selected individually. The weight that it must withstand must be no less than the weight of a person plus the load from tools and materials. In a word, 150-170 kg will be quite enough for any construction and repair work. The overall dimensions of the platform should be such that it fits into the doorways, which is no more than 70 cm, and its length should not exceed one and a half meters, otherwise it will be inconvenient to maneuver.
Consequently, to make two sawhorses, a platform and, possibly, a wall stepladder, you will need no more than 12-15 meters of edged board, and this is quite a bit to guarantee a convenient eight-legged assistant for any repair and construction.
Nothing extra: mobile trash can
Forgive me for such a natural comparison, but do you know why the horses that drove chaises around the city had a bag tied under their tails? Yes, precisely for this reason, to keep the pavement clean. So my working goat got such a device.
I cut the rim off the paint bucket and cut off the lid. You can attach a garbage bag between the rim and the lid. And the rim itself was fixed with a movable holder
I hope you liked my construction beast. I will be glad if my experience helps someone with repairs
Thank you, Olga! A charming master class from a real craftswoman! It's nice to look at your work. We don't even have anything to add. The only thing you can do is to suggest complicating the task, as in this short video on creating a multifunctional carpentry table:
Watch this video on YouTube
We are waiting for your impressions and comments, as well as new materials in the section “This is not a woman’s business!”
PHOTO: Olga Yarovaya
How my goat became electric and mobile
So, when the main structure is ready, you need to add additional capabilities to it for comfortable work.
To install the electrical extension cord, I made three round holes in the tabletop
I inserted the extension cord, securing it at the bottom with metal perforated tape
Pieces of plywood that were cut with a special drill were used as covers to prevent debris from getting into the sockets
I secured these covers with plastic ties, threading them through the drilled holes.
Slightly going off topic, I’ll say that it would have been better to make the sockets on the side of the tabletop, and not on it. The top location is undoubtedly convenient, but I was constantly haunted by the thought of what would happen if I accidentally spilled something on this table, for example, paint thinner. This thought was not entirely pleasant.
To attach a long extension cord, I used 4 self-tapping screws on the inside of the legs
To prevent the extension plug from dangling, I attached the cheapest socket I found in the store to the side
Now I needed to give my instrument mobility, because I would need it in almost all rooms.
To do this, I cut out recesses from one end of the legs and installed these small wheels. Now the table can be rolled by lifting it from one edge
To prevent the legs from scratching the floors, I glued felt strips on them
My goat turned out to be quick, so the first experience of using it led to damage to the drywall on the wall. To avoid such embarrassment, I rounded the edges of the tabletop
The table turned out to be stable and comfortable, I tested this from my own experience
Complete assembly of goats: what material is required
In order for the trestles to be foldable, each of them will require two door canopies, which will connect the elements. To complete this work, you need to lay the squares one next to the other on any flat surface. They should be located in one line at the ends. If there is no suitable workbench, then all the work can be done on the floor.
At first glance, it may seem that the structure made from scraps of plywood looks flimsy, but this impression is deceptive. After complete assembly, the strength will be at a very high level.
PHOTO: YouTube.comThe elements are located as needed, it’s time to connect them together
Door awning fastening
The canopies are attached to the same self-tapping screws with a slight indentation from the edge of the elements, but without going beyond the joint of the plywood scraps. It is better to purchase canopies with three or even four holes for fixing screws. This will give the structure additional strength.
It is best to use hardened black self-tapping screws (they are also called German, or Germanic). The main thing is to choose the right length so that they can sink into the wood to a depth sufficient for fixation (through both layers), but at the same time do not stick out too much from the back side. Otherwise there is a risk of injury.
PHOTO: YouTube.com Trying on door canopies before final fixation
The final touch in the manufacture of construction sawhorses
Despite the fact that after fastening the canopies, the sawhorses seem ready, they lack stability. If you press from above, the legs will simply move apart in different directions. This means a little modification is needed.
To prevent falls from the scaffolding, it is necessary to install a limiter that will hold the legs in the desired position. A wide and durable canvas belt is ideal for this. Having measured the required length (the same for both trestles), it needs to be fixed on the lower jumpers of the elements. However, simply screwed in screws will not work here. The connection needs to be strengthened. This can be done using a metal profile through which the screws will be screwed.
PHOTO: YouTube.com The canvas belt will perfectly hold the sawhorses in the desired position
Technology for assembling dismountable construction trestles
In order to assemble the structure, you can also use nails - this is the cheapest and most practical option. However, some elements will not hold well after such fixation, and the scaffolding will turn out to be unreliable. The best and fastest way to assemble trestles is with the help of special screws and a screwdriver.
Disposable sawhorses are most often fastened with nails Source ireland.apollo.com
Storage and use of sawhorses
Using our recommendations on how to make a sawhorse, you will create a stable structure, and cutting firewood on it will be a pleasure. You can also view ready-made sketches, photo and video materials on the Internet.
Equally important is the correct use of sawhorses. You should not load too massive and heavy logs on it.
The folding design of the sawhorses is suitable for cutting firewood using a hand saw or chainsaw. This device is simply indispensable in the homestead for collecting firewood and stove logs to light the stove, barbecue or fireplace in the house.
Drawings for manufacturing
Schematic drawing
Dimensions of trestles
- height 811 mm;
- width of the upper base 844 mm;
- minimum width (legs) 711 mm.
Goat drawings in Sketchup
In case you want to change the design and dimensions at your discretion, you can download the file for editing in SketchUp
Download file: scetchup.zip [39.73 Kb] (downloads: 1005).zip
3 Metal sawhorses for cutting wood
Metal products are compact in size, have a long service life, and are highly reliable. Small specimens intended for processing small volumes of wood, and larger machines for large-scale production are made from this material. The cost of a homemade model using scrap metal waste is low. To make them at home, you need to prepare the following materials and tools:
- profile corner 50x50 mm, pipe of similar characteristics;
- grinder, hacksaw;
- measuring tape;
- chalk;
- connecting bolts, welding machine.
A sketch is drawn up listing the main elements and the mandatory marking of each of them. The design of the upcoming product may be different, but in order to give greater durability, two additional profile elements at an angle or a transverse beam of the base are additionally installed. For example, from a piece of pipe. In the second case, it is necessary to protect the saw teeth from contact with the beam, so at the final stage of assembly, a piece of timber is secured on top.
The fastening points are marked by welding or bolts. If a bolted connection is provided, then additionally indicate the location of the holes. A system assembled by welding is one-piece; a dismountable system is more mobile.
All parts are cut according to the intended dimensions using welding or a grinder. To prevent sliding and turning of the logs while sawing, a jagged edge is prepared on the inner side of the outer legs. For the safety of further work, the cut sites are processed, removing scale, burrs, and other defects from each edge. The product is being assembled. To protect against rust, non-demountable structures are treated with an anti-corrosion compound.
You can build a mobile version of folding trestles from metal. The simpler the design, the less often the device breaks down, so this type of machine is manufactured as simply as possible. When folded, it takes up little space, is convenient to store and transport, but more manufacturing and assembly costs are required.
The main difference is the mobility of the X-shaped support; it can be folded like scissors. The bolts are not fully tightened, to prevent them from unscrewing spontaneously, an additional lock nut is installed. Installing a limiter helps fix the supports in the desired position. This can be a metal chain attached to one leg of the support, and a hook is made on the other to hook it.
Tools and hardware
Before starting to manufacture a device for sawing wood and metal elements, you may need:
- nails;
- self-tapping screws or self-tapping screws;
- hacksaw (for metal or wood);
- drill (for drilling metal for fastening);
- roulette;
- chalk or something for marking;
- hammer;
- axe;
Depending on the type of construction, you may need something else in addition; this must be taken into account before starting work, so as not to be distracted from the process later.
Mobile trestles made of wood
The design of conventional trestles has rather large dimensions and weight, which is a serious obstacle when transporting the machine. But you can also make a mobile installation with your own hands, which will be foldable and can be easily carried. But, as a rule, such plans require more costs and time to assemble.
For folding trestles you will need the following material:
- durable, but small in diameter wooden beams. You will need at least 4 units of them;
- for the base of this structure it is best to use a metal pipe with a length of 1 to 3 meters;
- since the design is folding, you will need a limiter (you can use a strong rope, a small chain, a good belt or cable);
- To connect the components you will need a wood drill. It is worth choosing the most durable option.
To avoid unnecessary costs and reduce the likelihood of device breakdown, this machine is manufactured as simply as possible. You need to start the assembly with the beams. You can make them yourself from a 50 mm board. After receiving the finished material, it is necessary to mark the location of the cut where the legs for the trestle will subsequently be installed.
After drilling a hole on each strip for the pipe, the base is inserted into them, and the legs are set in their places. Next you need to make a limiter for the racks, which will not allow the legs to move apart.
Mobile wooden sawhorses for sawing firewood
Here you should be careful, choose the same length for both sides, which will allow the sawhorses to open 350 to 450 degrees. Thus, a structure will be assembled that will be easy to fold and store in small spaces.
Materials
Making goats is quite simple, but for this you need suitable material, which may be suitable:
- wooden beams or poles. Wooden sawhorses for firewood are the easiest to make, but they are not resistant to high humidity and can quickly fail, this largely depends on the type of wood and storage conditions. They deserve a great advantage because they are very economical in financial terms;
- metal. Structures made from this type of material are highly reliable and can last forever if rye is not allowed to appear. You can even use metal elements that are only suitable for scrapping.
Leg assembly and fitting
The performance of the device depends on the quality of the marking of the hole for the bolt. Therefore, preliminary fitting using technology is necessary:
- the leg is placed on the table so that the cutout hangs over the tabletop (you can use a stool, chair)
- the support bar (upper) is installed vertically in the groove
- a second leg is added on top of the first (the bar should fit snugly into the cutouts in both parts)
- the structure is temporarily tightened with a clamp
Then the following operations are performed:
- Using a vertical square, the intersection of the legs is transferred to the side surface on both sides of the structure
- the resulting points are connected by a line, which becomes the vertical axis of rotation
- the longitudinal axis of the leg is marked with a square
- at the intersection of these lines there will be a center for the hole of the M10 bolt, which is the hinge of the connection
Attention: The holes must be perpendicular to the plane of the boards, so a jig is required. They can serve as a cut in a block pressed to the leg with a self-tapping screw or clamp
If the hole is inclined, the legs will not be able to transform into the working position.
The legs are assembled in stages:
- the bolt goes through one piece
- two washers are put on it to facilitate the rotation of the wooden elements relative to each other
- the second leg is put on the threaded part
- the hinge joint is secured with a nut
The result is a set of two legs, into the cuts of which a support bar is easily inserted from above.
Design and use cases
Unlike classic trestles, universal trestles are folding, which makes storage and transportation easier. The design of the carpentry and construction device is as follows:
- legs with spacers, hingedly connected to each other
- removable support bar
- belt tie at the bottom
The device allows you to harvest firewood, cut long lumber and support scaffolding panels (you will need 2 pairs of trestles) by default. A wooden table top can be attached to the support crossbar to accommodate power tools (for example, a cross-cut machine, a drilling machine, a sharpening machine).
If you assemble a lightweight frame from boards or plywood, you can build a large-sized carpentry table-workbench from two trestles for assembling furniture.
Cutouts in the support strip allow you to work with tubular workpieces and press the lamellas of the joinery parts being glued together. On one side of the trestles you can attach a sheet of plywood, gypsum board, OSB for marking, straight or figured cut.
Assemble the frames
1. To make half-wood joints, install a 19 mm thick groove disk into the saw machine and make test joints on scraps with a cross-section of 19 × 114 mm, setting the sawing depth equal to half the thickness of the workpiece. Cut cutouts in legs A and crossbars B for half-tree joints (Fig. 1 and 2).
2. Glue the A/B leg frames together and secure them with clamps. When installing clamps at half-wood joints, in order to evenly distribute the pressure over the entire gluing area, place wooden scraps under the jaws of the clamps. Check the squareness of the assembled frames.
3. Create a 15° bevel on the top edge of each A/B frame (Photo A).
Set up a circular saw to cut the bevels at 15°, attach a flat board to the A/B leg frame, and cut a bevel on the top edge of the frame.
Assembly diagram
- Place two more boards in the shape of a rectangle on the inverted structure and connect them. It turns out to be flooring or an area for work.
- Take four more wooden panels with dimensions 1100x100x30 and attach them at the ends. The result is a structure somewhat reminiscent of a table.
- The next step is to strengthen the structure with boards 1700x100x30mm and 1500x50x30mm. They must be attached so that the opposite reinforcements are in different diagonals.
- And the last point is attaching the ladder. For more convenient operation, the steps at the bottom can be made with a small protrusion. You select the length of the stairs based on individual preferences.
- That's it, your goats are ready. But for safe construction and repair work they need to be checked. To do this, we place any objects with a large weight on the surface; if the trestles can withstand it, then you can not be afraid and safely use them in installation.
Drawing of construction trestles. DIY installation
When carrying out any work related to repairs or maintenance of the house, it is required to rise to a certain height. If you can screw in a light bulb with a chair, and cover a small crack with a stepladder, then extensive work requires greater mobility.
To move at height, construction trestles, otherwise called scaffolds, are created. Ready-made structures are available in construction stores, but prices run into thousands of rubles. It’s easier to make them yourself, and it costs several times less.
Construction trestle structure
Before you start making construction trestles with your own hands, we select materials for production. There are three main materials from which goats are made:
- metal;
- tree;
- wood-metal combination.
Since metal ones are difficult to create and quite expensive in terms of materials, let’s consider wooden trestles.
After choosing a material, it is worth understanding the conditions of their use. If these are stationary or rarely moved scaffolds, then it is worth creating a disposable scaffold. If you plan to move the trestles frequently, we choose folding trestles.
Before starting carpentry work, we create a drawing and calculate the required height. The standard height for comfortable work for an adult man is 80–90 cm.
For a finished product with a height of 85 cm, legs 95 cm long are needed.
The length must be chosen such that when a construction site board is placed on top, the beam protrudes at least 5–7 cm on each side, but it is better to take it with a margin.
The design is extremely simple, when open it resembles the letter “A”, and can be used both at a low height and with the help of two trestles at full height.
Preparation
After creating the drawing, you need to decide how long the platform will be, and how many trestles will have to be made for it. Goats are always created from two or more - if the board being applied is long and can break in the middle.
Collapsible wooden construction trestles
The advantage of collapsible trestles over a conventional platform is their reusability and the ability to quickly remove them from storage and use. In conventional scaffold construction, only boards fastened with nails are used.
After completion of work, it is difficult to leave them for storage unassembled. To ensure that such scaffolds do not take up much space, they have to be dismantled, which is difficult if they are made with high quality.
Collapsible trestles do not take up much space; they can be transported and used for various needs other than their intended purpose. To create a sawhorse, you need two supports.
To make one support you will need:
- four boards for legs - 0.95 m;
- board 0.9 m for the top;
- three crossbars of 0.85, 0.77, 0.7 m each.
Carpentry work
The goats are assembled in accordance with the recommended instructions.
- Make markings on the legs, cut off excess wood on both sides at an angle of 800. The cuts should be parallel.
- Use the finished leg as an example and make the rest.
- Check that the ends of the top board, which will support the platform, are at an angle of 900.
- On the boards of future spacers, measure an angle of 800 at one end and 1000 at the other. Cut.
- The blanks are ready, now the space for the top board is cut. To do this, fold the two finished legs into the position that they will take when open, draw an angle of 900, and cut. All the others cut through this leg.
- The legs are connected like scissors, a rotation axis is drilled into them, in which the bolts are not fully tightened, allowing the legs to open and close.
- All that remains is to make spacers between the finished legs, two on the wide side and one on the narrow side. Then fasten the tension belt to the lower spacers.
- One support of the future construction site is ready, the second one is being assembled according to the same scheme.
Collapsible trestles are an easy and inexpensive way to create a construction site that is durable, mobile, and able to support the weight of an adult man, as well as building materials.
Images from www.forumhouse.ru were used for this material.
Ideas for using waste lumber
Let's consider what products can be made from scrap boards in your free time.
The list of crafts that we will discuss below includes the following categories:
- a country stool is a necessary thing in everyday life that you can not buy, but make from improvised means;
- a chair that will not only serve as a comfortable element of the surroundings, but will also become an interior decoration;
- lampshade for a lamp, which will look natural in the interior of a house decorated with wooden paneling;
- New Year tree, which will come in handy on the eve of the winter holidays.
Of course, the list of crafts is incomplete, so you can add your own ideas to the ideas already proposed by leaving a comment on this article.
Assembling the stool
The photo shows a stool that you can make yourself
To assemble the stool we will need:
- cutting boards 60 cm long and at least 2 cm thick;
- self-tapping screws for assembling all the parts together;
- paints and varnishes for finishing the finished product.
Tools you will need:
- wood hacksaw;
- screwdriver with drill function;
- sandpaper to level the cut line;
- brush;
- container for mixing paints and varnishes.
Bottom view of the stool
The manufacturing instructions are as follows:
- we cut blanks for the seat from two boards;
- we prepare 4 blanks for the legs;
- in the lower part of the blanks for the legs we make an oblique cut, as shown in the photo;
- We connect the blanks for the legs together with self-tapping screws, so that the cut corners are on the inside of the structure;
- We attach the seat on top of the legs;
- We sand the finished product with sandpaper to remove splinters and irregularities from the ends.
Important: When tightening the screws, we recess their heads so that they are flush with the surface of the lumber used. As a result, we know how to make a simple and yet reliable stool within half an hour, which will be an excellent addition to a set of homemade country furniture
As a result, we know how to make a simple and yet reliable stool within half an hour, which will be an excellent addition to a set of homemade country furniture.
In order for the finished stool to last as long as possible, after assembly it should be covered with a layer of varnish or paint. As a result, if you accidentally forget your own outdoor furniture, it won’t cause much harm.
Assembling the chair
Do you dream of designer furniture, but the high price is stopping you from buying it? It turns out that a designer chair that can decorate any interior can be made with your own hands and the material costs will be very small.
A designer chair that is not difficult to make
So, in the photo there is a chair, the price of which can be several hundred dollars. Meanwhile, it is enough to use your imagination and it will become clear that anyone can make such an element of the surroundings.
What is required to assemble a similar chair?
- A large number of small planks that can be split from waste construction lumber;
- The frame of an old chair that you wouldn’t mind sacrificing in the name of creativity;
- Glue for working with wood.
We make small boards for finishing the chair as follows:
- We place a piece of board on its edge at the site of the cross section;
- With precise blows of the ax we break off chips about 1 cm thick.
The frame of an old chair is the basis for creativity
It is clear that the chips will not be of the same thickness, but this is not important, since the finished chair will have to be covered with many such parts and the difference in their thickness will not be noticeable.
As glue, you can use compounds designed for working with wood. But the disadvantage of such compositions is that they take a long time to dry. And in addition, you will have to provide strong pressure on the slats for the entire time necessary for drying.
Given the number of parts, fulfilling this condition will not be easy at all. Therefore, we recommend using two-component compositions based on epoxy resins and a hardener as glue. Such compositions dry quickly, as a result of which it will be easy to assemble the chair.
Other goat options
The most widely used for sawing single thick logs with chain saws are various sawhorse designs with fixation of the rear part of the log.
These are the ones that are produced most industrially, besides the cruciform ones.
Their designs are so simple that they do not need detailed descriptions; everything can be seen in the photo. Such sawhorses for sawing firewood can be made by any home craftsman who is more or less able to hold a tool in his hands. The main thing here is the ability to balance the dimensions of the support platform with the size and weight of the logs being cut. It may not have a rectangular shape, or even be completely replaced by stops. I liked this goat design for its simplicity and minimalism.
Or this option, designed for very thick, but not long logs:
And finally, we will present a wooden structure that is very successful for home production, which is also guaranteed to ensure that the saw does not jam due to the small width between the saw stops at the cutting site.
In such sawhorses, the log is laid with equal overhang on the sides for stability, and is sawn in the middle. Next, do the same with the resulting pieces.
In all cases, when making a trestle yourself, you choose the height individually, so that, first of all, it is convenient for you.
Dear readers, if you have any questions, please ask them using the form below. We will be glad to communicate with you;)
Do-it-yourself sawhorses for cutting wood? Easily! Good owners make sure in advance that they have enough firewood in stock for the winter. To prepare them, you must have an indispensable tool for all owners of private houses - a sawhorse for sawing firewood.
This is a fairly simple design that everyone should have in their dacha to make it convenient to process, prepare firewood and saw metal strips or wooden boards with millimeter precision.
Making goats with your own hands is quite simple, and even someone who does not have any special skills can handle it.
Kinds
To make a classic version of such cutting equipment, you will need any of the following materials:
Despite the fact that the design itself is simple, sawing sawhorses can be classified as machines. For this reason, during production, certain conventions must be observed, one of which is the presence of a drawing or plan according to which the assembly will be carried out. When planning, it is worth signing all the dimensions; this also applies to even the smallest details.
Criterias of choice
The main thing to pay attention to when assembling is the dimensions. This will be affected by:. All the time spent on work will depend on what sizes are chosen.
The best option is to make the machine with a height of 0.9 to 1.1 m. Thus, the person who will work will not bend his back too much, and his arms will be positioned horizontally. It will be easy to work and the load on your back will be reduced
All the time spent on work will depend on what sizes are chosen. The best option is to make the machine with a height of 0.9 to 1.1 m. Thus, the person who will work will not bend his back too much, and his arms will be positioned horizontally. It will be easy to work and the strain on your back will be reduced.
Features of using tools when working on sawhorses
If you plan to process wood with a regular two-handed saw, then you will definitely need a reliable support for the second one. For this reason, when planning, take care of the presence of such elements. An affordable option is to create a support from timber, which will give you the advantage of installing a support anywhere. When using a power tool like a chainsaw, make sure there is a sturdy surface on the sawhorse.
Goats for sawing firewood with a chainsaw have their own characteristics, since there are differences in operating rules that affect the safety of the worker. In this case, you will need to take care in advance of a place for free hanging of the material that will be sawn. This way you can avoid the tool getting caught in the sawn blade.
Goats for working with a hand saw
Most often, a regular saw is used for harvesting wood; this allows you to cut small-sized logs. Goats for such purposes may have standard dimensions. To assemble such a structure you will need the following materials:
- Beam with a section of 100 by 100 mm. This thickness of wood is enough to create a stable structure. The length of the material is taken from 1 to 1.5 meters.
- Beam for legs of smaller diameter. For supports, material from 50 to 50 m in cross section and a meter in length is suitable. The goat will have 4 legs in total.
- Material for crosses. The “horns” of the structure are made of 10 by 10 cm timber. Some structures require reinforced legs. For them, timber with a cross section of 30 by 30 mm or more is used. For stability you will need 4 supports, but you can leave only two.
- Fasteners. It is best to use self-tapping screws to connect parts. The diameter of the cap is 45 mm and the length is 100 mm. The entire product will require about 40 fasteners.
- Coating. In order for the timber to remain intact for a long time, it must be impregnated with varnish or other protective compound.
The material will be required for homeowners who do not have building materials on the site. Those who have scraps of timber or pipes left over from other work can use them in assembling the trestle.
To create the design you will need the following set of tools:
- hacksaw for cutting timber;
- corner for aligning parts of the structure;
- pencil for marking;
- hammer or screwdriver;
- roulette;
- finishing coat and brush.
Once the material has been purchased, assembly can begin. The goat frame is made starting with wood processing. To do this, use a tape measure and a pencil to mark the cutting areas. They need to be made 6 on each side. There will be 12 of all grooves for connecting the legs and crosses. With a beam cross-section of 100 mm, the depth of the groove is 25 mm, this is enough for a strong fastening. When cutting the grooves, make sure that they are a couple of millimeters smaller than the legs. After marking and making grooves, all parts are assembled into a single structure.
After assembly, fastener reinforcements are installed; they enhance the strength of the structure and make work safer. To do this, saw off the bottom of each leg so that there is enough space to install a new fastener. After assembling the product, it is treated with a protective compound. To do this, use varnish or stain. When the structure is dry, it can be used.
Leg assembly and fitting
The performance of the device depends on the quality of the marking of the hole for the bolt. Therefore, preliminary fitting using technology is necessary:
- the leg is placed on the table so that the cutout hangs over the tabletop (you can use a stool, chair)
- the support bar (upper) is installed vertically in the groove
- a second leg is added on top of the first (the bar should fit snugly into the cutouts in both parts)
- the structure is temporarily tightened with a clamp
Then the following operations are performed:
- Using a vertical square, the intersection of the legs is transferred to the side surface on both sides of the structure
- the resulting points are connected by a line, which becomes the vertical axis of rotation
- the longitudinal axis of the leg is marked with a square
- at the intersection of these lines there will be a center for the hole of the M10 bolt, which is the hinge of the connection
Attention: The holes must be perpendicular to the plane of the boards, so a jig is required. They can serve as a cut in a block pressed to the leg with a self-tapping screw or clamp
If the hole is inclined, the legs will not be able to transform into the working position.
The legs are assembled in stages:
- the bolt goes through one piece
- two washers are put on it to facilitate the rotation of the wooden elements relative to each other
- the second leg is put on the threaded part
- the hinge joint is secured with a nut
The result is a set of two legs, into the cuts of which a support bar is easily inserted from above.
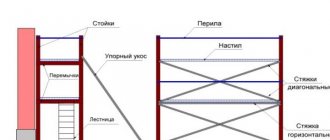
Features of manufacturing wooden scaffolding
If you decide to make trestles from wood, then the step between the racks can be equal to the limit of 2 to 2.5 meters. As for the width of the flooring, it should be equivalent to one meter. You should not make the structure too high; the maximum height limit is 6 meters. To carry out the work, it is necessary to prepare boards 50 millimeters thick. As for their width, this figure should not appear less than 100 millimeters. You can replace such blanks with a square beam of 10 cm. The racks and stops can be based on round timber. Spacers and barriers are typically made from boards that are 30 millimeters or more thick.
Choosing a place to build
When choosing a place to build a goat house, give preference to a small hill or plain. In the lowlands, the barn will be damp, which means the animals will constantly get sick and waste away.
Before construction, the area for construction must be cleared of vegetation: remove trees and shrubs with maximum uprooting of the root system. After preparatory work, level the area.
Keep in mind that each adult goat needs about 1 square meter. m. area, and for kids - 0.6-0.8 square meters. m. Place the building on site so that the façade and walking pen are located on the south side.