Selection of lumber for scaffolding
Pine boards and beams are used to make scaffolding. This is explained simply: it is the cheapest, is always available in any warehouse and is available in various sizes. When choosing softwood lumber, their grade is taken into account (according to GOST 8486). This is important because, for example, you will have to overpay for first-grade boards, while third-grade lumber will call into question the reliability of some elements of future forests.
Optimal from the point of view of availability and strength is second-grade lumber. It is these boards and beams that are best used for the construction of scaffolding.
In practice, this means that lumber must meet the following criteria:
- have no more than three knots per 1 linear line. m (the knots should not be located in the middle of the board);
- mushroom core spots and stripes are allowed no more than 20% of the total area of lumber;
- up to 4 resin pockets per 1 linear m.
These are not all varietal characteristics, but from them you can visually determine the category of the material, and what is more important, they directly affect the structural reliability of the structure being built.
About choosing fasteners
As for fasteners, they are usually faced with a dilemma - nails or self-tapping screws. For the construction of wooden scaffolding, the best option would still be to use ordinary (smooth-bodied) nails. They are made of “mild” low-carbon steel, due to which they better withstand static and variable loads, which especially often occur on scaffolding. To put it simply, they may bend, but not break.
Self-tapping screws are more convenient. At least from a practicality point of view. They significantly speed up the assembly of the structure, they make it easier to accurately position the fixed parts, while they provide the same quick and easy dismantling of the structure (with minimal damage to the lumber). But given the fact that self-tapping screws are made of hardened steel, and their working fluid has a relatively small diameter, such fasteners are less resistant to shock or variable loads and often break.
To a greater extent, this problem is characteristic of oxidized screws (black) and to a lesser extent – anodized (yellow and white).
When making homemade scaffolding, as a compromise, you can use both types of fasteners: loaded nodes can be fastened with nails, and less critical ones with self-tapping screws. The length of the nails for loaded scaffolding elements is selected in such a way that when hammered, their ends protrude by 2-3 cm. After this, they are bent across the fibers and sunk into the wood.
Construction of scaffolding for construction
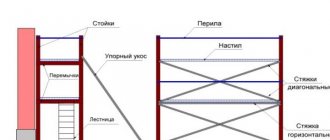
The average person who wants to figure out how to assemble scaffolding will find many options and methods. Despite this, the equipment for almost any type of scaffolding will be standard, and it will include:
- Vertically located racks that can withstand heavy loads and transfer them to the ground surface.
- Diagonal ties, with the purpose of strengthening the skeleton of the structure and enhancing its rigidity indicators.
- Horizontal jumpers, the purpose of which is to lay flooring boards on them.
- Directly the flooring, consisting of boards capable of holding a large load.
All of the above is usually supplemented by the following elements:
- fencing (railings) protecting workers from the risk of falling;
- persistent slopes that prevent the possibility of scaffolding overturning;
- ladders for transition between tiers.
Advantages and disadvantages of wood for scaffolding
We analyze the features of wood and compare it with metal scaffolding.
pros
- The main advantage is the ease of assembly. To join prefabricated elements, you do not need a welding machine or other professional equipment. No special skills required. Anyone who knows how to use a hammer can handle the job. Mounting a metal base is much more difficult. It takes practice to weld a seam correctly. It is impossible to learn how to use an electrode from photos and video instructions. Renting or purchasing models with screw connections is not always possible.
- You can use ordinary boards and beams as blanks. The tower can be easily constructed from available materials. The only requirement for blanks is their reliability. Often, excess building materials left over after repairs and pallets used during transportation and storage are used.
- Upon completion of the repair work, the frame is disassembled and the parts are used as needed. Steel tubes are more difficult to adapt for household needs.
Minuses
- Greater flexibility compared to metal. Flooring laid on a frame made of profiles or rods will sag underfoot.
- Metal is stronger, so to give the beam base stability and rigidity, you will have to make it more massive.
- One of the disadvantages is the fire hazard. Even after treatment with fire retardants—compositions that impede combustion—the parts maintain a flame.
- All elements are attached to nails and screws, which weaken the edges, so it is not recommended to use the array more than twice.
Elements of homemade scaffolding
- Supporting frame - all other parts are attached to it.
- Flooring - it can support the weight of one or more people. To make it more convenient to work, tools and materials are dragged upstairs. The total load is several hundred kilograms.
- Stairs to the lower tier and between tiers.
- Fences.
- Stiffening ribs, which are spacers located vertically and diagonally.
- Stops are diagonal beams that support the platform. Their bottom rests on the ground, their top on the platform or base.
Options for assembling homemade structures
Towers on four supports - to increase the surface, they are connected together. The base is a frame made of boards or beams. This method allows you to create multi-tiered structures and ordinary two-meter pedestals. It is often used when you need to reach the roof or the third floor.
A wall is sometimes used as supports located on the inside of the frame. Nails do not leave noticeable marks on unpainted or unfinished surfaces. Any cladding after such an intervention will have to be changed or repaired.
A-frame trestles consist of two homemade stepladders, on which flooring is laid on top. Suitable only for low-rise buildings and are mainly used for finishing. The design is simple and unreliable. It is advisable to nail down the horizontal platform with nails - otherwise it will have to be constantly adjusted. It is quite narrow and designed for only one person. There are no railings or steps. They climb up using a stepladder or ladder.
To assemble such wooden scaffolding with your own hands, drawings are not needed, but quality control of lumber is still necessary.
Extension scaffolds - they are also called Armenian. Instead of a four-legged frame, diagonal holders are used here. The bottom rests on the ground, the top rests on a corner fixed to the wall of the building. Boards perpendicular to them are nailed to the holders. One side of them is attached to the wall, the other serves as a base for the work surface.
Shelves that differ from Armenian rafters in the method of fastening. They do not have a central diagonal holder.
The load is carried by a system of perpendicular beams. The vertical row is nailed from below to the wall, the horizontal row is located on top at a right angle to it. The horizontal board, together with the flooring, is held in place by boards that form an acute angle with it. The shelves are designed for light loads. After them, noticeable marks from wide nails, anchors or self-tapping screws will remain on the surface. Without a diagonal holder, the thickness and number of fasteners will have to be increased.
Rules for constructing a frame
First, prepare the soil on which the scaffolding will stand. Then they begin to install the scaffolding from the profile pipe.
Preparing for installation
It is necessary to compact the soil well where the scaffolding support posts will be installed, and provide drainage in case of rainy weather. It is better to prevent water from flowing under all supporting elements so that the soil under them does not erode.
Installation
The procedure for installing walkways from a profile pipe is as follows:
- Assemble vertical staircase posts. To do this, horizontal crossbars are mounted to the supports to form a ladder.
- Next, the intermediate racks are assembled. They differ from staircases only in the absence of steps. Only the horizontal crossbars are the same.
- Vertical posts are secured with side struts.
- After mounting and installing the stairs, horizontal supports are installed and the flooring is laid on them.
- Then, in the same sequence, the parts of the second floor, third, etc. are assembled.
When assembling scaffolding with your own hands, follow the drawing.
How to choose a professional pipe, how many pipes will be needed
For vertical racks, it is advisable to use profile pipes with a side of at least 40 mm. These can be pipes 40 × 40, 40 × 60 or 40 × 80 mm. For horizontal crossbars, you can use corrugated pipe 40 × 40, 40 × 30, 40 × 20 or, in extreme cases, 30 × 30 mm.
Some suggest using a profile pipe with a side of 20 mm. I do not recommend doing this, since the thin profile pipe has a small fastening area, and the side horizontal supports, together with the flooring on which the workers and building materials are located, are fixed with only four connections.
The rungs of the staircase posts are made from a profile of the same size. If they are thin, then bringing the building material onto the flooring will be extremely inconvenient.
If the size 40 × 20 is chosen for the steps, then it is better to mount them flat, with the wide side parallel to the ground. But the profile pipe for the side horizontal supports, on the contrary, has the narrow side facing the ground so that it does not bend. By the way, this is the advantage of a profile pipe compared to a round one - it is more resistant to bending.
We recommend reading: Retractable staircase to the attic: design nuances and installation rules
For side braces or side diagonal braces, a 20 × 20 mm profile pipe is sufficient. The amount of material depends on the height for which the walkways will be designed, the number of intermediate struts and the span length used - 2 or 2.5 m. The standard width is 950 mm for a 1 m deck.
For the option described below, you will need 10 m of profile pipe 80 × 40 mm, 4 pieces of 2.5 m each. For horizontal crossbars you will need 8.65 m, 4 pieces of 2.16 m of profile pipe 40 × 20. Diagonal crossbar length 2, 85 m is the same standard size as the horizontal ones, but it can be thinner.
The steps are made from a 40 × 20 mm profile pipe; you will need 12 of them. 1 m long. In order for the distance between the supports to be 950 mm, they must be recessed into the square holes of the racks. For metal flooring you need a sheet of 2 × 0.95 m with a thickness of at least 4 mm.
How to assemble metal scaffolding with your own hands
To replicate a convenient and compact design with your own hands, I suggest an option with a height of 2.5 m racks made from a profile pipe. They are suitable even for interior construction work where the ceiling height is more than 2.5 m. When used externally, these walkways are suitable for almost any one-story house. They are easy to install or dismantle with your own hands, or move to another place. They are shown in the photo above.
Required tools and materials
To mount scaffolding from a profile pipe, it is better to use an autogen or semi-automatic machine, because it is almost impossible to make a high-quality connection with a simple inverter. Horizontal crossbars, as I wrote above, are subject to heavy loads. Therefore, you need to burn holes where the crossbars or steps will be inserted.
The connection is then scalded until a reliable fastening is obtained. To do this, it is better to use gas welding or semi-automatic welding. But it’s even better to make square holes using a drill and a punch. This option is preferable.
You will need a grinder, a tape measure, and a metal marker. Made of material - 10 m of profile pipe 80 × 40 mm and 23.5 m - 40 × 20 mm, metal sheet 4 mm thick and 2 × 0.95 m in size. Can be made from 2 pieces 1 × 1 m by cutting or bending the edges with your own hands.
Drawings and diagrams
The scaffolding, the diagram of which is shown in the drawing, is made of profile pipes 80 × 40 mm and 40 × 20 mm.
A crossbar with a metal profile deck is shown in the figure below. There are plates welded on the edges - they will prevent the sheet from sliding off the supports.
Step 1. Preparing the spacers
Blanks for spacers are cut from pipes with a diameter of 15 mm: the length of horizontal ones is 96 cm, diagonal - 2 m. After this, cuts 6 cm long are made at the ends of two-meter tubes and flattened. This will make it easier to attach the spacers to the supporting posts.
Preparing the spacersPreparing the spacers
Step 2. Making adapters
To build up scaffolding, you will need connecting elements - adapters. They are made from profile pipes: 25x25 mm pipes are cut into pieces 30 cm long, and 8 cm long blanks are cut from 30x30 mm pipes. Short blanks are put on long ones and welded in the middle to prevent shifts.
Adapters
Step 3. Frame assembly
Racks
Two vertical posts are connected to each other by horizontal struts, welding them every 30 cm. The result is a frame in the form of a ladder. The second frame is assembled in the same way. Square plates 70x70 mm are cut out of sheet metal and welded flat to the lower ends of the support posts. Thanks to this, the section racks will not sink into the ground, although on soft soils dense wooden planks are additionally laid under the metal plates.
Step 4. Section installation
Assembly of the structure
Two frames are installed vertically, one opposite the other, and diagonal struts are tried on. Mark the fastening points with a marker, then drill holes for the bolts in the posts and spacers. Connect all the parts together and check with a level that the upper crossbars are horizontal. If the structure is skewed, you will have to additionally adjust all the elements, otherwise it will be difficult to stand on the scaffolding.
Step 5. Making the flooring
Assembly diagram
Flooring boards can be laid in two ways - along the length of the section and across. For transverse flooring, horizontal pipes are bolted to the sides of the structure at the level of the upper struts. For longitudinal flooring, take boards at least 2 m long, knock them down along the width of the sections, and reinforce them from below with transverse bars to prevent deflection.
To ensure that the flooring does not move during operation, a metal U-shaped profile should be secured to its ends according to the thickness of the spacer. To do this, lay the finished shield on the scaffolding and mark the line from below with a marker where the horizontal spacer touches the boards. Markings are made in the same way at the other end of the shield. Next, take a profile 17-20 mm wide, cut it to the width of the flooring and screw it with self-tapping screws to the boards on the marked lines. Now, when the flooring is laid on the scaffolding, the spacers will be inside the profile, which will not allow the boards to move.
Painting scaffolding
It is needed not so much for beauty as to prevent metal corrosion. Therefore, I advise using acrylic or alkyd paint. Before painting, it is advisable to treat the product with an anti-corrosion solution, wash off the dirt with a solvent, and wipe the scaffolding with a rag. It is advisable to paint all welded parts in 2 layers.
If you paint it with light paint, then any elements of corrosion will be clearly visible. Therefore, they can be noticed in a timely manner and re-processed: painted or repaired with a welding tool.
Drawings and dimensions
Wooden scaffolding must be assembled according to drawings, which are drawn up taking into account the features and dimensions of the facades and interior spaces. For self-assembly from wood, attached scaffolding is best suited because it has good stability and does not require a lot of time for installation.
For them, you can use third-grade wood without defects, which can then be recycled for firewood after completion of the work.
The maximum length can be no more than 6 meters, otherwise such a structure will be difficult to move along the facade or indoors. It is also necessary to take into account that scaffolding should be located at a distance of no more than 15 cm from the outer wall. When carrying out interior work, such structures should be located at a distance of no more than 10 cm from the wall.
Here are drawings of different types of scaffolding structures:
The simplest are considered to be attached scaffolding, which are used when covering the facade of a low-rise building with siding, when lining gables. When carrying out plastering work, finishing the facade with stone or facing bricks, it will be necessary to assemble more durable scaffolding structures.
The attached scaffolding consists of several elements:
- racks;
- lintels on which the boardwalk is laid;
- spacers and stops that give the scaffolding rigidity and strength;
- fencing in the form of wooden railings.
If you plan to climb to the top of the wall, you will need to use stepladders and ladders so that you can climb to the desired level of the wall. The dimensions of scaffolding depend on the size of the walls next to which they are installed.
It is not recommended to make structures that are too large, as they will be difficult to move along the walls.
Manufacturing process
Initially, you should put together the correct frame with your own hands. In most cases, it is more rational to use attached scaffolding, which will require less lumber. In order to correctly make home-made structures, which you can then simply attach to the wall, you should adhere to installation technology that will help you assemble wooden scaffolding yourself.
In order to build a reliable structure where you can work safely on the extension for finishing work, you must adhere to a certain scheme.
Frame
Before starting work on assembling the frame, the site should be leveled and, if necessary, drained so that the finished structure does not wobble during work. On a flat area it is easier to install vertical frame posts, under which you do not have to place bricks and cuttings of boards.
The first to install are 4 vertical posts, for which timber measuring 10x10 cm or thick boards 4-5 cm wide are used. The drains are cut to height and fastened together using horizontal bars or short boards. First you need to assemble the sides of the frame on the ground, after which they are lifted and fastened with parallel elements. Racks for the frame, for better stability, are better made in a trapezoidal shape. For example, the lower strut of one sidewall can be made 1.2 meters long, and the upper one 1 m long.
- When assembling the sides of the frame on the ground, it is better to work together. If the frame assembly is carried out by one person, then first you need to strengthen the internal spacer on the wall.
- There should be several paired racks. They are a support for the flooring, which diverges in different directions. The stand can be single. In this case, its length should not be more than 4 meters.
- To make the structure stable, you need to make diagonal struts on each side of it, which will act as stiffeners and prevent the scaffold from swinging.
Flooring
When the scaffolding frame has been assembled, you can begin installing the panel flooring, which is made from boards 4-5 cm thick. When laying the flooring, you should remember that there should not be large gaps between the boards. The length of one span of flooring should not exceed 3-4 meters if the thickness of the boards is 4-5 cm. For thinner boards the length should be no more than 2 meters.
Hatches and ladders
To climb to the upper tiers, you will need to make a ladder with steps measuring 5x5 cm. The interval between the steps is selected individually for the person who will work on such a ladder.
If the scaffolding is two-tiered, then you need to make a hatch to climb to the second floor. It is usually done from the side. A hatch in the center will interfere with work. A ladder is nailed to the hatch, which will be used to climb to the second floor of the scaffolding.
Attached scaffolds
This element helps to lift containers with working compounds to the upper tier and for the finishers themselves to climb. It is also assembled from boards independently. The scaffolding rests against the ground at one end and against the wall at the other. Most often, frame or attached structures are used, which are considered the most reliable. They are based not on a frame, but on a frame, which increases their strength and ensures safe movement on the stage.
For their manufacture, a beam measuring 5x15 cm and a board 3-4 cm thick are used. All wooden parts are fastened with nails.
A support is made from two boards 1 m long. One element is mounted vertically and looks down, the second to the side. The parts are connected at right angles. The flooring is laid on this base in increments of 1-2 cm. Then, to strengthen the structure, jibs made of diagonal beams are attached to the formed corner. Their underside should rest against the ground. To fix the lower part of the scaffold, a stake is driven into the lower part. Its upper part is nailed to the base.
In the space created by the sides of the corner, panels are placed on each side, which will ensure the rigidity of the structure. Flooring is placed on top.
The construction of wooden scaffolding takes little time if you follow the proposed scheme. The better and more reliable the structures, the faster the finishing work will be carried out. The safety of those who have to work at height directly depends on scaffolding. When carrying out construction or repair work in low-rise buildings, you cannot do without such structures. Therefore, you need to know how to quickly and correctly assemble such a structure from boards on your own.
Video description
The sequence of creating scaffolding from boards with your own hands, design features and assembly procedure are discussed in detail in this video:
Typically, production is carried out section by section, and if necessary, the entire structure is extended or raised by adding additional sections and connecting them using boards.
Important! When assembling wood scaffolding and using nails, it is recommended to pre-drill holes for fasteners. This will significantly increase labor costs and installation time, but is guaranteed to prevent the board from splitting during operation.
Construction trestles
There is another option on how to make scaffolding quickly and easily. The same type of “goats” are made - a product made from knocked down supports and flooring laid on top. Essentially, these are mini scaffoldings with a simplified design.
Such a product is relevant for private households, for example: for servicing low buildings or as a stand under a staircase in order to “extend” it.
The ideal option for using trestles is to cover a building with siding. The work is carried out from the ground to the roof, the height gradually changes, and fastening the scaffolding to the wall or simply supporting it is impossible.
Variant of folding construction trestles made of wood Source master4dom.ru
It happens that one side of the trestle is made in the form of a vertical stand, not tilted. This is done to allow installation directly against the wall at a minimum distance. This will greatly facilitate work during preventive surface treatment, painting, caulking, etc.
Weaknesses of wooden structures
The most important problem is dismantling and subsequent storage of the product. Disassembling a wooden frame upon completion of the work is quite labor-intensive, and storage requires appropriate conditions so that the structural elements do not deteriorate under the influence of climate or pests.
Secondly, the design feature greatly complicates the process of moving scaffolding from place to place during work. Since quick disassembly and reassembly is impossible, it will be necessary to move all the structures, and this will require the involvement of a certain number of people.
And finally, the relatively low height of the product. It is quite difficult to assemble a structure that is high enough on your own so that it has the necessary reliability.
The process of assembling scaffolds
- To install lightweight wooden scaffolding with your own hands, you will need the same set of tools. We will use beams 5x15 cm and boards 3-4 cm thick as materials. We fasten all elements with nails. If necessary, the scaffolding reaches the third floor, but it will not be possible to create a second tier. They do not need a flat, dry area, since the main part of the structure is in a “suspended state.”
- We knock together supports from two elements 1 m long. To do this, we place them at right angles, fix them and mount them on the wall. The vertical one is directed downward, the horizontal one is directed to the side. Together they form the base for the decking. They are placed in increments of 1-2 m. Jib beams are inserted into the corner - diagonal beams, the bottom side resting on the ground. The bottom is fixed by driving a stake into the ground, the top is nailed down or tied with wire.
- The space between the sides of the corner is boarded up with shields on both sides. They serve as stiffening ribs and additional fastening for the diagonal holder. A shield is placed on top.
One section can support a person's weight. To prevent the racks from moving to the side, install side holders or nail the diagonals together with additional jumpers. One way is to hang the base with long anchors that can support heavy loads. It is possible that the holes from them will have to be sealed with cement mortar.
Detailing for assembling one metal section
To assemble one section you will need:
- Profiled pipe for supports 40x40 mm - 4 pcs. 1.5 m each.
- Profiled pipe for crossbars - 4 pcs. 1 m each.
- Thin-walled pipe with a diameter of 20 mm - 4 pcs. 2 meters for screed diagonally.
- Profiled pipe 35x35 mm - 8 pcs. 10 cm each, which will play the role of adapters.
- Profiled pipe 35x35 for railings - 1 piece 2 - m.
- Steel plate for thrust bearings 10x10 cm, thickness 3 mm - 4 pieces.
- To connect the crossbars diagonally to the frame, you will need 10 bolts with nuts and washers.
Types and components of metal scaffolding
When building a house from stone or building blocks, metal scaffolding is more suitable. They are able to withstand any load. They are less popular only for the reason that in many regions wood is still the cheapest type of building materials. The second point, which is often decisive, is that after dismantling the wooden scaffolding, the boards can be put to work - used in further construction. And metal parts should gather dust in the shed.
But metal scaffolding also has its advantages. When disassembled, they do not take up much space.
Owners of wooden houses still have to use them periodically: the log house requires maintenance, so scaffolding is needed every two to three years. In this case, it is more practical to use metal rather than wooden ones. They are easier to assemble, more durable and stronger.
All metal scaffolding has the same shape - vertical posts connected by crossbars and slopes. The only difference is the way the parts are attached to each other:
- Pin scaffolding. They are called so because the crossbars and posts are connected using pins. Pieces of pipe or perforated disks are welded on the racks, and bent pins are on the crossbars. This system is very easy to assemble and can withstand heavy loads. Pin scaffolding for buildings of simple shape is very easy to implement; going around bay windows and projections is much more difficult.
- Clamps. For racks and crossbars, round pipes are used, which are fastened together using specially designed clamps. The system turns out to be very mobile and movable; you can easily get around any curved facades. The downside is the limited load capacity and height (according to GOST - no higher than 40 meters).
- Frame. Frames of the same size are welded from a round or rectangular pipe. They are connected to each other by transverse pipes and jibs. They have a modular structure and can be easily expanded both in height and in length. They have a certain step in length - 1.5/2/2.5/3 meters, in height one section is usually 2 meters, the standard depth is 1 m. Some frames have wheels for easier movement on a flat surface. Connection of flag-type elements - pins with a slot into which the flag is inserted are welded on the frame. Holes are made in the crossbars and slopes. The elements are put on a pin and secured with a flag. Sections are built up using connecting pipes of smaller diameter, welded to the frame posts on one side. With this method, it is important to have perfectly selected pipe sizes so that there is no backlash.
- Wedges. Although generally similar, the designs differ in the form of the connection. On the jays with a certain pitch (usually 2 meters), perforated discs are welded. Special cleft-mouth type locks are welded onto the jumpers at both ends. The locks are fixed to the disk using a specially shaped wedge. Such scaffolding connects and disconnects quickly, has high mobility, and can be used on facades of complex shapes.
When making metal scaffolding yourself, pin scaffolding is most often used. They are the easiest to implement, however, they are only good on rectangular facades; to bypass more complex shapes, you have to weld additional tubes.
From a profile pipe
Metal scaffolding
Now about how to make scaffolding (collapsible) from metal (dimensions of one section: height - 1.5 meters, width 1 meter, length 1.65 meters). Determine the number of sections based on the height of the scaffolding you need.
- Prepare the necessary materials:
- for racks - profile pipe (square section) 30x30 mm - length 1500 mm;
- for spacers - a pipe with a diameter of 15 mm;
- for connecting inserts (adapters) – profile pipe 25x25 mm;
- Make the flooring from boards 40-50 mm thick and 210-220 cm long.
- Cut the pipe for spacers according to the following calculation:
- for diagonal elements – 2 meters;
- for horizontal elements connecting the racks from the sides of the structure - 96 cm each.
- Cut diagonal two-meter spacers at both ends (by 6-8 cm) and flatten them (this will make it easier to attach them).
- Connect two posts together by welding them together with horizontal spacers in increments (vertical) of 30 cm.
- Assemble the adapters: put a small section of 30x30 cm profile pipe (7-8 cm long) onto a profile pipe with a cross-section of 25X25 mm and a length of 25-30 cm and weld in the center.
- Drill holes for bolts on the posts and diagonal braces.
- Assemble the entire structure, sand and paint.
- Place one section on top of another (connecting them using adapters), lay the flooring from the boards in the right place.
"Pros and cons"
- Firstly, scaffolding is not a small scaffolding, but a rather bulky structure that will need to be stored somewhere after the need for it disappears.
Wooden scaffolding, of course, can be disassembled later, but the work is labor-intensive, and the boards, if you don’t need them in the near future, also need to be stored somewhere. Do not forget that wooden scaffolding is assembled using nails, not screws, so the boards will no longer be completely intact. In addition, when working on scaffolding, the wood often gets dirty with mortar or paint.
- Secondly, non-prefabricated scaffolding is designed to work maximum at the second floor level (from the ground). At higher altitudes, the operation of self-made scaffolding becomes dangerous.
- Thirdly, scaffolding is required quite rarely (only for repairing the facade of a building), so the assembly and disassembly of such a temporary structure is not profitable in terms of the time spent on this work.
- Fourthly , scaffolding often has to be made long (for example, at least 6 meters for installing siding). Accordingly, their weight increases, and moving homemade wooden scaffolding to the other side of the house becomes a problem even for three or four people.
Universal dismantling scheme
This procedure has its own characteristics: the technology involves dismantling the structure from top to bottom in the reverse order of installation. However, do not forget that before the main manipulations you must:
- inspect the scaffolding flooring for the absence of any foreign objects: garbage, equipment, etc.;
- fence the site to avoid unforeseen situations;
- All exits to the balcony and window openings are tightly closed;
- make sure that the tools are in working order;
- a safety belt is required when the structure has not been used for a long time and there is a possibility that defects or traces of rust may form.
All types of products are dismantled tier by tier, section by section. Pay special attention to the fastenings to the wall, which are disassembled according to a similar principle: remove the fastening hooks, which are located above the tier subjected to manipulation. When disassembling almost all scaffolding (except for the clamp variety), craftsmen advise removing the components of the tier and placing them on the ground.
So let's get started.
- First, take into account the strict sequence: fences - posts and fastening devices above the flooring of each tier - diagonal connections within the boundaries of this tier.
- Secondly, we move on to the flooring panel. It is not completely removed: one of the fragments will be useful for laying the tier under the one in question.
- Thirdly, the railings of the staircases are removed, then the counters. And then - the boards of the platforms and stairs. And finally, it’s the turn of the tier frame: the crossbars (transverse and longitudinal) are removed.
- The wall mounts are disassembled. And the holes from them are rubbed with a special compound.
Throughout the entire process, you cannot do without ropes and pulleys - reliable lifting devices. The elements obtained after dismantling must be inspected and packaged in order to store or transport scaffolding.
How to do without scaffolding
If you don’t plan to carry out the façade work yourself (but are planning to hire a construction team), then you don’t have to think too much about scaffolding, since builders usually come to the site with their own scaffolding and scaffolding.
However, after construction is completed (and after some time has passed), scaffolding may be needed for minor facade repair work. Can this be avoided?
Certainly. And first, make sure that the facade of your house does not require repairs for many years. To do this, it is enough to use facing bricks when constructing walls. Now it is produced by many manufacturers and in a fairly wide range of colors.
But other facing materials (such as siding, plaster and others) will periodically require your attention and, accordingly, additional costs, since you will not be able to make scaffolding (buy or rent) for free.
How to make a bench with your own hands
How to make a bench with your own hands is almost a rhetorical question. “How to make benches” - almost any home craftsman or summer resident can tell you about this. But the question of what kind of bench to make, from what materials, and how to link designer benches with the existing design of a house or landscape is almost as complex and interesting as the topic of workshops on making benches. Moreover, each homemade bench and bench is unique. Ideas for original benches are everywhere - in the forest, at a construction site, on the seashore. Art benches (which are also incredibly comfortable - you don’t want to leave such a bench) are made from the most unexpected things and improvised means: planed lumber left over from construction, wooden cargo and disposable pallets and pallets, wild stone and soil with sowing of lawn grasses “on seat". A separate extensive family of benches are natural compositions from the trunks of old fallen trees, snags and twigs brought from the forest. In the context of a new construction site, garden and cottage, these are stumps from the uprooting of the site, roots, cuttings of logs and whole trees. As well as old (or purchased specifically for design work) pallets and Euro pallets, car tires, boats, cart wheels, concrete blocks and masonry stones - it is impossible to list all the creative means for benches.
A favorite idea for many is benches made from saw cuts. You can get luxury saw cuts yourself if you have wood and a chainsaw. Modern manufacturers offer saw cuts from wood of various species, clean or processed, in different sizes and degrees of artistry. Benches and benches made from large saw cuts are amazingly comfortable and original. It is interesting that artificial stones are sometimes made to look like a thick saw-cut or stump - to form benches from them, or to cover the hatches of septic tanks on the site with them. One of the master’s tasks when processing natural sawn wood is to preserve the maximum texture, forest atmosphere and naturalness of the tree. The same applies to natural gifts - stumps, fallen trees, snags and other things.
The difficulty often lies in examining the old wood, selecting parts suitable for the product, and then protecting the old wood from further destruction by woodworms and bioflora. It’s understandable why craftsmen rack their brains over such a trifle as rotten trees. An old tree is unique, vintage, and creates a fabulous forest aura in the landscape by its very presence. And if this tree is refined and designed as a functional household item, it has no price. Benches made from driftwood and thick branches, from stained wood from a river or sea bank - are exclusive and invariably arouse the delight of guests and the love of the owners.
Monastic benches are simple and ingenious. Asceticism in this case does not mean discomfort - an elegant and high-quality bench made of half a log, installed on supports-blocks or stumps, is extremely comfortable. Sanding the wood to perfect smoothness is possible, and the tactilely pleasant bench seat, which has only one decor - the natural texture of wood under a clear varnish - will be a favorite gathering place at the barbecue or near the house.
Benches made from solid logs are difficult to make and can be done by a true craftsman. Flowerbed benches are often made with support - tires, lightweight concrete blocks, boards from dismantling pallets. Sometimes the design of a bench is dictated by the existing shape of a log or driftwood.
Caring for a wooden bench is necessary. Moisture and woodworms are the enemies of wood, and the base for wooden outdoor furniture should be protective pads - rubber, stone, slabs, brick. A wooden bench on metal or forged supports, or with wooden legs and rubber boots is a practical approach. Unprotected wood with open capillaries (for example, at the ends of supports) will not last long, and in negative weather conditions it can collapse in just one or two seasons. Therefore, beautiful benches are usually hidden for the winter under a canopy or in a warm outbuilding. Often, lightweight mobile benches are taken out into the garden or to the front of the house only in good weather and removed when it rains. In a house or apartment, a wooden bench is protected from moisture using natural compounds based on wax and oils, or acrylic and latex paints and varnishes.
Properly caring for a wooden bench means renewing the protective paint or wax coating every season, with preliminary cleaning of old paints. And further:
- In the hot sun, a bench is hardly needed - it’s not comfortable to rest. And it’s bad for the tree, UV rays are destructive to the decor, the tree quickly dries out;
- The condition of the fasteners and components of the bench, especially the supporting and critical ones, is checked quite often. The bolt may weaken when it shrinks and deforms, the same applies to nail connections and self-tapping screws. Tighten all the way in time, avoiding loosening of the elements in the nodes;
- If mold and rot are noticed on a separate element, they urgently replace it, preventing it from spreading, and renew the protective impregnation or coating.
DIY bench made from pallets
They say that it is much more difficult to get a suitable pallet for a bench than to make one. the wood of the former container may have an unsurpassed smell (the reason is treatment with chemicals or long service in a food warehouse). It is impossible to remove this amber from wood, and it is better to immediately abandon such material. Another difficulty is nails and the lack of polishing in domestic cargo containers. Euro pallets for a bench are an ideal option: smooth, marked with information about processing, stylish. In landscapes and loft interiors, benches made from Euro pallets are so popular that expensive stores offer them. But any craftsman can make a designer bench and other furniture from a pallet. The process is standard: selection of a model, sketch and measurements of compliance of the pallet dimensions with the plan, disassembly and assembly and decoration. Irregularities are sanded down, but the markings are often left visible - a chic sign of style. Varnishes, waxes, wood oils for decoration are additional opportunities to get unique, comfortable furniture for your home.
The simplest benches made from pallets are U-shaped compositions with or without backs. Three pallets stacked on top of each other form both a seat and a table, depending on the creative purpose. Another popular option for a bench made from a pallet is a container cut into two unequal parts: the smaller panel will become the back, the larger panel will become the seat. Consumables, except for bioprotective materials and paintwork materials: bars for legs and armrests, decorative elements, reinforcement - special perforated corner and other fasteners. Pallet benches look luxurious if you add soft pillows to them. It is also possible to cover it with slats, and any decor according to the personal preferences of the owners.
DIY board bench
Ring garden benches around a century-old tree are often made light and lattice, because the trunk should not get wet at the butt during rains and snowmelt. The ring bench wraps around the old tree, other configurations are possible. It’s interesting that a bench around a tree always has both shady and sunny areas. Such ensembles are arranged around strong garden (not fruit) trees with high-growing branches in order to provide a breeze, a minimum of insects and a maximum of horizons. It is clear that such a bench under the apple tree would be advisable only during those periods when apples do not fall from the tree.
What's better?
The first question that a home owner has during construction or renovation concerns the choice of material for the structure. Of course, it’s hard to argue with the fact that metal is always a favorite. However, what is captivating about wood is its flexibility, the ability to make do with simple tools that are in any “gentleman’s kit” - a hammer, drill, saw and screwdriver.
Metal in this case is much more complex. To get the most durable structure, you need a welding machine and skills to work with it.
Such a structure will have to be stored somewhere; it will require quite a lot of space. Of course, high-quality scaffolding can be rented out, but it is unlikely that many owners will be impressed by the possibility of such income. It is for these reasons that preference is often given to traditional wood, a material that is light in every sense.
Another important point when choosing a material is economic feasibility. Many people believe that it is logical to give preference to metal only in one case: if it can be “obtained” for free. If you add to the price of hardware the cost of fastening elements, as well as welding work, then homemade scaffolding will cost more than factory scaffolding. At least purchased wooden products.
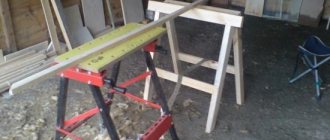
Now a few words about wood, which should not have serious defects. The ideal material is considered to be spruce boards, characterized by minimal weight and the same number of knots. However, they are not always available on the farm, which cannot be said about pine. This is a second potential candidate, but it needs to be tested first.
To test, elements 2-2.5 m long are placed on low brick pillars, then stand on the middle of the board and jump several times. If the board withstands such experiments without problems, then it can be safely used for the manufacture of scaffolding.
Screws or nails?
This is another point that needs to be addressed, since the strength of the structure depends on the fastening elements. Naturally, wooden scaffolding is not intended for long-term use. When the work is completed, they are simply dismantled. However, in this case, it is not the ease of dismantling that plays a role, but the reliability of the fasteners.
For the manufacture of wooden structures, it is recommended to use self-tapping screws, but only if it does not involve devices for working at relatively high heights. In this case, nails are preferable. They are made of soft metal, so they may bend, but will not break. Hardened steel self-tapping screws are the worst solution. The best are anodized fasteners, but they are not blameless, as they can also present an unpleasant surprise.
The best solution would be nails. However, there is another way. First, all parts are connected using anodized screws. If after checking no reliability problems are identified, then 2-3 nails are driven into each connection.
In order not to damage the wood, thin boards (slats) are placed under the elements, which can be easily split before the final dismantling of the scaffolding. In this case, protruding nails can be removed without any problems.
Painting metal scaffolding
When preparing pipe elements before installation, the structures are cleaned of rust. For this, it is good to use a grinding machine with an emery wheel.
After this, the structures are primed with a product for external metal work. Dried pipes are coated with two layers of paint intended for steel products.
During intensive forest exploitation, metal elements are tinted once a year. If the scaffolding is stored disassembled, then the products are repainted as needed. Store forests in a dry, ventilated area.