#0
A few years ago, my keyboard, which I had been using for more than 10 years, came to an end. What did I type on it? Tens of thousands of lines of code in many programming languages. Your book. Messages and letters to people. Some are no longer alive. The keyboard took a mechanical part in all this. She may not remember this, but I remember. And the decision came to turn the keyboard into a cat.
The keys have different heights, which gives the image a certain charm, in my opinion. I didn’t bother much with the technology. I found a piece of plastic siding, assembled it and glued it together. The process turned out to be painstaking – it took many hours.
Now my keyboard cat moves with me from apartment to apartment, always occupying, if not the most, a prominent place.
How to make a keyboard backlight on a laptop
Not all laptop models are equipped with a backlit keyboard. Therefore, craftsmen have found a way to make a keyboard backlight with their own hands.
To create your own keyboard backlight, you will need the following components:
- network cable;
- adapter 2-4-pin to 1-6-pin;
- switch;
- batteries;
- soldering iron;
- Screwdriver Set;
- insulating tape;
- stationery knife;
- glue;
- tester;
- LED strip.
All components are available for sale in most specialized stores.
Important! For the first experiments with transformation, experts recommend that beginners take keyboards from computer hardware manufacturers such as Asus, Genius, A4tech, Gmej. This is due to the fact that the models of these manufacturers have a simple design and sufficient height. They can also easily replace the keypad, and this will not cause problems with the keyboard.
Before starting work, you also need to decide where the power for the keyboard backlight will come from. There are several options:
- Make a connection to the computer's power supply.
- Make a separate pin to connect to the socket connector.
- Install an additional power supply. This is done to unload the main unit.
It is recommended to choose the second or third option, since these methods do not create additional load on the computer.
#1
A month ago I suddenly had a vacation. I then looked at the stock of keyboards on the balcony and decided to do a series of works. Having estimated the time, I planned five pieces.
First: GEMBIRD KB-8352U. The keyboard has a very nice design. Made by the Dutch company Gembird. Light, thin keys. There are keys that differ in size from the main ones by 25%, 50%, 100%, and so on until the space bar. And then there's Enter.
A keyboard from a newspaper office that no longer exists. The keyboard lay in a visible place for several days. I walked around and looked at what its keys looked like. For the dog. I assembled the sketch on the windowsill and for a few more days regularly came up and made changes.
The result turned out great, in my opinion. Some keys are located right in the right place. The dog has a nickname. Even two. Moreover, in English and Russian.
I placed the assembled picture against the wall opposite the window. One morning I walked into the living room, and someone was looking at me from the wall. It turned out that the frame with the keys gives such a cool reflection, because... they are glued on top of the glass. Double art turned out.
Membrane keyboard
Custom film keyboards
Membrane (film keyboard)
Film control panel
is the most elegant, simple and durable solution for any type of equipment and devices. It has a number of undeniable advantages that allow the use of this technology in various fields of industry: (medicine, instrument making, machine tool building, computer technology, military equipment).
Backlit membrane keyboard
The membrane keyboard consists of two parts - electrical and decorative, glued together.
The decorative part of the membrane keyboard is a lavsan film (front film), with an image printed on the inside. The film can be of several types:
Electrical part of the membrane keyboard
can be of various types:
The tactile effect of pressing keys can be achieved in several ways:
There are different options for illuminating the membrane (film) control panel:
Design standards for membrane/film keyboards:
Maximum overall size, mm700x600Min. key size, mm8Min. distance between the edges of the key molding, mm3Min. Distance from the edge of the key to the edge of the keyboard, mm4Min. Distance from the edge of the windows to the edge of the keyboard, mm5Min. Distance from the edge of the windows to the edge of the keys, mm5Min. Diameter of molding for built-in LED, mm5Min. Distance from the exit point of the cable to the edge of the keys, mm5Min. Distance from the cable exit point to the edge of the keyboard, mm5 Pitch of cable tracks, mmFrom 1Min. Free line thickness of graphics, mm0.2Min. Line thickness when transitioning colors (stroke), mm0.4Dot LED indication of membrane keypads
The LEDs are soldered onto the electrical part of the keyboard (polyimide film or rigid printed circuit board).
A transparent window is made at the location of the LED on the decorative film. We always recommend covering it with a light filter (transparent milky paint) so that the LED and printed circuit board are not visible through the window when turned off. The filter perfectly transmits the LED glow.
The window for the LED is also molded (punch with a diameter of 5-6 mm), because The height of the LED exceeds the thickness of the keyboard. For keyboards on a rigid printed circuit board, it is possible to use reverse solder LEDs. For them, molding/applying of the front film is not necessary.
Active backlighting of membrane keyboard keys
Active key backlighting (APK) is the illumination of the entire surface of the key using a built-in LED.
Advantages of active key backlighting:
The keyboard circuit board contains the output connector (or wires), and may also contain elements of the keyboard controller, backlight control circuitry, etc.
Fastening a keyboard with an active backlight can be achieved using built-in pins, axle boxes, threaded holes, etc. Keyboards with an APC can be used in various conditions. They are characterized by excellent resistance to vibration, mechanical shock, and climatic factors. They have high reliability due to the use of long-life LEDs.
Electroluminescent backlight of membrane keyboard
Electroluminescent panels are designed to create backlighting for film keyboards, displays, information signs, etc. The panels are recommended for use in low light conditions.
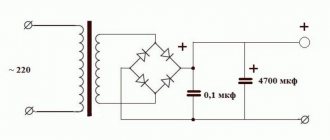
The backlight panel is a flat film capacitor with a transparent electrode. The application of an alternating electric current to the capacitor plates results in a uniform glow of the electroluminophore layer located inside the capacitor.
We use phosphors of various glow colors.
It is also possible to use film filters to obtain the required color shade.
| Glow colors | Blue, green, yellow, red |
| Supply voltage | 100-250 V at a frequency of 50-1000 Hz |
| Power consumption, mW/dm² | 300 |
| Dielectric loss tangent, tgφ | 5-15 (79 degrees) |
| Brightness of the working field, cd/m² | 50-70 |
| Operating time until loss of brightness, h | 3500 |
Shape and size of backlight areas
The backlight panel can be either solid or have several unconnected glow areas of any shape and configuration. This allows you to highlight only the necessary elements without consuming extra electricity. The minimum size of the backlight element is 3x3 mm.
With large areas of the backlight element (typically from 100×100 mm), the effect of decreasing brightness in the center of the panel may appear. When designing lighting elements of a large area, it is necessary to consult with our designers.
Power, connection to power source
For the panel to glow, an alternating (sinusoidal or other) voltage of 100-300 V with a frequency of 50-1000 Hz is required. Increasing the voltage and frequency leads to an increase in the brightness of the glow, but reduces the operating time of the panel. The use of high frequencies (more than 500 Hz) can also cause uneven glow (decrease in brightness in the central part).
It is possible to power the backlight panel from a constant low-voltage voltage using a power converter. We do not recommend using a 220V/50Hz household network as a power source. The voltage surges present in it lead to rapid failure of the panel.
Source
#2
Unlike the previous keyboard, which was used by fragile journalists, this one was used by gloomy system administrators 20 years ago. This is a UNIKEY KWD-820 keyboard. Reliable, convenient. Many people still use it via a PS/2 to USB adapter.
An interesting feature is the thin function keys. After experimenting, I made a spine, fingers of the left hand, and a joint on the right hand out of them. My creature is 10 vertebrates. This keyboard also supported special Windows 98 keys. I made an ax blade out of them. I unexpectedly liked the colorful background. How do you like it?
Despite the fact that the pattern is flat, the picture turns out three-dimensional. This is especially noticeable on keyboards with tall keys. The image does not look drawn. It seems to be from the material world. An axe, for example, creates the feeling that it can be directly picked up in the hand.
As usual, I “encrypted” a few words into the keys. For some reason, it gives a special pleasure to leave hidden messages.
After several cloudy days, the sun came out again in the morning, and a strange dude was chasing a dog along the wall. Such an unexpected show.
Current projects
Not a specialized rubber keyboard that can be used even now.
Today, I am not aware of cases of using specialized rubber keyboards in small quantities. They certainly exist in the DIY community: Adafruit sells 4x4 keyboards (Sparkfun has the same thing), and similar buttons can be ordered on AliExpress and eBay. Yes, of course, Sparkfun and Adafruit spent money on developing the boards, but the buttons themselves are most likely being made somewhere far, far away. These are not dedicated keyboards; These are standard ready-made keyboards for specialized projects.
And these rubber buttons were used in many places: to create a Monome clone, a step sequencer, a MIDI device. That's exactly what backlit silicone buttons were designed for: they make cool MIDI controllers. But since they don't have marks on them, they're not good for much else.
And these are the only DIY projects that I know of that use 4x4 silicone keyboards. People, of course, are trying to do something else. Some of them are looking for rubber keyboards on forums, and some are experimenting with aluminum casting molds, but so far none have been successful. Dave Jones rejected the idea of rubber keyboards for his uSupply project and switched to specialized membrane switches.
Keyboard development, bosses and air holes
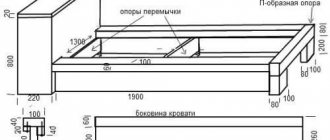
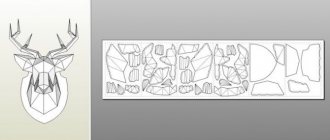
So what goes into creating a rubber keyboard? Essentially, we design a steel or aluminum casting mold. The mold is sent to an injection molding machine where it is filled with carbon beads, filled with hot silicone, which is then vulcanized. Further processing of the buttons is possible - laser marking, silk-screen printing or epoxy coating. Designing a rubber keyboard is like designing a mold, but the basic components are quite simple. Below is an example - a single key keyboard - that I made in Fusion360 in a few minutes.
The external shape of the keyboard depends on the purpose, and the base is a layer of silicone. There are four bosses at the corners of the base for mounting on the board. They are needed to align the button and prevent it from sliding.
The internal structure of the key consists of a large carbon pellet, the contact that will press the board. The keyboard simply has more keys, but the shape of each key is essentially the same. Mark gaps at the bottom of the key to allow air to pass underneath. If you don't do them, the keyboard will beep when pressed.
Silicone key in section. The black object is a carbon pellet that serves as a bridge between two contacts on the board.
Dimensions of my keyboard, in mm.
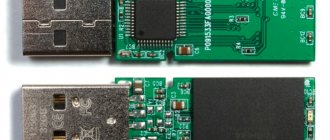
Once the keyboard design was complete and the files were sent to the factory for mold making and a few test samples, it was time to design the PCB. For my project, the circuit was not particularly important - the main thing was that there were two tracks close together on the board, connected to opposite sides of the keyboard matrix. For this purpose, ENIG technology is recommended. Manufacturing constraints also matter: the standard minimum trace width and spacing is 0.15 - 0.20 mm, and I designed the board with 0.25 mm traces and the same spacing.
Having finished the keyboard and board, you can move on to the mounting strip. This is perforated plastic that is screwed to the board. The rubber keyboard is clamped between it and the board. I made the following prototype just to test the keyboard. The electronics are just a Teensy LC (I had one on hand), with a cutout giving access to the board for prototyping:
I sent this model to Shapeways and the keyboard was assembled. The Teensy firmware uses the standard Keypad library and appears to the computer as a USB HID device. The result was a specialized rubber keyboard of exactly the shape that I needed. This is not the final solution since the USB keyboard is just a working concept for testing rubber keys, but it does work.
I will reveal the cost of the project; It is worth considering that the sample here is very small - I contacted only one manufacturer with only one model. However, due to the strong competition in the market, I think these prices will be fairly representative of the average cost of a dedicated rubber keyboard.
The cost was as follows:
| Manufacturing | $2 219 |
| Design | $600 |
| Bank commission | $58 |
| TOTAL | $2 877 |
#3
From the SVEN Standart 301 keyboard I assembled this Micro QR code. Used in the accounting department of one shopping center. The numbers on the Numpad are almost completely erased. But the most powerful thing is the Backspace key: apparently, many numbers were corrected by accountants.
Now, in order to go to this shopping center and other places, you need to present a QR code, which is also obtained through injection. I tried to present the method of obtaining, the QR code itself and the shine of the boutiques that you can get into in this pattern.
The gilded leatherette backing under the glass glitters coolly in the light.
Procedure for creating a keyboard backlight
Laptop users have repeatedly wondered whether it is possible to backlight the keyboard on a laptop if the model is not equipped with such a function or the backlight is very weak. It is quite possible to make a backlight, but you need to be very careful when working with a laptop. For beginners, it is recommended to backlight along the contour of the keyboard. This will avoid possible damage to the functionality of the computer due to installation errors.
To backlight a laptop keyboard, you will need to do the following:
- Disconnect battery.
- Remove all fasteners.
- Carefully remove the hard drive.
- Disconnect and remove the DVD-ROM (if present).
- Remove the keypad.
- Disconnect the display cable that goes to the motherboard.
- Disconnect the cable.
- Remove WLAN.
Also, during installation, you must not forget to take into account the mounting location of the battery or any battery, which must be quite flat.
The result of such illumination will please its creator and will allow you to use the laptop in the dark without additional lighting in the room.
#4
When you deliver a game to a publisher on time, sometimes you have to finish the code until the morning. It’s already starting to get light outside, and the sky is taking on a pleasant blue hue. The background was made exactly this color.
Fatigue hits the programmers, but the bugs must be fixed. Stepping out into the hallway of a large, empty office building at this pre-dawn hour, there is a lot to see. For example, such a ghost.
For this pattern, two keyboards were used that programmers used to work on long ago. The F10 key fell off and was lost in the black one. Press F10 to pay respect. All other keys were used here.
A game
Press any Key to Adventure is a handcrafted Puzzle Adventure game. Platforms: Desktop/Mobile/Watch. This could be a description.
Imagine a person picking up a keyboard and having images of stories written on it. Such a superpower. If this keyboard was in the newspaper office, then the person sees the reports. If a writer typed a book, then a person sees its plot. Or maybe a man and a woman met by chatting in instant messengers. Feelings arose. And then the woman suddenly disappeared, and the man did not receive an answer, no matter how many times he wrote.
A person (the main character of the game) can reconstruct the picture of what is happening if you bring him a keyboard. The images are formed into riddle scenes made from keys. If you solve the sequence of riddles, you will solve the case.
The main character deals only with the most mysterious and complex matters. Mystery Keys Files.
All scenes in the game are made manually from keys. Signatures and interface elements are placed on top. The key animation looks good at 10fps. The game of light/shadow can be done at 60fps.
The background can be made of different materials of different colors and textures. Thick glass on top of blue cardboard will look cool. It's like ice.
By playing with camera tilt, you can achieve interesting effects of a sense of scale.
Light is another powerful means of expression. If the scene is in an office, then you can light a candle while recording the animation. This will give an atmospheric play of light/shadow.
The types of tasks in one scene can be of at least two types. Sets of keys are characterized not only by form, but also by content. Sometimes you need to “type” a word on the keys. This could be an action or an item that will be added to your inventory. And sometimes you can select the shape itself, formed from keys.
You can also make cool mini-games. It turns out to be a Puzzle Adventure game. Wow, I made so many of them in my time. But there is a unique art style, which with its specificity also determines the gameplay.
Interesting idea? As a game developer (albeit on vacation), I couldn’t help but come up with the idea of making such a game. To try to make animation, I assembled the following stand on my knee:
I tried different options. It became clear that it was possible to make an interesting picture, but it would take much more time. I can’t handle such a project alone. Before even making a demo, you need to carry out the RnD stage. It is necessary to accurately determine the capabilities of the video recording style and technology. If suddenly there was an interested investor/publisher, then we could try. The press would probably like this style, which would give some initial traffic.
Various types of silicone and membrane switches
ZX Spectrum Membrane Keyboard
Before we delve into the design of silicone keyboards, we need to discuss the designs of small keyboards and key sets. The first are Metal Dome, or membrane, keyboards. The best examples of these tactile membrane buttons would be keyboards from popular home computers of the 1980s, the ZX Spectrum or Atari 400. If you look elsewhere in your apartment, you might have one of these on your microwave.
Such keyboards arrange the buttons in a matrix. The electrical circuit consists of tracks drawn with conductive ink on two sheets of polyester. A stainless steel dome is located under each button. Pressing the button compresses the canopy and closes the two layers of polyester.
The best images of a membrane keyboard can be taken from one of your projects. Such membranes do not care how the metal dome was pressed. The simplest option is to place the buttons and letters directly on top of the membrane. A piece of plastic can be glued onto the tactile switch array. This is exactly how the keyboards in the Speak N Spell and Big Trak toys are made [in the USSR there was an analogue of such a toy, “Lunokhod” / approx. transl.]. This is how you can make a peanut butter proof keyboard for a three year old.
However, pure membrane switches feel very cheap and offer no tactile feedback. One option is to place plastic buttons above the membrane switch. Metal Dome keyboards use hard plastic keys that press small metal domes sandwiched between two layers of polyester with conductive ink:
But membrane keyboards do not require hard plastic buttons. You can use soft silicone ones over a membrane keyboard, as done on the ZX Spectrum. Instead of hard plastic rectangles, like in my Metal Dome project, Speccy used a single canvas of silicone buttons. The ZX Spectrum used silicone buttons on its keyboard, but it was still a membrane keyboard. It makes no difference whether you press the metal dome through a sheet of plastic with printed symbols, or through silicone rectangles.
Another type of keyboard - the one I made for this article - is a silicone, or rubber keyboard.
The Ubiquitous Membrane Keypad for Arduino
The rubber keyboard uses injection-molded silicone buttons to push contacts. The carbon contact ("tablet") is built into the silicone button, and the contacts for the keyboard matrix are created from traces on the printed circuit board. The contacts can be integrated into the board (ENIG technology is recommended) or printed on top with conductive ink. In any case, the keyboard consists of a circuit board, silicone buttons with conductive contacts under each button, small conductive carbon contacts in each button, and sockets for securing the silicone to the board.
When choosing between a membrane and a rubber keyboard, there are several things to consider, and many of them can tip the scales in favor of the membrane one. Although rubber keyboards can be made in many colors, the characters on a membrane keyboard are essentially printed; On a membrane keyboard you can make any symbols of any colors. Membrane keyboards are cheaper because they don't require a mold to be molded. Rubber keyboards require a strip containing a solid block of silicone keys, which means the added cost of a second mold to cast. And the rubber keyboard wins only in terms of tactile sensations. If you've ever tried using an Atari 400, you'll agree: rubber keyboards are much easier to type on. They are also more stylish than membrane ones.
Preformance
I decided to stage an NFT performance - record my patterns from retro keys directly into the blockchain. Each pattern I have is assembled from exactly all the keys of one keyboard. Therefore, one pattern is one unit of cryptocurrency. Each key is one cryptocent/cryptopeck.
This is a representation of my project on the NFT platform. Quite modern crypto-art, I think. I set it in the settings so that each key/pattern can have one and only one owner. Creatures can be copied, but the original pattern is unique. Here it is: hanging on my wall. The liquidity of digital property (keys) is obvious.
My performance is just a form of implementation expression of the project in the blockchain. In short, it's just a joke. I ask you to treat it that way. I just couldn’t help but try the new technology. In this case, for some reason I wanted to troll NFTs.
#5
In the last work in the series, I planned to try to go into 3D - turn pixels into voxels. Experiment with multilayer structures. This turned out to be difficult.
From the two keyboards of crime chronicle editors, you can make the composition “Hardhearts.” Black and white are intertwined in life.
The volume looks very interesting in real life. However, the composition itself does not add up. The tilt of the keys, in my opinion, no longer looks so authentic. Moreover, at night the cat broke the composition.
I'm trying other options. From media keys you can make the edge of a dagger, for example.