Sheep magnet made from coffee beans
To create a cute toy you will need:
- coffee beans;
- twine;
- decorative elements.
Steps to create a sheep from coffee beans:
- You need to start with the basics. You need to cut out templates from thick cardboard: a head with ears and a torso. All these parts are well coated with paint. This is so that if the grains do not fit tightly to each other, then no gaps will be visible.
- When the paint is completely dry, apply a layer of glue and take the string. You need to lay out an oval from the twine for the future muzzle. For the ears you also need to lay out two ovals like this.
- The hooves are also made from twine. To make them, you need to glue two grains together and fix them on a thread.
- Finished hooves are attached to the body. To prevent the thread fastening from being visible, the coffee beans need to be glued thickly and tightly. A lamb made from coffee beans or a lamb can be decorated in different ways.
- Now you need to glue the head to the body.
- These sheep serve as a talisman, so you can attach a coin and a heart to them.
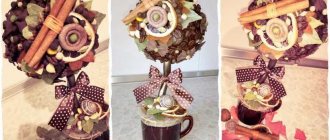
Master class: Christmas tree made from coffee beans
The cardboard cone is thoroughly coated with glue and wrapped with brown threads. It is desirable that the coils be thick. Now you can glue the coffee beans. To avoid gaps, there should be two layers of coffee beans. First, paste over the bottom, pressing the grains tightly against each other. The top should be open.
When the layer has dried, apply the next one. The second row needs to be glued as efficiently as possible, covering all gaps with grains.
When all two layers are thoroughly dry, you can begin to decorate the Christmas tree. You can use bows and beads for this. You can use a wide variety of decorative elements, such as feathers, rhinestones or sequins. It is best if the decor is glued using transparent glue. So, Christmas trees made from coffee beans will look neater.
While the decor dries, you need to create a trunk. To make it, you need to twist a pipe out of cardboard so that it fits snugly into the cone. The barrel is painted with golden paint and set aside to dry. Using semolina you can create a snowy effect. The necessary places are coated with nail polish and sprinkled with semolina.
Now let's move on to the top. A little glue is dripped onto the top of the Christmas tree and a bow is glued. Next, cuts are made in a circle at the bottom of the tree, which are straightened into petals and coated with glue. Using these cuts, the trunk must be inserted into the prepared base after pouring a little glue into it.
Thus, you can create Christmas trees from any materials, using coffee beans.
Sea topiary
Topiary is a tree of happiness; it can be made from different materials.
Topiary made from natural material looks more beautiful, similar to a real tree. It will fit into the design of every room and will remind you of the beauty of nature. For example, a topiary made of shells will refresh every person’s memory of the sea, the sun and warm days spent on the beach.
Materials for work:
- Newspaper sheets.
- Various shells.
- Glue.
- Chopsticks for eating food.
- Gypsum.
- A crumb of stone.
- A glass.
- Twine.
How to make a sea topiary with your own hands, instructions:
- To begin with, it’s worth doing making a tree trunk. You need to use a strong dry twig or chopsticks for this. We recommend tying them tightly together with regular thread. The resulting trunk must be wrapped tightly and tightly with twine.
- It is recommended to make a ball for topiary with your own hands from polystyrene foam. It is convenient to attach additional elements to it.
- In a prepared glass mix plaster with a little water. You need to insert the trunk of the tree of happiness into the resulting mass. Leave for several hours to harden.
- The barrel should be positioned exactly in the center, otherwise the whole tree will tilt in one direction.
- After drying it is required attach the crown to the top of the stick. To do this, you need to make a small hole in the foam ball and lubricate the tip of the stick with glue.
- Styrofoam can be covered with blue paper. Next, you will need to attach shells and beads to it.
- To decorate the cup you can also use shells or blue satin ribbons.
get topiary from pasta using the same method. To create such an accessory, it is recommended to use several types of pasta. Before gluing, they need to be painted in different colors. This is labor-intensive work that requires perseverance and desire from the author to create a unique tree of happiness.
Video master class on DIY topiary made from shells:
Material for a thorny animal
A hedgehog made from coffee beans with lemon, star anise and cinnamon will be a wonderful piece of furniture in any home, filled with the aroma of coffee and spices.
To create it you will need the following consumables:
- plastic ball,
- brown paint,
- coffee beans,
- Styrofoam,
- cardboard,
- spice decor,
- black beads,
- glue.
Fragrant coffee hedgehogs. Master class – Masters Fair
Content
Materials:
- Plastic ball from a dry children's pool (or a foam ball)
- Brown paint, brush
- Cutter
- Scissors
- Jute twine
- Coffee beans
- A piece of foam for the muzzle
- Cardboard
- Cinnamon, dried lemon or other decoration for decorating the hedgehog
- Black beads for eyes
____________________________________________________________________________________________
Cut the plastic ball in half. (You can use half a foam ball for the base.)
We cut out the face of our future hedgehog from foam plastic. Cut out the bottom of the desired size from cardboard.
Paint the base brown. Glue all the necessary parts together.
We wrap the spout and bottom with twine.
We get a blank for our hedgehog:
Cover the base with grains, starting from the middle:
Layer by layer we glue the grains, moving first towards the back:
Then - towards the nose:
Glue on a nose made from a coffee bean, select beads for the eyes, and glue on the decor.
Our hedgehog is ready!
You can add a holder for photos/notes/business cards
Happy creativity!
Comments:
(MK from Design Studio Zebrano)
- Do-it-yourself panel of coffee beans: making master class and decorating tips (120 photos + video)
“Materials:
- Plastic ball from a dry children's pool (or a foam ball)
- Brown paint, brush
- Cutter
- Scissors
- Jute twine
- Coffee beans
- A piece of foam for the muzzle
- Cardboard
- Cinnamon, dried lemon or other decoration for decorating the hedgehog
- Black beads for eyes
____________________________________________________________________________________________
Cut the plastic ball in half. (You can use half a foam ball for the base.)
We cut out the face of our future hedgehog from foam plastic. Cut out the bottom of the desired size from cardboard.
Paint the base brown. Glue all the necessary parts together.
We wrap the spout and bottom with twine.
We get a blank for our hedgehog:
Cover the base with grains, starting from the middle:
- Amazing coffee cats from Olga Kachurovskaya. Master Class. DIY coffee cats
Layer by layer we glue the grains, moving first towards the back:
Then - towards the nose:
Glue on a nose made from a coffee bean, select beads for the eyes, and glue on the decor.
Our hedgehog is ready!
You can add a holder for photos/notes/business cards
Happy creativity!
Materials:
- Plastic ball from a dry children's pool (or a foam ball)
- Brown paint, brush
- Cutter
- Scissors
- Jute twine
- Coffee beans
- A piece of foam for the muzzle
- Cardboard
- Cinnamon, dried lemon or other decoration for decorating the hedgehog
- Black beads for eyes
____________________________________________________________________________________________
We cut out the face of our future hedgehog from foam plastic. Cut out the bottom of the desired size from cardboard.
Paint the base brown. Glue all the necessary parts together.
We wrap the spout and bottom with twine.
We get a blank for our hedgehog:
Cover the base with grains, starting from the middle:
Layer by layer we glue the grains, moving first towards the back:
Then - towards the nose:
Glue on a nose made from a coffee bean, select beads for the eyes, and glue on the decor.
Our hedgehog is ready!
You can add a holder for photos/notes/business cards
Happy creativity!
)
Materials:
- Plastic ball from a dry children's pool (or a foam ball)
- Brown paint, brush
- Cutter
- Scissors
- Jute twine
- Coffee beans
- A piece of foam for the muzzle
- Cardboard
- Cinnamon, dried lemon or other decoration for decorating the hedgehog
- Black beads for eyes
____________________________________________________________________________________________
Cut the plastic ball in half. (You can use half a foam ball for the base.)
We cut out the face of our future hedgehog from foam plastic. Cut out the bottom of the desired size from cardboard.
Paint the base brown. Glue all the necessary parts together.
We wrap the spout and bottom with twine.
We get a blank for our hedgehog:
Cover the base with grains, starting from the middle:
Layer by layer we glue the grains, moving first towards the back:
Then - towards the nose:
Glue on a nose made from a coffee bean, select beads for the eyes, and glue on the decor.
Our hedgehog is ready!
You can add a holder for photos/notes/business cards
Happy creativity!”
Source
Did you like the article? Subscribe to the channel to stay up to date with the most interesting materials
Hedgehog made from coffee beans – Me Myself
Not everyone knows how unusual and interesting a handmade craft like a hedgehog made from coffee beans looks. As an interior detail, it will look great in any setting and at the same time fill the room with the warm homely aroma of coffee.
This master class will introduce you to step-by-step instructions on how to make a hedgehog from coffee beans with your own hands.
To make this coffee hedgehog you will need:
- a piece of foam plastic,
- jute twine,
- coffee beans,
- glue gun,
- stationery knife,
- decorative apple,
- eyes.
Step 1: Using a utility knife, cut off everything unnecessary from a piece of foam plastic.
We get the body of our future hedgehog.
Step 2: Using a glue gun and jute twine in a spiral, starting from the spout, we begin to tightly wrap our workpiece.
Step 3: Now glue the coffee beans with hot glue, starting from the middle of our hedgehog’s body.
Row by row we glue the grains, moving first towards the back.
Then - towards the nose.
At this stage, I already decided to glue the eyes so that I could see when to finish the next row of coffee beans, so that the hedgehog’s face would be open and cute. The nose is a coffee bean.
Step 5: Let's treat our cute hedgehog to an apple.
You can decorate in any way. These hedgehogs look interesting with cinnamon sticks, star anise flowers, and dried lemon or orange slices. You can use peppercorns or beads for the eyes. Your fantasies are limitless. Only when performing it, you should take into account the recipient’s favorite aromas, since star anise seasoning is quite aromatic.
And now, our coffee hedgehog is ready!
This hedgehog will be a wonderful gift for your close friends who love the smell of coffee.
I was glad to help.
You can also look at the gallery of crafts made from coffee beans and finished works from twine, perhaps they will give you new ideas. Be creative, share your ideas and works!
Topiary made of pine cones
topiary from cones and acorns in the fall. At this time of year, there will be no problems with such forest materials, and they look attractive.
DIY topiary master class:
- First you need collect materials for work. You will need: a straight tree branch, twine, beads, a glue gun, acorns with caps, cones, a stand and acrylic paint in a bronze shade.
- The first step is to make a tree crown . This can be done using polystyrene foam or newsprint.
- Then start making the barrel . To do this, you need to wrap a dry twig with twine.
- Further connect the resulting ball to the barrel using twine. Place the resulting product firmly on the stand. You can use your favorite jar or glass as it.
- The next step requires beautiful decorate the crown. It is recommended to choose beautiful and whole acorns and cones. Tip: dry acorns may begin to crack during the process, and this will not make the topiary more beautiful. Materials must be glued using glue. After it dries, paint the acorns and cones with bronze paint.
- After finishing working with the ball, there will be gaps between the acorns. You need to get rid of them. Corrugated paper will help with this. It needs to be trimmed or pasted over the product.
- To complete the work you will need decorate the topiary with beads or sparkles.
In a similar way, you can make topiary from chestnuts with your own hands.
Do-it-yourself hedgehog made from coffee beans: master class with photos
Coffee beans are an excellent material for creating amazing coffee crafts. They have a very pleasant subtle aroma, interesting texture and shade. As a rule, grains are used to create various topiaries, but not everyone knows that interesting animals can also be created from grains. Today's master class will tell you how to make a funny coffee hedgehog with your own hands. Let's prepare some tools and basic material for work:
- cells of a cardboard egg tray;
- coffee beans;
- acrylic paints or gouache;
- scissors;
- brush;
- glue gun with several sticks of glue;
- light shade yarn;
- newspaper;
- two brown beads to create eyes;
- decor: dried flower, leaf and ladybug.
How to make a hedgehog from coffee beans
Step 1. Cut out the inner long cell from the bottom of the egg tray.
We create a lump from a sheet of newspaper and place it inside the cut-out cell.
Step 2. We wrap the resulting workpiece with yarn, smoothing out all the irregularities and corners.
Step 3. We cut the tip of the hedgehog base on four sides, apply a drop of hot glue inside and squeeze them together. Thus, the future hedgehog's nose has become more realistic in shape.
Step 4. Now we wrap the entire workpiece with light yarn. We place the coils as close to each other as possible. Periodically fix the coils with glue.
The back part of the frame does not need to be wrapped; we’ll leave its creation at this stage.
Step 5. Next, paint the part of the craft where the grains will be glued brown. For this process, it is better to use thick paint, such as gouache or acrylic. You should avoid translucent watercolors, otherwise painting will take longer due to the application of paint in several layers. After dyeing, the craft can be put in a warm place for 20-30 minutes so that the yarn, which has absorbed all the water, is completely dry.
Step 6. We begin to glue coffee beans to the colored part of the base. We place them with the embossed side towards the nose.
Step 7. When the hedgehog's spines are ready, glue on the nose and two eyes.
Step 8. You can decorate the craft to your taste. We decided to decorate the back of the hedgehog with a dry bud of an unopened rose, a small ladybug and a textile leaf.
And to create a fragrant decor, you can use dry lemon, orange or lime slices, cinnamon sticks, vanilla pods or clove seeds. If you plan to change the decor in the future, stick it on pads of double-sided tape. This way the decoration can be removed without much effort, and the surface of the grains will remain clean. The craft is ready and now you can decorate your interior with it.
Photo:
Topiary made from napkins
, topiary made from napkins is found as a decoration element . It brings a certain zest to the interior, it becomes more rich and complete.
What do you need for napkin topiary?
- Small pots.
- CPS (cement-sand mixture)
- Newspaper sheets.
- Napkins.
- Decoration elements: artificial leaves, beads, ladybug.
- Stapler and scissors.
- Glue.
- Threads.
- A thick and strong willow branch.
DIY topiary master class:
- In the pots it is necessary pour CPS (2/3 of the height of the pot), add a small amount of water, mix thoroughly. The edges of the pots need to be wiped clean of cement.
- The twig must be inserted into the center of the clay mixture. Place decorative stones on top of it. They will serve as decoration, hiding the gray mass. Leave the product for a while, this will allow the mixture to harden.
- Branch, serving as the main trunk of the tree, will need entwined with willow branches. It is recommended to use tape to secure its tip.
- Next you need fold a sheet of newspaper lengthwise, wrap it around the top of the trunk.
- After make a few more layers, they will be the basis of the tree crown. Next, the ball must be secured with threads.
- Next step - decorating the crown of a tree. You need to take a napkin and fold it in half twice. Cut out a neat circle from the resulting square. It must be stapled in the center.
- The end result will be a product that resembles a flower. Each layer of the napkin needs to be crumpled.Advice: You need to crumple the napkin differently each time. Thanks to this, the flower will look lush and beautiful.
- To decorate a topiary you will need about thirty of these flowers, everything will depend on the size of the tree crown and the density of gluing.
- The next step is to glue the flowers onto the ball using glue. It is recommended to perform this procedure from the tree trunk.
- In a neat and correctly designed composition, newspaper stains do not show through between the colors.
- Topiary made from napkins is necessary beautifully decorated. Artificial leaves, ladybugs, and beads will help.
We recommend using napkins of two colors. For example, some will be made of blue napkins, and only a few flowers will be made of blue paper. It looks beautiful and unusual.
Topiary from cotton pads can be made using the same method. The only thing to remember is that they do not need to be folded to cut out flowers.
Coffee topiary
Check out other ideas on what you can create from such simple material.
Crafts made with your own hands will be ideal decorations for the kitchen, and you can also give them to someone as a gift. It’s so nice to come home after a hard day and feel the pleasant smell of coffee emanating from a craft that a loved one made with love.
I hope you liked all our DIY coffee bean craft ideas and will definitely use them. Is it true?
And that's all for now. See you in new articles.
Lamb made from coffee beans as a gift
Materials needed for the craft:
- coffee beans,
- twine,
- dye,
- cardboard,
- plastic eyes.
Do-it-yourself lamb from coffee beans is made as follows:
- On paper you need to draw a sketch of the desired sheep.
- From this sketch you need to cut out a head, and the resulting template is transferred to cardboard and cut out.
- Finished parts need to be thoroughly coated with a layer of brown paint to eliminate gaps.
- The head is laid out in exactly the same way from twine as in the first method. Only in this option will plastic eyes be used. A lamb made from coffee beans can be decorated with any material.
- For one sheep you need to make legs from twine as in the first option, and for the other, the legs are cut out of cardboard and covered with twine.
- The hooves are attached to the body in a well-known way, and the entire body is covered with grains.
- The head is glued to the body.
Funny sheep made from coffee beans will decorate any room.
Making a Christmas tree from coffee beans
Today it has become fashionable to make Christmas trees from a wide variety of materials - fabric, feathers, papers and even coffee beans. A miniature coffee tree will fill your home with an amazing aroma. Its size may vary, but a small Christmas tree looks more impressive. You can make this craft with your children.
To make Christmas trees from coffee beans, you will need to prepare:
- cardboard cone,
- coffee beans,
- brown threads,
- glue,
- thick cardboard,
- semolina,
- transparent varnish,
- gold spray paint.
Only after this can you start creating an unusual Christmas tree from coffee.
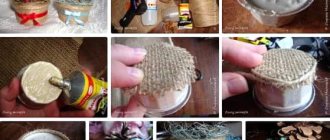
Magnet
We will need:
- thick cardboard
- magnet of any shape
- a piece of fabric of any color you like
- glue gun
- brush for cleaning grains and glue residues
- scissors
Preparation method:
- Cut out the shape of your magnet from cardboard. To make it easier, you can cut out the shape from paper in advance, and then attach it to the cardboard as a template and cut out the part.
- Glue the magnet to the workpiece using a glue gun.
- Wrap the workpiece in fabric so that the front completely covers the cardboard. From the side of the magnet, the view can be left unpresentable, because it is this side that will be adjacent to the refrigerator.
- Glue the first layer of coffee beans to the fabric with the flat side. Wait until the glue hardens completely.
- Glue the second layer with the flat side facing out.
- When the glue has completely hardened, use a brush to clean the front side of the magnet from any remaining glue.
- If desired, decorate the top of the magnet with additional decorative elements.
DIY coffee hedgehog
The plastic ball must be cut into two parts. A cone is cut out of foam plastic, which will be the face of the hedgehog. One half of the ball is traced on cardboard and cut out, and the other part of the ball needs to be painted brown.
The finished half of the ball is glued to the cardboard. Next, the foam plastic muzzle is attached. Use twine to wrap the muzzle. Next, the coffee bean hedgehog is turned over and the bottom is glued with twine, starting from the center. After this, you need to make two skeins of twine on the hemisphere.
Starting from the center of the body, rows of coffee beans are glued, while they need to be tilted to the side. Next, the grains are glued from the center to the muzzle. The eyes and nose are made from beads. On the back are attached: a cinnamon stick, anise and lemon.
Such a hedgehog will not only serve as a piece of furniture, but will also become an unusual gift for family and friends.
All the crafts made from coffee beans (each master class is described in detail) are very interesting, and their production will take very little time.
Crafts from coffee beans: DIY fragrant hedgehogs
What kind of crafts do our needlewomen make from coffee beans! And topiaries, and spilling cups, and photo frames... You can’t list it all! And I suggest you create these coffee hedgehogs! Look how cute they are! This is also a great souvenir with the mesmerizing aroma of coffee!!!
For creativity you will need:
- ping pong ball;
- jute twine;
- a piece of foam;
- cardboard;
- coffee beans;
- cinnamon sticks or other decorations;
- beads for eyes;
- scissors;
- gun glue.
We cut the ping pong ball into two parts and glue each of them to cardboard of the same diameter. These will be the bodies of our hedgehogs.
From polystyrene foam we cut out small triangles for the spouts:
We wrap the cardboard and pieces of foam plastic with twine, fixing it with gun glue.
Glue the hedgehogs' noses to the body.
Having marked the middle on the hedgehog’s body, glue coffee beans along it.
Next, glue the coffee beans from the middle of the body to the back of the hedgehog.
We also cover the entire remaining surface of the ball with grains.
We glue a small coffee bean to the tip of the nose, beads in place of the eyes, attach a cinnamon stick to the back... And our hedgehog is ready!!!
You can also add flowers, butterflies or dried fruits. This is how quickly and easily you can make crafts from ordinary coffee beans with your own hands!
I wish you creative success and see you again!
The author of the master class is Victoria Zhuzhgova (Torrey)
SHARE! "Cross" will not give bad advice!