Rules for connecting a wireless mouse
The connection method will depend on the type of mouse. There are 2 types of pairing: USB and Bluetooth to connect the manipulator and computer. All mice require power as there is no wire and the computer cannot provide power to the device. At the bottom of the mouse there is a compartment where the battery is inserted.
Bluetooth mice connect to a PC using Bluetooth communication. Therefore, the computer must support this type of connection. You can check this like this:
- On the “My Computer” shortcut, right-click and select “Manage.”
- If there is an integrated Bluetooth adapter, the list of devices should have the value “Bluetooth”. If it is not there, then the computer does not support such a connection without additional equipment.
On the right, go to the “Device Manager” tab.
The computer may not immediately recognize some models, and then the mouse will not work. To do this, the kit with the manipulator also includes a disk with which you can install the driver on your computer. The utility will allow you to synchronize a laptop or PC with a mouse.
Comparison
Now let's compare several power sources to roughly assess the prospects of the whole idea. A regular computer mouse, in addition to batteries, can also be powered by a rechargeable AA NiMH battery. It is with this that we will compare both ionistors - a large one, approximately the size of a D battery and declared characteristics of 500 F and 2.7 V, as well as a small lithium one, with a capacity of 100 F and a voltage of 3.8 V. The NiMH battery itself standard voltage 1.4 V and medium capacity, rated for 1500 mA ⋅ h.
An important point: it will not be possible to compare them head-on, since battery discharge is described by the Nernst equation. Actually, this equation describes all chemical food sources. As a result, the battery discharge graph has a plateau in the center and a sharp decline at the end, and its capacity is measured in ampere-hours and calculated as the area under the plateau on the graph. The capacitor, in turn, discharges exponentially (assuming the load resistance is constant), and its capacitance is measured in farads.
However, there is a way out: you will have to compare the stored energy in joules. So, for a capacitor (or ionistor):
E = (C × U2) ÷ 2
Here C is the capacitance in farads and U is the voltage in volts. For battery:
E = 3600 × Q × U
Here Q is the capacity in ampere hours and U is the average voltage. For a NiMH battery, the voltage across a fully charged cell is approximately 1.4 V, and for a discharged cell - about 0.9 V. However, since the voltage drop during discharge is non-linear, let's take the average at 1.1 V (this is still an approximate calculation ).
Now we get the following values: 5940 J for the battery, 1822 J for the large ionistor and 722 J for the small one. It looks good, especially considering that the latter is about the size of a battery. But there is one nuance: if in the case of a battery this is the energy that we can take from it, then with ionistors it is a little trickier.
As I already mentioned, the lithium ionistor cannot be discharged below 2.2 V (looking ahead, I will say that we will also not charge it above 3.3 V). This gives us a total of 302 J per cycle. There’s another thing with a large ionistor - it doesn’t hold a charge well above 2.2 V, especially with fast charging, which is what we’re aiming for. It will also not be possible to discharge it usefully below 0.5 V (due to purely technical limitations). However, the latter does not introduce a noticeable loss, so here we have about 542 J.
Here you can clearly see the advantage of a lithium capacitor. Still, it is worth considering that it is seven times smaller in size than its counterpart. However, for my taste, the advantage is not as great as it is described in advertising articles. And don’t forget about the difference in price - such ionistors are quite expensive.
Taking into account all the comments, we end up with the following values: the same 5940 J for the battery, approximately 542 J in the large 500 F ionistor and 302 J in its younger brother at 100 F. Not so optimistic. Okay, how long will a computer mouse last?
A modern inexpensive wireless mouse consumes approximately 4 mA in active mode and significantly less in standby mode. For simplicity, we will assume that our rodent is always in an active state and its supply voltage is 3 V. This gives us 43 J/h.
Thus, to a first approximation, the mouse should work for twelve hours from a large ionistor, and about seven hours from a small one. Of course, these calculations are only approximate, but they allow us to assess the overall prospects of the idea. And in fact, it’s quite good, considering that a large supercapacitor can be charged in about thirty seconds, and a small one even faster. Thus, in theory, our manipulator will be able to store enough energy for the entire working day just during the loading time of the OS.
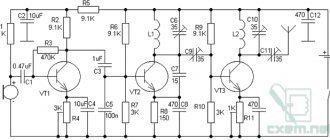
Lithium capacitors
Such capacitors are much more expensive than even classic ionistors, and they are sold charged. Therefore, if you decide to fork out money, make sure that the voltage on it is above 2.2 V, and that the capacitor itself is not swollen. Here I want to thank Faberge who provided the VLCRS3R8107MG 100F lithium capacitor for my project.
There was a whole story with this capacitor. It was ordered from a well-known store, known not least for its high prices. The very first capacitor that was sent from there turned out to be swollen and discharged. However, in response to the complaint, the store promptly and without unnecessary objections sent a replacement. And in this way I was able to compare the defective and working copies.
It turned out that the swollen, discharged capacitor had greatly lost quality and, in terms of self-discharge, began to resemble classic ionistors (PDF), which are easy to order in China. There are no special nuances here, except that quality is not always the case. However, several charge-discharge cycles and a long charge are to their benefit.
Continuation is available only to members
Option 1. Join the “Xakep.ru” community to read all materials on the site
Membership in the community during the specified period will give you access to ALL Hacker materials, allow you to download issues in PDF, disable advertising on the site and increase your personal cumulative discount! More details
Difficulties and their solutions
During operation, the user may encounter several problems. One of them is the loss of the USB mouse adapter.
If you lose or lose the adapter that came with the mouse, you can try several ways to correct the situation:
- In a digital equipment store, you can ask about the availability of adapters for a particular mouse model. Many manufacturers take into account the fact that the consumer may lose this part and sell adapters separately.
- You can purchase the same mouse model hand-held along with an adapter. You need to change the “stuffing” of your mouse with the internal parts of the purchased one so that the adapter can receive signals from this particular manipulator. Of course, you should buy a used mouse at a low price to make the cost worthwhile.
If the described methods turned out to be useless, then it is best to buy a new mouse.
The second difficulty is that the computer does not have a built-in Bluetooth adapter. It would seem that connecting a mouse using such a connection is impossible, but there is a solution. You should purchase an external adapter that will implement this feature on your computer. Purchasing such a Bluetooth accessory will allow you to use the connection functions, and there are no differences at all between the integrated version and the external one.
Attention! If you have an old wired mouse, don’t immediately throw it away when purchasing a wireless option. The first can serve as an excellent replacement when, for example, the batteries of a wireless controller are low or the device has become unusable, and using the computer is urgent.
Columns
Speakers are popular output devices used with computer systems. They receive audio input from the computer's sound card and produce audio output in the form of sound waves. Most computer speakers are active speakers, meaning they have an internal amplifier that allows you to increase the volume or amplitude of the sound.
In this case, everything is much simpler. You need speakers and the mouse itself. Everything unnecessary is thrown out of it. The speaker is inserted, the housing is put on, and the wires are stripped. You can also install a variable resistor to adjust the volume when you rotate the mouse. To complete it, you can attach legs and attach a decorative mesh.
So don’t throw away your old mouse; you can do many fun projects with it and even assemble the right thing.
Step-by-step instructions for connecting a wireless Bluetooth mouse
To connect these types of mice, you will have to perform several additional steps for synchronization:
- Insert the battery into the manipulator to provide it with energy for operation. Then turn on the mouse.
- On your laptop or PC, enable the Bluetooth function, go to its section and click the “Add device” button.
- If the mouse is turned on, the brand of this same mouse will appear in the Bluetooth settings, which you need to click on and connect. After completing the steps, you can use the mouse. However, it is worth considering that Bluetooth must be constantly turned on in order to maintain communication with the manipulator.
You can customize your computer mouse to suit you. To do this, go to the control panel and find the “Mouse” item. This section will display all the properties and settings that, if desired, can be changed (press speed, sticking function, setting for left-handed or right-handed people).
Step-by-step connection of an RF mouse
- This type of mouse comes with an adapter that should be connected to the computer via a USB port. The adapter receives mouse signals and transmits them to the PC.
- Insert the battery into the manipulator and slide the switch to the “ON” or “ON” position.
- Check the functionality of the mouse on the screen.
Thus, due to the fact that there are two types of wireless mouse connections, you can choose exactly the type that will be convenient for you. Problems that arise when the user uses the equipment have a clear solution, so the advantage of wireless mice is also their ease of use.
What can be made from a computer mouse: ideas
External and internal parts from the old device will be useful for creating the following original things.
Robot
An unnecessary ball mouse will become a light-sensitive robot. To do this, the parts are disassembled, and the switches and infrared emitter are left for operation. The body must be freed from unnecessary parts and protrusions, and wheels must be attached, wrapped in three layers of rubber tape. Next, you will need a relay, which must be installed inside the case, connect the necessary contacts and solder the wiring. To operate, the robot will also need a small microcircuit; it must be placed inside the case. It remains to make two holes for the eyes and one for the LED lamp in the front and one hole for the toggle switch in the back. Contacts are attached to the right and left motors, eyes and battery are connected. The robot is turned on using a toggle switch.
Flashlight
By inserting an LED inside the housing, you can get a small flashlight. Using the same method, you can make a small table stand or lamp. A stand is attached to the place where the wire is connected, and a lighting lamp can be installed in the place of the ball.
Important! Do not use incandescent lamps as lighting. When they heat up, they can damage the plastic from which the mouse body is made.
Tachometer
Using a board from an old mouse, you can create a tachometer. Transistors and an LED board element will come in handy. A resistor is soldered into the free hole of the controller, and a contact from the phototransistor is connected to the board connector. All that remains is to connect the tachometer through the connector to the computer. The resulting device counts rotation pulses per second and displays the data on the monitor.
Winder
A hole is drilled in the upper part of the body into which an adapter with a convenient attachment is placed. Such a winder will be mechanical and will rotate due to the movement of the adapter.
What should I do if I lost the USB receiver for my wireless mouse?
Wireless USB mouse adapters are compact and small antennas, but this convenience also has a downside. If any of you have lost the USB adapter from your wireless mouse, what to do first is not to panic. In many cases, you can replace the adapter with another one. I performed this procedure myself and helped several friends. The problem is really common, but can be solved in several ways.
* * *
Obviously, not everyone has such opportunities for experimentation: while a drill, soldering iron and a sheet of sandpaper can still be obtained, laser welding and an induction furnace are unlikely. However, there would be a desire. Almost every Russian city has large and small factories with modern and not so modern machines. Specially trained people work at these machines, so if you find an approach to them...
In general, it is not at all necessary to create a steel mouse. You can make a beautiful window in the system unit, repaint the monitor, or at least change the standard LEDs on the keyboard. Again, there would be a desire.
Method 1: write to technical support
If you have lost the receiver from a wireless mouse from a well-known manufacturer, then the first thing you need to do is write to the official technical support service. There is a high chance that you will be asked to take a photo of the device and will be sent a new adapter to replace the one you lost. There is a lot of information on the forums about users who have used this method. For example, Logitech sends a USB adapter for free in most cases.
The only caveat: find out the cities where they deliver. Company policies change periodically. If this is only Moscow or St. Petersburg, then you will need a relative or friend from these cities to receive the device and then send the USB adapter to your address.
Method 2: Logitech Unifying Receiver
This method is only suitable for Logitech products. If your device has the “Unifying” logo - a red sun icon - then you can use any receiver with this image - not necessarily the original one that you lost. Moreover, you can connect up to 6 devices from Logitech to one receiver: keyboards, mice, clickers, etc. What should I do for this? It is necessary that they all support this technology, and also download the Unifying application from the official website. This will help you configure your wireless mouse to a different adapter.
You can buy an adapter with Unifying technology on the Internet: both used and new. Price – about 500-700 rubles.
Edible mice on the festive New Year's table
And for a snack - snacks from products in the form of mice to decorate the festive table.
Looking at these photos, you understand that everything here is so elementary simple that any housewife can handle it.
You can use any products: cucumbers, radishes, eggs, cheese, sausage, lemons and others - whatever your imagination allows.
We cut out the parts of the desired shape, make small slits in the “body” and insert “ears” into them. You can probably also secure it with toothpicks.
So, choose your favorite mouse from any material and make a craft for the New Year!
- How to decorate your house for the New Year with your own hands
- How to beautifully and originally decorate a Christmas tree for the New Year
- DIY snowmen for the New Year from different materials: ideas, photos, master classes
- What to give men on February 23: ideas for original gifts
Method 3: Configuring to a different adapter
This method is the most difficult and does not always work. When searching on forums for the question “how to connect a wireless mouse to another adapter if you happen to lose yours,” you most often hear the answer “no, it’s impossible.” However, I managed to solve this problem in one case. In one more case, unfortunately, all the methods really didn’t work. But if I lost the USB adapter from my wireless mouse again, I would check them too.
Remember that, in most cases, you will not be able to use a USB adapter from a similar mouse in place of the one you lost. Device recognition is performed by ID, so the wireless receiver simply will not see your device. However, there is one way that you can check if you have a similar USB receiver on hand. Here's what to do:
- Turn off and on the mouse. The batteries must also be charged.
- Place the device close to the USB port.
- Insert the receiver into the USB port.
- No later than 15 seconds after this, simultaneously hold down the middle button (wheel) and the right mouse button.
- After a few seconds, the mouse and receiver will be paired and the device can be used.
This method works, I repeat, for the same manufacturer (or the same model) and not always. But if you can test it and it solves your issue, then this is perhaps the easiest option to continue using the device when you have lost the original receiver.
Step 1: Check compatible USB adapters on the manufacturer's website
If adapters are interchangeable, this should be indicated in the documentation or simply on the page with the characteristics of your device on the website. Sometimes the same receiver is suitable for devices released within 7 years of each other. And you can buy an old receiver for pennies, for example, on Avito.
Step 2: Check drivers and utilities on the manufacturer's website
There is a possibility that the problem of a USB receiver that can be lost has already been solved by the manufacturer earlier. If the site has software that will help you easily flash another similar receiver, your problem will be solved. For example, for A4 mice this is Office Shuttle Software G9_G11. What remains to be done is just to buy a receiver on the Internet: on Avito, Ali Express, etc.
Step 3: contact the service center
You need to find out whether specialists can find you a new receiver or link a wireless mouse to another receiver instead of the one you lost. Often, the experience of the service center employees will solve the problem much faster than you would. It may happen that the required receivers are idle in the warehouse. It is also possible that specialists know how to flash USB receivers.
There is another way: reprogram the receiver yourself. In this case, you will need special knowledge and software. The USB receiver should be flashed to a different device ID or the frequency of the received signal should be changed. This method is quite complicated and is not suitable for all devices. Suitable for people with technical knowledge, experience and free time.
If you have lost your wireless mouse adapter, I advise you to immediately contact the company’s technical support, and then check all the methods and steps one by one. In many cases, the problem can be solved and you won't have to buy a new mouse. However, in another case, unfortunately, you will have to purchase a new device.
Christmas rat made of polymer clay
For craftsmen and lovers of handicrafts made from polymer clay, here is such a wonderful cute rat (or is it more like a big mouse, I don’t know?).
We have a master class, I must say, it’s the only one floating around on the Internet, at least I haven’t come across any others.
Materials:
- polymer clay of different colors
- special knife or thick needle
- wooden or plastic skewer
- rolling pin
- beads for eyes.
Sequence of work
- We first form a ball from a piece of gray clay, and then give it an elongated shape.
- We make the basis for future legs - use a skewer to draw two vertical stripes on both sides of the workpiece.
- Roll out a small layer of white clay 2-3 mm thick, apply it to the base, straighten it: you get a breast.
- For the paws, you need to roll small balls, and then use a needle to flatten them and make 4 fingers (front paws).
- We make the hind legs in a similar way, forming three fingers, while stretching them a little.
- A thin long tail can also be made from white clay.
- We attach the resulting parts to the body.
- We form a head from a ball of clay by stretching it out. Use a skewer to make a mouth and attach the head to the body.
- Our ears will be made from two circles: a larger gray one, a smaller white one.
- The eyes can be made in three layers: first a white layer, then on it we put a smaller blue piece and a small black pupil.
- Finally, make the eyebrows and attach the nose.
- And the last step is to bake the resulting mouse toy in the oven according to the instructions for the material.
Lost wireless mouse receiver: 8 comments
Thank you. I didn’t know the SCM+PCM method.
Dude, thank you so much. I bought a mouse on Ali, but it came without a receiver. It turned out to be configured on the old PKM+TsKM adapter
how did you do that?
loss of the receiver from the mouse and keyboard Logitech m185 and k270 what can be done
Download Logitech connect and link it to your native m185 without unifying.
Thank you very much, Ivan. After a sudden power outage, my 4TECH wireless mouse stopped working - I really like it (it has a double click) and it was a pity to throw it away. But today I found your site and this article, and really good advice! SCM+PCM helped! Damn, I still can't believe it. Thank you Ivan.
Thank you! helped! I bought a mouse, but apparently they forgot to flash its receiver: it was not recognized by any computer. I was already thinking about returning the mouse or carrying it under warranty. but since it was a day off, I decided to look for a solution on the Internet. Luckily, thanks to you, I found it! The SCM+PCM method works! The receiver was flashed and the mouse connected.
How to make a mouse pad with your own hands: instructions
Linoleum rug
A piece of flooring will help you create another alternative at home.
First, cut out a square from linoleum.
We cut out a stand measuring 24x20 cm. We make the edges slightly rounded to make it easier to work with such an accessory.
Attach a round glass and carefully cut them along the contour with a stationery knife.
Let’s complicate the task and make a truly exclusive thing. Let's try to make decoupage on the surface of linoleum. We will need napkins with an interesting pattern.
Whitening the surface in decoupage is done to make the picture brighter
We cut out the fragments and glue them onto the linoleum. Carefully coat with glue. When the surface is dry, apply several layers of special decoupage varnish.
Now we repeat the procedure of painting the background with a sponge once again, only with blue paint.
Cardboard mat
That's true, a rug made from scrap materials. For work, you can use corrugated cardboard or part of a regular shoe box. To prevent the accessory from “driving” on the surface of the table, we use a special anti-slip layer for furniture. To prevent the cardboard surface from looking dull, use craft paper or wrapping paper with an interesting print.
This will give you a great working surface for your rug.
To best secure the fabric decorative layer, use regular or aerosol textile adhesive.
We glue the wrapping paper onto the cardboard surface with glue. And we fix it on top with self-adhesive film. As you work, smooth the film well so that there are no folds or bubbles. Thanks to this surface, the mouse will glide better, and the service life of the accessory will noticeably increase.
A transparent self-adhesive film will protect the decorative layer and allow the mouse to easily move around the mat.
How to connect a wireless mouse to a laptop or computer
Author: admin · April 4, 2018
The rapid development of technology has led to the fact that any device for processing, storing and exchanging information must be as mobile as possible. The presence of wires can be a big obstacle to this. Therefore, wireless computer peripherals have been in great demand lately. In this regard, many people have a question about how to connect a wireless mouse to a laptop. As for a desktop computer, wireless devices optimize the workplace, its comfort and functionality.
What can be replaced
Of course, in emergency situations, when you need to continue working at the computer, and the table surface is too slippery, the sensitivity of the mouse is reduced because of this. In this case, a quick temporary replacement will do. And even if it doesn’t turn out to be very designer-looking, it will save you for the first time.
When choosing a replacement mouse pad, you need to look at what type of mouse it is - it can be laser, optical or mechanical with a ball. To determine the device type, you need to carefully turn the mouse over and look at the bottom:
- If you see a rubberized ball on the bottom of the mouse inserted into a hole and spinning in it, then the mouse is mechanical. Such device models were popular earlier, but now they are practically not used, unless you have changed your computer since time immemorial.
A rubberized ball is visible in the hole
- An optical mouse has a hole at the bottom with a red light (LED). Be careful not to shine it in your eyes. This mouse uses a small viewfinder that takes pictures of the surface.
In the center of the bottom there is a red LED - A laser mouse is similar to an optical mouse, but you won’t see a light in the hole. Its work is based on the action of a semiconductor laser, the beam of which is repelled from the surface and returns the result in the form of coordinates.
There is a hole in the center of the bottom surface of the mouse through which the laser shines onto the sliding surface
The difference in mouse types and the principle of their functioning leads to the fact that they need different surfaces for smooth gliding, and even the speed of the mouse depends on the surface. For the average document user, speed may not be a critical factor. But for a gamer, on whose prompt actions victory in a game round depends, and the count can even go by seconds, the surface is very important.
- Any surface is suitable for laser mice; their design is such that they can move with equal success on a rug, a table, or even glass. The trajectory of their movement is not distorted. The operating speed remains the same. This is why gamers prefer them.
- An optical mouse can also move on slippery and smooth surfaces, but this will significantly affect its sensitivity. When the cursor moves across the screen, jerks, “slipping” of some areas, and shaking of the mouse pointer will be noticeable. Therefore, in this case, for replacement it is better to choose a surface with a matte or not too glossy finish. It is worth noting that a fleecy surface is also not the best option here, since it consists of tiny hairs, and the mouse’s LED beam will “fall” between these hairs when moving, which will also make it difficult to recognize coordinates. To replace the mat, you can use a book (not too thick so that it is comfortable to hold your hand), a piece of linoleum, a magazine with a matte cover, a box lid, an untreated wooden plate, or a piece of corrugated cardboard. Test different options and settle on the most convenient one. Often, if your rug has become worn out, turning it over with the foam side facing up will be enough to give it a second life.
- Matte surfaces are also suitable for a mechanical mouse. The main thing here is to ensure an even hard surface. There is another problem with ball mice - it is not the mouse pad that wears out, but the rubberized ball itself. Then only replacing the mouse or ball will help.
To improve the glide of the mouse, it is also necessary to clean it. On the bottom surface of the device there are special smooth shaped inserts (usually located around the perimeter of the bottom of the mouse), which help smooth movement along the surface. Over the years of use, lumps of dirt accumulate on these inserts; they can be removed with a special cleaning agent for personal computers or any composition containing alcohol.
Wipe the bottom of the mouse with special wet wipes for equipment or a cotton swab dipped in an alcohol-containing solution
How to connect a wireless mouse to a tablet
Sometimes there is a need to connect a wireless mouse and keyboard to a tablet or phone, for example, for typing text in large volumes, for processing it when there is no access to a desktop computer. Some tablets have a standard USB port. In this case, connecting a wireless mouse will not cause difficulties. Proceed in the same way as when connecting a mouse to a laptop. If there is no such port, then the tablet always has a micro-USB connector and you can simply use a USB - micro-USB adapter. It is usually included in the kit or purchased additionally. It looks like this:
Insert the mouse adapter into the USB connector and turn on the mouse. Through such an adapter it is possible to connect a regular, wired mouse to the tablet. A signal that the pointing device is connected to the tablet is the appearance of a standard cursor icon in the form of an arrow on the screen.
The video on the link will tell you in detail how to connect and configure a mouse on an Android tablet:
If you need to turn on a wireless mouse and keyboard at the same time, but there is only one micro-USB connector, you can use a special OTG MicroUSB Hub splitter, which makes it possible to connect several devices at once. Here he is:
When connecting a mouse directly via Bluetooth, without an adapter, make sure that this type of connection is enabled on your device. Then wait for synchronization with the mouse. If it does not happen automatically, then in the Bluetooth settings you need to manually search for available connections. The tablet will detect the mouse, select it from the list and click “Connect”.
The advantage of a wired mouse
Having carefully studied all the characteristics of a wired mouse, we can highlight a number of advantages that encourage users to make such a difficult modification. The advantages of this device include:
- price;
- durability of use;
- speed of response to user commands;
- versatility.
As you can see, the main advantages of a wired mouse over a wireless one will be price and durability of use. A mouse powered by a computer costs even less than a wireless mouse of the same class. Moreover, for remote control you will also have to spend money to purchase power supplies. Moreover, given that this mouse is scrapped twice as fast, we can conclude that a much cheaper option is a wired mouse.
More than once, users have encountered the problem that mouse drivers do not fit their home PC or laptop. A wired mouse does not require the installation of special drivers. To start using it, you just need to plug it into the USB output and get to work.