/Accessories and decor/Decoration/
Baskets and baskets help keep the house tidy and decorate the interior, so you can never have too many of them. Beautiful braids can be bought in the store, but it is much more profitable to learn how to weave them yourself.
- If you have a couple of free evenings and a pile of any paper, then you can weave a basket not only without financial losses, but also in the size, color and shape you need. And weaving baskets with your own hands is a very pleasant and peaceful process that you can do, for example, while watching your favorite movie.
And don’t let it bother you that the baskets are not made of wicker or rattan, because if everything is done correctly, then in appearance homemade baskets made from old papers will not differ from real wickerwork. Of course, they will not be as durable and moisture-resistant, but, nevertheless, they are ideal for storing most things.
For beginner craftswomen, we have prepared a step-by-step master class on weaving such a rectangular basket from kraft paper with leather handles. And at the end of the article you can see several ideas for using baskets of different shapes and sizes.
How to roll a newspaper tube
Recently, many master classes on making various crafts from newspaper tubes have appeared on the Internet.
However, many people still do not know about their existence. If you belong to this number, then this section is intended for you. Old newspapers need to be cut into strips 10-12 cm wide. Starting from the corner of the rectangle, roll the paper with your fingers, pressing the turns tightly so that the tube turns out to be thin and long.
Many craftsmen advise using a knitting needle for convenience, but some do not like this facilitating method, since the tubes turn out to be slightly conical, that is, by the end of winding the diameter of the product increases. To weave, the tube must be smooth and thin. Try to ensure that all the parts are the same diameter, otherwise a basket made of newspaper tubes will look untidy.
In the photo above you can see how the master rolls a thin tube out of paper with his hands. If you don’t manage to do it neatly the first time, don’t worry, with experience you’ll get the hang of twisting weaving blanks in 1 minute. At the end, coat the extreme corner of the paper with PVA glue and attach it to the last turn. Unevenness in length and edges are trimmed with scissors at the end, when many elements have been made.
Weaving a basket from newspaper tubes requires long parts, so immediately try gluing two pieces into one. Lubricate the edge of the first element with glue and screw it into the hole of the second from the end side. After hardening, weaving can be safely continued. In this way you can weave a basket the size of a person, because the tubes can be extended many times.
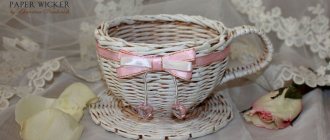
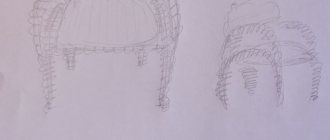
Corrugated basket
To make a paper basket like the one in the main photo in the article, carefully examine its structure. There are three components of this craft. The base of the basket consists of a rectangular sheet of thick paper, on which three folds are made for the sides and bottom of the basket. To make them take the shape of a trapezoid, additional parts in the form of triangles are glued on the sides.
The second part of the craft is done by folding the paper into a small accordion. To make a paper basket open wide, you can fold it from two strips, making a glued joint in the center. Attach the corrugated part on both sides, spreading PVA glue on the last fold of the paper.
Lastly, attach the handle and decorate the craft with half beads. Attach fabric flowers to the top of the handle.
Cardboard base
For beginners, it is more convenient to decorate a basket of newspaper tubes on a cardboard base. To make the bottom of the craft durable, they mainly use packaging corrugated cardboard in one or two layers. Draw the desired geometric shape on the sheet and cut out the part with scissors. Stepping 1 cm from the edge of the cardboard, use an awl to make holes at regular intervals. In our sample it is 2 cm. Then insert a newspaper tube into each hole to the middle and bend it in half, pointing upward.
The first row of weaving begins from the corner of the future basket, if it is square or rectangular. Pull a piece bent in half onto the outermost newspaper tube and twist it in an “X” shape, alternately along the entire perimeter of the bottom, going around each piece sticking up. Change the position of the halves all the time: one in front, the other at the back of the canvas. The next step is done in reverse. When you run out of paper, attach another tube to the two ends using PVA glue and continue working until the desired height of the basket. This is the simplest weaving option, which can be handled by craftsmen who are taking on such work for the first time.
What kind of baskets can be made from paper?
There is a large collection of basket crafts. But many children find it difficult to come up with an idea on their own. In this case, kids can use ready-made options based on their current skills and mastery.
Rectangular basket
This is one of the simplest crafts that every child can do. To do this, you need to cut out a large square, fold its sides and glue them together. But to prevent the basket from looking too simple, you can decorate it to your liking.
Paper chain basket
The craft is ideal for storing things. In addition, you can place a houseplant or gift in it. The decorative basket is woven from homemade chains. You can use any paper for this work.
Wicker basket
Wicker products always look beautiful and neat. It is not surprising that such a craft fits perfectly into any interior. The basket is created from paper tubes that are intertwined. The result is a luxurious basket that can hold just about anything.
Basket with fringe
Girls will especially like this craft. A basket with fringe always looks bright and festive. It can be made from short pieces that need to be glued together.
Flower shaped basket
The most talented and creative children can give free rein to their imagination to make the most unusual crafts. A flower-shaped basket is a vivid example of how you can create a real work of art from ordinary paper. If you wish, you can make your own basket of corrugated paper flowers.
Origami basket
From childhood, children learn to create various figures using this technique. But in addition to flowers, animals and birds, you can make a beautiful basket from paper. This craft is not suitable for storing things, however, it will be a wonderful interior decoration.
Weaving baskets of different shapes
Baskets made from newspaper tubes have different shapes. Even beginners can weave various configurations with their own hands.
Square basket
Sequence of making a square basket:
- You should start by forming the bottom. To do this, take a cardboard strip and bend it in half. Punch holes in the cardboard at a distance of no more than 2 cm. Insert an extended “work cord” into the resulting holes.
- A long vine should be woven near the cardboard. Having reached the edge, turn and weave in the opposite direction. To extend the “working cord” it is necessary to re-glue the paper blanks. The bottom width may become narrower and should be adjusted to the desired size.
- Then the side walls of the braid are formed. An oblong newspaper rope is required, which is bent in half and both ends are threaded into the bottom. The tails that appear from the bottom of the bottom must be bent upward and secured. The “working cord” must be made to the desired size depending on the required height.
- To fix the sides, you need to place a heavy thing in the center, similar to the shape of the future basket. Then attach the frame tubes to it using an elastic band.
- Start weaving from the bottom of the craft. Using a long piece, weave it into one side, alternating the placement of vertical strands, placing them at the back and in front.
- At the beginning of work, the tip of the “working cord” remains, which can later be used as one of the components of the frame. It allows you to form an odd number of vertical blanks. After the next row, the unoccupied edge should be braided. The procedure of weaving the sides is carried out in a circle until a basket of the required size is obtained.
Rectangular basket
To form the bottom of a rectangular basket, you need to cut out a template of the intended size from cardboard, place it along the edge of a twisted tube, and secure the structure with clothespins. Then lay newspaper blanks across the base so that each bundle in turn goes from below or above the base, and adheres to the desired grouping of weaving.
For some period, the craft should be covered with another paper cord and secured with clips. The bottom will become like a comb, and then you need to weave in new pieces, observing a checkerboard pattern and forming the desired density. If the bottom becomes strong enough, you can remove the clothespins because it can hold its shape on its own.
When the base is woven, ray-like strips remain, which in the future will be used as the basis of the frame, and with their help you can form frame walls. If the tube runs out, you need to add a new one. When decorating the edges, unnecessary ends are cut off and glued inside.
Punnet
To create a round-shaped product using the rope method, you need to follow the following steps:
- Take six strips of newspaper and use clothespins to make a solid surface.
- Repeat this manipulation again and fold both parts crosswise.
- Then put the paper vine into the work. Bend the workpiece in half and place its tip in the place where the cross is formed.
- Next, a circular bottom is woven. The work cord must be bent with each turn, which is made at an angle of 90 degrees. This maneuver, which forms a ring, should be repeated 4 times, and then fixed with clamps.
- The sides are woven in pairs. Place an oblong double paper vine exactly under the created bottom. The ends of the paired strands should be secured to the basket.
More options for weaving a round bottom
Option 1
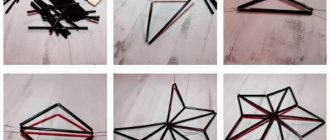
The step-by-step photo below clearly shows the order of laying out the tubes on the table surface before starting work.
First, place three elements side by side vertically and horizontally with a “+” sign, then place a similar number of pieces on top with the letter “X”. To prevent the newspaper tubes from slipping or slipping during further work, press down the middle of the workpiece a little. You can use an iron or a regular rolling pin.
Weaving is done in a circle. Bend one tube in half and place three tubes standing in a stack. Press down the fold with your fingers. Next, we weave a basket of newspaper tubes in pairs, that is, we visually divide the three elements into pairs and go around them with halves of the main part in the manner described above. When a little material remains, make a coupling: glue one more to each end of the tubes and continue weaving to the desired diameter. You can make a cardboard template or measure the bottom using a regular glass container.
Option# 2
Circular weaving of a basket from newspaper tubes can also be done with large stitches. Getting started is completely consistent with the previous option, already described above. The main tube is highlighted in white in the photograph. It is bent, as usual, in half and crossed around packs of three parts, without separating them in pairs. To continue working on the round basket of newspaper tubes once the desired diameter is reached, lift all the elements perpendicular to the table surface upward.
There are baskets in the shape of a truncated cone, that is, with an expansion at the top, then you will need to insert a template inside the workpiece. It is most convenient to make it from corrugated packaging cardboard, already familiar to the reader. To prevent the tops of the parts from bending under the weight of the paper, they are attached to the template with clothespins. And the main newspaper tube, which is used for the actual weaving, continues to be twisted around each vertically protruding knitting needle. For convenience, you can temporarily remove the clothespin, stretch the tube and attach the clothespin to the previous place.
Oval basket
An easy way to create a basket:
- to create the bottom you need to take several newspaper blanks and weave them together in the form of an oval.
- fasten them by tying them together
- Having formed the base, you need to weave it according to the usual method.
- Having made the desired diameter of the bottom, wrap it and lift the tubes up.
- Secure the strands with clamps and continue weaving.
- After finishing the work, secure the edges in the usual way.
Corner basket
When weaving corner crafts from newspaper bundles, it is advisable to follow these rules:
- To make stands, it is advisable to use a vine from a whole sheet of paper for printing or use magazine source material. Soft blanks will not be able to withstand the braid.
- When designing a basket, to form a uniform bottom, you should place a weight on it, paying special attention to the corners of the product.
- For painting, it is necessary to accurately calculate the required amount of acrylic coating, because if you add another shade, the color will be far from ideal.
From pine roots
Baskets made from the roots of coniferous trees (pine, fir, spruce) are very durable and textured. They are obtained from relatively young plants - no older than 30 years. The thickness of suitable roots is 2-6 mm, they are usually located at a depth of about one and a half meters. Roots that are literally on the surface are not suitable for work - they are difficult to split into ribbons. The easiest way to obtain material is on the steep banks of reservoirs and cliffs. The required amount is chopped off with an ax. Cut, split the roots immediately, dry in the shade, and before starting work, soak in warm water for 20-30 minutes. Weaving is similar to that made from wicker.
Weaving from newspaper tubes for walls
As soon as you start weaving products, the patterns will become clear to you. Having gained a little experience, you will learn how to reconstruct the weaving method by looking at the photo. For beginners, we recommend starting with the simplest patterns. This is a rope, and then a pigtail. It won't take much time to master them.
Even a beginner can weave such a basket from newspaper tubes.
Rope
To master the technique of weaving from newspaper tubes, you will need about five to seven stands. To begin with, you can attach several pieces of thick wire to some kind of stand (a piece of dense foam plastic, for example).
This is what weaving looks like live on a “simulator”
The following is the weaving process:
- We take two tubes and place them crosswise between the two outer posts. It turns out that one tube is in front of the work, the other is behind.
- Holding the tubes at the intersection with one hand, bend them with the other, going around the next stand. As a result, the tube that was in front turns out to be behind, the one that was behind turns out to be in front.
- We bend it again, going around the next rack and so on until the end of the row.
That's all - this is a method of weaving a “rope” from newspaper tubes. Already using this technique you can do the simplest things. The product is dense and durable. One important point: for this pattern to look normal, there must be an odd number of racks.
By changing the “starting” location of the tube, we get a different pattern in appearance
If you want to make it a little more complicated, you can take two tubes and go around two posts at a time. But then you need to calculate the number of racks so that the second row is offset - then the pattern will turn out to be interesting. No less interesting are two ropes directed towards each other, and not woven in one direction.
Chess
Checkerboard is another simple weaving method. To do this, you need to take two tubes, placing them one above the other.
- We fix the first pair to one of the racks (just hold the edges with your finger).
- We bring them forward, making sure that they remain one above the other.
- Let's start it back.
- Forward again and so on...
- We take the second pair, secure them behind the next rack (move one rack forward), but above the first row.
- Further actions are similar - forward/backward.
- Using the same principle, we weave the following rows.
This way you can weave a basket, tray and many other products. In terms of density, the product is not as strong as with the previous weave.
In combination with the already known rope we get an interesting product
If you combine the two methods described, you get a rather interesting product. And if the transition is also decorated in a different color, it will be even prettier.
How to make an Easter basket from dough?
I also suggest that you make crafts from salt dough, since such material is available to everyone, and such works are suitable for children’s creativity.
I present to your attention ready-made product options:
- Basket with chicken or flowers
- You can make such souvenir magnets
- Well, here is a whole step-by-step photo instruction for you, all you have to do is knead the dough and repeat everything
And I also want to invite you to watch the video story. I really liked the author’s work, I think you will too.
By the way, you will get not just a craft, but a real edible decoration for the holiday table!! And instead of salted dough, yeast dough is used. Intrigued?! Then hurry up and watch it!!
Shutdown
In order for the product to look neat, it is necessary, firstly, to remove the working tubes, and secondly, to somehow form the edge and do something with the stands.
Some weaving elements are more complex. It’s best to master them after you’ve made a couple of simple baskets
We fix the working tubes
First you need to secure the working tubes. Usually they are hidden in the weave - in the nearest binding. For this operation you will need a knitting needle or a long wooden skewer.
- Having retreated down three or four rows, we insert the skewer so that it comes out not far from the working tube.
- Bend the tube and place it on a skewer. We carefully place the entire structure in the place where the skewer was inserted.
- We cut the tube as close to the weave as possible.
- We repeat from the second.
- We straighten the weaving from newspaper tubes so that the scraps are not visible.
This is a simple and reliable way to secure the working tubes. Their ends are hidden in the weaving, but are securely fixed and clamped. For those who are just starting to master paper weaving, this is perhaps the best option.
Weaving the edge - the main technique
Next, you can begin to close the edge. There are many different ways - more or less complicated. The simplest one is to do the same as with the workers, but bend them inside the product. But then the edge is not very beautiful. If you want to make it more aesthetically pleasing, you can try the “rod” edge. It is not too difficult for beginners to master, and it looks interesting.
To close the edge with a “rod”, you need an auxiliary tube or you can take a skewer or knitting needle. With its help, we bend the first post to the right, bring it behind the next post and bring it forward. We bend it to the right in the same way, hook it behind the next one and bring two more posts forward. In total, we have three bent.
From now on we will always work with the leftmost tube. We take it, move it to the right, go around the two posts in front (one bent, one standing), take it behind the third, bring it forward and bend it.
We cut it with pliers so that 8-9 mm of tube remains behind the stand. To fix this trim, we bend the first of the standing posts to the right, pressing the trimmed edge. Again we have three tubes (bent) at work. Again we take the left one and repeat everything again.
A side is gradually formed that covers the top of the weave. We repeat all these steps until three stands remain: two bent and one standing. It’s easy to track this moment, it’s important not to miss it. This is where you need to be careful. If everything is done correctly, it will be impossible to find the place where the work begins/ends.
Final chords
When three racks remain uncovered, you need to make sure that the newspaper tubes are laid in the same sequence and in the same direction, so that they lie the same way as before. We take out the auxiliary tube or skewer with which we began to close the edge.
Again we take the leftmost tube, in front we go around the last standing post and then, according to the previous weaving algorithm, we need to lead it behind the next post. This stand is already bent and secured. This is the one with which they began to close the edge. We insert the tube from the back, slip it under the first curved post (it’s more convenient with a skewer) and pull it forward, laying the tube like the rest. We cut it off.
Further according to the algorithm, it must be covered with the previous stand. In this case, it's the last one standing. We bend it, bring it behind the weaving and push it behind the cut-off post.
Now there are no standing racks, only three working ones remain. They must be laid in the same way as those that are already secured. We take the far left one, it must be pulled under the third post. Look carefully. This is the first stand that does not have a cut tube near it. Stretch, lay, cut.
We lay the left tube along the top, covering the tubes we just laid. We start it from the back, pull it under the counter, in front of the laid tube.
We repeat the same operations with the next leftmost one. It must be placed behind an “empty” stand, near which there is no cut tube. This stand is located to the right of the one we just worked with. Here you can’t do without a skewer - you need to slip a newspaper tube under the two already laid (look at the photo).
We lay the tube on top, hiding the cut one above. We start it from the back, put it on a skewer and pull it out. Holding it with your fingers, we rock it from side to side so that there is a place for it and it “lies down.” We cut it off.
All that was left was a newspaper tube sticking out. We start it behind the third rack. It’s not difficult to find your way: under the first two there are already scraps of the ones that were just laid. We insert the skewer under the laid turns and bring it out near the bent post.
Using a skewer, we bring the last rack out and lay it out so that it lies the same way as the others. Now it can be trimmed. The edge of the basket is ready and it is impossible to find where the row begins and ends.
Ideas for making a crochet basket for Easter
When I was preparing this collection, of course I couldn’t leave out the knitted toys. Indeed, in skillful hands, whole masterpieces can be made from yarn, knitting needles or crochet.
So, you can knit a case for an egg and the egg itself)) Or an excellent chicken.
But what a motley hen!!
Or an idea with interesting Easter bunnies. It looks very original.
How do you like these bunnies?? Well, just lovely!!
Or these delicate baskets with Easter characters.
But here is a similar job to rabbits made of fabric, only here you need to knit them.
And I also selected diagrams for you, it was very difficult to find them of good quality, but I tried, I hope you like it and find it useful.
This option is suitable for storing sweets or can be used as a box.
The yarn makes very cool works, and most importantly original ones; no one will definitely have such crafts.
Master class: a simple basket made from newspaper tubes
A simple model of a basket made from newspaper tubes is created with your own hands in this way:
- Use a knitting needle to twist 30 strands of newspaper strips, 10 cm wide.
- Using a jar, cut out 2 circles from cardboard. Flatten the tubes for the frame on one edge by 3 cm and glue them to one of the circles with the flattened side.
- Glue the second circle on top of the first so that the ends of the paper cords are between them. Raise the blanks up and secure with an elastic band.
- Next, you should take the newspaper edge flattened on one side and pass it behind the tube located next to the right, pulling the edge further and bringing it in front of the next paper strip. To form the bottom row, you need to alternate the workpieces in this way, putting others into the hole when they are finished.
- Weave to the desired level, then trim off the excess ends and treat the basket with glue.
Punnet
You can make a paper basket with your own hands in a round shape. It’s not difficult, just cut the bottom out of thick material and wrap it in a long strip around the base. To attach to the rectangle, an additional thin strip is drawn from below and cut into triangular corners. They are then bent upward with your hands and smeared with glue.
To decorate the side surfaces, buy a package of square-shaped colored paper for notes. They are sold in whole packs in office supplies. Each square is bent with opposite corners to the center and glued together. The entire side strip is covered with such rolls. They are decorated by gluing beads to each joint with a glue gun.
The handle is made wide by placing a carved strip of paper of a contrasting color in the center. Here the master used plastic stars of different colors for decoration.
A complex basket made of newspapers. Step-by-step instruction
A low, practical basket is made as follows:
- For the bottom you will need 13 newspaper tubes. 5 of them need to be placed side by side, and the remaining 8 should be laid out crosswise on top.
- Next, we braid the top in the form of a braid with one piece of paper.
- When the paper rope runs out, it should be extended.
- Weave the bottom in this way to the required size.
- Having completed forming the base, you should bend the tubes upward and braid them again.
- Having created 4 rows of walls of the future product, fix the main strips on the sides with clothespins and then form the basket. The entire craft is braided in two pieces.
- At the end, the edge is made with a figured volumetric weave.
- Hide and glue the excess ends.
- Pull out the clothespins, paint and varnish the basket.
Square basket pattern
The figure below shows how you need to outline the sheets in order to subsequently assemble a paper basket with a square bottom. The side parts can also be made of the same shape, or they can be enlarged with a trapezoid, then the basket will have a side surface expanding upward. On each part, be sure to draw strips for gluing, approximately 1 cm wide. Their edges are cut at an angle.
After the drawing is completed, the whole part is cut out along the contours with scissors, and then neat, even folds of paper are made around the base and on each side part. All that remains is to glue the workpiece by spreading PVA glue onto thin strips on the sides, indicated in the figure by dotted lines. A handle is cut out separately from a thin strip of paper and attached to the edges of the opposite parts of the craft.
How to make a pen
The easiest way to make a handle for a basket:
- You will need 4 long flexible ropes. For elasticity, it is worth spraying them with a spray bottle.
- Use clothespins to mark the places on the basket where the handle will be attached.
- Pass the tubes through the rows already made so that they are of equal length.
- Having obtained two rows of four strands, you should cross the parts. As a result, an even braid-curl should form.
- Make spirals until you get a handle of the desired length.
- Thread the braid through the braided model.
Flat basket
This craft can be done with children of older preschool age during manual labor classes. The teacher gives the children a template of flowers. Children draw the basket themselves on the back of colored construction paper and cut it out along the contours. Then, using a black marker, highlight the main parts of the craft. Separately, cut out the excess paper from the top to make a handle, but also leave paper for gluing flowers, and make vertical cuts on the surface of the basket itself. In this case, a teacher or mother can join in the work if the work is done at home. It’s more convenient to use a linoleum knife, just don’t forget to put a wooden plank underneath so as not to damage the surface of the table.
Either a strip of paper of a contrasting color or a satin ribbon is pulled between the slits in a checkerboard pattern. All that remains is to arrange the flowers according to size and glue them together in decreasing order. You can attach beads or shiny pebbles to the centers.
What to paint with?
It is better to color the tubes in advance. To do this, you need to immerse them in a container of shallow depth, and then fill them with the selected dye, water-based wood stain will do, for 3-5 minutes. Dry the products on a wire rack or mesh. A brush will help distribute the paint evenly. It is easier to tint finished baskets using a spray bottle.
You can get a blue tint using regular blue dissolved in a water-alcohol base. The color can be varied individually. When using wood stain, the color match will be as follows:
- maple - red-orange;
- oak - brown-red;
- ebony gives a dark gray tone;
- larch – yellow;
- fern – green;
- mahogany – pink.
When using stain, the easiest way to paint the workpieces is to dip them directly into the container with the composition, from each end. This way the products will also be painted on the inside. The paper has time to become saturated with color, but does not get wet.
It is better not to pre-tint newspaper tubes. During initial painting, they still retain visible remnants of printing ink. When repeated, they become brittle. The problem can be solved by applying varnish tinted in the desired colors after weaving, in 2-3 layers.
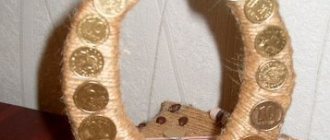
Advice from experienced professionals
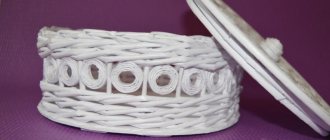
If you are filling the entire surface of the craft with threads, then some craftsmen advise wrapping the cardboard basket first with transparent tape before working with threads. They say this will help the threads stay in place and not slip to the side.
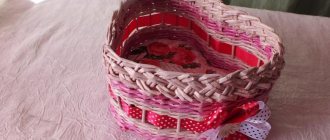
In the main photo you can see another version of the craft, where not the entire surface of the cardboard is covered with threads, but only part of it. All colors of the paper are examined, and the threads are chosen in a contrasting color, which adds originality to the craft.
In the article, we examined in detail how to make a basket with a beautiful flower using technology (grade 2), using threads of yarn or floss. Try creating a similar one with your children or come up with your own version. Good luck!
Modular miracle
A basket of flowers made using modular origami technique will be the best decoration for a spring interior, as well as a good gift for March 8 or a birthday. The size of the product depends on the original elements. They can be large, up to 1/8 of an A4 sheet, or, as in the next video tutorial, miniature - 1/64. The larger the assembly parts, the more important it is to attach them with glue so that the basket does not fall apart in the future.
This elegant model will require 605 modules, of which:
- 245 blue;
- 160 green;
- 120 lilac;
- 80 red.
Following the step-by-step assembly diagram, even a beginner can make a luxurious spring basket. The openwork insert and the handle, fixed at an angle, are especially impressive. You can also make flowers yourself using the classic kusudama technique.
The process of folding the Easter basket:
1. Cut out a square from an A4 sheet of paper (do not throw away the rest of the paper - it will be useful for a pen in the basket). Fold the basic shape into a double square.
2. Place the blind corner towards you (down). We bend the top corner and fold it towards the bottom corner.
3. Then we bend the same corner up to the fold line.
4. Turn it back.
5. We bend the corner up again to the line outlined in the previous step.
6. Then fold it up along the fold.
7. And fold to the first fold line.
8. Turn the page.
9. Repeat steps 3 to 8 until all corners are folded. It should look like this:
10. Top view for control.
11. Now we bend the lowest blind corner upward, marking the bottom of the basket. We turn back.
12. Bend the side corners towards the center.
13. Then we turn it back and hide the middle of the corner inside the figure.
14. You get one corner sticking out inside.
15. Bend it down towards you.
16. And we also hide it inside.
17. Repeat steps 12 to 16 with each corner. This is what comes out.
18. Now we give the box volume: we carefully push it apart from the middle with our fingers.
19. The result is such a basket, but so far without a handle.
20. From the remaining paper from the original sheet, fold the handle: first, once lengthwise and unfold it back.
21. Then bend the edges to the marked line.
22. And one more time.
23. Apply glue to the tip of the handle on both sides.
24. Insert the handle into the basket and press firmly. The longitudinal fold on the handle should be at the top - it’s more beautiful.
25. The result is an Easter basket like this.
26. You can make several origami Easter baskets in different colors. From A4 sheet you get a basket with a side of 7.5 cm and a height of 4.5 cm, the height together with the handle is 14 cm - quite suitable in size for one Easter egg - just perfect!
27. For children, baskets can be filled with sweet gifts - Kinder chocolate eggs with a surprise inside and small Choco Bones, also in the shape of an egg.
28. You can decorate the basket with flowers and plant Easter bunnies and hens and chicks inside. In addition, you can fold a simple origami chicken out of paper together with your children.
29. Happy Easter!
Basket of flowers
Creating a plot application is not as difficult as it seems. Even the smallest child can cope with this task, with the help of their parents.
You will need:
- colored paper;
- stencil;
- cardboard;
- glue;
- pencil.
Manufacturing process
- Cut out a basket from paper, after drawing it on the back of the sheet.
- Glue the finished basket onto cardboard.
- From different colors of paper, cut out circles of different sizes. Some should be smaller and others larger.
- Place a pencil in the center of the circles and press the paper against it, wrapping it around it. This will make the flowers on the basket voluminous.
- Without removing the paper from the pencil, dip its end in glue and press it to the basket in the right place. Then we do the same with a smaller circle and glue it to the center of the first circle.
- We make an unlimited number of flowers and place them anywhere.