The dream of many men is to build their own yacht. This opens up amazing opportunities to conquer water spaces.
However, such pleasure is not accessible to a wide range of people. Therefore, it makes sense to consider the possibility of making the most romantic means of transportation yourself.
How to build a yacht with your own hands? This article will be devoted to this topic.
Where to begin
You can make your dream of building your own yacht come true by first studying the technology of building a yacht on your own. It is advisable to create a small mockup at the beginning in order to understand the operating principle and features of the technology. If the result is successful, you can move on to a large-scale project.
The interested person has the opportunity to choose from two options:
- Assembling a vessel from ready-made parts.
- Completely independent construction from purchased materials.
Assembling the constructor
You can find out how to build the Optimist yacht with your own hands below. Now there are many options for prefabricated structures on sale, which are already cut to size. All that remains is to glue and secure the structure in a different way, and the boat of your dreams will be ready for adventure. For ease of assembly, detailed instructions for performing the work are provided.
This kit consists of all the necessary parts to create a yacht, detailed instructions and drawings. They provide all the conditions for the assembly to be carried out correctly in compliance with the specifications of the technological process.
Such “semi-finished products” undergo a pre-sale preparation cycle. To ensure successful assembly, the quality of components is controlled. The model is assembled, the cutting accuracy is assessed, and then it is disassembled again and packaged for shipment to customers.
Knowing how to build a yacht with your own hands, you can successfully assemble it from ready-made components. All that remains is to assemble the vessel yourself and glue the parts. The manufacturer's recommendations in the instructions will help with this. You can compare the process of creating such a yacht with assembling a construction kit, only more complex and voluminous.
A more difficult task
We continue to consider the question of how to build a yacht with your own hands. If you are not afraid of difficulties, have a lot of free time and are well versed in drawings, you can start building a ship from scratch.
This task will be more difficult, since the builder will have to cut the materials himself. And such a process requires the presence of certain skills and additional equipment.
If you are new to shipbuilding, this task will be quite complex and difficult to complete. To implement it, you will need to carefully prepare and study a large amount of information on how to build a wooden yacht with your own hands.
So, first study as much specialized literature as possible. Get ready to create a small model right away so as not to risk large volumes of materials, which is quite expensive.
Analyze the features of the process of how to build a yacht with your own hands, photos with step-by-step instructions. Next, take care of the availability of the premises in which the construction work will take place. It should be quite spacious, since the dimensions of the finished vessel are not small.
The better the conditions for construction are organized, the more successfully and quickly the process of creating a yacht will be completed. It is also important to stock up on the necessary tools for the job.
RADIO CONTROLLED YACHT “ALL TERRAIN Vehicle”
Successful tests of the homemade radio control system "Kanata" (see "Modeler-Constructor" No. 6, 7 for 2022), and then the creation of its modification "Kanata-D" made it possible to fulfill his long-standing dream - to go sailing. When designing the yacht in question, there was no idea of getting a competition-class vessel - basically I wanted to “just ride” in nearby bodies of water. There was no real prototype, so the proposed design has very few decorative elements, and most of the design is functional. In addition, I, who had never worked on serious models before, had to solve many quite complex problems from scratch. After all, even the methods of attaching sails to the spar, which are common in the practice of building radio-controlled sailboats, were unknown to me. Nevertheless, the appearance of the finished vessel, in my opinion, turned out to be quite impressive.
GENERAL POINTS
I started with the design requirements. They are mainly dictated by ensuring the safety of the vessel, because a miniature sailboat, a radio-controlled fishing boat carpboat.ua, released into the “wild nature”, and not into a clean indoor pool or on a competition track where there are rescuers with a boat, can easily be lost. There are many reasons for this. It can get caught in very strong algae. A strong gust of wind can knock it over or damage the equipment. The yacht can be sunk by a wave from a real boat or get stuck in the middle of a body of water due to complete calm.
Based on this, the technical requirements for the yacht were determined. Firstly, a moderate draft and smooth contours of the underwater part, without protruding parts on which algae and other debris could get caught. Secondly, a good margin of directional stability. Thirdly, the presence of an auxiliary engine without openly located screws that can wrap around threads of seaweed, fishing line, nets, etc.
Positional designations on general diagrams: 1 - keel;
2 - false keel; 3 — water cannon inlet; 4 — steering wheel; 5 — sheet adjustment unit; 6 — crinoline; 7 — main boom; 8 - slack tench; 9 - grotto; 10 — shrouds; 11 — mast; 12 - forestay; 13 — staysail; 14 - antenna; 15 — shrouds; 16 — steering wheel; 17 — superstructure; 18 - screw; 19 — rescue buoy; 20 — jib sheet rollers; 21 — hatch; 22 — forestay eye; 23 - engine; 24 — mainsheet rollers: 25 — steering gear; 26 — coupling; 27 — steering rod; 28 — water cannon channel; 29 — sheet steering machine; 30 — intermediate thrust; 31 - movable bar Since long keels with a drop-shaped weight at the end, generally accepted on racing models, turned out to be unacceptable in my conditions, the stability of the yacht had to be largely ensured by the hull itself: its sufficient width and the location in the underwater part of the most massive units (batteries and motors) . The propulsion unit decided to use a water jet. This made it possible to avoid open propellers, which not only collect any debris, but also create significant resistance when sailing. And for installing a “water cannon,” it is clear that it is more convenient to have a flat transom in the stern, half submerged in water.
So, step by step, it was possible to select suitable body contours. True, subsequent sea trials showed that for greater performance of the model and better directional stability, a hull with a slightly greater elongation would be desirable. But the reserves of stability and displacement were pleasing, providing complete freedom in the design of the remaining elements of the model. I’ll tell you more about them, but I’ll immediately note that this is only my personal experience gained in practice. I will be glad if any of it is useful to readers. At the same time, I in no way claim its exclusivity, and more experienced modellers can use their own technologies that are familiar to them.
FRAME
The set is made of plywood 4 mm thick. The transom and deck are made of three-millimeter plywood, and in places of the bow, where the deck is not weakened by any cutouts, it is made of cardboard. The gaps between the frames are filled with foam plastic: in the bow - with solid blocks, in the rest of the hull - with pieces of ceiling tiles. Then the whole thing was sanded down and covered with epoxy resin cloth.
The keel is made of two 2 mm thick steel plates folded together. At this point the keel beam is divided into two plywood strips covering it on both sides. To improve directional stability, it was necessary to make a false keel from a thin wooden plank.
Section of the bow of the hull: 1 - keel beam;
2 — frame; 3 — life buoy pocket; 4 - deck; 5 - tench; 6 — jib sheet rollers; 7 — jib sheet; 8 — movable bar; 9 - rescue buoy; 10 - false keel The roof of the superstructure is made of thick Whatman paper, the glazing is glued in with epoxy. This, as well as painting the roof with waterproof enamel, is quite enough to ensure proper water resistance. In front of the superstructure there is a large hatch for access to the interior of the bow. The corners of the hatch cover are rounded and carefully sanded so that the jib sheet does not catch on them when sagging.
PROPULSION AND STEERING COMPLEX
The water cannon channel is formed in several stages from fabric impregnated with epoxy resin. At the front it branches into two inlet channels, covering the keel on both sides and exiting into the bottom of the hull. After installing all channels, the joints are carefully taped to avoid leaks.
The design of the deadwood is as follows: a paper tube impregnated with epoxy resin is glued into the body of the water jet, with an internal diameter corresponding to the outer diameter of the gel pen refill. The deadwood itself is cut out from a section of the mentioned rod, glued in with “Moment” glue and filled with a syringe with silicone grease or “Litol”. The design is reliable, does not leak, and does not have too much friction.
The propeller is glued together from a polystyrene hub and three blades of the same material. The seating surface of the blade blank is bored obliquely with a round file and the blades are glued to the hub. After two days, when the glue has reliably hardened, the edges of the blades are sharpened with a file so that the installation angle is larger at the hub and smaller at the ends of the blades. The end of the propeller shaft is given a faceted, slightly tapering shape using coarse sandpaper, and it is glued “Moment” into the hub hole. The propeller is checked for free rotation in the water jet channel; if necessary, the blades are filed. After which the finished screw is coated with waterproof bronze paint.
Construction of a propeller blade template: r—hub radius;
S—thickness of the blade blank I didn’t look for any particularly powerful boat motors for the model. The engine from the disk drive, designed for a voltage of 12 V, is quite suitable. With it, the model develops quite satisfactory speed and confidently rakes even against a fairly strong wind. The motor is glued into the frame hole.
The steering wheel is located behind the transom, with its upper part directly in front of the water jet outlet. Thanks to this, the yacht is exceptionally maneuverable when sailing under power.
To ensure that the rudder protruding beyond the edge of the hull is not damaged during transportation or storage of the model, a crinoline welded from thick copper wire is installed behind the stern above the waterline.
RANGOUT
Regarding the spar, the author also adhered to the use of the most available materials. The mast and booms are made of wood. The diameter of the mast from the spur to the roof of the superstructure is 10 mm, gradually narrowing towards the top to 6 mm. On top of the keel and the bifurcated keel beam covering its top, a plywood strip with two rows of M3 holes with a pitch of 10 mm is glued with epoxy resin. The mast spur is inserted into another plywood plate - with two rows of 3.2 mm holes every 5 mm. Thanks to this, the mast can be moved back and forth, selecting the correct relative position of the center of sail (CS) and the center of lateral resistance (CLR).
In most known designs, the eye for attaching the boom is a pin inserted into a through hole in the mast. The author considered it best not to weaken the mast, but to attach the boom fastening eye to it with threads using BF glue.
The length of the main boom is 190 mm, the diameter at the mast is 5 mm, gradually decreasing to 3 mm. The jib boom length is 120 mm. The diameter is constant and is 3 mm.
STANDING RIGGING
Made from thick nylon threads. The stay is inserted into a wire eye, inserted into a hole in the stem. For the shrouds, shrouds are placed on the deck - duralumin plates attached to threaded holes in the deck through short tubes with two M3 screws each. They cope with their role quite well even in the absence of a backstay. The shrouds should be wound at such a distance behind the mast that they do not interfere with the main boom deviating at an angle of up to 60 degrees from the centerline plane (DP). The receiver antenna is stretched parallel to the right shroud so that it does not touch the metal parts of the shrouds. From above, the antenna wire is soldered to a piece of copper wire glued into the top of the mast. To avoid injury, its end is twisted into a ring.
The running rigging is represented by the sheets of the mainsail and jib. To avoid tangling the sheets, the author did not risk using winches to reel them in. It was decided to make do with the simplest kinematics with translational movement of the elements. The running ends of the sheets are tied to a movable bar made of hardened duralumin with a cross-section of 8×2 mm. The plank passes close to the DP (just so as not to touch the mast). It moves in holes in two frames. The inside of the holes are wetted with epoxy resin, which after curing gives a smooth surface. Additionally, these components are lubricated with grease. The distance between the attachment points of the sheets on the plank is the same as between the axes of rotation of the booms and between the attachment points of the sheets. The distance from the boom rotation axes to the sheet attachment points is also the same and is 100 mm. Thanks to this, the sails deflect equally.
Keel attachment.
Top view The windage of the spar leads to some change in the trim of the vessel at different courses relative to the wind, which can cause a displacement of the central steering system and a violation of the settings. To compensate for this phenomenon, I assumed that the most complete courses (etched sheets) corresponded to the rear position of the bar. In this case, it was necessary to change the direction of movement of the sheets by almost 180 degrees. To reduce friction in this unit I used rollers. The front one is located below the deck between the superstructure and the hatch. The mainsheet roller is on a wire running across the ship above its open cockpit. To prevent the sheets from slipping off the rollers, side stops are made. Ordinary, not roller ones, since the angle of the lateral bend of the sheet and, accordingly, friction are small. On a jib sheet, the stops are the walls of a hole in the deck, sanded and coated with epoxy. At the main sheet they are made of the same wire.
The sheets are connected to the booms using conventional devices for adjusting their length - small fiberglass plates with three holes.
SAIL
As a material for the sails, the author used film from a baking sleeve from a regular hardware store. The hit turned out to be extremely successful. This material is light, durable, easy to process.
Attaching the sails to the spar is done as follows. The 5mm edge of the sail is bent. A 5mm strip of double-sided tape is glued onto it. A line of thin nylon thread is also inserted into the fold (the luff of the jib is glued to the forestay instead), after which the edge is folded. The resulting sandwich of two layers of film and a strip of tape between them is pierced evenly at five to nine points with a hot needle so as not to touch the lycrop or forestay. Melted holes hold the structure together. A slack line is pulled through them in a spiral, covering the mast or boom. Both the lead line and the slack line are tied to the mast or the ends of the boom.
The luffs of the sails do not have any padding or reinforcements. When strong gusts of wind fray the sails, it looks scary. However, throughout the entire season there was not a single case of damage to the sails or equipment.
CONTROL EQUIPMENT
As already mentioned, the model is equipped with homemade Kanata-D radio control equipment. In the bow of the hull only the attachment point for the jibsheet and its roller are located. It is for access to them that the hatch is made. Inside the superstructure there are two lithium-ion batteries, a receiver and a DR-4 decoder. The frame, which serves as the rear wall of the superstructure, has a battery charging socket and a power switch.
In the open cockpit there are located: on the starboard side - the steering gear amplifier module (SAM) of proportional channel B and the steering gear connected to it. On the left side there is a channel A URM module and a steering gear connected through an intermediate rod to the sheet control bar. The thrust of both sails in fresh wind can be quite significant, therefore, in order to cope with it, it is advisable to choose a more powerful machine. In the center there is a DD module, which includes a travel motor. The disadvantage of this equipment is the lack of reverse gear, but this is largely compensated by the maneuverability of the vessel, whose rudder is located directly in front of the water cannon exit - the yacht turns almost on the spot.
OPTIONAL EQUIPMENT
Despite all the precautions, it still cannot be completely ruled out that the yacht could be capsized and sunk by a very strong gust of wind or a wave from a boat. In such a case, it is equipped with rescue buoys, which are brightly colored foam reels on which several meters of strong nylon thread is wound, attached at the other end to the frame of the vessel. The buoy pockets are slightly tilted outward, so that with any roll at least one of them will float.
The yacht can also be equipped with LED running lights and floodlights for night trips. However, keep in mind that highly raised conductive parts will eat up the working length of the antenna, and, consequently, the control range.
ADJUSTMENT
Tilt the yacht on its side and, using the sheet adjustment handle, set the movable bar to the middle position. Select the length of the sheets so that the sails are positioned at an angle of about 45 degrees to the sail. The stroke of the bar is approximately 50 - 55 mm. This is not much, but it is enough for the sails to operate quite effectively on any course. Check that the jet is sufficiently submerged in water. If necessary, load the yacht hull with additional ballast. There should be no more than 2 mm of free space at the top of the water jet outlet pipe. Otherwise, the efficiency of the water cannon and the speed of the yacht under the engine will noticeably decrease.
When launching the model into gulfwind with the rudder in a neutral position, select the position of the mast so that the yacht, if possible, stays on course without falling over or being driven by the wind.
* * *
Tests have shown that the strength of the equipment and the stability of the yacht are quite sufficient to withstand even strong gusts of wind. The yacht “plays back” long waves from boats, and easily cuts small wind ripples so that sometimes the spray scatters from the stem. The yacht maneuvers normally when close-hauled. The radio and mechanical controls also worked reliably throughout the season. I am pleased, like any sailor who has received a ship on which he can rely.
Alexander LISOV
We recommend reading
- LIKE A STRING This is what they say when something is stretched like a guitar string. Namely, this is the tension required for the wire bracket for window curtains, which is called...
- IF THERE IS AN ARTIST IN THE HOUSE This simple and elegant table will be very convenient for children who love to draw. Working at an inclined work board will ensure correct posture, and located on both edges of the table...
We begin construction
The process of creating a yacht is called boathouse. Whatever the model you choose, you need to start implementing the project after you have carefully studied all the provided documentation and step-by-step instructions on how to build a yacht with your own hands. This is a fairly important stage, because mistakes at this stage can have serious consequences. We recommend purchasing a ready-made set of wooden parts so as not to risk large volumes of natural wood. This will save not only money, but also a lot of time.
Important Notes
Tips on how to build a yacht with your own hands will help you complete this process clearly and efficiently. Start by connecting the frames and the keel. The end result should be a permanent connection.
Next comes the installation of springers on the frames. This ensures fastening of the ship's hull. For this, special moisture-resistant plywood is used.
This assembly will require a traditional position. Consequently, it will be necessary to install the yacht with the keel up, which makes it possible to accurately calculate the dimensions and ensure the creation of ideal contours of the vessel.
The use of moisture-resistant plywood cladding will make it possible to achieve high reliability indicators, which will distinguish the structure of the vessel. Do not forget to take care to use fiberglass to seal the surfaces.
It is necessary to install fiberglass fabric in areas where there is a special moisture-resistant epoxy composition. It must be laid in several rows. When they dry, a layer of uniform waterproof surface is formed.
DIY yacht made of plywood
A DIY plywood yacht will allow you to go for a walk on a pond at any convenient time. In order to build a yacht from plywood, the following tools are needed: nails, a hacksaw, a hammer, a screwdriver, an electric drill, a drill. To build a yacht you need seven sheets of plywood. The thickness of the plywood should not be more than 6 millimeters. Experts recommend taking plywood measuring 1.22x2.44 mm. Additional sheets are also needed, about 10 millimeters thick and identical in size.
The main task when building a yacht is the correct choice of plywood. Plywood can be made from various types of wood, but one of the most acceptable options is to use poplar plywood, 7-10 millimeters thick. This indicator does not affect the weight of plywood.
If the plywood is made of birch, then the thickness should be up to 5 millimeters. When building a yacht, it is imperative to take into account the level of water resistance. Plywood contains several layers of wood (2-3). It is for this reason that it provides a high level of strength for the future yacht.
If large plywood sheets are used in the construction of a yacht, the level of labor intensity of the process is reduced. A groove is made on the stringer or scup in the form of combined sheets of plywood. This work process does not require careful adjustment of the edges of the belts. Plywood sheathing involves transverse patterns that serve to outline the body. This construction process involves the use of frames that are located in the structure. This option does not require independent preparation of patterns.
Frames for yacht construction are made in a simple form. For their manufacture, futoxes (a straight part) are used. When building a yacht yourself, it is imperative to pay careful attention to the manufacture of the hull. Assembly of the body is carried out on a workbench and ends on an earthen surface. The keel is placed on the workbench, after which it must be connected to the frames and stems. The connection is made using bolts, screws and nails.
After completing this work process, it is necessary to check whether there are any defects in the form of misalignment. Porous paper or thin cloth impregnated with resin is inserted into each connection. If the body is connected with nails, then you definitely need to pay attention to their length. In order for the nails to be driven in easily, holes must be drilled in advance. The hole should be 1 millimeter less than the thickness of the nail. Boards for the side are placed on both sides of the frame, and the ends are tied with twine to the stem.
Next, boards are bent around the frames, tied and brought to the transom. Unnecessary ends can be cut off. The yacht must also have a mast, which can be made of pine. Before starting to build a yacht, the plywood must be moistened so that it does not crack in the future. You can also steam plywood.
The work is coming to an end
The final stage will be the final finishing of the body. Next, the type of necessary equipment and sailing equipment is installed.
The most important step in following the instructions on how to build a yacht with your own hands is testing the finished vessel and checking the strength of the connection of all elements. This provides the safety measures required for all waterborne modes of transport.
If there are some shortcomings and shortcomings that were noted during the design of the vessel, care must be taken to eliminate them as soon as possible. After all, you are risking your safety on the water.
Sails of a homemade sailboat
The sailing equipment of a homemade yacht consists of a mainsail and a jib. The mainsail is sewn around the mast and has free sliding around it. With this scheme, the author's mainsail fell off the mast under its own weight, and the author additionally sewed a picket fence along the height of the mainsail (see photo).
The lower edge of the mainsail is connected to the boom with nylon loops. To strengthen the mainsail, strips of rigidity are inserted into it.
The staysail is made in the form of a non-rectangular triangle with luffs stretched through the bends.
If you choose the difficult path
Construction of a vessel without blanks and instructions requires an independent search for drawings. It is necessary to accurately carry out the calculations so as not to make a mistake with the amount of wood.
The first stage will be the preparation of project documentation. Compiling it on your own is beyond the power of beginners. You will need to contact employees of specialized organizations or help from Internet resources.
The second stage is the preparation of a spacious room, the creation of a boathouse for construction work.
The slipway is assembled in accordance with the dimensions of the vessel. Creating a slipway consists of laying coniferous timber beams on areas of a flat, prepared surface.
It will be necessary to perform this procedure in two layers with ligation of the structure to form a surface that will be exactly horizontal.
The third stage is timber harvesting. It must be of high quality, as this affects the strength and navigability of the vessel.
Creating a vessel requires the presence of two types of wood: boards made of pine needles without knots and harder wood, for example, oak or ash.
It is necessary to take into account the moisture parameters of the material, which should be within 20%. This will protect the structure from possible deformation.
The fourth stage is the assembly of all structural elements.
It is necessary to assemble and glue frame frames using a special template device. The working area should be located on plywood sheets from 10 to 12 mm thick.
When installing the stem blank, take care to accurately maintain the angle of inclination. It should be clearly oriented towards the horizon line.
All elements are fastened with screws or glue. The next stage is the mandatory chalking of the yacht’s surfaces in order to identify all inconsistencies and eliminate defects. You can sheathe the vessel with sheet plywood.
The rigidity and tightness of the skin is ensured by gluing it with fiberglass.
Next, you need to turn the base of the vessel over and build the deck longitudinally.
This is followed by painting work and testing of the vessel.
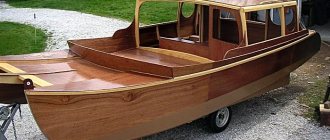
First experience. Yacht model "Natalie 695"
Hello! I decided to share my first modeling experience.
Epilogue:
Ever since I was in school, I had a dream to put a sail on the Slavyanka Inflatable. But then things didn’t go further than talk. In subsequent years, thoughts about the sail periodically appeared and were safely forgotten. And last year, in the summer, when I came across reports about sailing tourists’ voyages, I decided it was time to make my dreams come true. So I started building a sailboat. That's what came out of it:
But that is another story.
In the process of building the boat, I studied sailboat forums, and I wanted to build a wooden trailer yacht, 5-7 meters long. But since this requires a suitable place, 3-5 times of the year, and a completely different budget, and technologies unknown to me (fiberglass, epoxy resins, etc.), it would be nice to try it on something smaller, and there was also a Chinese helicopter lying broken at home. I decided to build an RU model of the sailing dinghy "Natalie 695" with minor design changes. Unlike the original, I decided to make an inclined stem and lengthen the bottom and sides at the stern to create a platform behind the transom (I don’t know what it’s called), so I think the look is more aesthetic. Well, install a stationary auxiliary engine (the original provides for the installation of an outboard motor).
As I already wrote, I decided to use the radio equipment from a helicopter (Chinese toy), but when studying the subject, I realized that I couldn’t use anything from this device because... The motors are weak and commutator, the transmitter-receiver is infrared, the control is not at all clear how it is implemented. As a result, having found this site on the World Wide Web, an order was made:
- engine with regulator
- transmitter with receiver
- vacuum
- ship winch
- servos
- shaft with screw + reserve screw charging
I would like to immediately apologize for the quality of the photos, I took the photos on my phone and didn’t check the settings. Already during the construction process a normal camera arrived.
And started making the case.
I found drawings on the Internet and drew them in a “compass” on a scale of 1:10.
Since it is impossible to find anything for modeling in our city, for the frames we had to separate two layers of veneer from 6mm thick plywood, the frames turned out to be 4mm, only the transom and midship frames were left 6mm..
I laid the slipway.
Kiel made a laminated one, made from half-meter wooden rulers (longer ones are not available for sale).
I glued everything on epoxy with the addition of wood flour.
From the same rulers I sawed some slats and glued in the stringers.
In general, the model could have been built much faster and easier, but I had a goal to build precisely according to the technology for building large yachts.
After this, the case was kept quiet and the search began for material to close the case. I’ll say right away that I’m looking for 1-2mm plywood. or veneer were not successful and the body was covered with ordinary cardboard. I glued the cardboard to the stringers with epoxy, for which I also had to go to Bratsk (250 km). After gluing, the cardboard was impregnated with epoxy so that it acquired the necessary rigidity and water resistance. Next, I put five layers of fiberglass on the body, puttyed it and primed it.
I decided to putty with automotive putty because... It dries quickly and is processed much easier than epoxy resin, and the resin I came across took too long to harden. Those. It polymerizes to a tack-free state in the first day and remains in this form for 1-2 weeks. When processed, it instantly clogs the sandpaper. It finally rises only after heating to 50-70C. for 15-20 minutes.
After priming, many jambs came out that were not noticeable before. I postponed the removal until the deck was closed because... I still need to glue in the false keel, daywood, baller, rudder.
I made the rudder blade from PCB, glued two 5mm thick plates with epoxy, and ground it into a streamlined shape. I drilled a hole vertically from the top, cut an M5 thread and screwed in a long pin using epoxy. I screwed a fluoroplastic bushing onto the stud, which is inserted into the baller tube. My baller pipe is made from a copper tube with an outer diameter of 10 mm, and a deywood was made from the same tube. For the daywood, I turned fluoroplastic bushings on a lathe instead of bearings, and filled the daywood with lithol.
I carved a false keel from 12mm plywood, and also drilled two holes on each side along the plane of symmetry, on one side for attaching to the body and on the other for attaching the bulb.
The bulb, to increase stability, was cast from lead in a plaster mold. The weight of the bulb turned out to be 1.1 kg.
This is what happened. I also made a tiller from aluminum 3mm thick. The motor frame is also made from an aluminum plate 1.5mm thick. Installed a winch and steering servo.
I decided to make the steering wheel drive by cable (nylon thread). The first launch into the water (in the bathroom) showed that the design was generally functional, but the effort of the servo drive, which I purchased due to inexperience, was clearly not enough, and I didn’t like the “nylon-thread” drive. Also, the engine seemed to me to be too high-revving for a displacement hull. Therefore, the second parcel was collected:
- Servo – HK15138 Standard Analog Servo 38g / 4.3kg / 0.17s
- Engine – HobbyKing Donkey ST3508-730kv Brushless Motor
- Regulator – HobbyKing Brushless Car ESC 30A w/ Reverse
- ESC Programming Card - Automotive ESC Programming Card for Brushless Motors from Hobby King
- Battery discharge controller -
While the parcel was being sent, I covered the deck and cockpit with veneer, which remained from peeling the plywood to reduce the thickness (see above). This is a type of hold, I made a place for the battery from the ceiling.
Then the body was puttied and primed.
After priming, naturally many small irregularities and other imperfections were revealed, so I had to putty and sand the entire body again. Made manhole covers. The covers were made from ceiling tiles, covered in two layers of fiberglass and filled with epoxy with aluminum powder as a filler.
After puttying and sanding, the body is primed again and finally prepared for painting. The hatch covers were covered with mirror tint film. I’ll say right away that it didn’t turn out beautifully. the film does not stretch, even when heated with a hairdryer. Later I covered the covers with black vinyl film. The rails on the lids have an almost decorative function and are made of copper wire; their only practical functionality is that rubber bands securing these same lids are attached to the ends of the rails, bent in the form of hooks. I also installed a step with the ability to adjust the position of the mast.
Next, I made a mast from a carbon fishing rod, placed a white LED on the top of the mast, and ran the wires inside the mast.
I installed a more powerful steering servo, having previously coated all connections and the shaft output with sealant.
I also machined from aluminum the bracket for fastening the shrouds, the backstay on the top of the mast, the boom hinge and the shrouds. All parts were attached to the mast using nylon thread with epoxy, and the shrouds were attached to the deck using self-tapping screws and sealant. The staysail was made semi-balanced, i.e. The sail's turning axis is behind the luff. The jib boom was made from the same fishing rod as the mast.
In these photographs, the mast is secured with shrouds and stays made of nylon thread. But since the thread stretches and it is not convenient to adjust the tension of the forestay and the position of the mast, I decided to make all the standing rigging from steel cable with a diameter of 1 mm.
After making the standing rigging, I made the stern and bow rails as well as the railing posts from a brass tube with a diameter of 5mm.
I glued the rails and racks into the body using epoxy and aluminum powder. I inserted green LEDs into the rear posts of the rails, and red LEDs into the rear wall of the cabin. Initially, the shrouds and backstay were connected to the hull with soft turnbuckles (made of nylon thread), but adjusting the mast and forestay tension turned out to be a very tedious task, because I had to tie and untie the knots on the turnbuckles many times, tightening and loosening them. So I decided to make five screw lanyards. Which was done successfully.
I sewed the sails from Oxford fabric, with a density of about 120g/m2, they turned out a bit rough, but I couldn’t find a thinner material that was suitable, and I liked the color.
And finally, painting the lower part of the body and testing.
Some test videos:
under the engine:
under sail:
And the final version, covered the hatch covers with vinyl and glued on imitation pilothouse portholes.
And some more video:
Well, the project is finished, good luck to everyone and success in modeling.
Let's sum it up
We hope that this article on how to build a yacht with your own hands will help you achieve your desired goal and make your dream of traveling on your own ship come true. To do this, you will need to be patient and take care of the availability of space and tools. It is important to purchase high-quality materials from which the vessel will be made.
But when all the work is left behind, and you board your own yacht, you can get maximum pleasure from realizing your cherished dream.
On this ship you will have many pleasant trips, admire the beauty of the water landscapes, and have a good time with your family or friends. All this is worth the work that awaits a person who decides to make a yacht on his own. Get started - everything will work out!