Communities › DIY › Blog › DIY sports corner.
Part 1
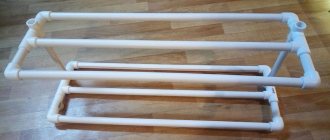
The child is growing quickly and therefore in the autumn-winter period it was decided to make a sports corner. I had several requirements: a) it should be as multifunctional as possible b) the Swedish chariot should be able to withstand adults
Thanks to all the masters who have already solved similar problems and shared their work on the Internet. The basis was taken from a picture found on the Internet.
At the start, it was decided that the complex should contain the following elements; *Swedish ladder *Run walker *Gladiator net *Slide *Swing *Trapezoid *Rope ladder
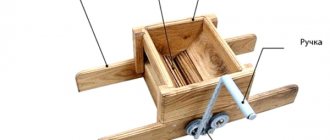
Everyone knows perfectly well that the most convenient way to make crossbars is to take cuttings for rakes; a pack of cuttings (20 pieces) was bought at a wholesale base, sawn and opened with varnish
The forestry base ordered 6 40mm boards for the Swedish ladder and 4 pieces of support, 2.5 m long. For the monkey bars, 2 pieces, 2 m long. The boards were purchased 4 months before the start of work. And they dried for 4 months according to all the rules (dry, ventilated shed)
The boards were sanded and varnished. The process is very dusty and smelly, so everything was done outside of the apartment. To fit the crossbars, the recesses were drilled with a milling cutter, filled with furniture glue and, to be sure, they were placed on the comformats
In the second part, I will post a photo of each element with a detailed description. If you are interested, ask questions, I will try to answer.
I’m not saying goodbye. See you later...
Hanging equipment
To make a snowmobile fast and strong, you need to put a good engine on the frame. If you install a low-power motor, then such a structure will move poorly. You also need to correctly calculate the caterpillar. If the area is too small, it will drown in large snow and will not pull even on flat terrain. Particular attention should be paid to skis, which should create good stability and safety when moving at high speed.
DIY rubber caterpillar
To easily move through the snow, it is very important to give your homemade snowmobile a good rubber track. It is not easy to make such a device with your own hands and it is better to purchase it in a store completely with rollers. Installing a standard factory track on a homemade structure is not difficult. To do this, you just have to secure the drive shaft and rollers with bearings to the frame. If your financial situation does not allow you to buy the entire device, then the most expensive parts can be easily made yourself. For this you will need:
- Conveyer belt.
- Plastic pipe.
- Bolts, washers and nuts.
A cheap homemade snowmobile track is usually made using a thin conveyor belt. To do this, plastic pipe blanks are sawed off to fit the width of the rollers. Then they are cut lengthwise into two equal parts and holes are drilled for small bolts. After this, the halves of the plastic pipes are secured to the conveyor belt with bolts, washers and nuts. The caterpillar is ready and further construction needs to begin .
Homemade skis
It's no secret that in winter it is much more convenient to travel on deep snow on skis. They also serve well as a control device on a snowmobile. It is not difficult to make a wooden structure, but only strong boards made of birch or oak are suitable for this. They need to be well dried, planed, and then heated and the ends bent. It's no more difficult to make metal skis. To do this, you will need to cut two plates from sheet steel and weld a thin corner on the sides.
In order for the skis to turn freely, metal pipe stands are welded to them. In working condition, they are held in the front bushings of the frame, where they rotate easily .
Washers or large nuts are welded to the top of the racks, into which rods are inserted to control the snowmobile.
The steering wheel itself is easy to make with your own hands, or it’s easier to remove it from an old motorcycle. Thus, all that remains is to install the motor, as well as the driver’s seat, and you can hit the road.
Tags: children's complex, monkey bars, Swedish forest
Comments 24
I wish I could announce the dimensions of the product, I want to make the same wall.
When I was a child, I had a similar one only twice as large; my dad actually made it from metal pipes for the ceiling. I didn't get off her.
Well done! it turned out great. tell us how you made the slide and how you secured it?
Great job. I would also add a horizontal bar.
the cuttings were drilled through or how it was secured is not entirely clear
Gorgeous! and helpers nearby!
It is a mistake to insert the handle bars into the center of the board - less than half of the material is used to hold it. Also, as I understand it, the holes were not milled to their full depth - even less strength. Confirmats will not help here - the cap is too small, and they are not very good at shearing loads (the projection is too small). Static tests with a body weight of 100 kg on a freshly assembled device mean nothing; the mobility of children and dynamic loads are not taken into account (Ef is equal to Em * Ve squared, well, it’s half) and the change in strength properties after drying (and in the apartment the humidity will be less than street), and the resulting deformations (with additional stresses of the material).
In the future, you will have to make it a rule for yourself to check all the elements on yourself before admitting children. On the other hand, the father’s own example will be an incentive for the child to “Do with us, do like us, do better than us!” (c) old GDR sports family game show