The article will tell you how to make a barrier with your own hands from scrap materials. Of course, the materials are not entirely available - you will find some in your garage or shed, and others you will have to buy in the store. Why is a barrier needed? Its main function is protection from foreign cars. Quite often, cars roll around the courtyards of high-rise buildings, disturbing the peace of residents.
To avoid this, you can install a house barrier. This will protect the residents and make children’s stay in the yards safer. As for opening, this can only be done with a special key or a wireless key fob - it all depends on which unlocking method you choose.
Where can it be used?
Now let's talk about in what cases it is reasonable to install a barrier. Most often it is placed in the territories of the following objects:
- Apartment buildings.
- Car parking.
- Dacha settlements.
- In areas prohibited for entry of vehicles.
- At the entrance to protected areas.
- At the entrance to private households.
Sometimes, to reduce the speed of passing cars, it is enough to install a speed bump. But this is not always effective, since in some cases it is necessary to limit the movement of vehicles around the yard or site as much as possible.
As for barriers, there is no need to buy them - the industry produces models that ordinary owners will not afford. It’s cheaper to make a barrier yourself. You choose the materials yourself, and therefore guarantee high reliability of the product.
What if your car is not allowed into your yard?
Barriers have always been a way to make money, most often illegally. Now some yard associations of car owners and other dubious organizations are trying to take money for parking in the yard from residents of the same yard.
The logic is simple: you didn’t throw yourself at the barrier, all the places are distributed, whoever stood up first gets the slippers, and in general we are the power here.
If you are a homeowner, then they cannot deny you access to the yard and prohibit you from parking. In paragraph 1 of Art. 262 of the Civil Code of the Russian Federation clearly states:
The plot on which your house stands is the common shared property of all owners of the premises in this house (Part 5 of Article 16 of the Law on the Enforcement of the Housing Code of the Russian Federation). All owners of premises in an apartment building can use and dispose of this site (Part 2 of Article 36 of the Housing Code of the Russian Federation).
If your neighbors prohibit you from entering your yard, they are breaking the law. No decision of a meeting of residents, car owners and other responsible citizens can contradict Russian legislation.
Nobody can find fault with the number of cars the owner has. Even if these are friends' cars, rented ones, and so on.
If you opposed the barrier and did not pay money for its installation and maintenance, you may not be given a key fob for it. But then the housing cooperative must appoint a person in charge who will open the barrier in front of you every time.
They don't open? Take a video of this and call the police, because your civil rights are being violated. Are they systematically not allowed in? File a lawsuit against the housing cooperative. Here is one of the Supreme Court's determinations that you can rely on.
Finally, if you did not know about the meeting of residents regarding the installation of a barrier or you think that it was held with violations, you can also go to court. The installation may be considered illegal. You will have to pay for dismantling, then do everything as expected and pay for reinstallation.
Types of barriers
There are several types of devices that are produced by domestic and foreign manufacturers. The designs are not very complicated and can be repeated in a homemade environment. So, let's highlight the following devices:
- Automatic barriers.
- Electromechanical.
- Retractable barriers.
- Swing structures.
- With manual drive.
- Hydraulic systems.
They all differ not only in price, but also in the principle of operation. The design of any barrier consists of the following components:
- Central control unit.
- Mechanical gearbox.
- Electric motor.
- Balance.
- Rack.
- Boom for barrier.
Also, some designs have protective mechanisms, for example:
- Photosensors and other control and safety devices.
- Catchers.
- Automatic systems.
- Protective "skirts".
Brief description of designs
Electromechanical barriers are more popular and have the following characteristics:
- They work in any conditions, even the harshest.
- The design is not complicated.
- Uninterrupted operation.
Such devices are practical when compared with others. They provide passage clearing and fencing and can be a good alternative for gates.
As for hydraulic structures, they are usually used to limit the movement of vehicles. The designs have the following parameters:
- Can work continuously.
- Wear resistance at the highest level.
- The utilization rate is also high.
- Absolutely silent operation.
Sliding barriers are anti-vandal devices, as they are able to protect any object from mechanical impact. The active element is an arrow that extends in a horizontal plane and performs an enclosing function. When choosing and manufacturing such barriers, the space available at the entrance is of decisive importance. It is convenient to use such barriers; anyone can open and close it without any problems. As for manual designs, they do not have an auxiliary drive. A counterweight is placed on the boom, which lifts it.
Installation Features
Installation of a mechanical barrier must be carried out in accordance with current legislation. It is necessary to obtain permission from residents for construction. You need to contact government agencies, vote on the decision at a meeting of residents and draw up an estimate.
With private houses and industrial facilities the situation is much simpler. If construction has been approved or title to the property has been obtained, the owner can install anything on the property. For construction work you will need a flat surface. Otherwise, there is a risk of distortion of the structure.
The base of the rack must be secured with bolts. It can be concreted, but then moving the barrier will become impossible. The arrow can be made not only from steel. It can be made of wood or plastic. A good alternative to steel is aluminum. This metal successfully combines lightness and strength. The paint for the arrow should be reflective.
Preparatory work
The first step is to make a drawing of the barrier or a sketch. This will help subsequently make calculations of all components and their selection. Then choose the location of the barrier - it is also recommended to indicate it in the diagram. Next, supports are placed, one will secure the block, the second will protect the boom from lowering too quickly. The arrow should be the same length as the distance between the posts.
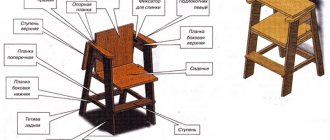
If you are unable to make a drawing yourself, then contact a specialist. The drawing must contain the following elements:
- Arrow.
- Axial mechanism.
- Catcher stand.
- Support block.
- Fastening block.
To make the drawing more detailed, it is recommended to use a top view. In this case, it is extremely important to demonstrate sections of the elements. Especially for those cases where pipes of different diameters are used in production. You can make it easier to find the best option for manufacturing structural components. A separate drawing must be drawn up for the axial mechanism. To avoid mistakes, please indicate all dimensions in millimeters.
Check out the shipping container type locking mechanism
When choosing a gate lock design, it is useful to remember the “sea container” type mechanism. It can also be seen on “wagons”. With the help of such a device, both leaves of swing garage doors will close tightly and securely.
The mechanism is made according to the following scheme:
- a vertical pipe is installed on the edge of the opening half of the gate, which rotates in three guides;
- guides in the form of rings are welded to the edge of the sash in the center and 10 cm from the ends of the pipe;
- curly hooks are welded to both ends of the pipe;
- a pipe about 25 cm long is also welded to the pipe, approximately in the middle, as a handle for rotating the pipe;
- Two clamps with pins for hooks are welded to the gate frame at the top and bottom.
How to make and install a lifting mechanism yourself
To make a barrier in the yard with your own hands, you need to mount a lifting mechanism.
This is done in the following sequence:
- Drill a hole in the center of the main support using a carbide cutter.
- Place a limiter on the second support. You can make it from any available material. Its main function is to limit the movement of the boom.
- Next, you need to place an arrow in the axis.
- You need to install a counterweight on the back of the boom.
- After this, place the entire structure and fix it on a concrete base.
- Paint the entire surface of the barrier. It is recommended to paint in red and white colors, preferably with compounds with reflective properties.
- To reduce the negative impact of the atmosphere on the paint, you need to apply a couple of layers of varnish on top.
- To make automatic control, you will need a remote control.
- To make fully automatic control, you will need sensors that respond to movement.
Once the structure is installed, you can begin setting up. Of course, if you installed a simple barrier with manual control, you don’t need to make any settings. But if the control is automatic, you will have to adjust the operation of the drives.
Deciding on materials
If you decide to make and install a barrier yourself, first of all you need to decide on the basic materials that will be used for its manufacture. There can be two options here - wood and metal.
Made of wood
Wood has its advantages - it is very low cost and the extreme simplicity of the design of a wooden mechanical barrier device. Light weight is also a big plus, which speaks in favor of choosing wood, since anyone can open and close such a barrier.
In the same dacha cooperatives there may well be female drivers who come alone. If there is no permanent employee at the entrance, for example, a security guard, then the driver will have to open the passage himself, and the simpler and easier it is to do, the better.
On the other hand, the tree is too susceptible to negative environmental influences . To protect against rain, mandatory impregnation and painting ; wind protection means making the structure heavier.
Alternating moisture and sun, heat and cold can render the material unusable after not too long a time. In addition, the tree can simply be broken or sawed .
Metal
A metal barrier is much more reliable than a wooden one. Manufacturing such a device will cost more, but it will last longer and be of better quality .
The good design of the axial lifting mechanism allows the heavy weight to be neglected. Anti-corrosion coatings in the form of varnish and paints will protect the material from rust formation.
A metal barrier copes much more successfully with strong winds; it is almost impossible to break or damage .
Installation and connection of automatic barriers
To make a barrier with your own hands, you need to prepare a concrete base. It is this that will be able to fix the entire structure. There are no innovations, everything is done according to the old and proven scheme. You dig a pit, pour a cushion of sand, install reinforcement and fill it all with concrete. Be sure to waterproof it.
When making an automatic barrier in the yard, you need to do several manipulations. In general, the installation is the same as in the previous case. You just have to connect the electrical part, namely:
- Reliably ground all metal elements.
- Lay the cable through special channels.
- Place the control panel at a height of about 0.3 m above the surface.
If you are not confident in your own abilities, contact experienced installers. In general, the installation of all systems should not cause any difficulties; the main thing is to adhere to the pre-drawn plan. Always rely on the drawing prepared at the first stage. This will allow you to save time and effort, and most importantly, avoid waste of materials.
Let's look at the manufacture of each type of deadbolt in more detail.
Do-it-yourself “Turntables” device
The pinwheel is one of the oldest and most popular types of deadbolt. It can be used on driveway or garage doors, and is often used to lock barns, sheds and other premises that have double swing gates. This is the most “popular” and easiest to manufacture type. The main advantage is that it is very easy to make yourself.
You will have to make a similar bolt for swing gates yourself also because they are not produced commercially. It is manufactured separately for each gate.
- Take a beam or steel strip (thin channel) of the required length. The recommended length is approximately 2/3 of the width of the gate leaf so that it covers at least a third of each leaf for security. Usually it is equal to a meter. If it is a wooden beam, then its thickness should be at least 5 mm, if it is a steel strip, then from 5 mm with a width of about 50 mm.
- In one of the doors, not far from the edge (60-100 mm), it is necessary to make a through hole for an M10 - M12 bolt. The bolt must have a wide head and sufficient length (thickness of the gate + thickness of the locking bar + thickness of 2 washers + space for 2 nuts).
- The head of the bolt should not be visible or have ground edges so that it cannot be unscrewed from the outside.
- A beam or channel is drilled in the middle and placed on a bolt, secured with locknuts.
- Fixed channels are fixed on both doors, into which the beam or strip fits when turning. The slots can be made wedge-shaped so that the doors are stronger and easier to attract when closing.
This type of bolt is characterized by high strength, reliability and clamping ability. In addition, it is very popular among those who strive to do everything themselves.
The thickness of the wooden beam must be at least 50 mm for constipation
Barrier-type gate bolt
This rotary deadbolt is also used frequently. It can be made of wooden beams or iron strips (channels).
- Mark a hole on the strip for the hole for the M10 - M12 bolt. The hole is not made in the middle, as in the previous case, but at a distance of 60-80 mm from one of the ends. The length of the bolt is calculated as in the previous case.
- A place for the hole is marked on the gate leaf (by placing the bolt in the door in place) and a through hole of the appropriate diameter is drilled. It should be noted that in this case the bolt carries a force load, so the head must be wide, ensuring reliable support for the bolt.
The bolt head should not be twisted from the outside. Therefore, it must either be hidden under the coating or have ground edges
Three grips are made on the sashes. One is on the same leaf where the bolt is attached, next to the end of the gate. The second is opposite him, near the end of the second sash, and the third is near the far end of the bolt. If necessary, it can have eyes for a padlock.
How to make a sliding bolt for a gate
This is also a very common design. These bolts were once made from wood, but today the more common material is steel strips. It’s not difficult to make it yourself if you have a set of tools and plumbing skills.
- Take a steel strip about 400 mm long and about 50 mm wide.
- The strip must move in special guide grooves. These guides can be secured to the plate by welding and then the bolt can be attached to the sash with self-tapping screws or welding.
- After the bolt is secured to one sash, another groove is attached to the second, which will secure the second sash.
This type of deadbolt is often equipped with a shackle in order to secure it with a padlock.
Make your own latch bolt
For a bolt, a smooth rod with a diameter of at least 10 mm is best suited. A handle is attached to the rod to form a T-shape (the easiest way is by welding, but you can also drill a hole in the rod, cut a thread and screw a bolt into it). It is also necessary to select a steel tube with such an internal diameter that the flow enters it without delays or backlash.
- Cut the tube into three parts - a long one (about 10 cm) and two short ones (5 cm each).
- Weld a long tube to one of the doors. On the opposite flap, weld a shorter section so that the rod fits into it.
- Having inserted the rod into the tubes to the end, put another short piece of tube on the free end and attach it by welding. Make sure the gate opens and closes freely.
- To ensure that the bolt is fixed when closed, weld a metal plate or corner that fixes the handle in this position. You can add a padlock eye to the plate to secure the deadbolt.