Mudguard manufacturing materials
This classification factor is considered one of the main ones, since it is it that first of all affects the price of the device, as well as its service life. The following materials are mainly used for manufacturing:
Rubber.
The most financially accessible type of products in question. The advantages of rubber variations include their ease of production, good flexibility and low weight, which is very useful for installation work. In addition, rubber variations can boast of durability, but this is only if they survive exposure to low or high temperatures. Therefore, in our area, during operation, they will not always show themselves in the desired way.
Plastic.
Such a splash guard can be called an excellent solution for operating conditions with significant temperature changes. Plastic in the role of the device in question demonstrates excellent wear resistance and strength, which will be noticeable in the event of constant collisions with stones or dirt from the wheels of your vehicle.
But, if such a mudguard collides strongly with a large stone or if it accidentally hits a curb, it may become unusable, which is why this material is inferior to rubber variations.
Such variations are chosen by those car enthusiasts who want to emphasize the individuality of their vehicle, since plastic devices are produced in a variety of color palettes.
A combination of rubber and plastic.
Mud flaps of this type will allow the car owner to acquire all the main advantages of the above-mentioned materials and at the same time forget about their shortcomings. They are characterized by strength and flexibility, due to which they react in a stable manner to sudden changes in temperature, and are also able to withstand even the most severe shock or collision.
It is easy to understand that combined variations will last much longer, although it will cost slightly more than other types of mudguards. The price of this option is several times higher than the price of rubber and plastic products.
As you can see, there is now a wide range of products on the market. Because of this, buying mud flaps is quite problematic. In order to facilitate this stage, it is worth considering the main criteria for selecting products.
Mshkin › Blog › JAOS mud flaps for SUV
Of course, these are not the same JAOS MUDDLE GUARDS. It's not even a fake. These are just mud flaps with the inscription JAOS. And if you look closely, they are very different from the products of the famous Australian company. Namely
Real JAOS mudguards are made of polyurethane. And here we use oil-benzo resistant rubber with a fabric layer or HDPE (low-density polyethylene). Rubber 3mm thick. has one fabric layer, 5mm thick - two layers.
Real JAOS mud flaps have a branded inscription on the polyurethane, and the metal plate is always without an inscription. The plate is made by stamping.
On fashionable mudguards, an inscription or design is carved into the plates themselves. It was made using laser cutting using industrial equipment on polished stainless steel 1mm thick. Single runs do not allow the stamping method to be used.
The holes in real JAOS mudguards have a special shape, a special diameter and a special distance between the holes. This creates a special aerodynamic effect, which significantly reduces the amount of splashes. These are already space technologies))), which are not yet used in fashionable mudguards.
Real JAOS mudguards use one plate and attach it with three rivets. The fashionable mudguard consists of two plates. The plates are connected with several bolts around the perimeter. The outer plate is with an inscription, the inner (wrong side) is without an inscription. That is, the design is collapsible and, if necessary, they can be disassembled and tired rubber replaced. This makes the mudguards heavier than the original ones. Bolts are used with two head shapes: spherical (mushroom) and cylindrical (grenade) - you can see in the photographs.
Real JAOS mud flaps have strictly defined dimensions for each car model. Fashionable mudguards are installed according to taste and desire, so their length is excessive, and the width is optional.
What are mud flaps made of and where are they used?
The mudguard is otherwise called the wheel arch apron and can be installed on the following equipment:
The purpose of the aprons is to protect against small stones flying from under the wheels, splashes, and dirt. They are attached to the rear of the wing, just behind the wheel. Mud flaps are made from different materials:
Rubber-plastic mudguards are considered the most convenient and durable, because they do not have the disadvantages of rubber (hardness in the cold) and plastic (fragility). Metal aprons are most often used on trailers and trucks.
YuriyMedvedev › Blog › Installing mudguards on the Irbis XR250R motorcycle
Almost all modern motorcycles have a flaw incorporated into them by their designers for the sake of aesthetics - chopped off wings.
The result is a predatory appearance, but the dirt protection function suffers. Short wings with . I previously built up the front one with a part from Kawasaki ZZR. But this is not enough. The motorcycle is used daily on a variety of roads and off-road. It is not always possible to avoid wet areas. When driving over them, at best, the frame and engine with pants are splashed; at worst, your back and head are splashed. I'm not even talking about getting caught in the rain, when water streams from under the front wheel directly into the boots, turning their internal microclimate into a swamp.
In the sixth year of owning the Irbis, I got tired of this kind of driving. I increasingly began to remember motorcycles of the old design school, created for humans. For example, the same M-105 “Minsk”, like its other contemporaries, had deep wings that actually protected the owner.
On later models, the shape of these parts was more “flattened”, the owners, I remember, installed mudguards. By modern standards, many will probably rate this as a “collective farm”, but to me practicality and efficiency are more important than the controversial aesthetic component.
I also decided to install mudguards following the example of motorcyclists of past years. Of course, there are ready-made universal plastic structures sold online, but they are again ineffective due to their small size and pointed, wedge-shaped shape. I went my own way. At the auto store I bought the widely used rear mudguards from the VAZ 2108 made of thick, high-quality rubber that will not bend under the pressure of a stream of water from under the wheels.
Purpose of car mudguards
Mud flaps are installed behind each wheel of a vehicle; depending on their location, they have different purposes:
- mud flaps located behind the front wheels are designed to protect the bottom, thereby preventing premature body wear and corrosion;
- The rear aprons are wider, they protect the body from flying particles, and also protect cars moving behind. Indeed, if dirt flying from under the wheels gets on the windshield of a vehicle coming behind, its visibility may be significantly reduced, and this will increase the risk of an accident. In addition, the car can be damaged by flying stones and ice.
Some drivers assume that since not all cars are equipped with mud flaps at the factory, they are not really needed. But that's not true. As for passenger cars, mud flaps in their usual (classic) form are not always present, which does not mean that they do not exist at all; their function in this situation is transferred to the wings, which have the necessary shape for this. Legislation establishes the need for cars to have mudguards, evidence of this is the “Technical Regulations on the Safety of Wheeled Vehicles” (clauses 10.1.1. and 10.1.2). Which stipulates that all vehicles must have a splash protection system, which should protect other moving vehicles as much as possible.
How to install mud flaps on a car?
Mud flaps are necessary to prevent dirt and moisture from getting inside the car. They allow you to keep the glass clean, providing a comfortable view for the driver. Also, these devices can prevent corrosion of the machine body, because moisture will not accumulate. The installation of mudguards can be carried out independently; for this you do not necessarily need a specialist.
Types and purpose of parts
To make such products, a special flexible polymer is used. Its features allow you to create structures of various shapes and configurations. Some of them are designed for specific models, while many have universal characteristics. In the first option, the quality is much higher and they create comprehensive protection. The latter are much easier to buy, and their sizes can be easily trimmed to fit the features of the car.
Since installation occurs on the plane of the car (in specially provided niches), front and rear mudguards are available on the market. For the front side, soft materials are used, which are mostly made of rubber. They are soft enough, due to which they do not create a load on the vehicle during operation.
Polyurethane is used for the back parts. It is made according to the shape of the body so as not to allow hard dirt and stones to pass through while driving. Due to its hardness, a strong protection is created that does not allow damage to the car body and “knock off” the paint from its surface.
DIY installation
Many workshops offer installation of products, but you can do this process yourself. In some cases, suitable mudguards may not be available, so they will have to be cut by hand. In order for them to be securely fastened and perform their functions, you will need to use:
- drill;
- special drills;
- mudguards;
- knife;
- Phillips screwdriver;
- self-tapping screws 2 cm;
- plastic plugs;
- washers (their size must match the screws).
In some cases, additional tools may be needed if mounting is carried out on branded vehicles. Imported manufacturers often install mudguards that are tailored to the roads and climate of their region - they are not always suitable for Russia. In this case, it is better to prefer universal elements rather than branded ones.
Work process
First, to attach the structure, you need to remove the wheels. In most cars, the original anti-pollution apron is installed. It does not have the desired effect, so it is replaced. It is held on by several self-tapping screws and a screw and is unscrewed with a screwdriver. To prevent the screw from turning, you can gradually pull the original mudguards down. After this, the bushing and the remaining screws are pulled out. It is important to clean the area where the installation will take place from dirt.
HOW TO CHOOSE MUDDLE GUARDS
Based on the main types of mudguards that are commercially available, you can determine a number of rules by which you should choose them. If you buy individual mud flaps, it is better to look for them in online stores, since you will need to select an accessory for a specific car model or line of cars. Please note: In some cases, it may not be possible to find custom mud flaps for vehicle use in extreme weather conditions. Many American automakers install plastic mud flaps on their cars, which are unsuitable for Russian realities.
Options for protecting vehicles from scratches
This function is partially performed by mudguards, but mainly it is directed only to the bottom. Therefore, to protect the machine the following can also be used:
- Various polishes and wax compounds that can be applied to the body without changing its basic color.
- Liquid glass, which can also provide excellent appearance to the car.
- Protective film. It can transform the appearance of a vehicle due to the abundance of colors.
- Covers with a fabric base. They are characterized by ease of installation, but at the same time they cost a lot.
- Plastic deflectors are available in almost every car, but if necessary, additional installation can be made.
Homemade mud flaps for cars
It often happens that as the season passes, mud flaps in cars lose their original appearance or even break down. This is due to the fact that they are subject to constant mechanical impact, be it impacts from small pebbles bouncing off the wheel or dirt falling on its surface. Typically, mud flaps last only a year, or even less, after which it is recommended to replace them with new ones.
The main function of mud flaps, also called mud flaps, is to protect your car, as well as the cars moving behind you, from dirt and stones flying out from under the moving wheel. They can severely damage the car's paint, and sometimes even lead to death, so the presence of mud flaps in the car is mandatory.
The replacement can be carried out either independently or at a service station, although this, as a rule, costs a little more, and the set of mud flaps itself, today, costs a lot of money. Therefore, in order not to waste your nerves and money, we have prepared for you an article on how to make homemade mud flaps for a car at home.
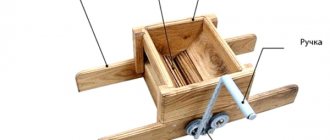
For production we will need:
Two tin plates will be used as the basis of the mudguards; Styrofoam; Molar tape; Fiberglass; Spatula and soil mixture; Paint and varnish mixture; A piece of newspaper and PVA glue;
To begin with, we make mock-ups of future mudguards from cardboard and try them on.
Having determined the required length and width of the mudguards, we place cardboard mock-ups on a piece of tin and cut out shapes of the same size from it. We perform a similar action with pieces of foam plastic.
Using tape, we attach the foam forms to the tin bases and hone their shape for future mudguards.
Next, using PVA glue, we glue our foam blanks with ordinary newspaper in the form of papier-mâché.
After the blanks have dried, we try them on our car and determine the locations for future mounting holes. After this, we treat our blanks with a primer and sand them using a piece of foam plastic.
Finally we start painting. You can paint it at your discretion; in our case, we painted the mudguards with green (metallic) paint that matches the color of the car body. In the end, this is what happened:
How to make it yourself
The sequence of actions does not provide any difficulties for inexperienced motorists. The instructions imply the following algorithm:
- At the initial stage, it is necessary to use cardboard to make standard blanks for the future product. It is strongly recommended that you try on once completed and adjust to size if any discrepancies are found, using the appropriate tool.
- Using blanks, it is necessary to cut tin plates to similar dimensions. In this case, the edges of the mudguards are made of foam plastic.
- The next step is to glue the foam to the tin plate using PVA. After final hardening, it is necessary to perform sharpening to form the required shape of the product of interest.
- Next, you need to cover the formed foam blanks with newsprint using standard PVA glue. It is required to perform the procedure using the classic papier-mâché technique.
- Once the pre-made blank has completely dried, the car enthusiast needs to try it on directly on the vehicle. Next, if necessary, adjustments are made while simultaneously forming a hole for subsequent installation.
- The next step requires removing the foam.
- The priming process is carried out using standard construction putty followed by sanding to form a smooth surface.
- At the final stage, painting is required, followed by fixing it in a permanent place. The procedure is performed after the paint coating has completely dried. As a result, do-it-yourself mudguards are ready for further use.
It is strongly recommended to pay attention to the fact that when making a product with your own hands, you need to use high-quality materials. This allows for a long service life. Numerous reviews from car enthusiasts indicate a lack of difficulties. The main thing is to adhere to a clear sequence of actions. The production time depends on the drying time of the blanks.
Mudguards for bicycles
5 minutes Author: Mikhail Skvortsov 496
Mud flaps are special inserts made of elastic material to protect the cyclist from water, dirt and small stones from under the wheels. They complement the fenders of the bicycle and are attached to them at the back. They come standard on road city models and some mountain and hybrid bikes.
Standard mudguards are often short-lived, and it is quite difficult to find a replacement for them - few bike shops freely stock this product, neglecting its importance. Where they can be found, they may be sold at an inflated price. Therefore, we try to take care of our original rubber bands if we ride with wings in the mud or try to make them ourselves. It is in this review that we will touch upon the topic of how to make mudguards for a bicycle at home. It's quick, easy and will help you save a good amount of money on other essential cycling equipment.
Learning to make mudguards yourself
- Learning to make mudguards yourself
- Homemade mudguards: when is it really needed?
- Useful for making
- Homemade mudguard - algorithm of actions
Installation or replacement of mudguards can be carried out at a service station or independently, which will be much cheaper, and a set of new mudguards is quite expensive today. That is why we will talk about how it is possible to make mud flaps for a car with your own hands.
- Homemade mudguards: when is it really needed?
- Useful for making
- Homemade mudguard - algorithm of actions
Homemade mudguards: when is it really needed?
The main task of mud flaps is to protect the car from stones and dirt that fly out from under the wheels and can severely damage the car’s paintwork or lead to more serious problems. Due to the constant mechanical impact of stones, sand and dirt, they lose their original appearance, or even break down, then they have to be replaced with new ones.
Mud flaps - five main advantages
First, let's talk a little about the usefulness of rubber bands on the wings:
- Mudguards are aesthetically pleasing. Wings without them look “torn” and unfinished. The usual classic style of a road bike cannot be imagined without mudguards, because this machine is specially created for the city. And there are puddles on city streets even in dry weather.
- Protection from dirt. The rear one protects the back and arms from flying dirt, the front one protects the legs and face (especially at a low seating position). But can’t just fenders keep the cyclist clean, is it necessary to have pads? Indeed, bare fenders are better than nothing, but, most likely, after a ride on dirty roads, it is unlikely that you will be able to come home clean. The fact is that the hard ends of the wings do not fight off dirt, as elastic bands do.
- Easy to maintain - they have simple fastenings on the wings, they are easy to clean, dry and put back on the bike.
- Good bike mudguards are designed for comfort and don't bother the rider with friction from the tires.
- Without unnecessary running around the shops, you can figure them out on your own.
Yamaha FZ6-N 2007 → My first post, or my hands are itching.
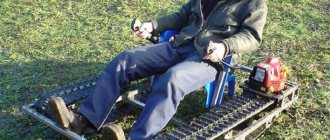
At the end of the 2012 season, I purchased an FZ6n. Actually, as soon as I bought it, the season ended, as the ambient temperature dropped to +3-4 degrees... I put the motorcycle in the garage for winter storage, and I began to think about what could be done during the “hibernation” period. The first thing that came to mind was that I have absolutely no room on my motorcycle for any useful items. During the time of owning maxi scooters, I have already gotten used to the fact that in my glove compartment I have a compressor for inflating the wheels, a raincoat, a reflective vest, a spare phone with a charger, a tool, oil for topping up (just in case), a spare belt, spark plugs, an anti-theft cable and a lock. . The solution was found in purchasing a givi tank bag, as well as mounting the rear case and the case itself from the same manufacturer.
What can mud flaps be made from?
To make fender flaps, it is not always necessary to look for rubber; besides it, there are other options:
- linoleum - plasticized PVC;
- PET plastic bottle;
- plastic from canisters;
- leatherette.
Traditionally, bicycle mudguards “hug” the fenders on the outer and inner sides. Fastenings - one or two standard bolts with nuts. You won’t be able to cut the same product yourself, so we’ll make do with just one-sided fit of the mudguards:
For standard rubber, it is necessary to take a material of sufficient thickness and rigidity so that the mudguard does not bend under the impact of dirt. Useful rubber floor mats, car mats, or inner tubes from truck tires are suitable for these purposes.
How to make and install yourself
If you have a sheet of rubber, linoleum or leatherette of a suitable color, cutting out the wing pads will not be difficult. The basic requirements for installation on full-size and short wings are the same - the product should not be too long and should not extend far into the wing above the mount.
As the length increases, the vibrations of even a rigid material increase, and the mudguard will touch the tire while driving. If you measure too much on the other side, the mudguard will bend and look unsightly when mounted externally, or again touch the wheel when mounted internally.
Traditionally, mudguards widen from the base. But you can break this rule with your own hands - make straight or pointed products:
You need to cut the material from the outside, which will face outward.
To make mudguards from hard plastic, the material must first be softened - this makes it easier to smooth and cut. A hair dryer will help here - its air flow is enough to cover the plastic. When the material has become slightly pliable, carefully cut out the workpiece with scissors.
General algorithm for making mudguards with your own hands:
- Make a life-size drawing on paper.
- Place the blank on the paper and cut out the overlay using the tips of scissors.
- Carefully sharpen uneven edges with a penknife.
- The mudguard is ready, now let's start installing it on the wing.
Depending on the type of fastening, mudguards can be screwed on with one, two or three bolts. We purchase bolts and nuts of the required sizes in advance. To prevent the bolt from pressing on the wing, it is advisable to place a washer on it. We mark the holes taking into account the distances between the holes on the wing.
All that’s left to do is make a hole. It is better to use a drill with a suitable drill bit or hole punch. It is not recommended to pierce it with scissors or an awl - over time, the edges will bristle and the mudguard will “ride” along the wing.
Mudguards for bicycles
5 minutes Author: Mikhail Skvortsov 496
Mud flaps are special inserts made of elastic material to protect the cyclist from water, dirt and small stones from under the wheels. They complement the fenders of the bicycle and are attached to them at the back. They come standard on road city models and some mountain and hybrid bikes.
Standard mudguards are often short-lived, and it is quite difficult to find a replacement for them - few bike shops freely stock this product, neglecting its importance. Where they can be found, they may be sold at an inflated price. Therefore, we try to take care of our original rubber bands if we ride with wings in the mud or try to make them ourselves. It is in this review that we will touch upon the topic of how to make mudguards for a bicycle at home. It's quick, easy and will help you save a good amount of money on other essential cycling equipment.
Do-it-yourself rear mudguards for the field
The modification, of course, is not God knows what, but it’s still painful to see how dirt and pebbles hit the rear fenders (especially when there is a CF, etc.), and even with standard wheels it’s no better. My brother solved the problem in the same way, only he had a separate mudguard, because he tore off the standard one and made it from reinforced rubber (you can make it cheaper and wider from “five” reinforced rubber. Reinforced rubber is more elastic than the standard one), and then made an extender arches to the mudguard from the three and still the dirt will find a hole.
Mud flaps - five main advantages
First, let's talk a little about the usefulness of rubber bands on the wings:
- Mudguards are aesthetically pleasing. Wings without them look “torn” and unfinished. The usual classic style of a road bike cannot be imagined without mudguards, because this machine is specially created for the city. And there are puddles on city streets even in dry weather.
- Protection from dirt. The rear one protects the back and arms from flying dirt, the front one protects the legs and face (especially at a low seating position). But can’t just fenders keep the cyclist clean, is it necessary to have pads? Indeed, bare fenders are better than nothing, but, most likely, after a ride on dirty roads, it is unlikely that you will be able to come home clean. The fact is that the hard ends of the wings do not fight off dirt, as elastic bands do.
- Easy to maintain - they have simple fastenings on the wings, they are easy to clean, dry and put back on the bike.
- Good bike mudguards are designed for comfort and don't bother the rider with friction from the tires.
- Without unnecessary running around the shops, you can figure them out on your own.
What can mud flaps be made from?
To make fender flaps, it is not always necessary to look for rubber; besides it, there are other options:
- linoleum - plasticized PVC;
- PET plastic bottle;
- plastic from canisters;
- leatherette.
Traditionally, bicycle mudguards “hug” the fenders on the outer and inner sides. Fastenings - one or two standard bolts with nuts. You won’t be able to cut the same product yourself, so we’ll make do with just one-sided fit of the mudguards:
For standard rubber, it is necessary to take a material of sufficient thickness and rigidity so that the mudguard does not bend under the impact of dirt. Useful rubber floor mats, car mats, or inner tubes from truck tires are suitable for these purposes.
How to make and install yourself
If you have a sheet of rubber, linoleum or leatherette of a suitable color, cutting out the wing pads will not be difficult. The basic requirements for installation on full-size and short wings are the same - the product should not be too long and should not extend far into the wing above the mount.
As the length increases, the vibrations of even a rigid material increase, and the mudguard will touch the tire while driving. If you measure too much on the other side, the mudguard will bend and look unsightly when mounted externally, or again touch the wheel when mounted internally.
Traditionally, mudguards widen from the base. But you can break this rule with your own hands - make straight or pointed products:
You need to cut the material from the outside, which will face outward.
To make mudguards from hard plastic, the material must first be softened - this makes it easier to smooth and cut. A hair dryer will help here - its air flow is enough to cover the plastic. When the material has become slightly pliable, carefully cut out the workpiece with scissors.
General algorithm for making mudguards with your own hands:
- Make a life-size drawing on paper.
- Place the blank on the paper and cut out the overlay using the tips of scissors.
- Carefully sharpen uneven edges with a penknife.
- The mudguard is ready, now let's start installing it on the wing.
Depending on the type of fastening, mudguards can be screwed on with one, two or three bolts. We purchase bolts and nuts of the required sizes in advance. To prevent the bolt from pressing on the wing, it is advisable to place a washer on it. We mark the holes taking into account the distances between the holes on the wing.
All that’s left to do is make a hole. It is better to use a drill with a suitable drill bit or hole punch. It is not recommended to pierce it with scissors or an awl - over time, the edges will bristle and the mudguard will “ride” along the wing.