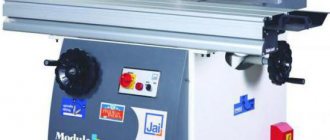
Various designs of jointing machines
Structurally, jointing equipment manufactured in industrial conditions is very different from machines made independently. They differ in the materials used, technologies, auxiliary equipment, etc. But this does not mean that a homemade jointing machine made from a simple electric planer will not be in demand for home use. It is quite suitable for processing small parts in small quantities.
There are two main types of wood planing machines:
- Single-sided machines (the production of this option will be discussed). With such equipment, only one surface can be processed in one pass. Structurally, these are the simplest devices;
- Double-sided or two-spindle. Such a device can simultaneously process two adjacent surfaces of a part. It is quite difficult to make such equipment yourself.
In addition to the above types, you can also add that machines can be both stationary and mobile.
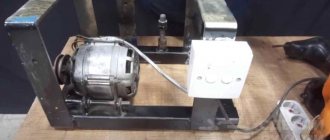
Do-it-yourself jointer from an electric planer
Today, jointers have become quite widespread. They are used for planing wood. The planing procedure involves removing the top layer of material, giving the workpiece a certain shape and size.
The cost of the industrial version is quite high, which is why professionals decide to create a jointer from an electric planer. Such modernization can be carried out by a master solely taking into account the features of such instruments.
Let's take a closer look at them.
Making a homemade jointing machine from an electric planer
You can make a jointer from an electric planer with your own hands, even if you do not have the required skills. In this case, attention should be paid to all components, since the main operational characteristics largely depend on the quality of each. You can make a jointer from an electric planer with your own hands, taking into account the following points:
- The project is downloaded on the Internet or created independently, it all depends on the specific case.
- The next step is to choose a suitable electric planer. It is characterized by a large number of features, for example, power or type of blade installed.
- When creating a machine from a plane, you need to pay attention to ensuring that it is stable. Otherwise, the quality of processing is significantly different.
You also often make a stand for a plane with your own hands. It significantly improves the quality of the processing performed.
How to properly adjust the tool being manufactured?
Adjusting the plane allows you to obtain a product with the required parameters. Among the features we note:
- The required power is set.
- Attention is paid to the degree of protrusion of the knives.
- The appropriate position of the tool is established.
Only after correct adjustment of the tool can you obtain a product with the required parameters. In addition, it is necessary to provide for the possibility of replacing the main elements in case of severe wear.
main idea
Yes, such a homemade jointing machine, unlike serious industrial designs, has a number of disadvantages, namely:
- Cannot boast of high processing accuracy;
- The width of the workpiece is very small - only 110 mm;
- Lightweight is a disadvantage, since a heavy massive base always gives the device stability and, as a result, ease of use, which ultimately improves the quality of the result.
- Low power, limited by the power of a household electric planer;
- The body material is wood, that is, not durable;
However, it also has undeniable advantages that make it very useful for achieving certain goals and performing a number of tasks, since it has the following advantages:
- Low cost - serious jointing machines cost tens and hundreds of thousands of rubles, and the cost of this homemade jointing machine consists of the cost of the plane and materials;
- Compact and portable - it can easily be stored anywhere in the workshop and can be deployed for work in a matter of minutes.
- The simplicity of the design affects its reliability and maintainability.
- The ability to make the necessary dimensions of the machine “to suit you”, for example, you can increase the length of the work table or change the height.
Preparing the necessary accessories for work
To make a jointing machine with your own hands, you will need materials, equipment and tools, namely:
- Manual electric planer. Will be used as a woodworking tool. It is best to use high-quality, branded Makita or Bosh power tools - this is an additional guarantee of productive, long-term work;
- Jigsaw with files. Alternatively, you can use a regular hand jigsaw, since we will only need it once to make one part;
- Drilling machine with drills or drill;
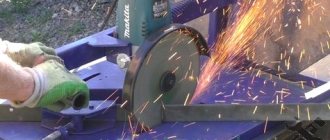
- Circular saw or any other sawing machine. Alternatively, you can use a simple handsaw;
- Electric screwdriver;
- Wood screws (3.5x40 or 3.5x45);
- Plywood 10-15mm, for tables and other small parts, 18-20mm - for the side wall of the bed. Alternatively, you can use chipboard or OSB, but this is an extremely undesirable option;
- Solid wood for making a side support, approximately 15-20mm thick.
This is an indicative set of what you might need to make a homemade jointing machine.
Description of the tool
Thicknessers are machines for wood processing that allow planing and leveling the surface of lumber to produce boards of a given thickness. This type of wood processing is carried out by using lumber in construction and making various structures from them. Planing equipment is in demand on the market and is popular with ordinary homeowners who independently engage in construction at the dacha and in their own home.
Self-made surface planers are distinguished by their simplicity of design, which allows them to be made using an electric planer, grinder and other similar power tools as a basis. You just need to make sure that you have the appropriate diagram, which you should adhere to when making homemade equipment.
Machine parts
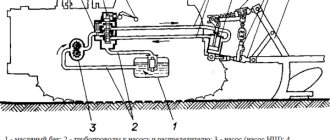
Let's look at the main structural elements:
| Name | Description and purpose |
| Machine base | The bottom part of the machine where everything is mounted. |
| Side wall | The supporting structure of the machine, which serves to mount the electric planer and both tables. |
| Rear table (fixed) | Together with the front table it forms the plane of movement of the workpiece. Attached to the side wall. |
| Front table (adjustable height) | Together with the back table it forms the plane of movement of the workpiece. Attached to the side wall. |
| Side stop | Fixed on the back table. Used to give direction to the movement of the workpiece. |
| Spacer corners (stiffening ribs) | They serve for general strengthening of the structure, as well as to support a given 90-degree angle. |
| Electric planer | The main element of workpiece processing. |
Making a homemade jointing machine
Side wall
First of all, we will make a side wall, for this we use plywood 18-20mm thick with dimensions 150x480mm. By cutting out a place in the workpiece in which the electric planer will be fixed. This should be done using an electric or manual jigsaw, since the sample shape has a complex configuration.
Using a drilling machine, two grooves should be made in the side panel at a distance of 70 mm, with their help, in the future, the base of the front table will be attached.
Machine base
We make the base. This is a simple rectangle that needs to be cut on a circular saw or other sawing machine from the same plywood 18-20mm thick with dimensions 180x480mm. Everything is simple here - we connect the base and side wall at an angle of 90 degrees with self-tapping screws into the end of the wall.
In the future, the plane will be installed as follows.
Back table
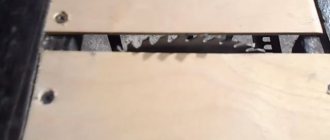
The back table is also made of 18-20mm plywood with dimensions of 150x600mm; a technological opening is cut out to get this shape.
The end edge of the opening must be cut at an angle. This can be done on a circular saw or jigsaw.
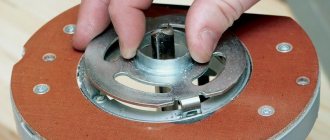
Next, unscrewing 4 screws, remove the fixed “sole” from the electric planer and mark the table of the future machine.
Having drilled the necessary technological holes, they need to be countersunk a little so that the standard screws are recessed “flush” and do not interfere with the movement of the workpiece.
We install our homemade back table in place of the removed sole of the electric planer using standard screws. After this, you need to fix this table on the side wall with self-tapping screws into the end of this wall.
Front movable table
The front table, which must be adjustable in height, is made of two rectangular pieces fastened at an angle of 90 degrees. For greater structural strength, you need to make triangular stops between them. In this example, everything is attached with self-tapping screws; however, for greater strength, it is recommended to coat the joints with wood glue. The end result should be a design like this.
At a distance of 70 mm from each other, you need to make two through holes with a diameter of 8-10 mm and hammer furniture drive nuts into them. It is better to do this before assembling the base.
Installation of the movable table is done using two screws on the back of the side wall. For convenience, you can use bandages with a winged head or make homemade holder mounts. The installation should be carried out so that the plane of the moving part of the “sole” of the electric planer is in the same plane as the movable table of the jointer.
Side stop
The side stop is needed to ensure smooth and parallel movement of the workpiece, as well as to establish an exact 90-degree angle between the work table and the stop plane. The stop is made simply - from two parts, which can be made from either plywood or solid wood. In this case, an array is used.
Two rectangular blanks are fastened at an angle of 90 degrees, forming a “corner”. After which it is rigidly attached to the stationary part of the table.
A do-it-yourself jointing machine made from an electric planer is ready for use.
Useful tips
When creating a surface planer from an electric planer at home, you need to have an idea of some of the subtleties in order for the result of the effort and time spent to be worthwhile:
- When making the fastening roller, its position must be correct: it should not be installed too low, otherwise transverse dents may form on the workpieces being processed.
- Carefully ensure that the tool's work table is perfectly level. If there are distortions, the finished product will not have a smooth, even surface.
- Make sure that the rear block of the thickness planer is positioned correctly: it should not put undue pressure on the workpiece. In this case, the feed force will decrease, but the knives will still work. As a result, grooves may form on the treated surface.
- It is worth paying attention to the cap visor of the product. If it is installed incorrectly, chips will fall onto the lower roller during operation, and dents will certainly form.
These are all the nuances that you should know in order to create a high-quality and durable surface planer at home. Good luck!
Safety when working with homemade equipment
When working with any tool, you must follow safety precautions, as ignoring them can cause various injuries. We will briefly list the recommended measures to ensure the safety of the master’s work on this machine.
- It is recommended to remove sharp chamfers and sand all manufactured parts to eliminate the possibility of hand injury (splinters, etc.)
- When working, it is necessary to use a chip extractor or a special vacuum cleaner, for example, a cyclone type, to remove sawdust and dust from the sawing area, which can cause the following harm:
| To the Master | Respiratory and eye contact |
| Tool | Getting inside the instrument and:
|
| Process | Chips and sawdust getting between the workpiece and the table, resulting in poor fit and misalignment - the result is uneven processing. |
- When working, it is necessary to use pushers, since when working with small parts, it is possible that the master’s hands will get into the cutting zone, which will lead to injury.