Making a working floor lamp for a roombox
I’m currently making a roombox in the form of a home library, and I needed a floor lamp for lighting.
A stationary one could be made very simply, but I love it when furniture can be rearranged to suit your taste and desire. Therefore, I began to think about how to make a floor lamp with an autonomous power supply, but so that it would not be too bulky. The idea came quite quickly, I found all the spare parts in my bins, and the main part was in my dad’s tool box
And in this master class I will show you how to easily and quite simply make a miniature working floor lamp.
So, we will need:
- LED lamp, I bought it at the Fix Price store, I got a very successful lampshade;
- metal dowel - it was just taken out of dad's box. I thought it would hold the floor lamp leg well and be a nice transition from the base to the thin leg. The lamp leg fits into it just right. The dowel has such sharp “legs” that you need to bite them off with side cutters (indicated by arrows in the photo). In principle, as further work showed, you can do just fine without a dowel;
- - a thing called “universal mounting holder”. Its presence is not necessary, but it is desirable; it will help us a lot when soldering. If you don't have it, think about what you can replace it with.
- electric candle (I bought a whole set at Ikea). Its body will serve as the base of our floor lamp;
- pliers, side cutters (I took my dad’s “adult” ones, because my little ones can’t handle the metal legs of the lamp), knife, tweezers, screwdriver, moment crystal glue (or whichever one you prefer), Poxypol. Not shown in the photo, but you will also need a soldering iron, solder, toothpicks, a needle file, a simple pencil (the most common one, preferably soft), and I also needed small pieces of paper tape. If you don’t have a soldering iron or don’t know how to solder, don’t despair, you can do without soldering.
Take our spark plug (1), unscrew the cover from the battery compartment (2), carefully use a screwdriver to pry off the flat bottom part and divide the spark plug into two parts (3). Be careful when separating, do not break the pins, I have circled them in the photo with 3 circles. Using pliers, slightly flatten the base of the “light” from the inside and squeeze it out. We get a disassembled candle (4).
I apologize, then in some places the background of the photo will not be very beautiful, because... This is the work surface on which I cut, glue and do a little soldering.
We turn on the soldering iron, and when it heats up, we simply unsolder all the available soldering joints. Be careful and careful when unsoldering the LED leg and the switch leg, it is quite easy to break (circled in the photo). You can help yourself with a screwdriver or an awl in order to have time to move the LED leg to the side in time. We put the separated LED in the bins, because we don’t have anything superfluous. Turn off the soldering iron.
If you don’t have a soldering iron, you can cut off the LED legs with side cutters and carefully clean off the soldering with a file.
We put the candle aside and take up the lamp. We try on the height of the floor lamp; we need to add another 3 centimeters to this height to get a supply of wire. Using side cutters we bite off the leg along with the wires; here you need to apply sufficient effort, because... This metal is quite difficult to cut. First, it’s better to try biting off the leg closer to the USB connector.
The leg itself consists of two spirals. One unwinds quite easily, but be careful, you can cut yourself. The second is just a tightly cut spiral. We unwound the first spiral to the place where we will have the junction of the stand and the leg, carefully bend the second spiral with pliers a little in order to pull the wires out into this gap. The wires can be picked up with an awl or a needle. Here, too, you need to be careful not to bite or break the wires. We pulled out the wiring - we bite off the rest of the tight spiral.
Now you need to strip the wires from the braid. Carefully run a knife along the braid without touching the wire, and remove the cut piece of braid. When this is done on both wires, let's check if the lamp works. At the same time, we note which wire will go to the plus and which will go to the minus; this is important for an LED. Red is a plus, we connect it to the switch, black is a minus, we connect it to the battery terminal.
We assemble our floor lamp: we put a dowel and a candle base on the leg.
I decided to narrow the pin on which the LED “sat” a little so that its top would fit into the leg of the floor lamp. The photo shows the bevels with blue lines. Plastic is easily cut with side cutters.
And now the holder enters the battle. To prevent the dowel and base of the floor lamp from falling off and interfering with soldering, I secured them with paper tape. We fix the floor lamp in the holder so that the wires reach their terminals and so that the entire structure does not move.
Turn on the soldering iron again and while it is heating up, wrap the stripped ends of the wires around the positioned terminals. Red to the switch, black to the battery. This is where tweezers come in handy.
After the wires are soldered, let's check if our lamp works. Don't forget to turn off the soldering iron. The lamp works, let's continue.
We take Poxypol, squeeze out a little of one component, and use a knife to clean off a little pencil lead. After this, squeeze out the second component and mix everything. We get a beautiful black mass. We generously apply this mixture around our soldering joint, at the bottom of the terminals, and also use it to secure the wires to the base. I use toothpicks; they allow me to get into places where a standard Poxypol stick won’t go. When applying, make sure that “clumps” of poxypol from different wires do not come into contact with each other or with other terminals. If you have a soldering expert on hand, you can skip this step. But I always play it safe. Poxypol mixed with lead provides additional insulation and securely fastens the wires. If you don’t have a soldering iron, soldering can be replaced with poxypol mixed with lead.
Now we mix the poxypol without the lead, put the lamp leg on the base pin and again generously coat it with poxypol. I also apply a little poxypol to the junction of the switch and the base (from the inside), because... The switch "walks" a little. We are waiting for the Poxypol to harden.
Apply a little Poxypol to the pins of the base and connect both parts of the base. In order to securely fasten the floor lamp leg to the base (and the leg is thinner than the hole in the base), we apply Poxypol here too. Now we need to secure the entire structure so that it does not warp. The “crocodile” of the holder could no longer help me here, I had to urgently build a stand from what was at hand - my daughter’s Lego, pliers and side cutters (so that the Lego turret would not fall) . At the same time, the free “crocodile” of the holder served as an additional support for the base.
After the Poxypol has hardened, we see that the floor lamp holds up perfectly as it is. Therefore, those who do not like the dowel or who do not have one can do without it.
That, in principle, is all the wisdom. Nothing complicated, in my opinion. The result is a wonderful floor lamp, which can now be decorated to your liking.
I could stop here, but I’ll tell you a little about how I completed the work on the floor lamp.
Since the furniture in my roombox will be dark brown, I decided to make the leg of the floor lamp the same. From Iris I crocheted a cover for the base - ordinary single crochets. Knitted in turning rows. Started from the bottom; when the fabric reached the top of the base, I made gradual decreases until the knitting reached the dowel. I tied the last row with a “crawfish step”, and also tied it with the base of the knitting.
I wrapped the leg of the floor lamp with thread, smearing it with Moment Crystal glue. I had to work especially hard on the dowel, because... he is curly. When the thread reached the very base of the floor lamp, I simply secured it there with a “Moment”.
Next, I first applied glue to the flat part of the base, put on the cover, and sewed the 2 parts on the plane. After that, I smeared the walls of the base with glue, glued this part of the cover and sewed the rest of it. Close the battery compartment cover and tighten the screw.
The finishing touch was acrylic varnish, which I applied to the winding. I have this “Gamma” acrylic varnish for artistic work, matte.
So my floor lamp is ready. In principle, the lampshade can also be decorated, but I didn’t.
The height of the floor lamp is 12.5 cm.
It shines beautifully in the dark and looks no less beautiful during the day, as well as in its rightful place - next to the chair
Thank you for your attention! I hope it was interesting and useful. If you have questions, ask them.
When reprinting (full or partial), or reposting, please provide a direct link to the original source, indicating the author of the master class. Thanks for understanding!
Variety of doll furniture
Sets of doll furniture amaze with their variety and elegance. It’s easiest to buy a ready-made kit, but it’s much more interesting to make miniature furniture for dolls with your own hands. In addition to standard interior elements such as a bed, chair and table, almost any item can be made from scrap materials. The main thing is to be smart and set aside some free time. Kitchen and bedroom sets are most often found in sets for playing with dolls. But the child will be delighted with the desk, floor lamp and bathtub.
The complexity of making doll furniture is determined by the material chosen as the basis. The dimensions must correspond to the height of the doll. For little dolls it is very easy to make furniture based on matchboxes. The owner of the dolls herself is often involved in the process. For larger specimens, choose cardboard and plywood.
The materials at hand, which are often used when making doll furniture with your own hands, are presented in the following list:
- Plywood sheets. The most durable design option for doll furniture. Processing plywood sheets is not for everyone and often requires the use of a jigsaw. But the doll furniture that came from the hands of the master amazes with its sophistication.
- Thick cardboard. It is much easier to handle; a school-age child can work with it independently without the help of adults. Often, ready-made cardboard boxes are selected as the basis for doll furniture.
- Matchboxes. Ideally suited for a miniature dollhouse where the main occupant is small.
- Plastic containers for cosmetics. Don’t rush to throw away your elegant after-cream jar and shampoo container. Perhaps they will be transformed into an elegant ottoman or a comfortable doll chair. Even a small plastic bottle can become the basis for a chair. The following video demonstrates how to make a comfortable toilet.
- Viscose napkins and dish sponges. Used to decorate the upholstered part of doll furniture.
- Containers for eggs, wire, beads, skewers. This list can be continued endlessly. The choice of additional elements depends on the complexity of the doll structure and the desired decor.
Exclusive sets of furniture for dolls, designed by wood craftsmen, are presented in the photo:
Dream house in night light
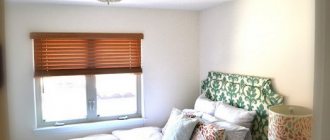
Good night! This topic is dedicated to the night. I think many, like me, at one time collected the details of the “Dream House” in order to ultimately build this house and thereby make their own dreams come true... I bought all the magazines in this series, ordered a house, assembled it, filled the rooms with various miniatures, but to complete the construction, light was needed. There was no way to bring light into the house through a system of wires and lamps. But a way out was found. I’ll write about it later. And so, the Dream House was built - large, beautiful, well-appointed, with residents. But only yesterday I looked at it with different eyes, when at night I turned on the light inside this mansion... And I found myself in a miniature world... Have you ever wondered what our toys do when no one is home? As a child, I was very tormented by this question, and then, as an adult, I unexpectedly found myself in this fairy-tale world. So, it’s night, and the lights are on in the windows of the miniature doll house and life is in full swing. I really want to look through the windows and see what’s inside. Closer…
How amazing the rooms look in the night light... This is the parents' bedroom:
Mistress of the house
Soon my husband joined
Children's room... and a little mess there:
Living room:
This is how the living room looks in daylight. Not so mysterious Bathroom:
And the bathroom in daylight:
Dining room... They still celebrate Christmas there
I forgot to hang candlesticks on the wall here... The children are in the dining room. Everyone won't go to sleep. And the boy, according to legend, is from a neighboring house
Here the candlesticks are already hanging on the wall. But it’s day outside.
The kitchen is the maid's domain.
And here the maid is already busy in daylight (or morning)
Well, morning has come, a new day... Good morning! :))
And a photo of chandeliers. In each room, chandeliers are glued to the ceiling with double-sided tape. The button battery is inside the base of the chandeliers, and the switch is at the base on the right (small black button).
Thanks for stopping by!
Ways to decorate a bed
Playing with dolls often turns into a real performance when your beloved Barbie is already a mother herself, and her little child needs a crib. Matchboxes with cardboard are an affordable and free material to make a doll bed. The whole process consists of three steps:
- glue 2 boxes;
- backs are cut out of cardboard;
- For beauty, doll furniture is covered with colored paper.
Instead of cardboard, the legs can be made from popsicle sticks.
It's not much more difficult to make a bed with drawers. To do this, matchboxes are glued in 2 layers. On the side that will be used as a box, beads are glued or secured with wire. After connecting with the backs, the furniture is decorated with paper. Additionally, it is advisable to sew bedding.
A small bed can be made from cardboard sheets:
- Initially, print out the proposed drawing or draw it yourself.
- The parts are cut out of paper, then transferred to cardboard or plywood.
- They assemble an interesting design of doll furniture.
Comment! If plywood is used in the work, the edges of the workpieces are carefully sanded so that the child does not get hurt during play.
DIY lamp for a doll's house. Master Class
Sometimes on the site there are questions about how to arrange lighting in a dollhouse. For lighting we need light sources - light bulbs, a couple of thin wires and batteries.
DIY lamp for a doll's house. Master Class. The most popular light sources today are LEDs. In the photo there I have several different types of LEDs, some wires, several different batteries and several small switches. And also several different pieces for making lamps for a doll's house, assembled from various garbage. LEDs are semiconductors. This means that LEDs glow only in one direction of current, but not in the opposite direction, unlike incandescent light bulbs for which there is no fundamental difference. Therefore, if the LED does not light, simply change the direction of the current by simply connecting the antennae of the LED to the other poles of the battery. In short, if it doesn’t light up, turn the LED 180 degrees. You cannot connect any LED to any battery; if the battery is weak for the LED, it will not light up, although it is connected correctly, and if it is too strong, it will burn out. Therefore, choose the right LED-battery pair in the store. For the lampshade, I took a large bead, carved a larger hole with a needle file so that the LED could fit in. Now the very principle of the light design: a pair of wires should go from the light bulb to the battery, in one of which you can build a switch. Although you can simply twist the wires together. Nothing complicated. LEDs are very power-hungry lamps, so the batteries don’t last long; it’s more rational to use an adapter that matches the voltage. Especially if you need to illuminate many rooms. I have it from an old phone. It's just 5 volts. Let there be light!
Yamogu: Hello! My name is Natalia, I create clothes for different dolls. I sew, knit and crochet.
Yamogu: Do you want to give an unusual gift or treat yourself with your mini-copy?
Selecting a lamp and socket
When selecting lamps, it is necessary to take into account the dimensions of the dollhouse and lamp. Common incandescent elements from pocket flashlights with a threaded metal base of the E10 standard are not suitable for use in a homemade design. It is recommended to use incandescent lamps with a base with a diameter of 5 mm, which have reduced size and heat dissipation.
To further reduce energy consumption, LEDs are used, which are installed in a socket or soldered directly to electrical wiring. The cartridge is selected simultaneously with the light source. The design of the unit contains 2 contacts separated by a dielectric spacer. The cartridge is attached to the house material using glue.
Chandelier for dollhouse
For the chandelier I took plastic from a file folder. I cut a 3mm strip and connected the ends together. To finish this strip you need small glass beads of a light, delicate shade.
The glue doesn't stick to the plastic, so I sewed the ends together with thread.
The photo below shows the decoration of the circle with bugle beads. I took the lightest and most transparent colors suitable for the chandelier. The threads are regular white.
In addition to Czech beads and bugles, pearl beads are visible in the photo.
We connect the lower petals along the bottom, and completely narrow the upper ones.
In this master class, my chandelier is not lit. I hope in the future to make a Mk for carrying light into a roombox,
but that will be in the future. In my house, ordinary flat lanterns are braided in this way.
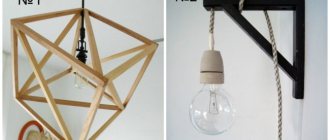
Model 1
To work you will need:
- cardboard 1.0-1.5 mm thick;
- foam board about 5 mm thick, it can be replaced by 3 mm corrugated cardboard;
- thick white paper;
- tube Ø 15-25 mm, for doll furniture a thread tube or marker body is suitable;
- thin foam rubber or fleece;
- upholstery fabric;
- glue, scissors, pencil, ruler.
Algorithm for making a doll chair with your own hands:
- A furniture drawing is prepared on paper, according to the doll’s height.
- For the seat, 4 pieces of foam board are cut out, if there are no 6 identical elements of corrugated board, which are glued together.
- The resulting seat figure serves as the base of the chair. The front and back made of cardboard are fixed to it.
- Then armrests in the form of tubes are attached to the piece of doll furniture. First, tape will help, then they are covered with paper and held firmly. A photo collage will add clarity to the actions:
- Cardboard strips along the length of the armrests, 10 mm wide, are placed in the gap between the seat and the tubes. Initially, the sides of the doll furniture are sealed with paper, then with fleece. What it looks like is shown in the photo:
Comment!
The external aesthetics of a doll chair and any other furniture depends on the finish. Therefore, take care of beautiful upholstery material. The upholstery elements are cut out according to the previously prepared drawing, only allowances of 15 mm are made. Before decorating the back, it is initially covered on one side with foam rubber. This element can be made removable or stationary. Making a pillow for doll furniture with your own hands is even easier; the steps repeat the algorithm with the backrest.
The work is, of course, painstaking, but the result deserves admiration.
Dollhouse, connect the light, scale 1:12
Now I’ll tell you and show you how to put lighting into it. We will make lighting for the lantern and fireplace.
To do this you will need: 12 v light bulb:
Take the wire from the light bulb:
And connect to the plug:
We plug the plug into a 12 V socket, which in turn connects it to the adapter and into a 220 V socket:
Or you can connect it to a battery:
And the light is on in your house! Flashlight:
Or a fireplace. The light bulb is installed in the fireplace, the wire and socket are left behind the house.:
An easy way to make kitchen furniture
First, let's look at a simple option on how to make kitchen cabinets from matchboxes. The lower part is formed from 9 elements according to the principle of a chest of drawers. The function of handles can be performed by staples from a stapler. For wall cabinets 3, the box is fixed to a cardboard wall and cut in the middle to make doors. Of course, it is better to cover the boxes with paper or paint them in advance. Naturally, the surroundings play a big role:
- Complete the doll kitchen with mini lamps.
- Decorate the window with a lace curtain.
- You can make a sink out of foil.
Doll furniture will sparkle with new colors. You can complement your kitchen set with a table and chairs made of cardboard.
We will not describe complex options for making doll furniture for the kitchen out of plywood. Let’s just imagine the result of the master’s painstaking work:
Doll life Modeling design Chandeliers in a dollhouse Beads Glue
In the dark. The oriental effect of the decor is enhanced by the light of such a light bulb.
And these are small mirrors, ordinary (silver) and blue.
there are pebbles around the edges.
We decided not to do any wiring in the house for safety reasons. Beautiful, small, battery-powered light bulbs of different shapes came to the rescue.
This is just the beginning, only 6 rooms.
June 11, 2015 — 07:10
Olechka, what a great idea you came up with, now you start to think what luxuries are created for the dolls. We never dreamed of anything like this, Smart girl.
June 11, 2015 — 14:08
Oh Gal, don’t even talk about it, such comfort, why am I not a doll, everything is beautiful, all the girlfriends are in the next rooms
Thank you very much for your comment!
June 11, 2015 — 10:52
Smart little daughter! Somehow I didn’t pay attention to whether we had such flashlights. Is the light from them white or yellow?
I would really like to see your house. Be sure to invite us to visit you for new items
June 11, 2015 — 14:11
The light from them is different, mostly white, they shine very well and most importantly for a long time.
I had never looked at such light bulbs before either; I already had three of these round ones for several years. But when I went to buy it for the house I discovered different shapes and colors
Thank you Yulechka for your comments, I was glad to see you visiting!
June 12, 2015 — 11:30
Somehow I like them better with yellow light - it makes the atmosphere look more comfortable. I made a table lamp for Mishutka, but I can’t buy a small LED light bulb, and all the toys have white or blue light. I'll show you soon)
June 12, 2015 — 11:51
It’s clear, but if you take it from a New Year’s garland, you can paint the diode (with nail polish), it doesn’t heat up.
June 11, 2015 — 22:06
Well, craftswomen. Both the house and the chandeliers are BRAVO.
June 12, 2015 — 11:53
Thank you very much Elena Ivanovna! Out of boredom of all trades, it was I who limited my access to the computer; there was more time
June 14, 2015 — 20:12
Oh, how I envy in a good way, when my daughters help, do something in the house, but for now, like a little forest troll, we just destroy everything. The whole chandelier is really oriental style, I can’t wait to see it in the interior... By the way, I have the same ribbon, only silver, I also tried to make small light bulbs for the windows, but no matter how I twist them, they all seem rude, but on a large one looks very good in a flashlight, considering that the baby did this at all
June 15, 2015 — 16:19
Thank you very much Inga for your sincere and warm comment!
The baby runs in front of the locomotive, I slow down a little, it’s like I’m not on vacation yet, we’re ahead of the construction schedule, but she can’t wait. And sometimes I come home from work and a corpse, puffing, playing next to me and asking when we’ll continue
Paper butterfly chandeliers
The most popular paper chandelier is the butterfly chandelier. And such love for this product is not just:
- firstly, it looks very chic and expensive.
- And secondly, the production is very simple, even a child can be involved.
Such an elegant lamp will go well with any interior style, and it is also appropriate in the living room or dining room and even in a children's room.
Manufacturing technique:
- The basis is an old chandelier or its frame. If this is not the case, then you can take a regular metal or wooden rim. If there is no such thing, take a thick wire and make 2-3 coils of yourself, so that you get a circle.
- Cut out butterflies according to the template (butterfly template below)
- We take a nylon thread or fishing line and attach butterflies to it. There can be two types of fastenings: either we pierce the butterflies or we put them on silicone glue. Whichever is more convenient for someone.
Butterfly pattern
To make a chandelier with butterflies, just take a template and scale it to your size. It looks very nice if you make butterflies of several sizes, for example 3-4 diameters. Using a pencil, draw the sketch on paper and cut it out.
- It is best to cut with a stationery knife
or straight nail scissors without curves. - It is better to use paper that is thicker and that does not attract dust , for example, a velvet structure. Since you will have to vacuum such a chandelier often
It is also a very beautiful option if you make a ball out of wire, take an old pendant from a chandelier as a basis and place several butterflies using a glue gun.
How to make a chandelier for a dollhouse?
Many parents make doll houses for their children, consisting of several floors and equipped with a decorative lighting system. Making an LED chandelier for a dollhouse with your own hands does not require the master to have knowledge of electronics. To complete the work, you will need basic skills in working with a soldering iron; assembling the structure takes from 30 minutes to 2 hours.
Required materials and tools
To make lighting in a dollhouse, you need to prepare:
- plastic box for installing batteries;
- a set of LEDs or a small socket with an incandescent lamp;
- connecting cables with copper core;
- insulating tape or protective tubes;
- small-sized operating mode switch;
- batteries (type and quantity depend on load power and storage box configuration).
To make the structure, you will need a household soldering iron with a power of 25-40 W or a soldering station with a tip temperature regulator. You will need flux for processing copper surfaces to be joined (rosin or a special liquid solution) and lead-tin solder. It is recommended to prepare scissors or a utility knife, which are used for cutting wiring and insulating materials. No protective devices are required; during installation, tweezers may be needed to hold the parts to be connected.
Selecting a lamp and socket
When selecting lamps, it is necessary to take into account the dimensions of the dollhouse and lamp. Common incandescent elements from pocket flashlights with a threaded metal base of the E10 standard are not suitable for use in a homemade design. It is recommended to use incandescent lamps with a base with a diameter of 5 mm, which have reduced size and heat dissipation.
To further reduce energy consumption, LEDs are used, which are installed in a socket or soldered directly to electrical wiring. The cartridge is selected simultaneously with the light source. The design of the unit contains 2 contacts separated by a dielectric spacer. The cartridge is attached to the house material using glue.
Battery selection
Alkaline batteries or rechargeable batteries (nickel-cadmium or nickel-metal hydride) are used to supply power to the backlight system. When selecting batteries, you should take into account the number and type of connection of the backlight lamps. The standard voltage of chemical disposable current sources is 1.5 V; for battery cells, the voltage value is reduced to 1.2 V. To power 1 light bulb rated at 3 V, it is necessary to connect 2 batteries into a common bank in a series circuit.
The batteries are installed in the distribution box, taking into account the polarity and switching diagram. If the backlight design requires the use of a voltage of 9 V, then the use of an alkaline element of the “Crown” type is allowed. The battery is equipped with a metal case; a plug with spring contacts is used for connection to external consumers.
For rechargeable batteries, it is necessary to provide for the possibility of removing the elements for charging. The procedure for restoring capacity depends on the type of elements. Cadmium-based products require complete discharge to maintain the original capacity. Lithium metal hydride batteries can be charged at any time, the devices do not have a negative memory effect. To restore capacity, original chargers must be used.
System assembly
The lighting system is installed on a finished and painted dollhouse. To install parts, glue or holes drilled in the walls are used. It is recommended to use an adhesive composition with a thermal drying method; the use of liquid nails or quick-drying sealants is allowed. A small-sized lamp can be equipped with a decorative lampshade made of paper and fabric. Decorative elements are glued to the surface of the cartridge using cyanoacrylate glue.
Postings
Before switching the wiring, you need to think about the direction of laying the line, which should not sag and spoil the appearance of the dollhouse. There are 2 cords leaving the power supply, one of which is led out to the side surface of the lamp base or the contact pad of the LED strip. The end of the wire is stripped and covered with a layer of solder, then the conductor is soldered to the base. The second wire approaches the central contact or the second terminal of the LED strip; the soldering points are covered with an insulator.
If the backlight design uses several incandescent lamps connected in parallel, then light sources with the same rating should be used. If one of the lamps has a higher filament resistance, then it will burn brighter than neighboring lamps. You can develop a separate lighting system for tiers or rooms of a dollhouse. Connecting cables are routed to individual luminaires through a control panel that contains several switches.
Microswitch
The switch, which has 2 operating positions, is installed in the gap of any wire connecting the power supply to the light source. Explanatory inscriptions are placed on the toggle switch body to help determine the purpose of the contacts. If there is no information on the casing, then it is necessary to find the contact pads experimentally. To test, you need to connect the power cable to one plug, and then connect the secondary wire in series to the remaining contacts (at different positions of the switch lever).
Once you have located the required contact pins, you need to secure the power cables to them. The basic technique is based on winding a copper core around the contact body or threading a wire through a hole in a metal plate. This switching method does not require the use of soldering equipment, but does not provide a reliable connection of conductors.
To ensure strength, the joint is treated with flux, and the contacting conductors are fixed with solder. It is recommended to cover the connection point with an insulator to prevent short-circuiting.
Location and mounting
Places for the location of the lamp, switch and power source are worked out in advance. The box with batteries is located on the back wall of the house or installed separately (if the structure is made of paper that is not capable of supporting the weight of the power supply). It is not recommended to place the unit at a large distance, since elongated power cables contribute to a voltage drop and a decrease in the brightness of the lamps. In houses made of plywood, the battery pack is placed in a separate “attic” compartment equipped with a removable lid.
The box is attached to the plywood base using 2-sided adhesive tape or a plastic clamp that is threaded through the drilled holes. The switch must be placed on a solid base, since when you press the toggle switch or button with your hand, force is applied to the product. The method of fixation depends on the design of the switch; the basic method involves installing the housing into the hole, then screwing a clamping nut on top.
The chandelier is attached to the surface of the ceiling or wall with glue; it is possible to use a transition pedestal in which a hole is drilled in the shape of the socket. LED strips are glued to a plywood or cardboard base using adhesive tape. Individual LEDs are mounted in holes whose diameter is slightly smaller than the size of the housing (to ensure fixation of light sources).
Required materials and tools
To make lighting in a dollhouse, you need to prepare:
- plastic box for installing batteries;
- a set of LEDs or a small socket with an incandescent lamp;
- connecting cables with copper core;
- insulating tape or protective tubes;
- small-sized operating mode switch;
- batteries (type and quantity depend on load power and storage box configuration).
To make the structure, you will need a household soldering iron with a power of 25-40 W or a soldering station with a tip temperature regulator. You will need flux for processing copper surfaces to be joined (rosin or a special liquid solution) and lead-tin solder. It is recommended to prepare scissors or a utility knife, which are used for cutting wiring and insulating materials. No protective devices are required; during installation, tweezers may be needed to hold the parts to be connected.
Our doll house + looking for ideas for a chandelier
Well, some little things - I changed the bathtub by making a frame for it, made a sink in the same place, gutted the Legos for little things for the house, and glued together 4 books, one of which was ordered by my youngest “with a duckling.” Now I’m thinking about what kind of chandeliers to make. My husband made LEDs for the ceiling, and now the house also works as a night light in the nursery, but we need to use them somehow.
In general, this is what we got.
The kitchen stands out because it is played most often, and it is easier for me to give away the kitchen than the whole house (which usually sits on a cabinet in the nursery). If you leave the house in the public domain, then you will have to look for all the small things throughout the apartment))
Dresses for dolls have scattered around the apartment, and you most likely need to look for them in a drawer with clothes for large dolls
This balcony is already version No. 2. The first balcony, more solid and durable, was torn out “with meat” by the youngest daughter a year ago. Let's see if this one lasts, she's older now.
And also. Looking at the walls, I already want to make my next house out of plywood. Well, if I decide to do this again
Model 3
A plastic bottle can become a furniture frame. Having cut out the blank, it is sheathed with fabric. For stability, the inside is filled with something heavy. To ensure that the furniture matches the idea of a chair, prepare a cushion and a soft seat. You can make a small chair from a 0.5 liter bottle or take a larger container, then it will be something like a throne.
If you want to make a doll rocking chair, we offer you a diagram of an interesting design for study. Experience with a jigsaw will be required; reliable and durable furniture is made of plywood.
Foamiran night light
Foam is a very attractive material. Even when you pick it up for the first time, it is very difficult to spoil the craft or do something wrong. This polymer makes wonderful full-sized flowers (in the evenings they serve as floor lamps). Wall flowers or dolls with fluffy dresses can also hide light bulbs in the core.
A night light flower can be made on the basis of a ready-made lighting fixture with a small round shade of transparent or white matte color.
You will need:
- 40 squares of foamiran with a side of 10-12 cm;
- Glue gun;
- Scissors.
Each square is folded 4 times. Four petals are cut out of it, united by a common center. The blanks are folded in pairs and glued to the lampshade. It is important to boldly move the petals away and glue the blanks as tightly as possible to each other. So the night light will turn into a lush hydrangea flower.
Doll in a fluffy dress
Using a similar principle to the flower, you can make a beautiful battery-powered night light. For it, in addition to the factory device, you will need a Barbie or Winx doll. You can take “veterans” who have served their time without legs and give them a second life.
The sequence of actions is as follows.
- Remove with wire cutters or unscrew the doll's legs.
- Make a hole for a screw in the center of the lampshade and in the bottom of the doll, connect them.
- Turn the lampshade into a beauty's skirt by gluing foamiran petals onto it in a cascade.
- You can make them as described above. Or cut out single blanks of any shape. The main rule: stick close to each other and in layers.
- If desired, decorate the bodice of the dress with foamiran, make decorations in the doll's hair or a small bouquet for her hands.
This night light is good for its independence. The electric cord does not spoil the appearance of the young lady, as can be seen in the photo of a night light made by yourself.
In addition, it is convenient to move it from place to place. Girls really like to take such a night light to their “houses” or “tents”. And in the evening the doll takes its rightful place on the bedside table.
Garland night light
Lighting stores sell ready-made night lights, which are a garland rolled up inside a transparent bulb with a stand. Why not make such a night light with LEDs yourself?
You will need:
- LED garland with small light bulbs (without shades);
- A jar made of transparent or frosted glass;
- Acrylic paint.
The idea is extremely simple. The garland, folded in a random order, is placed in a jar. A hole is made on the side for the cord. The jar is twisted. If the lid has a pattern (for example, from canned vegetables), it must first be painted with acrylic paint of a suitable color.
Place this night light with the lid down, it turns into a stand.
Night light from a tin can
Any tall tin can is suitable for this model. In addition to this, the work requires:
- Hammer and nail (or several nails of different diameters);
- Wire;
- Marker;
- Cup;
- Thick paraffin candle.
First, you need to draw an image of your choice on the jar with a marker.
- The drawing should be schematic and easily recognizable.
- You can immediately draw with dots or break solid lines into dots at the next stage.
- The finished design is knocked out using a hammer and nails.
- The intensity of the transmitted light directly depends on the number and diameter of the holes.
- When the image is framed, all that remains is to make a handle from wire.
- With its help, the night light can be hung or carried from place to place, like a lantern.
- A glass with a candle is placed inside the jar. Instead, you can use one or more battery-powered LEDs.
The night light is ideal not only for the home, but also for summer cottages and outdoor trips.