Bed with canopy
A more thoughtful design that is suitable for small summer cottages. Specially designed for a relaxing holiday in nature: reading, sunbathing, watching movies in a homemade outdoor cinema. The timber supports are secured either by casting special concrete pillars or on a rectangular wooden base.
The bed can be made from pallets, and all wooden elements must be coated with moisture-proof compounds.
Universal canopy extension
The structure is made of wood, has several supports and is adjacent to the facade of the house. One side of the structure is completely closed, while the other three are open. To ensure that the extension visually forms a single whole with the building, use the same material to create the roof as for the roof.
You can park your car under the canopy, lay woodpile, or set up a recreation area.
Construction tips
Any construction includes a whole range of works. This includes the purchase of materials, the selection and preparation of a site for installation, the engineering calculation of a canopy made from a profile pipe, and of course the assembly process itself.
Gable roof.
Preparatory activities
If you have several options for placing a canopy, you should first decide on the location. It is better to place such structures on a hill or on a relatively flat surface, where it is easy to arrange drainage. Water will collect in the lowlands, hence the additional costs for storm drainage.
A preliminary drawing of a canopy made from a profile pipe must be made
In addition to the location of the structures themselves, it is important to take into account the cross-section of the pipes. So, in the case when the length of the building does not exceed 4 - 6 m, and the width fluctuates around 3 - 4 m, for racks it is enough to take a pipe with a cross section of 60x60 mm
For a larger quadrature, a section of 80x80 mm is used.
The simplest drawing of a canopy made from a profile pipe.
The top frame, on which the trusses for the six-meter canopy will be based, is made from a 40x25 profile. The pipe for arches and cross trusses is selected depending on the amount of precipitation in the area. For courtyard structures with a small square footage, as a rule, products with a cross section of 30x30 mm are sufficient.
The material from which it is planned to construct the roof plays a big role here. For curved arched roofs, it is currently advisable to use lightweight, translucent cellular polycarbonate. It is better to make a straight single or gable canopy in the barbecue area from a fireproof metal roofing sheet or cover it with slate. Naturally, the heavier the material, the thicker the structures should be.
Roller pipe bender.
Canopy installation
Any work of this kind begins with marking and installing support columns. It is recommended to install supporting metal columns for light structures in the yard or at the dacha in increments of about 2 m. If the spans are larger, then the cross-section of the pipes will need to be increased, and the price will naturally increase.
Demountable connection.
Holes for installation are conveniently and quickly made using a garden drill with a diameter of 300 mm; a depth of 60 cm is sufficient. When all the holes are ready, the bottom of them must be compacted well, otherwise the column may shrink.
Before installation, a gravel or sand base 50 mm thick is filled and compacted at the bottom, after which the column can be installed and filled with concrete. All columns are mounted strictly level or using a plumb line. It is better to carry out such work with an assistant, since there is a high probability of making mistakes alone, and when the concrete sets, it will no longer be possible to correct it.
Straight trusses from profile pipes.
Concrete is poured to the level of the beginning of the pit for the construction of the screed. The floors under the canopy, depending on the financial capabilities and purpose of the structure, are laid with paving slabs or a concrete screed is made.
In both cases, you will need to make a small pit. To do this, the soil is selected to a depth of 100–150 mm, after which the surface is leveled and compacted. If paving slabs are being laid, it is recommended to cover the surface with geotextiles to prevent grass from breaking through.
To arrange the sole, you can use sand or gravel. The filling is done to a level of 50 mm and is also compacted. This layer is necessary to ensure normal drainage.
Next, the reinforcement frame is laid and a layer of concrete 50 mm thick is poured. This screed can withstand loads of up to 3 tons.
Covered parking on 4 pillars.
On top of the columns, a strap is made around the perimeter of the canopy. The transverse trusses for the sloping roof will be based on this horizontal frame. For a straight single or gable roof, trusses are installed in increments of 800 mm. The installation pitch for a curved roof varies depending on the width of the polycarbonate sheets, but, as a rule, it is about 500 mm.
The video in this article shows some of the intricacies of installation.
Polycarbonate canopy for dining room
The free-standing timber structure with a pitched roof is a simple but elegant addition to the garden area. All guests who come to an outdoor party can easily be accommodated here. The roof is made of transparent polycarbonate: it allows light to pass through, but protects from direct sunlight.
Also suitable for protecting personal vehicles from precipitation, prolonged exposure to the sun and falling leaves.
Dimensions and drawings
Option drawing of a canopy made from a profile pipe
First of all, you need to create a sketch. For example, let’s take a canopy whose roof will be made of polycarbonate. The sketch must show the appearance of the future structure and its approximate dimensions. Then you need to take all measurements at the site where the structure will be installed and create a detailed drawing. The canopy can be built either free-standing or attached to the house.
For example, you have a house 9x6 meters, and in front of it there is a free space of 9x7 meters. In this case, the width of the canopy can be equal to the width of the house wall, i.e. 9 meters. The reach can be made, for example, 6 meters. Thus, a canopy measuring 9x6 meters is obtained.
It is optimal to make a low paradise 240 centimeters high, a high one - 350–360 centimeters.
Simple mathematics calculates the angle of inclination. In this case it is equal to 12–13 degrees.
Now that all the measurements have been made, you can create a drawing. Rafter trusses must be shown on a separate drawing.
Roof truss options
After all the preparatory paper work has been done, you can calculate the required amount of building materials. Always purchase them with a margin of at least 5 percent. This is necessary in case you come across defective products or damage something during the process.
Sandbox canopy
Children playing outside need protection from the midday sun. If you have a wooden sandbox at your dacha, building a canopy will not be difficult: you will need four support beams, four crossbars, self-tapping screws and durable fabric to create a roof.
The sandbox can be protected from rays not only from above, but also from any side by hanging additional drapery on the crossbar.
Temporary canopy tent
Another option for a simple design, for the manufacture of which you will need wooden slats (4 pieces), one crossbar and fabric. It is necessary to drill holes in the bars and insert the crossbar into them. The edges of the fabric should be stitched and sewn onto each corner with an elastic band about 10 cm long, folded in half.
The folding house is very convenient: it can be removed during bad weather and taken outside on a hot day.
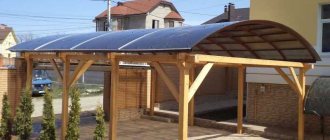
From metal profile
This canopy is a continuation of the roof and acts not only as a kind of porch, but also as protection for the car from atmospheric influences. The supports are made of steel, the roof is made of profiled sheets. The extension is architecturally simple, but reliable. The inclined plane of the roof does not allow water or large amounts of snow to accumulate.
Unlike polycarbonate, corrugated sheeting does not allow sunlight to pass through, therefore creating a completely shaded area.
Design Features
A canopy is a small architectural form, part of a covered area that has a functional or decorative purpose. The main function of this structure is to protect the site from precipitation and sun.
Metal profiles compare favorably with other materials in their resistance to biological, chemical, and mechanical influences. Corrugated pipes with a square or rectangular cross-section are easy to design and install. They are equally well suited for installing a small canopy for a porch and creating a spacious covered area.
The canopy consists of:
- foundation;
- supports or suspensions - vertical and inclined load-bearing elements of the frame;
- lateral connecting elements - slopes and trusses;
- rafter system, consisting of rafter legs, trusses, sheathing;
- roofs.
In the case of erecting a canopy over a small area, for example, a porch or a sandbox, you can do without trusses - the structure will fully withstand snow and wind, since it will not have long horizontal sections.
If you plan to install a canopy over a parking space or a swimming pool, the horizontal ceilings and rafter legs will be longer. Such extended elements are vulnerable to load. To distribute it and give rigidity to the structure, in these areas they use not individual pipes, but trusses (reinforced structural parts consisting of two pipes and vertical and inclined elements connecting them - racks and braces).
The foundation for a canopy is most often made columnar, since its equipment does not require large excavations. The roof is made of polycarbonate, corrugated sheets, ondulin and other sheet materials.
Wooden sheds for firewood
Such protective structures can be either free-standing or adjacent to a fence or house. The roof of the shed must protect the firewood from moisture, so it is built with a single or gable roof.
The walls of the woodshed must be ventilated so that the fuel remains dry, so the lattice structure, which is often used to decorate the shed, plays not only a decorative, but also a practical role.
Preliminary work before construction
- We think over the canopy diagram, draw a drawing.
- We choose a place for the extension, clean and level it, and make markings for supports.
- To protect wood from mold and rot, we treat wood parts with an antiseptic. With a ready-made composition or, for example, we paint it with a primer and then with paint.
- Let's prepare supports for the structure. We take 5 blocks of wood (90x90 mm). Since the roof is planned to be sloping, the bars intended for the front supports should be 40-50 cm less than the height that is measured on the wall of the house. We prepare the rafters and blanks for the sheathing.
- We fix the vertical distance on the building with a horizontal block (2.4 meters).
PVC pipe canopy
Plastic pipes are so convenient to use that craftsmen constantly find different uses for them. The material is also suitable for making a canopy: it is only important to secure the finished frame to the ground. For the roof and ceiling, ordinary tulle curtains with ready-made fastenings are suitable: they can be easily threaded through the pipes.
The structure will not protect from rain, but will provide pleasant coolness on a hot day. White transparent fabric looks picturesque and will decorate any summer cottage.
With retractable roof
Such purchased canopies are quite expensive, but if desired, you can make a folding fabric structure with your own hands. It can be opened to let in the sun and closed when shade is needed. You will need polypropylene pipes with plugs, a metal cable, fabric and screws with ears.
The awning is mounted on wooden supports and a crossbar in the form of a board. Choose fabric with water-repellent impregnation so as not to remove the canopy during rainfall.
A self-created canopy will not only be protection from the sun, but also a source of pride for the dacha owner.
Making a clothes dryer outdoors with your own hands
An outdoor clothes dryer is relevant for almost all categories of users. In a country cottage, it is used to give linen natural, rather than chemical, freshness. Property owners in apartment buildings use this method to solve the problem of small bathrooms in Khrushchev and Brezhnev buildings, and the lack of a balcony in the apartment.
For do-it-yourself construction, stationary type structures are optimal - a traverse on one post or a crossbar between two jays. They are installed at a distance of 2 - 3 m from each other, a cord is stretched between them in several rows. Less often, a home master uses original circuits.
Household goods stores for outdoor use offer a rather meager assortment of dryers. These are, first of all, a folding “umbrella” with 50 m of cord, a wall-mounted “spider” of a similar design, folding “trests”, stepladders, transformable tables.