The design and principle of operation of a homemade snow scooter
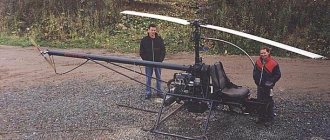
A snowmobile consists of several elements:
- steering wheel;
- back;
- brake lever;
- seat;
- reflector;
- splash guard;
- roller with caterpillar;
- ski;
- shock absorber and leaf spring;
- lighting element;
- cabin;
- windshield;
- air intake.
The operating principle of the device is as follows. A power unit mounted at the rear or under the operator's seat (the engine from a chainsaw, trimmer, or other device) causes one or a pair of wheels to rotate.
They push the structure forward, and it glides over the snow thanks to a pair of skis, which reduces friction and evenly distributes the load on the snow mass. The operator sits on the seat and selects the direction of movement using the steering wheel, which also ends with a single ski.
The basis of a snow scooter with a motor is a power plant - an engine from a trimmer
How to make a snow scooter with a chainsaw engine with your own hands
To make a children's gas snowmobile with your own hands, you can take the motor from a chainsaw. For example, common options:
- “Friendship” is simple, the device will be without unnecessary details. At the same time, the weight is 12 kg, and the power is small - 1 kW. Another disadvantage is that there are no safety covers, which is especially important for children.
- “Ural” - weight is approximately the same (almost 12 kg), while the power is much greater - 3.6 kW. The engine is two-stroke and works even in cold weather.
- "Shtil" is a saw of medium power, but it does not work so noisily. It does not produce strong emissions, which is also important for children.
Required materials and tools
To make a snow scooter with a motor with your own hands, you will need ready-made structures and installations: a gasoline engine, steering wheel, windshield, seat, chassis, shock absorbers. You can take a ready-made backrest for a snow scooter or make it yourself.
For work you need to prepare the following materials and tools:
- Welding machine with electrodes.
- Duralumin pipe D16.
- Bearings: 2 pcs. 16 mm each, 1 pc. – 10 mm.
- Plugs for plastic pipes – 2 pcs.
- Star element.
- Tracks 5 cm.
- Plywood, plastic or fiberglass (sheathing).
- Steel shafts.
- Pipe for frame with a diameter of 25 mm.
- Aluminum profile (letter “P”).
- Profile steel pipe with a cross section of 20*20 mm.
- Fastening elements (nuts, bolts).
Drawings and assembly diagram of a snow scooter
The easiest option is to take a ready-made children's snow scooter and mount the motor yourself. If you wish and have the necessary elements, you can assemble the structure yourself by taking the engine, steering wheel, making the chassis and other parts. You can take a ready-made drawing as a basis.
When assembling products with your own hands, you must follow safety regulations.
Step-by-step instructions for assembling a snow scooter with a motor consists of the following steps:
- First you need to make a frame. Using spot welding, a steel sheet 2 mm thick is connected in the middle of the entire structure. The chain drive shaft will be mounted here, as well as the gearbox.
- A seat is located in the middle of the frame. You can do this yourself - then you can save money on assembling a snow scooter with a motor yourself.
- The support base is fastened with a beam to the front axle crossbars. A water pipe with a diameter of 15 mm or more can be used as a connecting element. Bushings for the steering wheel are welded at the ends, and a stand is mounted in the middle.
- The next stage of assembling a snow scooter with a motor with your own hands is the stand. For installation, use steel corners with sides of 30*30 mm. They are connected by steel crossbars - 2 mm gussets are suitable for this. The motor will be mounted on this rack.
- The caterpillar is taken ready-made, for example, from the Buran snowmobile. The workpiece needs to be shortened by 50 cm. The caterpillar is secured with transport tape. And the gears are made from cardboard sheets 15 mm thick.
- The drive shaft is made of 14 mm thick pipe. The gears are fixed with the upper flange, and trunnions (tips) are welded behind the drive shaft.
- Now you need to attach the scooter motor. You can also do this with your own hands at home. To do this, take a working unit, weld it and mount it to the rear.
- To make sprockets, you need to take two tips, and the right one should be longer than the left one (to make a keyway that will fix the chain drive sprocket). The sprocket is secured with a pre-threaded nut.
- You can also make the snow scooter's steering wheel yourself. To do this, take a ready-made device from a bicycle or scooter. For proper installation, it is necessary to place it on the central axis so that the traction force controls the skis well.
- At the last stage, you can install a windshield, as well as headlights for illumination at night. It is not necessary to install the brakes yourself for a children's snow scooter with an electric motor or a gasoline engine, since the vehicle does not gain high speed. If necessary, you can always brake with your foot or release the gas.
Diagrams and step-by-step instructions for assembling a snowmobile from a saw with your own hands
The figure presented above depicts an example diagram of what a drawing of a future snowmobile should look like. It is important to work out everything so that you know and visually understand how to attach the engine, transmission, skis or tracks together.
Assembly instructions
This drawing suggests using the following components:
- steering wheel;
- fuel tank, which can be taken from the Druzhba chainsaw;
- “Ural” engine;
- steering ski post bushing, represented by two pipes, diameter 30;
- two main, steering skis;
- caterpillar wheel made of two S4 nylon sheets;
- the caterpillar itself, taken from the Buran snowmobile;
- frame;
- support roller;
- backrest brace;
- two devices that provide track tension;
- four bearings No. 80204;
- plywood box providing side boards;
- sitting;
- two stages of chain drives with driven and driving sprockets;
- steering knuckle lever;
- two tie rods and a steering shaft;
- front axle in the form of a pipe, diameter 30;
- drive shaft and tension axle for the track.
Thanks to all these components, you can assemble a high-quality, reliable and durable snowmobile simply with your own hands, without resorting to expensive specialists. If you also want to design tracks and racks with your own hands, we suggest that you familiarize yourself with the diagrams:
racks:
drive shaft:
You can watch the procedure, step-by-step instructions and additional tips in the video on how to assemble a snowmobile from a chainsaw with your own hands.
How to make a snow scooter with a trimmer engine
The engine from a trimmer (lawn mower) can be used as the basis for the power plant. You can also make an electric snow scooter with your own hands, which does not produce harmful emissions and operates with less noise. But if you use a trimmer, it is easier to design the installation. The battery takes up more space and has a noticeable weight. Thus, a trimmer for assembling a snow scooter with a motor with your own hands has several advantages:
- ready-made and inexpensive engine;
- small weight;
- ease of assembly;
- sufficient power at low gasoline costs;
- affordable price.
Required materials and tools
You can take a ready-made snow scooter as a basis, to which you just need to attach the motor (trimmer) with your own hands. To do this you will need the following products, materials and tools:
- children's snowmobile;
- trimmer (you can take the Partner t281 model);
- ripper attachment equipped with a gearbox;
- chain;
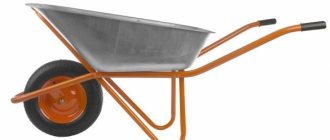
- a pair of wheels (can be taken from a garden wheelbarrow);
- leg (can be taken from an office chair);
- bicycle handlebar;
- welding machine;
- fasteners and other materials described above.
Step-by-step assembly instructions
The sequence of actions when assembling a snow scooter with a motor with your own hands is as follows:
- First you need to disassemble the ripper attachment.
- Tighten the fastening on the wheel disks - the result is a gearbox with a wheelset.
- Next, put on chains to prevent the wheels from slipping.
- At the next stage of assembling a snow scooter with a motor, shorten the drive cable and trimmer rod with your own hands.
- They make a mount for the gearbox from the leg of an office chair.
- The skis are reinforced with aluminum corners.
- Mounting a bicycle handlebar.
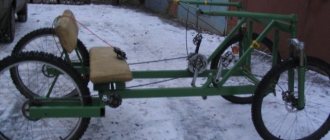
A child's vehicle can be easily transported even in a small car trunk
A successful workhorse with a small wide wheel
It was decided to install a wheel with a smaller diameter, and weld a crown with an even larger number of teeth to the sprocket in order to increase torque.
We put on the chain. Install tension rollers. One for stabilization, 2 for tension.
The shock absorber will now stand differently. OK it's all over Now! The snowmobile is ready. Let's see what he's capable of.
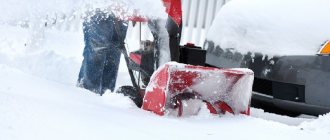
Testing a cool snowmobile in field conditions - snow and ice!
Despite the fact that the wheel is not studded, the snowmobile accelerates well on loose snow. The snowmobile turned out to be light and compact. Weighs no more than 30 kg. It is convenient to load the car.
To measure the speed during the test on ice, we tied a camera and launched a GPS speedometer on a smartphone.
Ice gave speed
Nobody expected the scooter to go so fast. This is really dangerous! Although the snowmobile was sure to gain even greater speed. The feeling of riding it is incomparable! You just have to try it. At the end of the test, the steering wheel of this exotic vehicle came off.
Tools and materials
The variety of materials and components for creating a snowmobile is small. Many people use waste materials. However, the most demanding riders will prefer products where the main components are manufactured at the factory. The segment of “stick insects”, which are collected using plywood and water pipes, is also somewhat popular.
Lightening snowmobiles is achieved through the use of large drive sprockets.
It is often recommended to use:
tracks 5 cm long;
frame pipe with a diameter of 25 mm;
aluminum, plywood, plastic or fiberglass for sheathing;
shafts made of high-quality steel (no worse than grade 45).
The suspension and other parts are chosen taking into account the capabilities of the engine. The total mass of the product must also correspond to it. Of the main components it is worth mentioning:
Since the main parts of snowmobiles are made of metal, you will have to use a welding machine and electrodes. You will also need an angle grinder, files, and a pipe bender. Detachable connections are made using screwdrivers and wrenches. It is also necessary to provide a tool for working with hinges. Other devices are used much less frequently.
Manufacturing
To assemble a homemade snowmobile from a snow scooter, you can also use parts of a cordless screwdriver. The complete set of parts in this case, in addition to the snow scooter and screwdriver, also includes:
- bicycle chain and sprockets;
- the steering wheel, cable and brake handle are also for bicycles;
- suitable nuts and bolts;
- pipe made of duralumin grade D16;
- two bearings with a diameter of 16 mm and one - 10 mm;
- a pair of plugs for plastic pipes;
- aluminum profile in the shape of the letter “P”;
- steel profile pipe 20x20 mm.
The first step to making a snowmobile out of a child's or adult's snowmobile is to replace the standard plastic steering wheel with a bicycle steering wheel. A trolley frame is welded on the basis of a profile pipe. After this, the shaft and drive wheel are grasped.
For their manufacture, plastic plugs and metal scraps are used. A bicycle sprocket is bolted to the wheel on one side.
On the reverse side you will need to weld a wide washer onto the shaft. After drilling the holes, attach the wheel to it (with the same bolts). The bearings are fastened along their outer diameter using pieces of pipe. A screwdriver connected to a small star is attached to the bottom of the trolley frame. The space between the sprockets is used to tension the bicycle chain.
Will a snowmobile run with a bicycle wheel?
Chainsaw 90 cubic meters, almost 6 horsepower. We took a cool sled with a steering wheel and a turning track, stuffed a bicycle wheel with self-tapping screws for better grip, and attached a large sprocket to transmit the torque of the saw through the moped chain. Now let's cut off the skis to boil them and make a sled. We want to put the engine under the seat for better weight distribution.
We decided to install a bicycle handlebar, as the existing one was too small. We boiled the sleds and attached hinges to them so that the skis could catch the unevenness of the road. Everything is on silent blocks, rubberized. Everything is on the original mountings. Due to the fact that a shock absorber will be installed at the rear, it will be attached to the frame, while lifting and pressing the front ski.
Products for inventors Link to the store.
Trying on a chainsaw motor. There will be a piece of pipe and protection on the axle to prevent snow from flying onto the motor. A mini tank is available. The most important part is the stabilizer.
Now all that remains is to collect it all. The beast saw! Previously, they did it conscientiously. We fix the star with the best step.
On the first test it turned out that there was no traction. The snowmobile with a bicycle wheel barely moves, and the saw does not gain momentum.
DIY electronics in a Chinese store.