Motor selection and connection
It all depends on the power of the unit. Belt-driven motors are best so that the speed is transmitted directly to the saw. If you plan to install a 35 cm disk on a circular machine, then 1 kW of energy will be required to start it. The saw, whose diameter is 17 cm, operates from 500 W. This means that motors from old Sibir or Oka washing machines are quite suitable. All that remains is to adjust the engine speed, because unstable rotation will cause the saw to “tear” the wood.
The tachometer, which controls the control module, is responsible for the number of engine revolutions in the washing machine. But since the module will not connect to the circular circuit, it is recommended to install a voltage regulator.
Connecting the electric motor is considered an important working step, and if everything is not done correctly, then you can’t expect normal operation from the circular saw.
How to make a circular saw with your own hands from a washing machine engine?
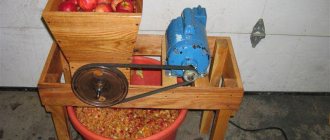
A circular saw is always useful on the farm: at the dacha or in a private house. But not everyone can afford a good expensive tool, and a cheap analogue quickly breaks down. The way out of the situation is to make a circular saw with your own hands. For example, you can make it from an engine from an old automatic washing machine, which is a shame to throw away and takes up space. This homemade tool can handle boards up to 5 centimeters thick. The advantage of this design is its weight, which is about 20 kilograms. The saw turns out to be mobile and you can take it with you in your car.
Moving parts
Having finished connecting the engine and making sure that it normally increases and decreases speed, you can proceed directly to the circular device.
Let's figure out which moving units that bear the main load we will need:
- saw shaft;
- SMA motor shaft;
- drive belt;
- two pulleys - from the washing machine and the circular shaft.
The drive must operate in this manner. The engine transmits rotation to a shaft on which a small pulley is pressed. The last one is wearing a belt that sends revolutions to the second pulley. At first glance, everything seems simple, but when the circular is being installed, many difficulties arise that must be resolved.
The small pulley must be sharpened. Three to four transverse grooves are placed on it so that the belt has the opportunity for a good hook.
You don’t have to use the belt from an old washing machine; just take an analogue from another unit. The main thing is that it is durable and has teeth.
A disc of a slightly larger diameter is welded to the edge of the large pulley to create a protrusion that prevents the belt from slipping during operation. It is not necessary to sharpen the serrations on this pulley; the clutch with the belt will be quite sufficient.
The shaft holding the circular saw, fastenings in the form of a washer and a nut must be reliable so that at maximum speed the saw does not become deformed and does not jump off, injuring workers. It is recommended to use the shaft and fasteners from a factory-made circular saw.
The procedure for constructing a circular saw is described for a saw with a three-hundredth blade. Many will say that the SMA engine will not pull such a saw and will stop. But here you should remember a few rules:
- you need to be able to operate a circular saw correctly;
- household saw, designed to work with small volumes of materials;
- the successful operation of such a saw is confirmed by numerous reviews.
Simply put, the saw should not be overloaded, and it is better not to work at idle speed .
Circular saw from an engine from an automatic washing machine
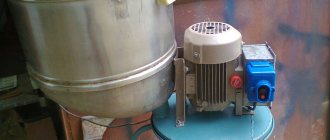
The author used a 430-watt motor from an automatic washing machine as a power unit. The selected engine produces as much as 15,000 revolutions per minute, at such speeds the saw has monstrous performance, but this is unsafe and unnecessary, so in the future the author plans to reduce the speed by installing a resistor or something similar. The machine is assembled simply and quickly, the author had a table already ready, he used an antique foot-operated sewing machine. So, let's look in more detail at how to assemble such a machine!
Materials and tools used by the author:
List of materials:
— motor from a washing machine; - metal table (from an old sewing machine); — corners, channels, etc. (for making a frame for the engine); - switch and wiring; — a circular saw blade (the author has it attached to a bolt); — drill chuck (installed on the motor shaft); — nuts, bolts; - plywood.
List of tools:
- Bulgarian; - welding machine; - drill; - wrenches, etc.
Manufacturing process of a circular saw:
Step one. Preparing the basis
As a basis, the author used a metal table, which in ancient times was part of a foot-operated sewing machine. You can assemble such a table from scratch using a corner, pipes or something similar. We weld two corners or channels to which we will then screw the engine.
Step three. Final revision
To finish, we will screw protective plywood plates over the engine to prevent chips from falling on it. We cut out the parts from plywood and fasten them with self-tapping screws. That's all, the machine is ready, let's move on to testing! During testing, it turned out that the speed was too high, causing the table to move around the garage. The power of such an engine turned out to be more than enough. In the future, the author plans to modernize the machine - make the speed lower.
In general, the homemade product turned out to be successful and viable. I hope you liked the project and found useful information for yourself. Don't forget to share your homemade products and experiences with us!
Source
Useful tips
When making a circular machine with your own hands, it is recommended to provide opportunities for its repair and maintenance. Any moving part must have convenient access for lubrication. When starting all installation work, you should prepare detailed drawings and diagrams and perform the appropriate calculations. A homemade circular saw is different in size and can easily fit in a utility room.
How to make a circular from a washing machine motor with your own hands
The electric motor from the SMA should not be lying around idle in the garage. An owner who respects his work will immediately find a use for it. For example, with a small investment you can get an excellent circular saw from a washing machine motor, which can easily cut boards five centimeters thick. Everything you need to make such a machine can be found in your own garage - the necessary tools, components, scrap metal.
The process of assembling a circular saw table
First, adjust the base to the optimal size. The wooden countertop is treated and left to soak in the antiseptic composition for a day. The metal base is sanded along the edges to avoid nicks.
Wood antiseptic is a modern building material that protects wood of any species in structures.
Electric saw
Electric saw table assembly process:
- First, prepare the beams, which are trimmed using a plane. A strong frame is assembled from them. Holes with a diameter of 5 mm should be drilled on each side of the base.
- Holes of the same diameter are also made in the drawers.
- Legs and drawers are installed on the tabletop. To ensure fixation, it is recommended to use clamps. They will help secure the legs while the glue dries. They are additionally fixed with metal corners and tightened with self-tapping screws.
- Fastening the saw with M4 bolts. The process is performed from the reverse side.
- To make a parallel stop, two strips are sawn off from plywood. Their width should be similar to the width of the tabletop. The average size is 10 cm. The corners must be rounded and polished.
The key property of the created table should be convenience.
Important! When installing an electric saw, you need to fix the start button. For this, a wire is suitable, which is threaded through the hole in the handle and twisted in the desired position.
For this purpose, a wire is suitable, which is threaded through the hole in the handle and twisted in the desired position.
Hand saw
For a hand saw you will need a 20mm sheet of plywood. The tabletop blank is made according to the selected size. The markings are made with a pencil, and the cutting is done with an electric jigsaw. Finally, the edge is milled. The workpiece must be sanded with sandpaper.
Care should be taken to ensure its stability. No loosening is allowed, otherwise it will negatively affect safety.
Subsequent assembly technology:
- The header is turned over, and markings are made on the bottom side for a hand saw. You need to attach a saw without a disc to the base and mark the dimensions of the sole.
- Using a hand router, a 10 mm recess is made.
- Next, the saw is tried on and the markings are adjusted.
- Markings are made on the bottom side, which are intended for stiffening ribs. For them, blanks are prepared from boards measuring 50x100 mm. The optimal location is up to 10 cm from the edge of the table.
- The longitudinal stiffening ribs are sawn and attached to the tabletop using wood glue. Clamps are used for fixation. Using a similar principle, side stiffening ribs are attached from beams.
- After the glue has dried, holes are drilled in the stiffeners and tightened with self-tapping screws.
- For table legs, boards measuring 50x100mm are used. The average optimal height is up to 110 cm. The legs are attached to the outside of the stiffeners with strong bolts. To improve stability, you can use ties made of beams measuring 50x50 mm.
The tabletop should have as smooth a surface as possible. This will reduce the likelihood of injury while working.
The hand-held circular saw is installed in the finished groove from the bottom side, the sole is fixed with bolts. A toothed disk is inserted into the slot. By following the technology and completing all the steps, you can make a homemade table at minimal cost to suit your height.
Regularly check the position of the table and its strength. The structure must be stable, without loosening.
Homemade stationary machine
The proposed project for a stationary circular saw assembled with your own hands involves the use of ready-made parts and assemblies. The assembly includes only a few parts that require turning. The model is based on an electric motor from an old washing machine.
bed
Making the frame from a profile pipe was not chosen by chance. The design uses a profile of 20x20 mm and 25x25 mm.
This frame turned out to be strong and stable. The side posts are made identical. They are connected at the bottom with a 25x25 profile, and at the top there is a jumper made of a pipe with a cross-section of 20x20 mm. The resulting frame of the tabletop circular saw is raised above the surface on plastic legs, this increases the stability of the tool. Bolts for mounting the engine are installed on the lower jumpers.
The working shaft fastening unit is made of a nut. The internal thread of the nut is ground off, the diameter corresponds to the external diameter of the shaft bearings. To fix the bearings, a retaining ring will be used, under which a groove is made.
Tabletop
A sheet of metal 2 mm thick will be used as a desktop tabletop in the circular machine. This is quite enough for the workpiece to move freely on the work table.
Holes are made in the metal to accommodate countersunk screws. In addition to metal, you can also use chipboard as a table, or make it from plywood. It is recommended to make the working table of the circular saw so that a stop can be installed on it.
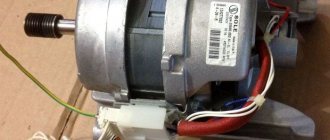
Motor
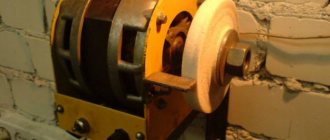
The engine already has a pulley. This is a standard pulley that is used in a washing machine.
Extended engine housing studs will be used as mounting points. The standard studs were replaced with longer ones with M8 threads. The brackets are made of angle 60x60 mm. Holes are drilled at the attachment point to the engine, and a slot is made at the attachment point to the frame to adjust the belt tension.
Rotation transmission
This table saw will use a belt drive. From the engine pulley, rotation will be transmitted to the working shaft using a V-belt. The pulleys on the machine are of the same diameter, so the rotation speed of the working shaft will be the same as that of the engine - 1450 rpm. These are standard pulleys used in a washing machine.
The circular shaft is taken from a grinder. This decision is completely justified. There is no need to be tricky with turning work; there is already a ready-made thread with washers of the required mounting diameter. And you can adjust the diameter of the shaft with your own hands, simply by clamping the shaft in a drill and processing it with a file.
The working shaft with a pulley installed on the frame will look like this.
Assembly
Assembling a circular saw begins with installing the motor on the frame.
After installing the engine, put on the belt.
After tensioning the belt and setting the engine position, it is secured with nuts.
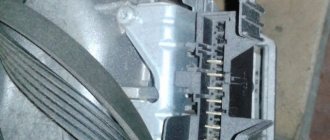
To protect the motor from sawdust, protective screens are installed on the housing.
The circular saw is installed and clamped onto the working shaft.
For ease of switching on, a switch is installed. The last stage is the installation of the circular table.
As a test, various materials were cut: a slab of wood chips, a piece of chipboard, a board 30 mm thick.
As you can see, the result is impressive.
Speed regulation
During the operation of the tool, it becomes necessary to work with materials of different sizes, so you need to be able to adjust the speed up or down. To do this, you can use a dimmer or trigger from a hand-held electrical appliance, because they allow you to regulate the voltage supply and, accordingly, the speed of rotation of the disk. We connect one of the coil terminals to the armature terminal, and connect the second one to power supply from the network. We connect the second armature output through a dimmer in the same way. We check the scheme and launch it.
A more complex way to regulate speed is to use a tachometer. Using it, you can regulate the rotation speed without losing engine power. Attention, you need to connect the tachometer using a microcircuit. It equalizes power when the load on the shaft increases. You can buy the required microcircuit or make it yourself. The TDA 1085 board diagram will help with this. The list of necessary parts is extensive, but with the list at hand, it can be easily assembled in specialized stores.
How to choose a trimmer
An electric sawing tool is selected based on your needs. But the best, of course, would be one with a power of at least 1.5 kW.
Based on the power, you can select a cutting disc. The more powerful the machine, the larger the disk you can install on it. The most common disc is 250 mm in diameter.
Even under favorable operating conditions, discs lose teeth, become dull, and wear out. Therefore, the moment comes when you have to select the disk again. If you bought a saw with discs with a diameter of 250, 260, 300 mm, then there will be no problems buying a new one. Having a different standard may create a problem. Therefore, in the store you need to find out whether there are similar ones for sale.
Read also: Reverse 3-phase motor circuit
An important factor is the number of revolutions of the disk rotation. Even in production, machines from 4000 rpm are used
Also, when choosing for yourself, pay attention to the fact that the passport indicates 4500 rpm
The next point is the type of engine. Motors can be asynchronous and commutator. The first of them works silently and lasts longer. But the trouble is that it is not found on all models. The second type of motor will force you to change brushes often, but the price will be cheaper.
Next, look at the design as a whole and the turning system in particular. Each change in angle must be reliably recorded.
And the last, but no less important factor in the choice is safety. The casing must securely cover the disk. See how the sawdust ejection works. The machine must be equipped with a protection system against overheating and disk jamming.
Of course, you need to pay attention to all this at any retail outlet. But if Leroy Merlin is nearby, it will be much easier
Firstly, there is always a large selection of trims. And secondly, sales consultants will always provide the necessary assistance. Plus, all products have a warranty period.