House made of plasticine. Step by step modeling lesson.
Modeling from plasticine is a fascinating and useful gymnastics for fingers and hands, so we continue interesting exercises.
We suggest making another toy from plasticine - a copy of an inanimate object. This will be a house. This version of the master class is quite simple, so even soft plasticine mass is suitable for work. 1. Select several shades of plasticine to imitate brick and tiles. There's also the task of creating windows and doors, so think about what color you'd like them to be. Also in this lesson, it is necessary to have a sharp spatula with a beveled edge.
2. A paper box of some kind will greatly facilitate the work of giving the house its shape. It is desirable that the base be square. For example, take a package of medicine, toothpaste or some other products. Cut two opposite sides, and fold the remaining two at an angle to form the roof of the house.
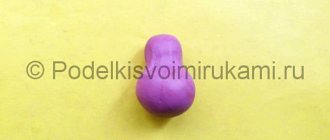
3. From the material selected for the walls, begin to form a cake, kneading it with your fingers.
4. Applying one of the walls of the house, circle it around with the tip of a spatula. The result should be a square, the size of which will correspond to the parameters of the paper wall.
5. Make four such squares and begin to attach them to the box, pressing them tightly with your fingers.
6. Decorate all the walls in the same way.
7. To sculpt the tiles, you can use red plasticine, diluting it slightly with black to dim the brightness. Create many oval flat pieces of the same size.
8. Start molding the roofing material onto the roof, pressing it tightly together.
9. Attach the next row with an overlap. Fill all the space in this way. Use a little more red plasticine to fill the gap on the back side.
10. To create the illusion of brick or cinder block on the walls, make a characteristic pattern with the tip of a spatula, arranging vertical stripes in a checkerboard pattern.
Plasticine applications for schoolchildren
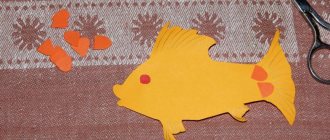
It will be interesting for 2nd grade students to portray a character from a fairy-tale cartoon. Before starting work, take a ready-made template and glue it to cardboard.
Then the outline of the template is pasted over with flagella of different colors. Eyes are molded from flattened balls of plasticine. Large applique elements can be made solid.
A plasticine applique option for grade 4 is a postcard with a picture of a tank or rocket. A sheet of cardboard is cut into the shape of a shield. Balls are glued on top, from which numbers are molded.
Four large circles are flattened from below, on the sides of which there are two similar circles of reduced size - these are the tracks of the tank. A black dot is placed on each of them.
A caterpillar strip in the form of an inverted trapezoid is formed from brown plasticine flagella. A thick green tourniquet is placed on it.
A green semi-oval is placed on the right side, to which the flagellum is glued. A red star is stuck on it. At this point, the plasticine application is considered complete.
How to make a house from plasticine for dolls with your own hands with photos and videos
Surely many children will enjoy a master class on how to make a house out of plasticine. “Building” a house will be an interesting game in itself. Children will be able to learn what and how a house is made of, and show their imagination in design and architecture. This craft can become a decoration or a game element. Having learned how to make plasticine houses, you can design entire streets and create cities for toys and dolls at home.
If you plan to keep the building for a long time and often play with it, then it is better to use polymer clay, which hardens in air. In any case, for a test craft it is better to take regular plasticine.
Application from plasticine “House in the village” for children 5-7 years old. Step-by-step master class with photos
How to make cake mastic with your own hands at home
Plasticine picture “House in the village” for children of senior preschool age. Step-by-step instructions with photos The material will be useful for kindergarten teachers and parents. Can be used as interior decoration or exhibition. Dzhezhora Matvey, 6 years old, student of the speech therapy group Teacher: Elena Valerievna Reva, teacher of the Cherlaksky Kindergarten No. 2 Municipal Preschool Educational Institution, r.p. Cherlak, Omsk region. Goal: To develop the ability to create the plot of a plasticine picture. Objectives: 1. Formation of the ability to create a picture from plasticine flagella; 2. Develop the ability to roll out plasticine flagella; 3. Cultivate accuracy; 4. Cultivate perseverance. Material: - Plasticine; — Stack; — A board for modeling; — Blank with a pattern — Green pencil. Work progress: Take a blank with a pattern. You can draw it yourself, as we did. You can take a ready-made template, for example this one. Roll out the blue flagella and sculpt them along the drawn line. In the same way, by rolling out the green and brown flagella, we make a tree. We also make the ground line with green flagella. We make the house out of logs. We also make windows, curtains and roofs from plasticine flagella. We choose the color according to the plan. We sculpt apples onto the tree and add leaves to them with a green pencil. We make flowers from rolled out balls on the grass. The picture is ready!
We recommend watching:
Plasticineography for preschoolers 5-7 years old. Master class with step-by-step photos “Zhostovo” Plasticine painting for children 5-6-7 years old Plasticine painting “Bird” for children of the senior group step by step with photos Plasticine craft “Vase with flowers” for children of the senior preparatory group of a preschool educational institution. Step by step ma
small house
The house can be made in different ways and using different materials - boxes, bottles, glass jars, shells, pebbles, etc.
The easiest way is out of the box. For this you will need:
- plasticine set;
- small box;
- cardboard (for the roof);
- stacks;
- modeling board.
The box will act as a frame for the entire house or as a base for the walls. The roof can be part of the box, for example, in a box of milk (yogurt, kefir), you should only slightly trim the top “comb” and cut out the triangular parts (such a box is opened through these places). The roof can also be made from a sheet of cardboard or polystyrene foam.
Dollhouse
Every girl wants to have the most beautiful home for her favorite doll. However, such houses are quite expensive. It’s easier to apply your skills to inexpensive materials, and you’ll get a real miracle!
- fiberboard sheet;
- a set of colored paper;
- sheets of white and brown cardboard;
- glue and scissors;
- a piece of corrugated cardboard;
- pieces of wallpaper that are in the house.
On a sheet of fiberboard we draw an approximate sketch of the house and cut out the parts.
- We fasten them together with glue. The roof is constructed from corrugated cardboard.
- We cover the outer walls using sheets of colored paper of your choice. We make decorative markings on it.
- For additional decoration, brown cardboard rectangles imitating bricks are glued on.
- The entire structure is attached with glue to a blank cut from fiberboard for better stability.
- We use white cardboard for window frames. Having cut them out, we place them on the sides of all the windows.
- We also cover the balcony.
- The door with the door frame is made of brown cardboard.
- Interior wall decoration with prepared wallpaper or colored paper.
An amazingly bright house is ready to welcome its little owners!
Paper house craft
The most affordable option is a paper house for crafts. Various levels of complexity of the models allow you to engage in joint creativity with both young and older children.
Application
Any child can make a 2D craft. The applique would make a great postcard. Preparation of the blanks falls on the shoulders of an adult.
You will need the following materials and tools:
- colored paper,
- sheet of white paper
- glue stick,
- scissors,
- pencil and felt-tip pen.
In advance, parts of the appropriate sizes are cut out of colored paper: a triangle, several squares, rectangles: large, small and narrow for the pipe.
Then they start gluing the figures in a certain order to make a cute house. Additional details are drawn with a pencil or felt-tip pen.
Craft from a sheet of paper
A more complex version of paper crafts is made from a sheet of paper. To do this, draw an unfolded template of the finished house on a sheet of paper with allowances for gluing. There are many blueprints available online that you can use if you wish.
Then they are painted in bright colors and cut out. Fold the model along the fold lines. Lubricate the allowances with glue and connect the parts. The colorful house is ready!
Crafting a log cabin
Creating a hut from paper tubes will take several hours of painstaking work, but the results will definitely please you.
For the craft you need to prepare:
- 18 sheets of white A4 paper,
- colored cardboard and colored paper,
- glue stick,
- scissors,
- pencil,
- marker.
Step-by-step instruction:
- First you need to prepare “logs” to build the frame of the house. To build walls with a height of 12 rows of paper tubes, cut white A4 paper. From 12 sheets, cut into 2 equal parts, parts for long rolls are obtained. From 6 sheets, cut into 4 parts - short rolls.
- Then the rectangles are screwed onto a pencil and secured with glue. After preparing a sufficient number of tubes, begin assembling the frame.
- We glue the first rolls onto a hard surface as follows: two long ones in parallel, and short ones perpendicular to the long ones, so that a square is formed - the base of the future building. Next, alternately laying long and short rolls on the sides of the house, fixing them with glue. Let the “logs” dry.
- At this time, prepare the roof and other accessories. Bend a sheet of colored cardboard. Bend all sides of the roof inward by about 1 cm and trim at the folds. Glue triangular gables made of colored cardboard to the roof on both sides. Glue the tube to the roof. Connect the roof and frame of the house.
- Cut out windows and doors with carved frames from colored paper. Stick to the walls of the house in appropriate places.
If desired, you can add a porch to the house and decorate the garden plot in accordance with the time of year. You can use dried, ironed tree leaves. Or cotton wool to imitate snow.
A house is a universal type of craft that can be made from any material. In the process of creating crafts with your child, time passes with pleasure and benefit.
The child masters skills of working with various materials; develops motor skills and perseverance; learn to express your imagination and make it come true.
A DIY house craft is perfect for a gift and will decorate the interior.
Colorful house
You will need cardboard sheets, spruce (or pine) cones, colorless tape, a pencil and a ruler.
- Cut out 5 identical cardboard squares. Their size provides for the size of the planned house;
- carefully glue them together with tape;
- we make the roof from the same cardboard - we prepare 2 triangles, 2 squares, a rectangle; we connect them into a roof;
- We cut a napkin from bamboo slats into a square, coat one side with glue, glue the sticks, leaving small protrusions on both sides; We also treat all walls;
- we create a base for the roof from sticks;
- on the walls of the house we decorate the doors with sticks;
- create windows;
- We separate the scales from the cones and cut each one into a diamond shape, coat the parts of the roof with glue one by one, gluing the scales onto them. They create the appearance of tiles;
- We attach the roof to the base of the structure.
The result is a charming decorative house!
Craft house made of cardboard
This material is the most popular for creating a house. Use materials like toilet paper rolls, small cereal boxes, or large mailing boxes.
House for a gnome
Making this house model will not be difficult. With a little effort, you can create an entire village for gnomes.
For the craft you will need:
- toilet paper roll,
- colored cardboard,
- colored paper,
- White paper,
- glue stick,
- scissors,
- black felt-tip pen.
First, cut the cardboard cylinder in half. Cut 2 white strips from white paper 1.5-2 cm wider than the sleeve. Windows and doors are cut out of colored paper and glued onto white strips. Use a black felt-tip pen to draw window frames and door handles.
Then the decorated white stripes are glued onto the cardboard cylinders. The free edges of the glued strip are folded inward and glued. Roof blanks - pointed cones - are made from colored cardboard. Roofs are glued to the frame of houses.
In another version of the gnome house, you can replace the cardboard roofs with felt cones. Doors and windows are cut out so that they are wide open.
A fabric roof and open doors will give the house an original look.
Doll house
Making an exclusive two-story house for a doll is not at all difficult. This will require: a little patience and unbridled imagination. The materials and color scheme for finishing a homemade house are selected according to your own taste, which gives it individuality.
Before starting the craft, collect the necessary materials:
- 2 cardboard boxes, one of them larger,
- 2 sheets of cardboard,
- PVA glue,
- scotch,
- pencil,
- scissors and stationery knife
- colored self-adhesive paper,
- other materials for decoration: scraps of wallpaper and fabric, lace and ribbons.
The folding sides of the boxes are cut off. Place the large box with the open side facing you. Using a utility knife, cut windows and a door on the sides of the box. The first floor is ready!
In a smaller box, windows are also made. Glue it on top first in the same way - with the open side facing you. The roof is glued together from 2 sheets of cardboard of a suitable size.
The sheets are connected using tape and attached to the walls of the building. Then they move on to decorating the house.
Decorating a house is limited only by the imagination of the master. The walls are covered with colored paper, wallpaper scraps or fabric.
We create houses from old furniture
In our version, the dollhouse will be made from an old chest of drawers.
The work will also require: a wood saw, a brush and a brush, glue, white paint, putty, sandpaper.
We make a miracle with our own hands - a step-by-step master class
- If the chest of drawers is tall, you will have to remove the extra partitions, leaving two floors.
- Apply glue to the empty space that appears with a brush, lay wooden slats over it and leave to dry.
- In the meantime, we fill up scratches and gouges on the furniture with putty.
- After drying, sand the entire workpiece with sandpaper until smooth.
- We paint the entire miracle house white. Now it can fit all the dolls in the house.
House on three floors
This is a more complex craft, and the house will be on wheels.
Let's collect everything you need to build the structure: plywood sheets, a wood saw, an electric drill, a pencil, glue, a stapler, brown and gray paint, a paint brush, a primer, leftover laminate or pieces of linoleum. You will need wheels.
Let's start the creation process:
- The first step is to make a sketch according to the selected size. We cut out the marked elements, not forgetting to estimate the places on the walls for windows and doors.
- Now they need to be cut through. This is a job that requires patience and care.
- We are preparing the blocks for the windows. We connect them with a construction stapler and glue.
- We put the building on wheels.
- We paint the shelves brown.
- We treat the outside with a primer and let it dry. Paint it grey. The roof can be made in the opposite color for added color.
- We cover the shelves with laminate or linoleum.
The three-story house is ready with your own hands!
A hut on chicken legs
All children love fairy tales and their heroes, so building Baba Yaga’s house will be interesting for them.
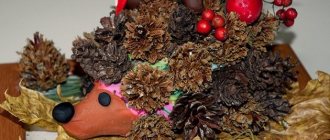
You need to collect available materials: dry moss, conifer cones, plasticine, glue, dried berries, clothespins, leaves straightened with an iron.
- We glue the house from disassembled clothespins using Liquid Nails glue.
- We firmly fix the manufactured house on a cardboard, treat the free space of which with glue and “plant” moss on it.
- We decorate the roof with dry berries, leaves, and pieces of remaining moss.
- We paint the cones with green paint - these are Christmas trees, and we “seat” them on cardboard.
- We make forest animals - hares, squirrels, hedgehogs - from plasticine. Creating a forest picture around the hut is important for the overall background - Baba Yaga’s house, created with her own hands, is installed in a thicket.
Any material is suitable for making houses. Not only the usual paper, cardboard, plasticine, plywood, but also not quite ordinary materials: vegetables, old things, cake boxes, etc.
In addition, you spend a lot of time with your child, both of them are engaged in a pleasant activity that you enjoy. Ready-made houses delight children with their uniqueness, filling them with pride in their creativity and imagination. They play with special joy, using their crafts in games and showing them off to friends and guests.
All the houses discussed in the article are suitable for decorating an apartment without extra expenses.
How to make a house from plasticine
How to make a house out of plasticine - my now eight-year-old son has been asking this question for several years now.
And at different times he built different houses and not only from plasticine. And not only at home. I myself don’t really like plasticine because of the residue it leaves on my hands, but Lesha always liked to sculpt, so I didn’t interfere or interfere too much. Again, our plasticine construction projects regularly alternated with various others, which, by the way, took place on very real construction sites, so everything was done for real. Bricks, mortar, masonry, trowels, putties - everything went into use. This is one of our construction projects, two years ago.
Last year there was another construction project, similar, in a different place, but this year, apparently, everything came together and this idea was born - to make a house out of plasticine. And also with such a thorough approach - bricks, mortar, gable roof, windows, door. And in the end the house turned out to be completely finished and quite simple and quick to manufacture - that’s what it means the child has gained experience.
By the way, it all started with monsters like these. They were made and redone several times, and now work is still underway, and, by the way, in these houses there are floors, communications, cables embedded in the walls, so it’s not so simple either!
How to make excellent play dough?
September 16, 2013
Ksyusha and I love to sculpt dough: crush it, tear it, stick it on paper. Salt dough was often prepared with food coloring according to the simplest recipe :
- 1 glass of salt,
- 1 cup flour,
- a little vegetable oil
- water to the desired consistency.
I often took this dough to work with children at the club. It is very salty, so it can be given even to the smallest. They won't eat much anyway