Inspection of available material
First, it’s worth examining what is available to create crafts. Then you should familiarize yourself with the many photos of marine crafts created by professionals and amateurs; this will help you, based on them, invent something of your own, or really just copy the product you like with your children.
Do not forget that this fun is primarily interesting for the little ones. They will enjoy spending time with adults during the creation and preparation process.
It’s worth pushing them a little so that they take the initiative on their own and demonstrate their imagination; sometimes children’s crafts amaze with their ideological content, and an adult will definitely help in making them.
Another seabed option
In the following example, a paper plate is half painted with blue gouache. After drying, the lower part of the craft is smeared with a layer of PVA and sprinkled with fine sand. Press down this layer a little with your palm and pour the excess sand back onto the table.
All that remains is to attach the fish, drawn separately on cardboard and cut out along the contours. The chenille wire is glued on both sides of it. The bottom can be covered with small pebbles, because starfish do not live in the Black Sea.
We use wooden materials
Children often love to carry home various pebbles, sticks and wooden boards. Don't throw everything away, as this can make for some amazing sea-themed crafts. The main thing is to create an idea and explain it to the little ones.
- For example, already at home after a few months you can recall the first days of rest. What were all the family members like? Surely white and perhaps slightly gloomy, tired. In just a few days they were smiling and covered with a bronze tan. It is this period that can be displayed in the form of crafts.
This option can be considered one of the best for making your own marine children's crafts, since the process is very simplified. To do this, a wide and long piece of wood about 10 by 30 cm is used as a stand. Then the children are given the task:
- It is necessary to carve a wooden statue that looks like a mother or a woman;
- Create a blank with the outlines of a dad or a man similar to him;
- Make a blank similar to a brother or sister, depending on the number of family members.
Now everyone should start coloring together to highlight their hair, clothes, and face. Decorative elements are added. All blanks are glued to the stand. To make the paint durable, the craft is varnished. All decorations for the interior of the apartment are ready.
Ideas for creating masterpieces for children of different ages
Together with adults, a child can make inhabitants of the sea, ships, boats and mythical heroes from fairy tales and legends who live in the water element. This exciting marine-themed activity can remind you of hot days and develop into a real hobby.
- You can make ordinary appliqués from paper by cutting out fish, crabs, boats, seagulls with scissors and gluing them onto the paper. This is a job for children 3–4 years old.
- For elementary school children, the work may be more complicated: Volumetric octopuses with tentacles made like a Christmas tree garland.
- Seahorses and jellyfish can also be voluminous, like New Year's lanterns, or made in the form of an accordion. You can hang them on the Christmas tree or just play with them.
- The fish are made using the origami technique. Attach the head, fins, and tail. A piece of blue paper (sea) is glued to a sheet of white cardboard, and curly waves with volume are placed on top. Fish, jellyfish and other inhabitants of the underwater world are attached, and algae decorate the work.
Be sure to take photos of the masterpieces that your child came up with and the works that you did with him.
This awakens creative ideas and a love of creativity for many years to come.
Decorative frame made of seafood
To create a high-quality craft from sea creatures, you will need a few different materials. The main thing is to involve children in this process.
As a result, you can make a frame for a family photo from a vacation at sea, a frame for a painting or a wall clock.
Tools and materials:
- Any collected shells, pebbles from the seashore or beach;
- Cardboard;
- Strong scissors;
- Beads, buttons;
- Glue;
- Pencil.
Manufacturing stages:
- To begin with, a base is created from cardboard, the size is determined by applying it to the main object for framing. Pencil markings are allowed. The workpiece is cut with scissors;
- Now you can select a composition from seafood. Let's look at where we can add beads and buttons to create an attractive look; it's good if they are also found on the beach;
- After estimation and rough composition creation, you can evenly glue the elements along the entire perimeter of the cardboard. It is important that there is no tread beyond its edges;
- After completion, you should wait a few hours until the glue dries and all the parts are completely fixed;
- Now you can glue the decorated frame onto the main product and admire the joint work with the children. Obviously everyone will be happy with the final result.
Making crafts for the interior
- Seashells in their original form can be used to decorate baskets, frames, vases, candles, and flowerpots.
- Having varnished them, you can also take them to decorate your home interior, but you can also make exclusive souvenirs that will radically change the decor of your home. After coating, you can sprinkle it with glitter, which will look great. A large shell can replace a vase on a coffee table, a glass in the bathroom for toothbrushes, or a candle if you pour wax into it and install a wick.
- Shell raw materials go well with natural materials - wood, twine, leaves, sand. With the help of a skillful harmonious combination, you can build a panel on the wall, a collage or an original candlestick.
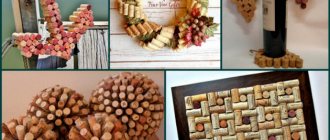
Here's how to construct a shell tree with a little imagination.
You need: a flat stick about 50 cm long, putty, water, twine, dishes for the base - 8 cm high, a ball made using the papier-mâché method with a diameter of about 10 cm, Moment glue, scissors, a knife and small shell material.
Make thick sour cream from putty and water, pour the solution into a bowl for the base and place a stick wrapped in twine in the middle, hide the edge of the twine in the solution and let it harden. Drill a small hole in the ball and put it on a stick to hold it tightly. Lubricate the ball with glue and glue the shells. Then you can coat it with aerosol varnish, matching the color of the ball to the interior. This should be done outside or in a well-ventilated area to avoid odor poisoning.
You can make a very interesting souvenir with your own hands, which is called a floating cup. The product is popular and original in appearance.
Let's make beads and bracelets from sea stone
To create these crafts from sea stones, you will need a lot of different materials. First you need to select suitable stones and arrange them according to size on a cardboard or table.
To create an attractive look, you will have to sharpen some elements using sandpaper or a file; children will be happy to do this.
Then adults use an awl, preferably a drill with the smallest cutting element, to make holes for stringing stones onto a fishing line or rope. After this, the little ones will be able to use their fingers to collect all the elements to form a bracelet or beads.
The latter should be created in several rows to be proudly worn on the chest or used as decoration in a child’s bedroom.
Unusual candlestick
To create a handmade candle holder, you will need the materials described above, as well as gun glue and a disk.
We recommend reading:
- Can compulsory motor liability insurance be issued by someone other than the owner?
- Stencils for crafts - beautiful stencils and a master class on making beautiful crafts (125 photos + video)
Crafts with a jigsaw - 85 photos and videos on how to cut beautiful jewelry and crafts with a jigsaw
Now we glue all the blanks onto the disk in random order. Silicone glue works best for this (although any other hot glue can be used).
There is one important nuance - when fixing decorative elements, it is necessary that the middle remains free. This is the place where the candle will be installed.
Before the dried flowers go, you need to put a tea candle, and only after that fix them.
We showed you what marine life crafts you can make for kids and with them. A beautiful candlestick will also serve as a reminder of wonderful summer days.
Soaking in a chlorine solution, like, “Duckling”
A similar product is diluted 1 to 1 with water and the shells are soaked in it for 30 minutes. If it was not possible to achieve the required result, then it is worth extending the process.
The fact is that the material may be very dirty with the presence of a dark outer layer (periostracum). After this, the workpieces are cleaned with a brush and washed with running water.
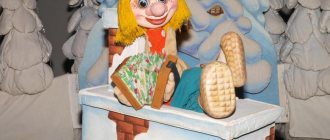
Volumetric paper star
A craft in the shape of a three-dimensional star will be an excellent decor for your apartment or for a themed party. For clarity, it is best to look at photos of the star’s crafts on the Internet on handicraft sites.
Materials and tools for work:
- thick shiny colored paper A4;
- scissors;
- regular pencil;
- compass, ruler.
Master Class:
- Using a compass, draw a circle on the entire sheet of paper.
- Using a protractor ruler, measure an angle of 72 degrees and draw a line, you need to draw 5 such lines.
- Connect all the lines to make a star.
- Draw additional lines in the center of the star using strokes.
- Cut out the silhouette and bend along the drawn lines towards you.
Such a star can be of different sizes. Large ones are suitable for decorating your home for the holidays, and small ones will become an unusual and cute decoration for a notebook, notepad or Christmas tree. You can decorate such stars with sparkles, sequins, beads or stickers.
Learning to prepare live shellfish
If live or dead shellfish remains are found inside, then a disgusting smell is guaranteed. Removal methods:
- To do this, the shell is lowered into boiling water for about 5-7 minutes. Now the remains can be easily removed with tongs, nail scissors, or tweezers;
- Alternatively, you will need a microwave. When exposed to powerful microwaves, the shells are not damaged, but the inside will dry out, burn out and peel off. Now you can remove it; in most cases, the contents spill out freely when tilted.
Star in 3-D technique
Master class on how to make a star with your own hands.
Cut a square from a sheet of thick paper. Fold in half twice to form a fold. Cut the fold lines, not reaching the center 3-4 cm. Bring the cut sides vertically to each other to form a triangle, glue the ends. Perform this procedure on all cut sides.
You should get a voluminous four-pointed star. Use the same principle to make the second part. Glue both parts so that the rays of one star are exactly between the rays of the other star.
The simplest pendant option for children
Kids must choose one of the most beautiful shells with an unusual shape. An adult drills holes, inserts fishing line, rope and the decoration for the child is ready.
Important: It is worth explaining to your child the safety precautions for using a shell pendant. It may have sharp spots, so you need to remove it before going to bed and wear it carefully. It is good if it is worn over a T-shirt and located in the solar plexus area.
Fish from cocktail tubes
From a foam sheet you need to cut out a head and tail using a template using a knife. Prepare several wide tubes of different colors and make a hole in the center of each. Insert a wire in a white plastic sheath into the tail and string cocktail tubes by color, pulling them tightly onto the base.
When all the elements are in place, insert the foam head. Using scissors, trim the length of the tubes, reducing the size towards the tail. All that remains is to cover the foam with colored paper and attach the eye.
Shell Valentine
Manufacturing stages:
- A cardboard base is cut out in the shape of a heart;
- Now the surface of the base is glued with shells. They should not go over the edges.
The craft can be given as is, or used to frame photographs of young people or images from the parents’ wedding.
Now we have looked at enough interesting examples so that you can understand how you can make a sea craft from various seafood collected on vacation. But in this case, the quality of the product should not be the main goal.
It is very important to preserve the memory of a joint holiday with your parents; it will be able to recall the bright moments of childhood after many decades and will allow you to reveal the history of the craft to your own children.
Paper plate crab
Another easy way to make an interesting Black Sea creature craft is to create a crab by folding a paper plate in half.
Strips of claws are cut out of red colored paper. The front large wire cutters can be cut according to the template. All elements are attached to the inside of the craft. The top of the shell can be covered with pieces of paper by tearing it off. Simply draw the crab's eyes with a black marker.
Photos of sea crafts
Starfish by me. Like MK :)
Since I won’t be buying a new camera any time soon, I don’t have anyone to borrow for a while, and I’m just bursting, I decided to use the photos from my sister’s camera (I mean, not the best).
Take the plastic, knead it, roll out the sausage to about 1 cm in diameter and cut off 12 equal parts. We set aside the rest, because we will still need it.
Roll each piece into a ball and roll it on one side in your palm to form a droplet.
We do this with all ten pieces + roll 2 balls for the middle.
We form the future star from the droplets by lightly pressing them together. Using a toothpick, we “pull” all the droplets together towards the middle.
Next, place the ball in the middle and press lightly:
And again, using a toothpick along the edges, press the ball a little into the droplets.
It should look something like this:
From below, the star already looks solid.
Now we carefully smooth it out with our fingers, shape it into the future star and “pinch” the rays with our fingers to make ribs.
And then we decorate as our imagination dictates. I decided to make them horned. To do this, I took the main plastic and added white to create contrast. I rolled the balls, placed them on the star and pressed them a little into the rays with a toothpick.
Then I went over it a little with a toothbrush to give it a rough texture, rolled it into balls and attached them to the rays of the star with a toothpick.
And glue the droplets to the smeared rays of the star:
Using a toothpick, we press each drop in the middle and then use this groove to guide where the middle is and try to preserve it.
Using a toothpick at an angle of 45 degrees, we make grooves from the middle to the outer part, smoothing the edges so that the star is solid after baking.
Add the ball, once again go over the ball with a toothpick and make a small depression in the middle.
And we send our stars back to the oven for final baking according to the instructions.
Here are my stars, on the basis of which I made MK:
Source
Preparing for work
- If they brought you shells, be sure to wash them to remove the smell and remains of crustaceans. You can treat them with water and chlorine-containing preparations, soaking them in the solution for an hour, and remove any remaining dirt with a brush. If there are a lot of unnecessary things in the shells, then you need to boil for about five minutes, let it stand and remove the debris with a stick or tweezers. Then dry thoroughly.
- The surface may be uneven, but with the help of available tools it is easy to eliminate defects and make them invisible, using spray or nail paint with or without glitter. Products in which the shells are covered with a pinkish or pearly white tint will look very chic. You need to glue the shells with “Moment” or “Titanium” glue, they will add water resistance and strength.
Making jewelry
Jewelry for fashionistas is made from shells; they resemble real jewelry.
- The shells are attached with glue to bobby pins used to create hairstyles.
- If you carefully drill holes in the shells with a screwdriver or drill and secure them with tape on a wooden surface, you can make chic earrings, necklaces, and pendants that are in no way inferior to expensive jewelry. There are no such tools, use a sharp awl or needle. But safety precautions must be observed. Then cover the surface of the product with glossy varnish. Accessories for products must be purchased in the store.
- Seashells on the Christmas tree will look very beautiful. Also, a replica of a forest tree, again, can be made from shavings, painted greenish and decorated with a starfish on top.
- To make a snowflake on a regular Christmas tree, the master makes a cross-section on a machine, and then a snowflake is glued together from such decorated plates. These parts can also be used to make earrings, jewelry for a wedding or other special event.
- For the New Year, a garland is made from pine or spruce, and it can be decorated with shell material, decorated with stones or whole strips of such rhinestones.
- Glued-on small shiny stones give the products a rich look. Of course, the work is painstaking and requires patience, because each rock crystal, holding tweezers in your hand, needs to be laid out on the surface and attached. Therefore, the decoration of bracelets and pendants is highly valued. Making such jewelry is in demand and is a good business idea.
Underwater world in a bottle
You will need: plastic bottle, water, blue food coloring, sunflower oil, fish, shells, pebbles, stars, glitter, cocktail tube, funnel.
Master Class
- Fill a third of the bottle with water.
- Add a few drops of dye and mix it thoroughly with a straw.
- Throw shells, fish, glitter and pebbles into the bottle.
- Pour the oil into the bottle through a funnel.
- Close the lid tightly.
The underwater world in a bottle is ready! I recommend watching this video!