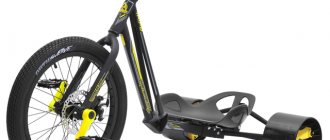
Good afternoon everyone! In this review we will talk about perhaps my most exciting DIY project, which brought such a lot of positive emotions to both children and their parents. We will make a children's tricycle (trike) from an old Chinese mini-Segway/hoverboard and a children's bicycle. As always, in the review I will present in detail the available components and components used, the process of manufacturing and assembling the design of a tricycle with rear suspension, preparing and installing electrical components, setting parameters and firmware of the motor-wheel controller for comfortable riding and control. The review turned out to be quite voluminous, I tried to present all the main points and features of the implementation of the task, so I will have to allocate considerable time to familiarize myself with the material in detail.
I will immediately ask mechanical engineers, electrical engineers and programmers to forgive me for errors in the terminology I use, I am just trying to understand this, please treat it with leniency, as a review from a construction linguist).
INTRODUCTION.
The idea to implement this project arose when our mini-Segway called “A8,” which is already 4 years old, broke down once again.
The Segway stopped responding to turning the handle, and accordingly the rotation function disappeared. It was necessary to deal with the Hall sensor, but to be honest, I no longer had the desire to do this. The Segway had already begun to show signs of inappropriate behavior: it switched off several times while driving, tilted excessively backwards when accelerating, and it was already becoming dangerous to ride. Therefore, the idea was born to use its motor-wheels and make a tricycle as the simplest design. Having gone online to develop the idea, I suddenly realized that everything had been happening for a long time without me, and my idea had long been worked out by a large number of people). Therefore, before direct implementation, I familiarized myself with the experience of other home-made people, and noted the following main points for myself:
— the tricycle must have a rear suspension, since we live in the private sector, and we do not have smooth asphalt roads near our house (maximum dirt roads rolled with asphalt chips), and driving onto the city roadway is not entirely correct; — the tricycle should be a two-seater, since we have two children, and organized alternate riding, sooner or later, will still lead to loud conflict and complaints; — the tricycle must be assembled on a native controller from a Segway/hoverboard, since many enthusiasts are working on open firmware for boards on STM32/GD32 microcontrollers, which are installed in these Chinese products. It becomes possible to get software fixes, flexible settings, and additional functions, unlike ready-made Chinese controllers for electric vehicles.
The ideological inspiration for my tricycle was the work and videos of the author of the Youtube channel ILYANOV. He developed his own tricycle design, and also made his own alternative firmware for the hoverboard controller for convenient control as a tricycle. It has a free (with maximum speed limitation) and paid firmware version. The amount for paid firmware is more symbolic, but I soon came across other alternative firmware options online, with more flexible configuration and more efficient operation of motor wheels. More on this later. I’ll say right away that I borrowed the idea of the rear suspension from my friend ILYANOV, as a simple and affordable option, but I did not use the frame of the hoverboard itself in my design.
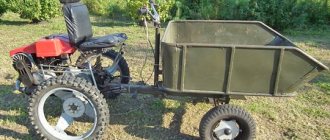
During a short simulation, the following tricycle design was obtained and agreed upon with the children:
What is a hoverboard?
How to make a hoverboard with your own hands? In order to understand how to make a homemade hoverboard, you first need to understand what a hoverboard is, what it consists of, and what is needed to create this interesting means of transportation. A hoverboard is a self-balanced vehicle, the operating principle of which is based on a system of gyroscopic sensors and internal technology for maintaining the balance of the working platform. That is, when we turn on the hoverboard, the balancing system also turns on. When a person stands on a hoverboard, the position of the platform begins to change; this information is read by gyroscopic sensors.
These sensors read any change in position relative to the earth's surface or the point from which gravitational influence comes. After reading, the information is sent to auxiliary boards, which are located on both sides of the platform. Since the sensors and the electric motors themselves operate independently of each other, in the future we will need two electric motors. From the auxiliary boards, the information in processed form already goes to the motherboard with a microprocessor. There, the balance retention program is already carried out with the necessary accuracy.
That is, if the platform tilts forward by about a few degrees, then the motors are given a signal to move in the opposite direction and the platform is leveled. The tilt in the other direction is also performed. If the hoverboard tilts to a greater degree, then the program immediately understands that there is a command to move the electric motors forward or backward. If the hoverboard tilts more than 45 degrees, the motors and the hoverboard itself turn off.
The hoverboard consists of a body, a steel or metal base, on which all the electronics will be attached. Then there are two electric motors with enough power to be able to drive under a person’s weight of up to 80-90 kg. Next comes the motherboard with a processor and two auxiliary boards, on which there are gyroscopic sensors. And of course, a battery and two wheels with the same diameter. How to make a hoverboard? To solve this issue, we will need to obtain certain design details of the hoverboard itself.
ACCESSORIES:
To manufacture and assemble the tricycle, I purchased the following components and materials:
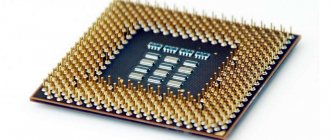
ST-Link V2 programmer
. We will use it to load new firmware for the STM32/GD32 microcontroller on the Segway/Hoverboard board. Link: ST-Link V2 stlink mini STM8STM32 STLINK simulator download programming With Cover
A set of handles for a bicycle handlebar, with an accelerator handle on a Hall sensor,
with an integrated voltmeter to monitor the battery voltage, and two buttons: a latching button (red) and a non-latching button (green), which we will use as an electronic brake button. Link: Electric Bike Voltage Display 1 Pair Universal LED Voltage Display Twist Throttle for 12-99V Ebike Scooter Durable
Tires and inner tube for a car, size “6” - 4.00.” Since the original tires of the motor-wheels are low-profile, more suitable for smooth asphalt, and they cannot reach high speeds, it was decided to change them to tires with a larger outer diameter. Buy something special from Kenda, 2-2.5 tr. There was no desire for a tire yet (there was no complete confidence in the success of the ongoing project), so a cheaper option for Delta tires was considered in the online store. Tire link: Delta 400-6 tire for pneumatic wheel Link to tubes: Tube 400-6 for pneumatic wheel
To make a shock-absorbing rear suspension, we purchased the simplest bicycle shock absorber with a declared stiffness of 850 LBS, which in the end turned out to be not enough, although the shock absorber may not correspond to the declared stiffness. Link: Rear frame shock absorber KZ-880B, 165 mm/420030
To make the frame of the tricycle, the following steel profile was purchased:
- Profiled pipe 20x20x2 – 3m;
- Profiled pipe 40x20x2 – 3m;
- Profiled pipe 40x40x3 – 1m (was in stock);
- Plate 40x4 – 1 m (cuts were available);
Also purchased at an auto parts store:
- Medium jet rod 2101-07, link: Jet rod
- Rear shock absorber bushing 2101-07 large metal spacer, link: Shock absorber bushing
We also purchased a high-strength M12x170 bolt with a short thread (for fastening the subframe) from a fastener store. A
used children's bicycle was purchased as the front part of our tricycle. When searching, the priority was the presence of a front hand brake:
Robot diagram
L298N Motor Driver Module:
DC gear motor with wheel:
A self-balancing robot is essentially an inverted pendulum. It may be better balanced if the center of mass is higher relative to the wheel axles. A higher center of mass means a higher moment of inertia of the mass, which corresponds to a lower angular acceleration (slower fall). That's why we put the battery pack on top. However, the height of the robot was chosen based on the availability of materials