Published Jun 23, 2014
The forest tiara is a wonderful accessory for a wedding, costume party or other events. What and how to make a tiara from? Wire is perfect for these purposes. And here is a master class on how to create it.
And more ideas for crown jewelry:
Making a crown for a princess with your own hands
Princess Crown
Gold Crown. How to make from beads
Description
Previously, it was believed that the tiara was an accessory only for men. In ancient times, women did not wear such jewelry. Then it was customary for Roman kings and Greek gods to wear a diadem on their heads.
What is the significance of the name of this decoration? Diadem is a word that comes from the Greek term "DIA", which was the name given to the headband worn by priests in Greece. Hera, the goddess of family and marriage, was often depicted with this decoration.
Nowadays, a crown (tiara) is also used as a decoration on a wedding veil. The tradition of using the tiara as a wedding crown began in the fifth century. From the beginning of the 17th century, such decorations became popular at balls and receptions. Noble ladies loved to complement their outfits with this accessory. Sometimes the first letters of the hostess’s name were laid out on such decorations.
Nowadays a tiara is an adornment available to everyone. Girls prefer to wear tiaras at proms and charity balls, and little girls love to wear homemade children's models to their schools and kindergartens. Little kids often ask their parents to buy jewelry. However, you can do it yourself. Moreover, the manufacturing process is quite easy.
Do it yourself
A handmade tiara is an original decoration. This accessory will suit any little princess. So, how is a tiara made for girls? Now we'll tell you. To make a children's tiara you need: wire (4 mm thick), multi-colored beads, a metal hoop, wire cutters.
You need to cut 80 centimeters of wire. A large bead should be attached to it and a loop should be tightened. Then you should make a spiral of wire, and secure slightly elongated petals around it. At the end, twist the wire a little and attach a large bead in the form of a tamer. All the petals must be braided with a thin wire, on which small and medium beads have been pre-strung. In the same way, you need to weave two more small flowers
Now you need to decorate the hoop. The first step is to screw on the small flowers.
Now you need to carefully secure all the elements and wrap them with thin wire. Then all that remains is to straighten the flowers, and the wire tiara is ready.
Headband-tiara
With the onset of warmer weather, everything comes to life, people get into a good mood, they begin to make grandiose plans for the future - the number of weddings increases in the spring, graduations take place in the spring, everyone wants to look beautiful and young in the spring!
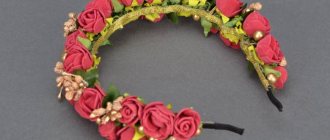
That's why now is the time to think about accessories for your upcoming holiday events. We offer you a lesson on how to create an amazingly beautiful tiara headband, decorated with flowers made of polymer clay and pearls, which will be a wonderful decoration for a bride or graduate, emphasizing her tenderness and beauty. To ensure that everything you need for work is at hand, and creating a tiara headband brings maximum pleasure, take the following: - a blank base for the headband (a metal or plastic headband without decorations); - green thin satin ribbon for the base of the headband (2 cm); - Super glue; - white thread or monofilament for sewing on beads; - wire for beading; - igloo; - stationery knife and scissors; - floral tape; - wooden toothpick; - white polymer clay and a little green or yellow, you can also take a small piece of blue or purple; — mold (texture sheet) for the petals (you can take thick corrugated paper); - pearl beads of different sizes;
Let's start by preparing the base: to do this, carefully glue one end of the satin ribbon to the end of the base headband, and begin to wrap the base with ribbon. Before starting work, be sure to burn the initial end of the tape with a lighter or on a candle.
After the base is completely wrapped, we cut off the free end of the tape with a small margin and glue it in the same way as at the beginning of work.
Now we need to make flowers out of plastic. Traditionally, roses, orange blossom or apple tree buds are the leaders in jewelry floristry; we will make roses, since these are universal flowers, suitable for both a wedding celebration and any other significant occasion. To prevent the flowers from being too bright and provocative, we will add just a little bit of another color to the main white color, let’s take blue, for example. When mixing white and blue, you will get a light shade of blue, divide it into two pieces, set one aside, and mix the second with a little more white. There is no need to stir until the color is uniform, this will create a beautiful veining effect. Now for sculpting the buds we have, in fact, white, light blue and white with a slight tint of blue.
All flowers are sculpted as follows: from the middle to the outer petals. The center of the bud is a drop-shaped piece of light blue plastic. We will attach the remaining petals to it - from small to medium, from medium to large. Therefore, you should break off pieces from all types of working plastic of different sizes. Light blue will be the smallest (roll into balls), white with a blue tint will be larger, white will be the largest. Here are our blanks for one flower.
Now we flatten each ball in the palm of our hand, apply it to a texture sheet (mold), attach it to the droplet center so that each subsequent petal slightly overlaps the previous one. We put the finished flower to harden slightly, since it is too soft for our fingers, then we make a hole in it for fastening.
We make many flowers of different sizes to make the headband very beautiful.
Let's start making petals by mixing yellow, green and blue plastic. The technology for making them is approximately the same as making petals. Only blanks of a more elongated drop-shaped shape, of different sizes. Make a hole at the base of each leaf.
We put all this splendor on a plate or foil and send it to bake in the oven, observing the baking temperature for the type of polymer clay you are working with.
We varnish the finished flowers or leave them matte and prepare for assembly on the base. To do this, take a needle and thread and sew flowers and pearls in a loose order. We sew flowers like this: we remove the needle and thread from the base, insert it from the bottom side of the flower, that is, the needle comes out from the center of the bud. We put one bead on the needle and again insert the needle into the center of the flower, bringing it to the base.
Instead of thread and needle, you can use beaded wire, weaving flowers onto the base; the wire can be camouflaged with tape.
The decoration is ready, it looks delicate and elegant, it is also important that it is one of a kind and no other girl except you has exactly the same!
Wedding decoration. How to make a tiara with your own hands
This tiara is worn on the forehead. Any bride can make such an accessory on her own; you just need to have a chain, earring, or necklace.
You need to put a drawing of the tiara on a napkin and cut out a model of the decoration. Cover the product with rhinestones, and use brocade to make a frame for the stones. It will turn out beautifully and reliably. Having finished with the brocade, you need to make holes for the stones and make a pattern of beads around the outline. A hoop is put on the bottom under the brocade. A wedding tiara should be strict and feminine. It is desirable that it matches the dress.
Creating elegant tiaras with your own hands from beads and beads
A DIY tiara is an original hair decoration for any little girl, girl or bride. This wonderful decoration for your little princess will bring the joy of completely entering into the image of a fairy-tale heroine.
When going to special events, girls style their hair with original jewelry. Among modern fashionistas, all kinds of tiaras, placed on the hair in the form of a crown, are popular. Jewelry is made from different materials - precious and simple metals, beads, seed beads, etc. Tiaras made from beads and seed beads look very beautiful and elegant. In order for the product to be original and unique, it is best to make it yourself. This article will reveal to novice craftswomen the secrets of creating a tiara from beads and beads with their own hands.
DIY tiara for prom
Greek style decoration is perfect for prom. The manufacturing process will not take much time. You need to stick pebbles on the small rim. At the same time, string several beads and leave them hanging. If you style your hair appropriately, this tiara will look absolutely stunning. She will please any girl. All that remains is to choose a suitable outfit in the same style and you can shine at the prom. You need to remember that a well-chosen decoration is already half the success.
Manufacturing
- The first stage of weaving. You need to weave exactly nine pieces of shamrocks with 3 beads, one with four. Collect the trefoil petals in one chain. This must be done in a certain order. First there are 4 trefoils, on which three beads are strung. Then a shamrock in the center. Then you need to repeat 4 trefoils with three beads.
- Decoration assembly stage. The ninth trefoil, on which there are 3 beads, needs to be attached to the central petal. The design will be reliable only with a common green cross for all leaves. To make the tiara look more beautiful, you need to add decor to the right and left sides of the product.
- Final stage. It is necessary to create a strong frame for decoration. To do this, beads should be placed on the iron wire for the entire length of the product. Then you need to attach this frame to the tiara using thin wire. Align all the links and you can start fitting. The DIY tiara is ready.
How to choose decoration?
If you buy a tiara, it is better to choose a model made of white metal, for example, white gold. You need to wear the accessory like a headband, directly in your hair. It is advisable to buy jewelry that already has teeth. This will be an additional fastening so that the tiara does not fall off.
The tiara should be the only active decoration. Large massive necklaces, earrings or bracelets do not go well with it. It’s worth giving up even rings. If you want to complement the tiara, then you need to do this with the help of miniature jewelry. Mini earrings or bracelets will do.
In modern fashion, the tiara has taken a place of honor. Many famous designers use tiaras in their collections. Using rhinestones from a small open crown, the image of a real princess is created. The designer has a chance to show his imagination. This decoration can be created in any way.
How to wear a tiara?
Tiaras were worn mainly by brides at weddings or debutantes at social balls; Tiaras were worn by women who had high status and wealth. Now girls wear such jewelry to parties and celebrations; little princesses decorate their heads with them at matinees; Tiaras are awarded to winners at beauty contests.
Tiaras and tiaras beautifully highlight your hair and make your face more expressive, so if you want to complement your look, choose earrings in miniature sizes. And the outfit can be complemented with a small bracelet. Tiaras are not worn with bangs; it is better to comb them back. The tiara is worn at a wedding - it ideally emphasizes the delicate image of the bride and secures the veil.
Designers use these decorations to complement fashionable outfits and emphasize their luxury.
The shape of the tiara depends on your image. For weddings and celebrations, go for a more formal decoration. Delicate tiaras are more suitable for little princesses or for a prom.
A headband tiara made of stones and rhinestones will make your look majestic.
By making tiaras with your own hands, you can bring any creative fantasy to life and get pleasure from this exciting process. This decoration will be a great gift for your friends and loved ones, because what is made with love is especially beautiful and valuable.
This article talks about what a tiara is and how to wear jewelry. We will also tell you how to make such decoration yourself.
If you carefully examine ancient portraits or coins, you will notice that there is a diadem on the heads of the nobility. What is this type of decoration?
Hairstyle and tiara
As for the hairstyle, it is important to remember that bangs cannot be worn with this decoration. It would be better if it was removed. The absence of bangs will make it possible to highlight the cheekbones. Most often, hairstyles for the crown are made from long hair, combing the curls and transforming them into a beautiful updo or perm with playful curls.
The tiara looks amazing if you let your hair down. Tiaras look elegant on curls collected in a high hairstyle. The decoration will look good on hair that is gathered in a bun at the top and with a curl hanging down. The main thing is that the hairstyle emphasizes the beauty of the product.
Tools and diagram required
For work we need copper wire 1.5 mm and 0.5 mm, a hammer, an anvil, side cutters, pliers, beads, beads and jewelry.
The first thing we start with is thinking through the details of the future tiara (or crown). We draw sketches of all parts and details.
For the central part, we make an element from a piece of wire 24-25 cm. We need to make droplets along the edges, for this we need to take borax, dip the tip of the wire into the powder, and bring it to the gas burner, a droplet will form quite quickly. The same trick can be done without borax, but the droplet will have to be sanded well so that it does not remain uneven. After this procedure, the wire has darkened, you should boil it in citric acid, pour water into a pan and pour a bag of citric acid into it, do not bring it to a boil, after some time the soot will go away. If desired, you can simply beat off the ends with a hammer rather than making droplets. Then we continue to work according to the sketch, bending the elements. Add volume to the curls using a hammer.
Face shape and tiara
If a girl has a square-shaped face, then it is best to choose a tiara strewn with stones along its length. Ladies with a triangular face are well suited for jewelry that is evenly shaped and has no sharp edges or hills. It is recommended to pay attention to models with a floral pattern.
Women with an oval face can choose any style of jewelry. However, an asymmetrical headdress will look unusual. To make the oval of the face appear more elongated, round-faced ladies need to choose tall tiaras with sharp edges. Any lady will be able to choose her own special piece of jewelry. It will turn a simple girl into a real princess.


